Keycloak as an Identity Provider
Keycloakfootnote:[Keycloak is a trademark of The Linux Foundation.] is an "open-source identity and access management" solution that can be used as an identity provider (IdP) for user authentication and authorization.
The following describes how to configure BPC with Keycloak as the Identity Provider.
Prerequisites
You have installed Keycloak and have administrative access to both Keycloak and BPC.
|
You should always use the latest version of Keycloak whenever possible to avoid security risks. |
Keycloak Configuration
Please create a realm for the BPC or use an existing realm that you may already be using for other applications.
|
We do not recommend using the realm |
A script that configures the following items via the API can be found in the section Script for Automatic Setup.
Create a client
To enable the BPC to communicate with Keycloak, a client must be created.
-
Make sure you have selected the correct realm.
-
Select "Clients" on the left-hand side
-
Create a new client using "Create client"
-
Select "OpenID Connect" as the "Client type"
-
Assign a client ID, such as
bpc.
This must later match the configurationclient_idin BPC. -
Enable "Client authentication". In older Keycloak versions, this corresponds to the "confidential" access type.
-
Under "Valid redirect URIs," enter the URL of your BPC. For example, “https://BPC.example.com/”
-
Save the client
-
In the “Passwords” (or “Credentials”) tab, you can view (and also change) the client secret.
This must later match the configurationclient_secretin the BPC.
Create BPC Roles
To appoint BPC administrators, you need the role bpcadmin.
-
Select “Realm Roles” on the left side
-
Use “Create role” to create the role
bpcadmin.
Create or Assign a BPC Administrator
For a user to be a BPC Administrator, they need the role bpcadmin.
-
Select "Users" on the left-hand side
-
Use "Add User" to or select an existing user
-
Assign the role
bpcadminto the user
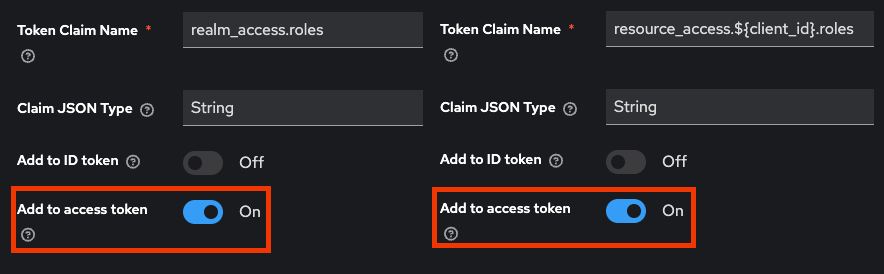
Configure Role Mappings
In order for BPC to successfully recognize the roles and for Identity Management API to be usable (required for user management in the frontend), the “Add to access token” option must be enabled for the Role-Client-Scopes.
This should be set automatically when creating a new realm.
If it is not set, navigate to Client Scopes > Roles > Mappers on the Keycloak administration page in the BPC realm and enable the option for both mappers, “realm roles” and “client roles.”
BPC Configuration
In BPC, Keycloak must be added as an Identity Provider under Backend Connections and then specified as the Identity Provider to be used in the Core Services settings.
|
When BPC starts, backend Connections are automatically created that can be used for Keycloak.
These contain a suitable placeholder configuration and are named |
Identity Provider Keycloak vs. OIDC
You have the option to connect Keycloak in two different ways (OpenID Connect (OIDC) or Keycloak).
In both cases, the actual authentication takes place via the OpenID Connectprotocol.
In the “ OpenID Connect (OIDC) ” variant, user administration takes place exclusively in Keycloak.
Select Keycloak, then you can use the identity management integrated into BPC.
Keycloak-Specific Configuration of the Backend Connection
The following describes specific configurations for Keycloak backend Connections.
For general configuration of the Backend Connections of type identity_provider, see General Identity Provider Configuration.
| Setting (Key) | Group | Example Value | Description |
|---|---|---|---|
config |
|
Set Keycloak or OIDC as the IdP for the backend Connection. |
|
IdentityProvider_ |
oidc |
|
OIDC Discovery Endpoint. |
IdentityProvider_ |
oidc |
|
The user is redirected to this address after logging in. |
IdentityProvider_ |
oidc |
|
The user is redirected to this address after logging out. |
IdentityProvider_ |
oidc |
|
Comma-separated list of all claim names from which the user’s roles are extracted. |
IdentityProvider_ |
oidc |
|
Comma-separated list of all claim names from which the user’s organizations are extracted. |
IdentityProvider_ |
oidc |
|
Comma-separated list of all claim names from which the user’s rights are extracted. |
oidc |
|
OIDC scopes that are requested during authentication with the OIDC provider. If scopes are requested that do not exist or for which the client is not authorized, authentication errors may occur. |
|
IdentityProvider_ |
oidc |
|
ID of the client configured in the OIDC provider through which access is to be granted. |
IdentityProvider_ |
oidc |
|
Secret for authenticating client access. |
oidc |
|
The PKCE (Proof Key for Code Exchange) method used for a hardened login flow. You can choose between |
|
API authentication using access tokens |
oidc |
|
Enables authentication at the API using access tokens issued by the OIDC provider. |
Verify access tokens at the introspection endpoint |
oidc |
|
If enabled, the access token is verified at the OIDC provider’s introspection endpoint. This allows verification of whether the session has been terminated at the OIDC provider. Otherwise, only the token’s signature is validated, which is sufficient in most cases when a token has a short validity period. |
Add new roles as realm roles |
oidc |
|
If enabled, new roles are added as realm roles in Keycloak. Otherwise, they are added as client roles in the client being used. |
Show only BPC organizations |
oidc |
|
If enabled, only those organizations (Keycloak groups) that have the 'bpcgroup'=true attribute set in Keycloak will be displayed as available organizations. Organizations created via the BPC always have this attribute. |
BPC Integration
If you selected the type " Keycloak " in the " identityProvider " setting, various integrations are available to you.
The BPC provides access to various user and authorization management functions through its integrated identity management.
Users can also perform various actions on Keycloak using the User Account Menu plugin.
Script for Automatic Setup
For development and test environments, the following script can be used to configure Keycloak so that it can be used with BPC.
This script uses Keycloak’s Admin REST API to set up a new realm bpc.
This realm is then configured to work with the preconfigured identity provider Keycloak (ID: idp_keycloak).
|
The script can be used, for example, when temporarily starting Keycloak via Docker for testing purposes. |
The script’s variables should be adjusted as needed.
However, it is not necessary to set ADMIN_USER and ADMIN_PASSWORD.
These two variables are prompted for when starting via the terminal.
-
createBpcRealm.sh
#!/bin/bash

# Keycloak Server URL und Admin Credentials
KEYCLOAK_URL="http://localhost:8080"
KEYCLOAK_REALM="master"
ADMIN_USER=""
ADMIN_PASSWORD=""

# Neue Realm-, Client- und Benutzer-Konfiguration
NEW_REALM="bpc"
NEW_CLIENT="bpc"
CLIENT_SECRET="bpc-test-only"
NEW_ROLE="bpcadmin"
BPC_USER="bpcuser"
BPC_ADMIN="bpcadmin"

# Benutzer-Daten
BPC_USER_FIRSTNAME="BPC"
BPC_USER_LASTNAME="User"
BPC_USER_EMAIL="bpcuser@example.com"

BPC_ADMIN_FIRSTNAME="BPC"
BPC_ADMIN_LASTNAME="Admin"
BPC_ADMIN_EMAIL="bpcadmin@example.com"

# Redirect-URL für den Client
REDIRECT_URL="http://localhost*"

# Funktion zur Eingabe von Benutzername und Passwort
read -p "Gib den Keycloak Admin Benutzernamen ein: " ADMIN_USER
read -s -p "Gib das Keycloak Admin Passwort ein: " ADMIN_PASSWORD
echo ""

# Abrufen eines Tokens vom Keycloak-Server
TOKEN=$(curl -s \
  -d "client_id=admin-cli" \
  -d "username=$ADMIN_USER" \
  -d "password=$ADMIN_PASSWORD" \
  -d "grant_type=password" \
  "${KEYCLOAK_URL}/realms/${KEYCLOAK_REALM}/protocol/openid-connect/token" | jq -r .access_token)

# Prüfen, ob das Token erfolgreich abgerufen wurde
if [ -z "$TOKEN" ]; then
  echo "Fehler beim Abrufen des Tokens. Überprüfe Benutzername/Passwort und Keycloak-URL."
  exit 1
fi

# Realm "bpc" erstellen mit Internationalisierung
# Für Login Theme die folgende Zeile mit aufnehmen
# "loginTheme": "theme-id",
echo "Erstelle den Realm '${NEW_REALM}' mit Login-Theme 'foo-theme' und Internationalisierung..."
curl -s -X POST "${KEYCLOAK_URL}/admin/realms" \
  -H "Authorization: Bearer $TOKEN" \
  -H "Content-Type: application/json" \
  -d '{
    "realm": "'"${NEW_REALM}"'",
    "enabled": true,
    "internationalizationEnabled": true,
    "supportedLocales": ["en", "de"],
    "defaultLocale": "en"
  }'

# Client "bpc" erstellen
echo "Erstelle den Client '${NEW_CLIENT}' im Realm '${NEW_REALM}' mit Redirect-URL '${REDIRECT_URL}'..."
curl -s -X POST "${KEYCLOAK_URL}/admin/realms/${NEW_REALM}/clients" \
  -H "Authorization: Bearer $TOKEN" \
  -H "Content-Type: application/json" \
  -d '{
    "clientId": "'"${NEW_CLIENT}"'",
    "secret": "'"${CLIENT_SECRET}"'",
    "enabled": true,
    "redirectUris": ["'"${REDIRECT_URL}"'"],
    "directAccessGrantsEnabled": true
  }'

# Realm-Rolle "bpcadmin" erstellen
echo "Erstelle die Realm-Rolle '${NEW_ROLE}'..."
curl -s -X POST "${KEYCLOAK_URL}/admin/realms/${NEW_REALM}/roles" \
  -H "Authorization: Bearer $TOKEN" \
  -H "Content-Type: application/json" \
  -d '{
    "name": "'"${NEW_ROLE}"'"
  }'

# Benutzer "bpcuser" erstellen
echo "Erstelle den Benutzer '${BPC_USER}'..."
curl -s -X POST "${KEYCLOAK_URL}/admin/realms/${NEW_REALM}/users" \
  -H "Authorization: Bearer $TOKEN" \
  -H "Content-Type: application/json" \
  -d '{
    "username": "'"${BPC_USER}"'",
    "firstName": "'"${BPC_USER_FIRSTNAME}"'",
    "lastName": "'"${BPC_USER_LASTNAME}"'",
    "email": "'"${BPC_USER_EMAIL}"'",
    "enabled": true,
    "credentials": [{
      "type": "password",
      "value": "'"${BPC_USER}"'",
      "temporary": false
    }]
  }'

# Benutzer "bpcadmin" erstellen
echo "Erstelle den Benutzer '${BPC_ADMIN}'..."
curl -s -X POST "${KEYCLOAK_URL}/admin/realms/${NEW_REALM}/users" \
  -H "Authorization: Bearer $TOKEN" \
  -H "Content-Type: application/json" \
  -d '{
    "username": "'"${BPC_ADMIN}"'",
    "firstName": "'"${BPC_ADMIN_FIRSTNAME}"'",
    "lastName": "'"${BPC_ADMIN_LASTNAME}"'",
    "email": "'"${BPC_ADMIN_EMAIL}"'",
    "enabled": true,
    "credentials": [{
      "type": "password",
      "value": "'"${BPC_ADMIN}"'",
      "temporary": false
    }]
  }'

# Benutzer-ID des Benutzers "bpcadmin" abrufen
BPC_ADMIN_ID=$(curl -s -X GET "${KEYCLOAK_URL}/admin/realms/${NEW_REALM}/users?username=${BPC_ADMIN}" \
  -H "Authorization: Bearer $TOKEN" | jq -r '.[0].id')

# Rollen-ID der Rolle "bpcadmin" abrufen
ROLE_ID=$(curl -s -X GET "${KEYCLOAK_URL}/admin/realms/${NEW_REALM}/roles/${NEW_ROLE}" \
  -H "Authorization: Bearer $TOKEN" | jq -r '.id')

# Rolle "bpcadmin" dem Benutzer "bpcadmin" zuweisen
echo "Weise die Rolle '${NEW_ROLE}' dem Benutzer '${BPC_ADMIN}' zu..."
curl -s -X POST "${KEYCLOAK_URL}/admin/realms/${NEW_REALM}/users/${BPC_ADMIN_ID}/role-mappings/realm" \
  -H "Authorization: Bearer $TOKEN" \
  -H "Content-Type: application/json" \
  -d '[
    {
      "id": "'"${ROLE_ID}"'",
      "name": "'"${NEW_ROLE}"'"
    }
  ]'

# Abrufen der Scope-ID für "profile" im Realm "bpc"
echo "Rufe die Scope-ID für 'profile' im Realm '${NEW_REALM}' ab..."
PROFILE_SCOPE_ID=$(curl -s -X GET "${KEYCLOAK_URL}/admin/realms/${NEW_REALM}/client-scopes" \
  -H "Authorization: Bearer $TOKEN" | jq -r '.[] | select(.name == "profile") | .id')

# Prüfen, ob die Scope-ID für "profile" gefunden wurde
if [ -z "$PROFILE_SCOPE_ID" ]; then
  echo "Fehler: Der Scope 'profile' wurde im Realm '${NEW_REALM}' nicht gefunden."
  exit 1
fi

# Mapper "Impersonator User ID" zum "profile" Scope hinzufügen
echo "Füge dem Scope 'profile' den Mapper 'Impersonator User ID' hinzu..."
curl -s -X POST "${KEYCLOAK_URL}/admin/realms/${NEW_REALM}/client-scopes/${PROFILE_SCOPE_ID}/protocol-mappers/models" \
  -H "Authorization: Bearer $TOKEN" \
  -H "Content-Type: application/json" \
  -d '{
    "name": "Impersonator User ID",
    "protocol": "openid-connect",
    "protocolMapper": "oidc-usersessionmodel-note-mapper",
    "config": {
      "user.session.note": "IMPERSONATOR_ID",
      "id.token.claim": "true",
      "introspection.token.claim": "true",
      "access.token.claim": "true",
      "claim.name": "impersonator.id",
      "jsonType.label": "String"
    }
  }'

# Mapper "Impersonator Username" zum "profile" Scope hinzufügen
echo "Füge dem Scope 'profile' den Mapper 'Impersonator Username' hinzu..."
curl -s -X POST "${KEYCLOAK_URL}/admin/realms/${NEW_REALM}/client-scopes/${PROFILE_SCOPE_ID}/protocol-mappers/models" \
  -H "Authorization: Bearer $TOKEN" \
  -H "Content-Type: application/json" \
  -d '{
    "name": "Impersonator Username",
    "protocol": "openid-connect",
    "protocolMapper": "oidc-usersessionmodel-note-mapper",
    "config": {
        "user.session.note": "IMPERSONATOR_USERNAME",
        "id.token.claim": "true",
        "introspection.token.claim": "true",
        "access.token.claim": "true",
        "claim.name": "impersonator.username",
        "jsonType.label": "String"
    }
  }'

echo "Fertig!"
configuration script [WARNING]
Running this script is at your own risk. No warranty is provided for its functionality.
The script sets an insecure secret for the client. This should never be used in production environments.
Providing Keycloak Health Checks
Keycloak offers a management interface with health checks.
The health check endpoints are available when the environment variable KC_HEALTH_ENABLED is set to true.
The management interface is typically served on Port 9000; the health check endpoints are /health/live, /health/ready, /health/started, and /health.
If you want to set up the Docker container with the health check endpoints as described in the section “ Script for Automatic Setup,” you must include the arguments -p 9000:9000 and -e KC_HEALTH_ENABLED=true.
After setup, as described in “Configuring the Identity Provider,” you can set the health check URL (e.g., http://localhost:9000/health/ready) and query it via the status API.