XPath Assistant
Call up
-
INUBIT Workbench, Burger menu Tools > XPath assistant (shortcut Alt+Shift+P)
-
Tool key icon in the XSLT mapping table (shortcut ALT+P)
Refer to XSLT Mapper User Interface.
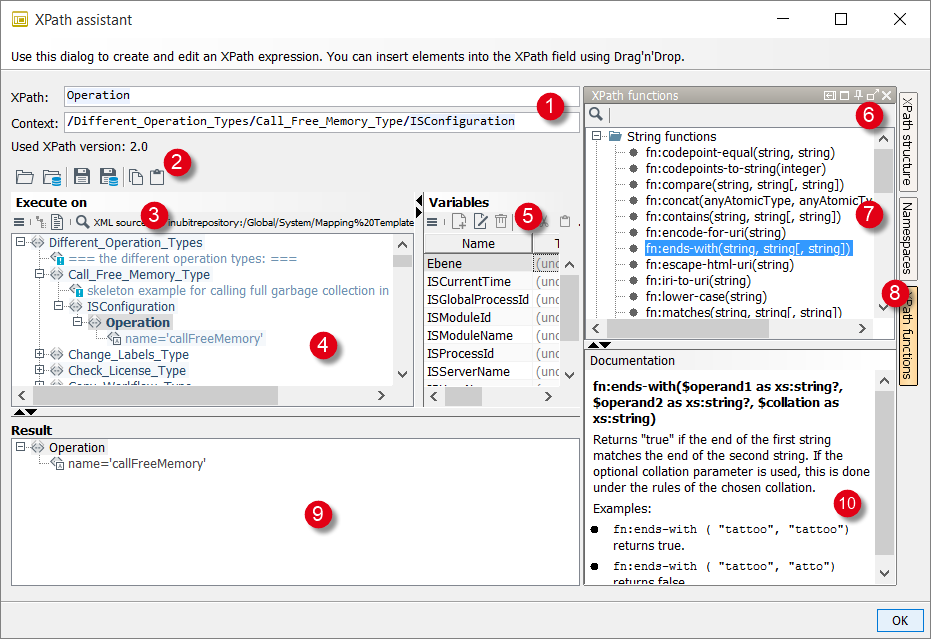
The XPath wizard helps you create, test and edit XPath expressions.
You can use the XPath functions and elements from an example message to the XPath field using drag & drop. The XPath expression is evaluated immediately, and the result is displayed in the Result area.
-
XPath field
You can use drag & drop to drag XPath functions from messages in the editor window or the XPath functions docking window as well as variables from the table of workflow variables to the field.
Context field (only if called via the tool key icon in the XSLT Converter)
The context path is filled automatically. It shows the position relative to one to which the XPath has to be specified. It is relevant, for example, for an XPath below an
xsl:for-eachelement where the context path refers to the node to be passed through and where this node is the starting point of the XPath. If auto complete is enabled (refer to Changing INUBIT Workbench Settings):-
The XPath field suggests variable names from the existing XPath function list if you begin typing with
$.Variables must be added to the Variables section before.
-
The XPath field suggests function names if you begin typing with alphabets, e.g.:
fnorxsltThe default namespace
fn:can be omitted. -
The XPath field suggests xml tag names when you begin typing with
/followed by the first letter of an element.To view the corresponding sub tag elements, enter
/followed by the first letter of an element after that sub tag element’s parent name, e.g.:/root/element1/sub-element2/
-
-
Toolbar for editor and variables table
Offers functions for editing messages in the editor window and workflow variables in the variables table.
-
Toolbar for the editor
Offers only functions for editing messages in the editor window.
Refer to XPath Wizard Toolbars
-
Editor
The editor offers a graphical interface for creating and editing text, XML and XML Schema files. You can load existing files from the file system, the Repository, or from the clipboard. Each file format is automatically displayed in a suitable editor.
Refer to Using the Editor.
When clicking the X icon in the top right corner, a dialog is displayed saying that all changes get lost when closing the dialog. The former XPath expression is not overwritten. When clicking No, the XPath assistant window stays open.
When clicking OK, the editor closes without saving. The former XPath expression is overwritten.
-
Workflow variables
Shows a list of all available workflow variables that can be used for the XPath expression.
-
XPath structure
Displays the syntax tree of the XPath expression. It can be used to view and analyze partial results (in particular of predicates) of the XPath expression, e.g., for debugging.
-
Namespaces
Lists all namespace prefix and namespace URI pairs used for the XPath execution. In case of drag & drop into the XPath field, the namespace is defined automatically.
-
XPath functions
Shows a list of all available XPath functions that can be dragged into the XPath expression using drag & drop.
-
Result
Shows the result of the evaluation of the XPath expression that was entered in the XPath field.
-
Documentation
Each selected XPath function is described in the Documentation window.
Enable/Disable millisecond precision for dateTime functions
|
This function is available from INUBIT 8.0.34. |
For external functions → Formatter class functions which use dateTime values as arguments, millisecond precision validation check can be enabled with the flag enableFormatterMicrosecondsValidation which by default is disabled (false).
-
In Windows
To enable this add the system property
enableFormatterMicrosecondsValidationin the filesstart_workbench.batandsetenv.bat:set JVM_PARAMS=%JVM_PARAMS% -DenableFormatterMicrosecondsValidation=true -
In Linux
To enable this add the system property
enableFormatterMicrosecondsValidationin the filesstart_workbench.shandsetenv.sh:JVM_PARAMS="$JVM_PARAMS -DenableFormatterMicrosecondsValidation=true"
XPath Wizard Toolbars
The XPath wizard has two toolbars for loading, displaying and editing example files:
-
Toolbar for editor and variables table
-
Toolbar for editor
The upper toolbar is used to control the functions for the editor window and the variables table:
Toolbar for editor and variables table
-
 :
Load watch point file
:
Load watch point fileYou can load messages and variables together from the file system as a watch point file (
*.wpffile). -
 :
Load watch point file from Repository
:
Load watch point file from RepositoryYou can load messages and variables together from the Repository as a watch point file (
*.wpffile). -
 :
Save watch point file
:
Save watch point fileYou can save messages and variables together as a watch point file (
*.wpffile) into the file system. -
 :
Save watch point file to Repository
:
Save watch point file to RepositoryYou can save messages and variables together as a watch point file (
*.wpffile) into the Repository.Refer to Test data
-
 :
Copy to clipboard
:
Copy to clipboardSaves the message -including all variables - to the clipboard.
-
 : Insert from clipboard
Inserts messages and variables from the clipboard.
Toolbar for editor
The lower toolbar only offers functions for the editor:
-
 Menu: Opens a submenu with the following commands:
-
 New: For creating a new file.
You can choose between the file types simple text, XML, and XML Schema.
New: For creating a new file.
You can choose between the file types simple text, XML, and XML Schema. -
Open: For loading a file from the file system or the Repository or for loading the clipboard content.
-
 Save: For saving the current file to the file system or the Repository or copying the current content to the clipboard.
 -
 Print: For printing the current file.
 -
Display appropriate editors for the content: Reduces the available editors to those that are suitable for the currently displayed file format.
-
Generate XML Schema template: Generates a template for an XML Schema from an XML file.
-
Compare: Compares XML documents
Refer to Comparing XML Documents.
-
Editable: If this option is selected, you can edit the displayed file.
-
-
 :
Tree view
:
Tree viewRefer to XML Editor - Tree View.
-
 :
Schema view
:
Schema viewRefer to Schema Editor.
-
 :
Text view
:
Text viewRefer to Text Editor.
-
:
Search
Clicking the button opens the input field. You finish the input of the character string you want to search for by pressing the Return button. All instances are highlighted as bold. You can use arrow buttons to navigate through the instances.