Using Metadata
Usage
Metadata are freely definable properties which can be assigned to diagram elements like activities or roles. Metadata can be used, for example, to store procedural instructions for roles in an Organization Diagram.
Refer to
Before you can use metadata in a diagram you must first create metadata types in the metadata manager and allocate these to diagram or element types. Once you have done this, the metadata is available in the corresponding diagrams or elements and can be allocated real values.
You can set and manage metadata both centrally and in a diagram-specific way.
-
Centrally managed metadata:
As long as you have not assigned diagram-specific values to metadata, the entries managed centrally in the Metadata Manager are referenced. -
Diagram-specific metadata:
Once you have set diagram-specific values to metadata, it will be copied and assigned to the diagram. Changes made to metadata in the Metadata Manager have no effect on the diagram-specific value of the metadata.
Metadata can be multilingual.
Internationalization: Defining Languages for Diagrams
The Default language entry is the metadata ID. This ID can be changed.
Refer to Editing Metadata.
Metadata Manager User Interface
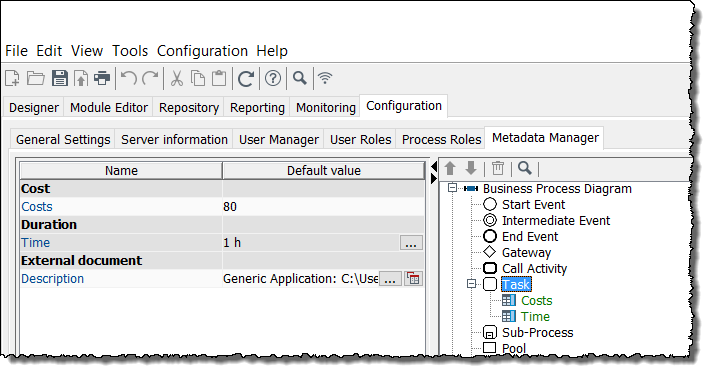
You use the Metadata Manager to create and manage metadata types and allocate these to diagram or element types using 'drag and drop'. The metadata manager is divided into two areas:
-
Left-hand area
For creating and deleting metadata. In the left-hand column of the table, the names of the available metadata types are displayed -in the right-hand column the default values. The default values can be overwritten with actual metadata. Metadata types have one of the following data types:-
Text (single line): Allows a single line of text to be input. Even longer texts are shown without line breaks.
-
Text (multi line): Multi-line text is input in a separate dialog and displayed in diagrams in a dialog of its own.
-
Integer: Allows an integer to be input. If a floating-point number is input, the decimal part is deleted.
-
Floating-point number: Allows a decimal fraction to be input. In German usage, the two parts of the number are separated by a comma; in the English usage a dot (point) is used as the separator.
-
Date: Allows a date to be input. You can select a date from a dialog or enter a date in the format
yyyy-mm-dd. -
Duration: Allows a time period to be input. You can specify a duration via a dialog.
-
Cost: Enter a floating-point number to represent costs.
-
Boolean value: Allows a checkbox to be activated/deactivated.
-
External document: Specifies the path to an external document. In the dialog in which the properties of the external document are specified you can select an application profile. If the external document is called, the selected application profile is used to display it.
Refer to Application Profiles. -
Text multilingual (single line): Allows the entry of a single line multilingual text for the configured languages. Even longer texts are shown without line breaks. Refer to Internationalization: Defining Languages for Diagrams.
-
Text multilingual (multi line): Multilingual multi-line text is entered in a separate dialog and displayed in diagrams in a dialog of its own. Refer to Internationalization: Defining Languages for Diagrams.
-
External document multilingual: Several external documents can be entered and an application can be selected to display the documents in the configured languages.
Refer to -
Link: Allows to assign a value with a link to a diagram or to a diagram element.
The value can be left empty; it can be set later. A initially set value can be removed again in the diagram. -
Multiple expression: Allows to create several - even different -metadata types to metadata, e.g. a text that is displayed, a floating-point number for the calculation, and a multilingual text for a detailed description. All expressions belong to the specific metadata item, but only the suitable expression for the relevant type is used.
-
-
Right-hand area
Displays all diagram types, their elements and already allocated metadata types.
Refer to
Creating Metadata Types and Allocating them to Diagrams
Proceed as follows
-
Click in the empty space of the left area, open the context menu in the empty part of the Metadata registry area, and then select Add. A dialog is displayed.
-
Enter a name for the metadata type and select the required data type.
To create multiple metadata types, repeat steps 1 and 2. -
To allocate a metadata type to a diagram or diagram element, drag the appropriate metadata type from the Name column onto the element to which it is to be allocated. The metadata types are displayed below the diagrams/elements to which they have been allocated. Repeat this action for all the metadata types that you want to allocate.
-
To display all the allocations of a metadata type, select the metadata type in the Metadata registry area, open the context menu, then select Show allocations. All the allocated metadata types are now highlighted in color on the right-hand side of the metadata manager.
-
Save your allocations.
→ You can now use the metadata types in your diagram.
Refer to Assigning Values to Metadata in Diagrams.
Deleting Metadata Types and Allocations
Deleting allocations
Proceed as follows
-
In the right area select all the metadata types that you want to delete.
-
Open the context menu then select Delete allocation. Confirm when prompted.
→ The selected metadata types are no longer displayed in the list.
Deleting metadata types
Proceed as follows
-
In the left area select the metadata type that you want to delete.
-
Open the context menu then select Delete. Confirm when prompted.
→ The metadata type is deleted along with all allocations to elements in diagrams.
Editing Metadata
Usage
Changing the name of a metadata item in the configured languages
Proceed as follows
-
In the left-hand area, select the metadata item to be edited.
-
Open the context menu and select Edit.
-
If desired, click the plus icon
 to edit the multilingual description.
 -
Enter the new ID in the Default tab (and thus the name for the default language) and/or make further entries for the other languages in the other tabs.
-
Close the dialog with OK.
-
Click the
 icon to save the changes.
 -
Confirm the message Metadata renamed in the protocol window.
Assigning Values to Metadata in Diagrams
You can insert metadata into the following diagram types:
-
Business Process Diagram
-
Organization Diagrams
-
System Diagram
-
Technical Workflow
Prerequisites
You have already created metadata types and allocated these to one or more diagram elements.
Proceed as follows
-
Display the diagram in a local directory.
-
Select the element for which you want to assign values to the metadata, open the context menu, then select Edit resp. for modules Edit metadata. The dialog for editing metadata is displayed. Metadata are displayed in different colors:
-
Blue
The diagram element has been newly created and has not yet been stored -
Black
The diagram has been saved since the addition of the element on which the metadata occurs. -
Red
The metadata type has been deleted in the Metadata Manager. For this reason, the diagram element’s metadata is carried as outdated metadata until you delete or import the outdated metadata.
-
-
Either enter values for the metadata or change the default values that are displayed.
-
Click OK. The dialog closes.
→ The metadata has been stored.
If you have allocated a metadata with a type of External document or External document multilingual, an icon is displayed in the bottom left-hand corner of the element.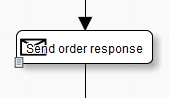
Refer to
Exporting Metadata
You export a single metadata item or all metadata as a compressed (*.zip) XML file to interchange them between different INUBIT installations or INUBIT versions.
Proceed as follows
-
Select a single metadata in the left-hand area.
-
Open the context menu and click Export.
To export all metadata, select the menu entry Edit > Export metadata.
→ The Export assistant opens and guides you through the export procedure.
Importing Metadata
You import one or more metadata items from a previously exported and compressed (*.zip) XML file.
Proceed as follows
-
Select the menu entry Edit > Import metadata.
-
Navigate to the import file.
-
Optionally, activate the Overwrite existing metadata checkbox to delete at first all existing metadata. If this option is deactivated, all existing metadata are overwritten.
-
Click Finish.
-
Confirm the import protocol with OK.
Handling Outdated and Unregistered Metadata
Outdated metadata can occur for the following reason:
-
The diagram containing the outdated metadata was imported from an INUBIT Workbench with a version < 4.0.
Unregistered metadata can occur for the following reason:
-
The metadata type has been deleted in the Metadata Manager or is not yet available after diagram import.
Deleting Outdated Metadata
You can either delete all the metadata from the selected diagram in one go or delete an individual item (metadata).
|
If an outdated metadata exists in a diagram element and you create a new metadata type in the Meta Data Manager having the same name, but a different data type, the new metadata is not displayed on this diagram element! If, on the other hand, you create a metadata type with the same data type, the outdated metadata is again displayed as regular metadata in black text. When importing metadata types with a data type of External document, ensure that the application profiles needed to display the document are available. |
Proceed as follows
-
Select the diagram in the local directory.
-
Open the context menu then select Delete outdated metadata.
-
Confirm when prompted.
→ The metadata present is matched with the metadata types present in the metadata manager. Outdated metadata are deleted.
Importing Unregistered Metadata
Proceed as follows
-
Select the element/module in which an unregistered metadata value is present.
-
Open the context menu then select Edit. The properties dialog opens.
-
Select the Metadata tab. The metadata dialog opens and highlights all unregistered metadata in red color.
-
Select the unregistered metadata value in the table, open the context menu, then select Import metadata.
→ The metadata is imported and then displayed in the table in black text.