Editing the Queue Manager Filter
Proceed as follows
-
In the INUBIT Workbench, display the Administration > User Manager tab.
-
Select the user for whom you want to add a Queue Manager filter.
-
Open the context menu and choose Edit Queue Manager filter…. A dialog opens.
-
Open the context menu and choose Add.
-
Select a column name.
-
Click OK to close the dialog.
-
Click into the Value column and enter the filter value.
-
Repeat step 4 to step 7 to add multiple filter restrictions.
To add different values for the same column, add a single entry for each value. They are OR connected.
Values for different columns are AND connected.
Example
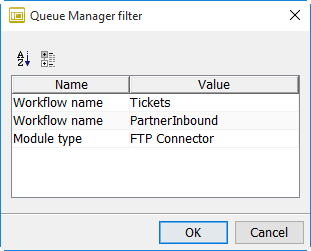
To filter for Workflows with the name Tickets OR PartnerInbound AND for an FTP Connector module type, add the following entries in the Queue Manager filter dialog:
-
Workflow name: Tickets
-
Workflow name: PartnerInbound
-
Module type: FTP Connector
-
-
Click OK to close the dialog.
→ Once the user concerned has logged in (again), the newly added filter columns and values apply to the result that is displayed in the Queue Manager. To delete or copy a filter column choose Delete/Copy from the context menu.
|
Only the system administrator can assign and modify Queue Manager filters to users. |