Workflow Variables and Mappings
Overview
When Technical Workflows are executed, workflow variables are included in addition to the input and output messages. Workflow variables are system variables and user-defined variables. You can define variables in the Variables docking window in the workflow or in the variable mapping dialog.
|
Workflow variables are not designed to store or process large amounts of data. Workflow variables are copied to the RAM. Hence, an out of memory error can occur if the variables' content is too big. Therefore, it is strongly recommended to process large amounts of data using input/output messages. Additionally, it is recommended to split large messages. |
|
As of INUBIT 7.3, checking the existence of variables results in an error message if the corresponding variable cannot be found or is not declared. |
Simple and complex data types
The INUBIT software supports typed variables. You can define variables with simple or complex data types.
You define the complex data types in an XML Schema that is referenced in the workflow. To use an XML Schema in several workflows, you can store and reference the XML schema in the Repository.
Validating variable values
In the execution of a workflow, you can have the current variable values validated against the referenced XML Schema.
Refer to Validating Variable Values.
Validity scope of workflow variables
The system variables of the INUBIT software are valid globally, that is, also in workflows that are linked with workflow connectors.
The following applies to user-defined variables and module variables:
-
By default, user-defined variables are only valid in the workflow in which they have been defined and are not forwarded to linked workflows.
-
In each workflow, you can specify individually
-
whether and which variables are returned if the workflow is called synchronously by a workflow connector
-
whether and which variables the workflow expects when called by a workflow connector.
Refer to Configuring the Variable Transfer for Linked Technical Workflows. -
By default, variables that are defined at a module within a Scope are valid for the workflow containing the Scope. To restrict the range of applicability of the variable choose the name of the Scope in the Scope drop-down list instead of the (Workflow) item. Therewith, the variable is valid only within the Scope and it is not forwarded to the module that follows the Scope. Within the Scope, variables respond in exactly the same way as other variables.
When choosing a Scope module as scope (as purview or range of applicability) for the variable, the Transfer upon workflow call tab disappears.
-
Defining Variables
Overview
Before you can assign values to new variables in a Technical Workflow, you must define these.
When you define a variable you specify which type of information is to be stored in it. This way you guarantee that certain operations can be executed with the current content of the variables.
Undefined variables cannot be used in subsequent modules and in workflows that are linked using workflow connectors.
Defining variables as input/output variables
When you are defining a variable, you can specify whether it is supposed to act as an input or output variable, if the current workflow is called by another workflow.
Defining and Finding Undefined Variables
Undefined variables in your workflow can be module variables that were set, for example, by a file or HTTP Connector in the current or a linked workflow, or user-defined variables originating from a linked workflow. You can quickly find and define these undefined variables with test mode.
If you do not wish to use test mode, use one of the methods for defining variables.
Refer to
Proceed as follows
-
Test your process locally.
-
Double-click a watch point to display the result file. After the name of non-defined variables links are shown:
-
Click the Define variable link. → The variable is defined with the type of the current value and displayed in black type in the table.
Defining Variables with a Simple or Complex Type
Proceed as follows
-
Depending on whether you want to define the variable in the workflow or directly in the variable mapping of a module, execute one of the following steps:
-
In the workflow:
-
Display the diagram in a local directory.
-
Open the Variables docking window in the sidebar. The docking window is displayed.
-
In the toolbar, click
 .
.
-
-
At the module in the Dialog Variables mapping:
-
Create a mapping rule, in which Variable is selected as target or source.
-
Next to the Variable option, click
.
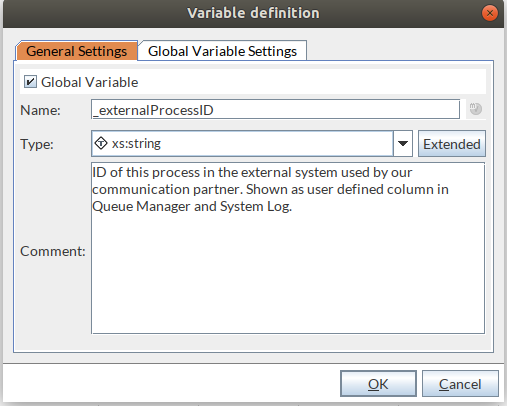
A dialog opens: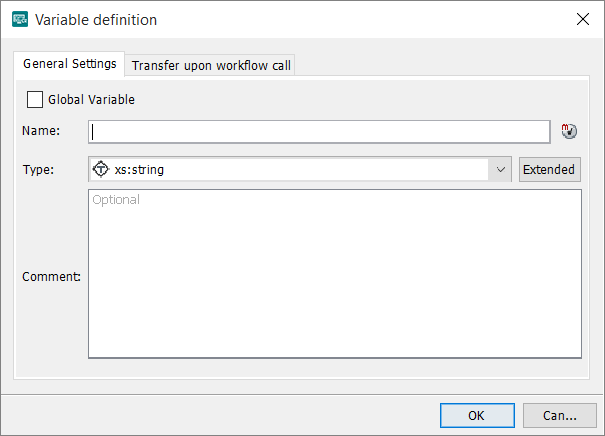
-
-
-
Select the Global variable checkbox, if you want to define a global variable. Refer to Using Global Variables.
-
Enter the name of the variable and add a comment, if necessary.
-
Define the data type:
-
Variable with simple data type:
Select a type from the list.
For variables that are supposed to contain a password, useis:password. The variable value then will be stored in encrypted form. In the INUBIT Workbench, the value will be masked and you will not be able to access the plain text form of the value via mapping of variables, XPath, or XSLT anymore. But it is possible to map the variable to a password module property or another password variable.
To learn more about access protection, refer to Notes on source and target values in section Functional Principle of the Mapping of Variables.
For variables whose content is to be masked but accessible in plain text via mapping of variables, XPath, or XSLT, useis:maskedString.
For variables that are supposed to contain an encrypted password value, useis:encryptedPasswordString. You can assign the encrypted value of ais:passwordvariable or a module property to this kind of variable. Vice versa, it is possible to set the content of anis:passwordvariable or a module property via theis:encryptedPasswordStringvariable. You can always access the value of anis:encryptedPasswordStringvariable, a decryption is not possible. For information about the mapping ofis:encryptedPasswordString, refer to Notes on source and target values in section Functional Principle of the Mapping of Variables.
For variables that are supposed to contain any XML documents, useis:anyElement. -
Variable with complex data type based on an XML Schema:
-
Click Extended. The dialog is extended with the display of system-wide schemas and those defined in the workflow:
-
Choose a data type. For complex data types, the structure is displayed in the Structure preview.
-
-
-
Click OK to save the variable. → The new variable is displayed in the Variables docking window.
Defining Module Variables
Some modules set variables when they are executed or they expect certain variables. These module variables are set in the module and must be defined before they are used in subsequent modules.
Refer to e.g.
Proceed as follows
-
Open the Variable definition dialog as described in Defining Variables with a Simple or Complex Type:
-
Click the
 button.
→ The dialog is extended.
In the Module variables area, all modules with undefined module variables that exist in the current workflow are listed automatically.
button.
→ The dialog is extended.
In the Module variables area, all modules with undefined module variables that exist in the current workflow are listed automatically. -
Choose the module for which the module variables are supposed to be defined.
-
With the Display list, you can also filter the displayed module variables and specify whether all, only input variables, or only output variables are supposed to be displayed.
-
In the Name list, choose the desired module variable.
-
Add a comment in the comment section, if necessary.
-
Click OK to close the dialog.
→ The variable is defined and displayed in the Variables Docking Window.
Validating Variable Values
You have the following options for validating variable values in a Technical Workflow:
-
For the mapping of variables
If the Validate contents of changed variables option is active in the Mapping of variables dialog and one variable is assigned an invalid value that does not fit the XML Schema, an error is thrown. Refer to -
For a validate module
The Validate control checks selected variable values against XML Schemas or WSDL files that are referenced at the workflow.
If the validation was successful, then the process is running further. Otherwise an error is thrown and the validation result is output as part of the error message.
Refer to Validate.
Testing Mappings of Variables
You can test mappings of variables and copy the end result of the test into clipboard to reuse it in other modules.
Prerequisites
You have created at least two modules in the workspace and mapping rules for one module.
Proceed as follows
-
Double-click the V button that is shown at the bottom left when hovering the cursor over a module.
-
Click
 to activate the test mode.
→ In the Source data and Target data of the Selected entry pane, you can see the result of the mapping you have just tested.You can change the input data for a mapping easily in the Test mode input data tab.
-
Click the Test mode end result tab at the right-hand side of the window. → The Test mode end result panel is displayed. In the Message pane, the input message is displayed. In the Workflow variables pane, you can see all variables including the variables of other mapping rules.
Copying the Test Mode End Result of Mappings of Variables
If you wish to reuse the test mode end result, you can copy it.
Proceed as follows
-
Click
 in the Test mode end result panel to copy the end result to clipboard.
→ You can now reuse the content of the clipboard. -
Close the Variables mapping window.
-
Right-click another module and choose Set start point.
-
Right-click the workspace and choose Start test with clipboard content.
-
Double-click the watch point.
→ A new window is displayed. You can see the input message and the variables of the edited module.
Searching for Variables in Diagrams
The search function enables you to find out in which module a certain variable is used, even in complex diagrams.
It searches variable mappings, XSLT Converter and Workflow Controls e.g. Wait, Receive and Validate modules.
Proceed as follows
-
Display the diagram.
-
Open the Variables docking window. This docking window shows all variables that are used in the diagram.
-
Click the searched variable.
The variable name is displayed in the input field under the list, for example:
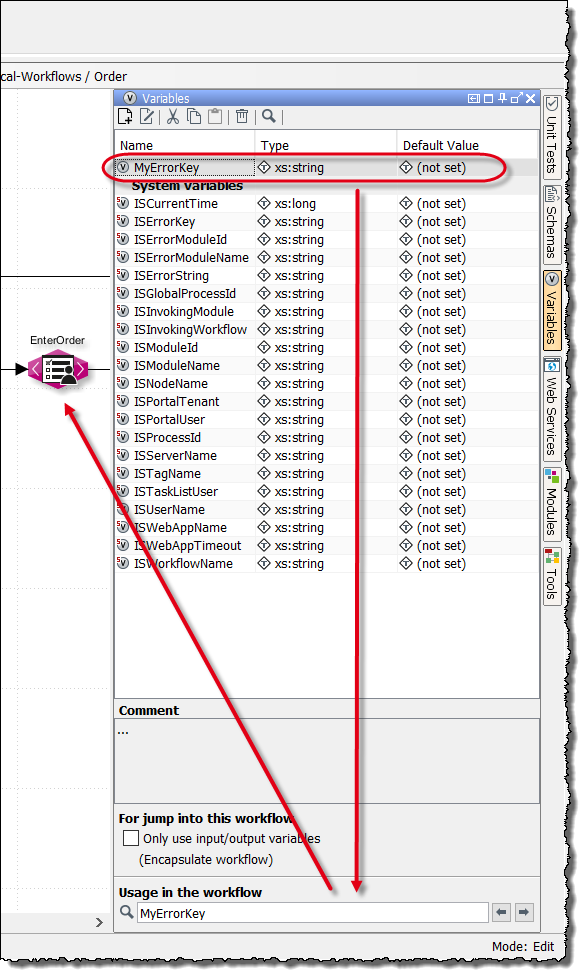
The color of the variable name indicates whether the variable is used in the diagram:
-
Red: The variable is not used in the diagram.
-
Black: The variable is used.
At the same time, the first module in which the variable is used is highlighted in color. You can use arrow buttons to go to the next place where it occurs.
Editing Variables
You can edit, cut or copy the variables of a diagram and insert them into another diagram.
|
You can neither edit, cut, copy nor paste system variables. |
Proceed as follows
-
Display the Variables docking window in local mode.
-
Select the variable from the list.
-
In the toolbar click the
 button.
The dialog for editing variables opens.
In the General tab, you can change the name and type of the variable.
button.
The dialog for editing variables opens.
In the General tab, you can change the name and type of the variable.If you change the name of a variable that is already in use, all instances of this variable in the currently displayed workflow are changed at the following points:
-
in mapping rules of the variables mapping,
-
in XSLT style sheets
-
in XPath expressions used in mapping rules
-
in conditions that are defined in Demultiplexer and Wait modules.
Names of instances in the XSLT stylesheets in XSLT Converters are not changed! In the workflow execution, errors can occur if you change the type of variable of which instances are already used. If you have activated Schema Validation, errors can occur!
-
-
Click OK to close the dialog.
Deleting Variables
You can delete variables that are defined in a workflow.
Prerequisites
The variable to be deleted is not used in any module.
Proceed as follows
-
Display the Variables docking window in local mode.
-
Select the variable from the list.
-
Open the context menu of the variable and choose Delete or, in the toolbar, click
 .
.
Selecting and deleting unused Variables
You can display unused variables of your workflow and delete them, if necessary.
Proceed as follows
-
Display the Variables docking window in local mode.
-
Within the window, open the context menu with the right mouse button.
-
Click on Select unused variables.
-
Press Del on your keyboard.
-
Confirm the following dialog with Yes if you really want to remove the selected variables.
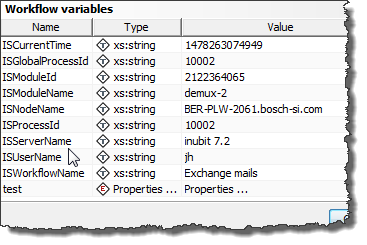
System Variable Overview
System variables are set by the INUBIT software and cannot be deleted. You can evaluate system variables with the mapping of variables.
|
Always use the specified spelling for system variables. It is case-sensitive. |
The INUBIT software offers the following system variables:
| System variable | Explanation |
|---|---|
|
Alphanumeric string. |
|
Current time in milliseconds |
|
String, size of a file in KByte |
|
Is set for Technical Workflows that are called by a workflow connector in another Technical Workflow. |
|
(Only for Technical Workflows that are called by a Workflow Connector in another Technical Workflow) |
|
Unique character string within a Technical Workflow |
|
Input message of the module |
|
Character string with the name of the module as specified in the designer |
|
Output message of the module so that this can later be used again and without changes. |
|
Displays the node name on which the workflow is executed. If the workflow is in waiting status, the node is shown as NotAssigned since the workflow is waiting to be executed on a node. |
|
Unique string of characters with which the execution of a workflow is marked in the INUBIT Process Engine. |
|
Server hostname |
|
Is set if a workflow is executed in a tag. Contains the current tag name. |
|
Name of the user under whose name the workflow is executed. |
|
Character string with the name of the workflow as specified in the designer. |
|
Status on integrity check on PGP decryption:
|
Error system variables
Error system variables are only available if errors have occurred in the workflow execution:
| Error system variable | Explanation |
|---|---|
|
Contains the error description. |
|
Is set if the error was generated by the INUBIT Process Engine. Contains the language- independent error key. |
|
Contains the name of the module that triggered the error. |
|
Contains the ID of the module that triggered the error. |
Refer to Handling and Suppressing Errors.
Functional Principle of the Mapping of Variables
Usage
You can use the mapping of variables to dynamically change messages and workflow variables whilst these are being processed in a Technical Workflow.
To do so, you create rules for mapping the source values and target values in the individual modules in the workflow. As the source and target values you can, among other things, use the input message of the module, module properties or module variables.
Examples
-
Reading values from the input message and assigning variables
An XML-formatted input message contains an FTP server address, the user name and the password. These values are to be transferred to an FTP Output Connector so that its output messages can be transferred to the FTP server. In the mapping of variables, a rule is created that maps the values from the input message to variables using an XPath expression. These variables are forwarded to the FTP Output Connector. The FTP Output Connector is configured so that it reads the variables and uses the values for sending the output message. -
Writing module properties to variables
FTP server address, user name and password of the FTP Input Connector are to be made available to the FTP Output Connector. To do so, these values are written to variables in the FTP Input Connector, forwarded to the FTP Output Connector, where they can then be accepted. -
Making statistical values available via variables
In a workflow that is split into several branches by a Demultiplexer, all branches end with output mail connectors. To ensure that all output mail connectors receive the same new recipient address, areceivervariable is created in a module preceding the Demultiplexer. The value of this variable is the new recipient address, and it is available in all output mail connectors.
Process order of mapping rules
Most mapping rules are processed in the order in which they are listed in the dialog (refer to Dialog Descriptions for the Mapping of Variables). The order of the mapping rules can be changed in the dialog.
Before the module is executed, the following mapping rules are processed:
-
Assign values to variables
-
Change input message
-
Change module properties that are used in the module execution
-
Delete variables
After the module execution, only the Copy output message to variable rule is processed.
Source and target values
In each module, you can define one or more mapping rules in the following form: Source value > is applied to > target value. The following table explains what you can use as source and target values:*
| Source | Target | Explanations |
|---|---|---|
Input message |
Variables |
|
Module property |
The selection depends on the module properties that the module offers. |
|
Input message |
You can edit specific parts of the input message by applying an XPath to it. |
|
Output message |
Variable |
|
Module property |
Variable |
The data types for source and target must be compatible (incl. the namespaces for complex schema types) |
Module property |
||
Input message |
||
Variable |
Variable |
|
Module property |
||
Input message |
If the variable is of the |
|
Static value |
Variable |
The permissible types are |
Module property |
||
Input message |
||
XPath expression |
Variable |
The XPath expression is listed in the context of a blank document, not in the input message. The XPath expression supports all functions that are offered in the XPath wizard. |
Module property |
||
Input message |
||
XSLT |
Variable |
You can define an XSLT stylesheet and thus execute complex operations on the input message, blank documents, variables, parts of (complex) variables or XPath results. |
Module property |
||
Input message |
||
PartnerLink |
Variable |
The option is only available in Technical Workflows with partner links. |
Module property |
||
Input message |
The source value is an XML structure that represents the end point reference of the selected partner link.
The end point reference contains address data according to the WS addressing standard, encapsulated into an |
|
(Delete target) |
Variable |
Deletes the specified target.
Suitable, for example, for variables of the |
Module property |
||
Input message |
||
Any source that produces an |
PartnerLink |
The option is only available in Technical Workflows with partner links. |
BPM rule |
Variable |
(Only available if BPM rules are licensed) |
Module property |
||
Input message |
Notes on source and target values
Please note:
-
The data types of source and target must be compatible.
-
The namespaces of XML Schema based data types must be compatible.
-
If an XML element is addressed as the source as well as the target, the source element replaces the target element:
| Source | Target | |
|---|---|---|
Before mapping |
|
|
After mapping |
|
|
Otherwise the content of the target element is overwritten.
-
If the source is an XML structure and the target is a string variable, only the element content is copied without tags.
-
If you want to map a character string as a source to an input message, you must choose the encoding with the option Encoding (if source side returns text) on the target side.
-
XML encoding is used for XML content on the source side.
-
If the mapping target is an
xsd:base64Binaryvariable and string content has been selected as the source (that is, a string variable, an XPath that returns a string or a static value), the source string must be base64-encoded. To encode a string with base64, please use the XPath functionisxp:encode().This function is not adapted for binary data. Therefore, use the encode module.
-
You can manually set module properties that are not available as a target. Choose Module property as the target and enter the name of the desired module property in the Module property field.
-
You can restrict access to password properties, that is, module variables of the
is:passwordtype, by means of the propertyRestrictedPasswordPropertyAccessin the<SUITE-INSTALL-DIR>/inubit/server/ibis_root/conf/ibis_config.xmlfile.Refer Configuring BPC via ibis_config.xml File to note the details.
This property by default is set to
trueand the following applies:-
Variables mapping
For the variables mapping you only can map password properties (that is, module variables of theis:passwordtype) on other password properties. -
XPath queries/XSLT converting
Password variables are not available for XPath queries and the XSLT converting. -
Demultiplexer/If-Module
In the Demultiplexer and in the If module it is still possible to compare the content of the password.
-
-
For the password variable
is:encryptedPasswordStringthe following applies:Source Destination Explanation Password variable or password module property
is:encryptedPasswordString
variableThe encrypted password string is assigned to the destination variable at processing time.
You can use thisis:encryptedPasswordStringvariable arbitrarily, for example, put the value into a database.is:encryptedPasswordString
variablePassword variable or password module property
The decrypted password string is assigned to the destination variable at processing time.
Creating Mapping Rules for the Mapping of Variables
Overview
You define the mapping rules for the mapping of variables in the workflow in the individual modules. In server mode, you can display the mapping rules; you can only create and edit them in local mode.
You can recognize modules for which a mapping of variables is defined by the continuously visible V button, e.g.:
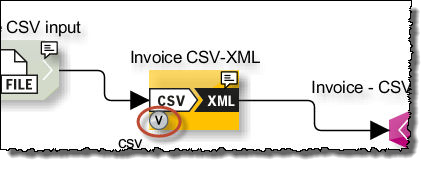
For modules for which no mapping of variables is defined, the V button is only display if you point the cursor to the module.
Proceed as follows
-
Display the Technical Workflow in local mode.
-
Point the cursor to the module to which you want to apply the mapping of variables. At the bottom left of the module, a V button is shown.
-
Double-click the V button. The dialog opens (refer to Dialog Descriptions for the Mapping of Variables).
-
To create a new mapping rule, click the
 button in the toolbar.
 -
Choose the source first, and then the target.
Click the M button in the toolbar to show the module properties that are currently available. The module properties are highlighted in color. -
To save your mapping rule, click OK. → The dialog closes, the mapping rule is saved.
Creating a Mapping Rule for Source=XSLT and Target=Variable
In a mapping rule, you can define an XSLT stylesheet and execute operations on variables of the types simpleType or complexType.
You can assign the result to a variable, a module property or the input message.
Proceed as follows
-
Display the Mapping of variables dialog.
-
Create a mapping rule.
-
As the source, choose the value XSLT.
If the target is a variable of the type
complexType, enter this target variable now and then define the style sheet. It is only then that the structure of the desired target variable is displayed directly in the Edit XSLT dialog in the Target structure tab. -
Optional:
Use the XSLT processor option to specify the functional scope of the XSLT style sheet by choosing another processor. -
For Execute on choose the value Variable content.
If the variable on which the XSLT style sheet is supposed to be executed has a complex data type, you can also choose the XPath option and specify and XPath that refers to the structure of the variable, e.g.
$var1/properties/property[1]. -
For Variable choose the variable on which the XSLT style sheet is supposed to be executed.
-
To define the style sheet, click Edit next to the Stylesheet option. The Edit XSLT dialog is displayed.
In this dialog, you can use drag & drop to create the XSLT stylesheet:
-
Load an example file with the structure to created in the XML target file area.
-
Drag the
rootelement or any other elements into the XML target area to thexsl:templateelement. -
From the Variables tab, drag the selected variables into the XML source to assign the variable value to an element in the target structure.
-
-
After completing your style sheet, click OK. The dialog closes.
-
If you have not done so yet: Specify to which target the result of the stylesheet is to be mapped.
For information about using the XSLT dialog refer to Creating a Technical Workflow 2: Converting a CSV File to CSV-XML.
Creating Mapping Rules for Source=XPath
In a mapping rule, you can use an XPath expression as a source. You can assign the result of the expression to a variable, a module property or the input message.
The XPath expression is listed in the context of a blank document, not in the input message.
The XPath wizard helps your create an XPath expression. In the wizard, you can use drag & drop to compile the expression from a list of functions and a list of all variables. In addition, the XPath wizard offers explanations of all available XPath functions.
Proceed as follows
-
Display the Mapping of variables dialog.
-
Create a mapping rule.
-
As the source, choose the value XPath expression.
-
To create the XPath expression, click the XPath assistant button. The XPath wizard is displayed.
-
In the XPath functions docking window, first choose the XPath function that you want to use, e.g., the
concat()string function. As soon as you select a function, an explanation of the function is displayed. -
Use the mouse to drag the XPath function into the XPath input field.
-
To assign the function an argument, select a variable in the Workflow variables area and use the mouse to drag it to the empty space in the function in which an argument is expected.
-
Click OK to close the dialog.
→ The XPath expression is displayed.
Overwriting List Module Properties
Some module properties such as process roles are saved in list form in the XML structure.
To overwrite list module properties, you have to know the XML structure and fill it correctly.
In general, you have to execute the following steps:
-
Make the new value of the list module property available by writing it e.g. into a variable or into the output message. This must happen before the module in which the list module property is set.
-
Create a new variable with the structure of the list module property.
-
Map the new value of the list module property to the new variable.
-
Map the new variable to the list module property.
This section uses the Overwrite process role example to explain how you proceed when you overwrite list module properties.
Proceed as follows
-
Generate a Technical Workflow.
-
Add an Assign module.
-
Create a task generator with the following configuration:
-
An option from the Entry in Task List area is selected.
-
A process role is selected, for example team member.
-
The Ignore input message option is checked.
You will overwrite this process role with another in the following steps. The new process role originates from a variable that is set in the Assign module.
-
-
Connect both modules:
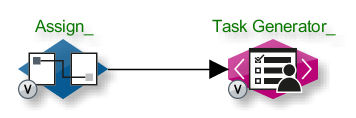
Creating a variable with a new process role value
-
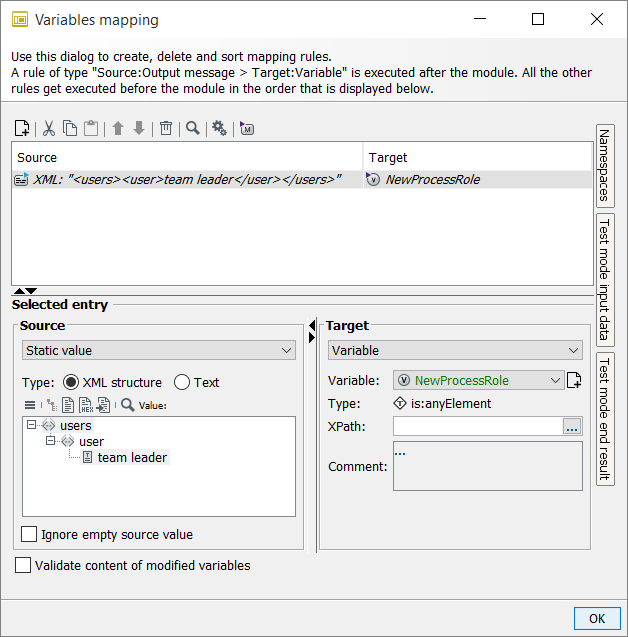
Open the variable mapping in the Assign module and create the following mapping rule:
You proceed as follows:
-
Choose Static value as the source and enter the XML structure manually.
-
Choose Variable as the target.
-
Create a new variable:
-
Next to the Variables list, click
.
A dialog opens. -
Name the variable and choose
anyElementas the type. -
Close the dialog.
-
-
Close the variable mapping dialog.
Mapping rule 1: Variable with expected list structure
-
-
Open the variable mapping dialog in the task generator and create a new mapping rule.
You use this mapping rule to create a variable with the same structure as theProcessRoleslist module property. Execute one of the following steps:-
Alternative 1:
-
In the toolbar, click the M button to display the module properties and their current values.
-
Select the list module property
ProcessRoles. The XML structure of the property is displayed in the Source area: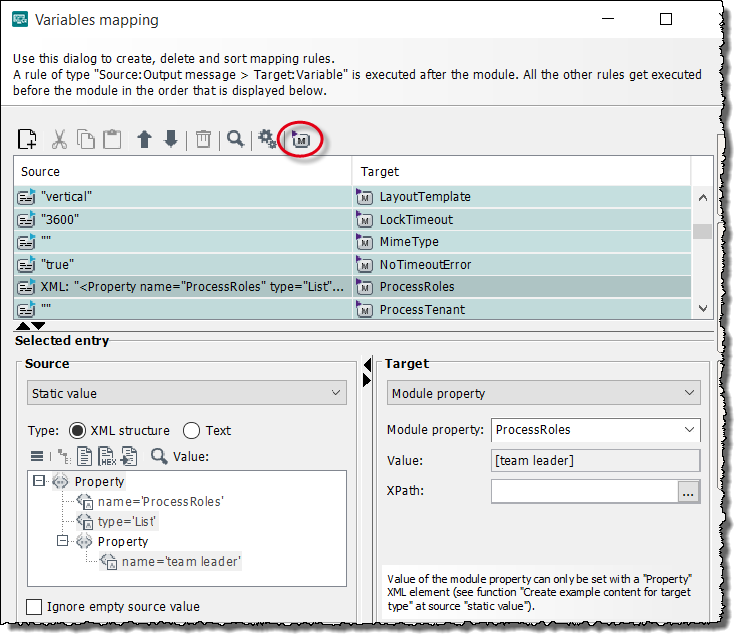
-
-
Alternative 2:
-
Choose Static value as the source and the
ProcessRoleslist module property as the target. -
Click the
 icon and choose Create example content for target type.
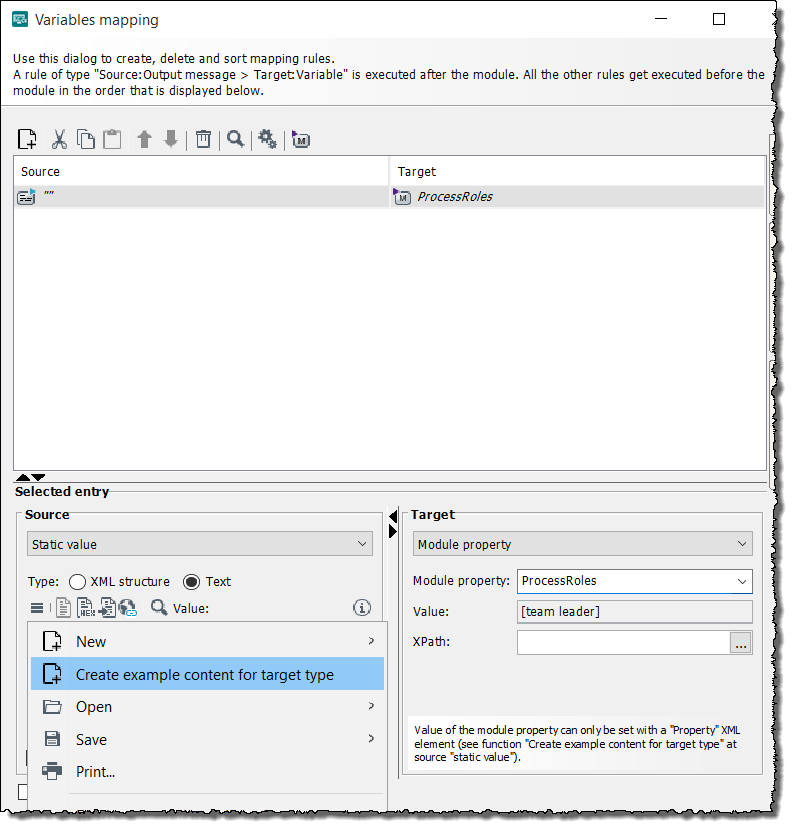
The XML structure of the module property is displayed.
-
-
-
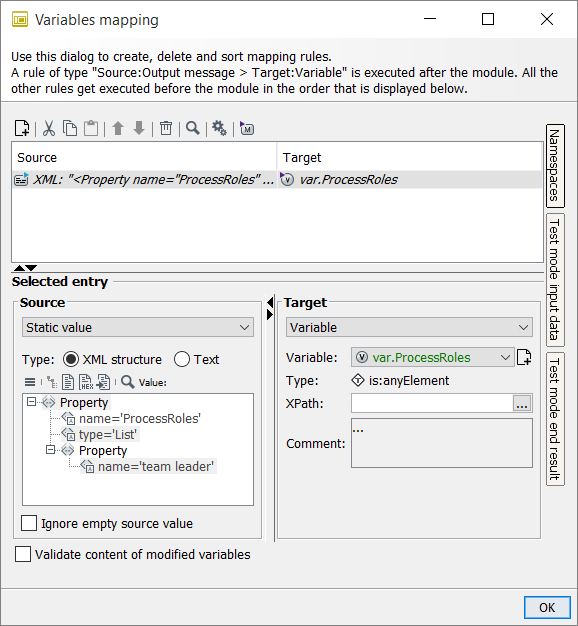
In the mapping rule you just created, change the target: Choose Variable.
-
Create a new variable of the
anyElementtype namedvar.ProcessRoles: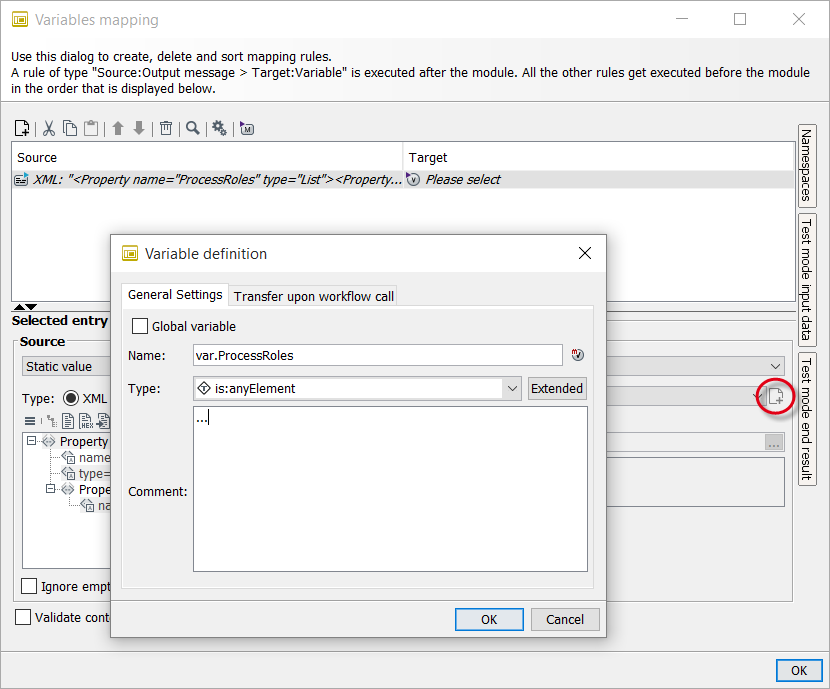
The first mapping rule in the task generator looks like this:
-
Close the dialog.
Mapping rule 2: Map new process role to variable with list structure -
You use the second mapping rule to fill the
var.ProcessRoles `variable with the content of the `NewProcessRolesvariable. You need the XML structure and the value of theNewProcessRolesvariable:-
In the Assign module, start test mode with the Start test without file option.
-
After the test, open the watch point between the two modules and copy the content (result file and variable) to the clipboard.
-
Close the dialog.
-
-
Open the variable mapping of the task generator:
-
Create a second mapping rule.
-
Click the Test mode button to activate test mode:
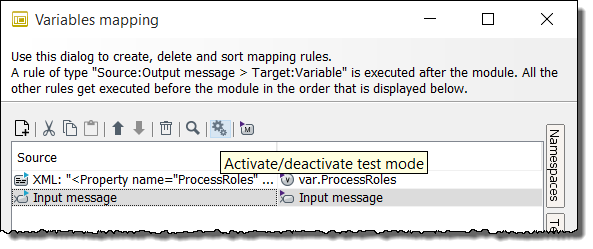
In the test mode, the variable values from the test run of the workflow are used.
-
If necessary, open the Test mode input data docking window.
-
If necessary, load the content of the clipboard into the Message area:
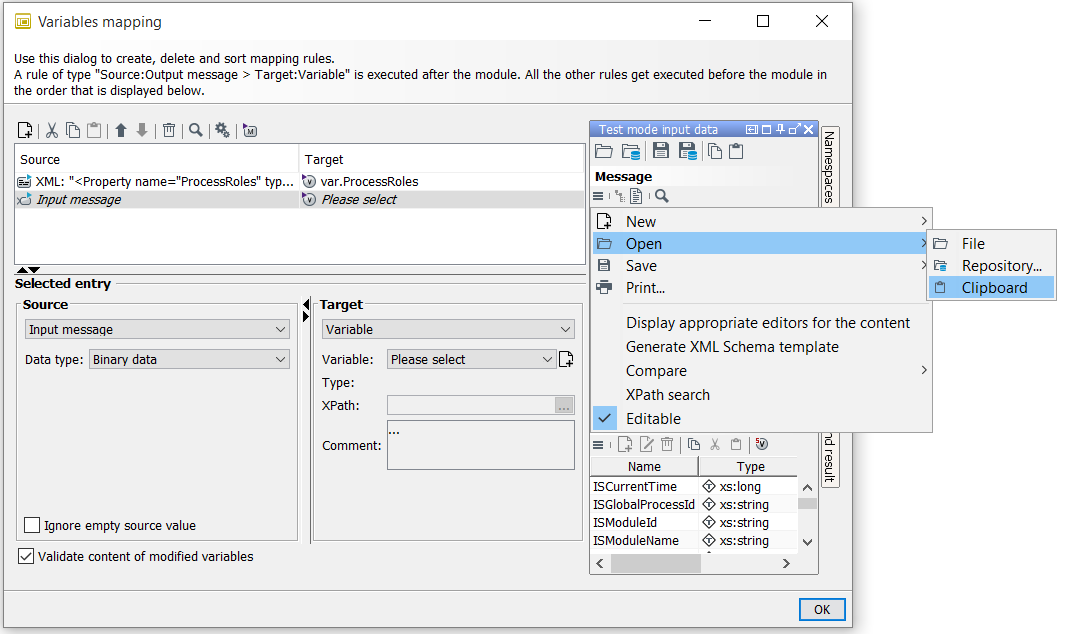
The thus copied variable value is assigned to the
NewProcessRolevariable displayed in the Workflow variable area. -
In the second mapping rule, choose Variable=
NewProcessRolesas the source.Make sure the test mode is activated.
-
Next to the XPath, click
 to open the XPath wizard.
 -
In the Workflow variables area, next to the
NewProcessRolesvariable, click the Value column to display the XML structure of the value. -
Drag the team leader text node into the XPath input field. The XPath is displayed:
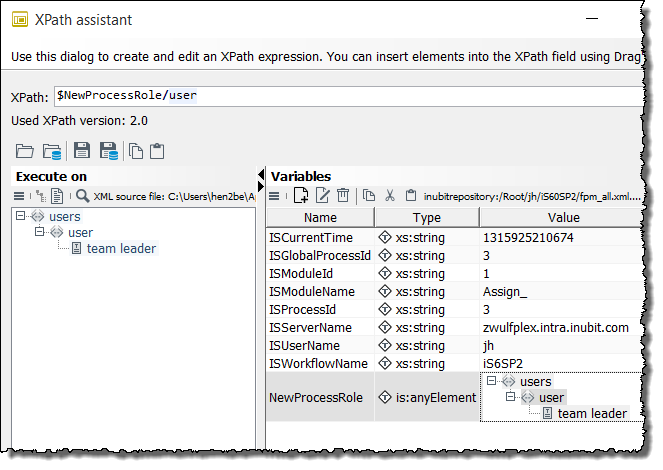
The XPath is tested immediately. You see the team leader result in the Result area.
-
Click OK to close the dialog.
-
-
Choose Variable=
var.ProcessRolesas the target.Make sure the test mode is activated.
-
Next to the XPath field, click
to open the XPath wizard. -
Drag the
nameattribute of apropertyelement into the XPath input field:
-
Click OK to close the dialog.
The second mapping rule now looks like this: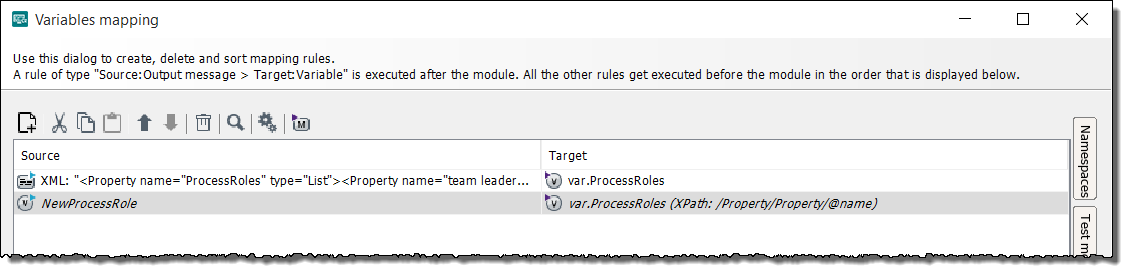
Mapping rule 3: value of the list module property
-
Create the following third mapping rule:
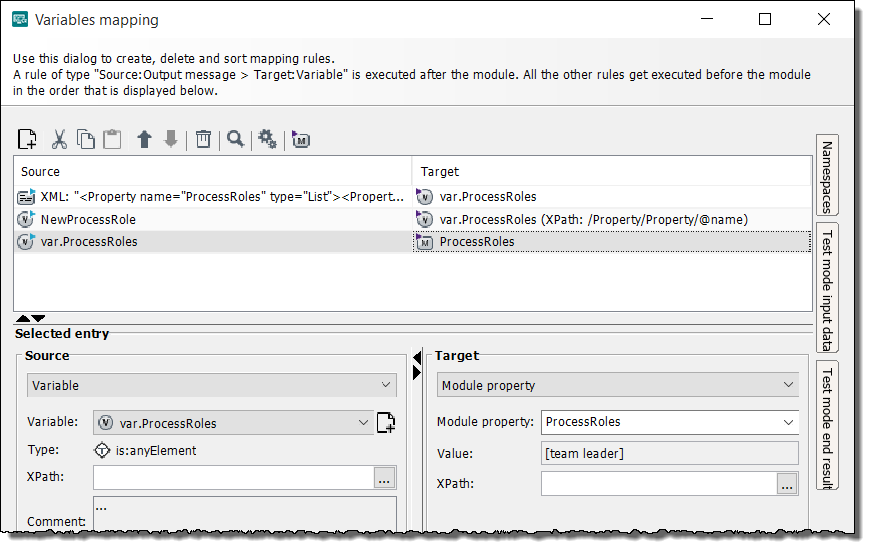
The new value of the
ProcessRolesmodule property is displayed in the Value field. -
Click OK to save the rules.
→ You have thus overwritten the process role initially defined in the task generator.
Changing the Global Process ID (ISGlobalProcessId)
This section describes how you set the value of the ISGlobalProcessId variable to identify all workflows that belong to
the same business transaction. In the Queue Manager, if you sort the table by the ISGlobalProcessId, you can quickly get an overview of the status of the corresponding business transaction.
Proceed as follows
-
Open the first Technical Workflow of the business transaction for editing.
-
Open the context menu of the first module and choose Edit mapping of variables.
-
Create the following mapping rule:
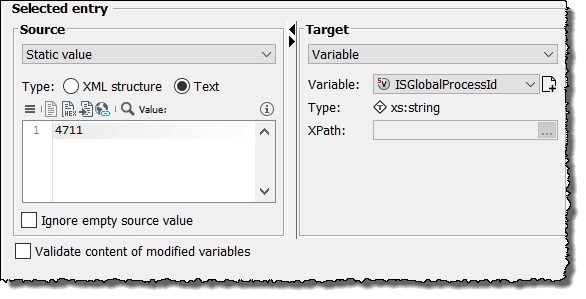
Enter the desired ID as a static value.
-
Click OK.
Execute this action for all Technical Workflows that belong to the same business transaction.
Dialog Descriptions for the Mapping of Variables
Dialog Variables mapping
Call
-
Edit
-
Display the diagram in which the mapping of variables of a module is to be edited in local mode.
-
Select the module and choose Edit mapping of variables from the context menu.
-
-
Display
-
Display the diagram in which the mapping of variables of a module is to be displayed in server mode.
-
Select the module and choose Show mapping of variables from the context menu.
-
In the Mapping of variables dialog, you can display, create, test, edit, and delete mapping rules.
Mapping rules are usually executed in the order in which they are displayed. You can change the order of the mapping rules in the dialog.
Refer to Process order of mapping rules
Toolbar
The buttons in the toolbar enable you to use the following functions:
-
: Add mapping rule
-
 : Cut mapping rule
 -
: Copy mapping rule
-
 : Insert mapping rule
 -
 : Move up mapping rule
 -
 : Move down mapping rule
 -
: Delete mapping rule
-
: Show/hide activate test mode
-
 : Show/hide module properties
The functions are also available via the context menus of the mapping rules.
Table of mapping rules
The table shows all already existing mapping rules in the processing order.
Skipping variables mapping
This Skip option is available for all assignments in variable mapping even for global variables.
When having activated the checkbox for a variables mapping in the Skip column, this variables mapping will be struck through and it will not be executed. A workflow input variable or a global variable is not mapped, but it will be available in workflow variables section of a watchpoint file.
The Skip checkbox is applicable for all assignments in variable mapping but only on the Local side.
At a Workflow Connector, the Skip checkbox is disabled for input variables, output variables, and global variables.
Selected entry
As soon as a mapping rule is available and selected, additional options are displayed, including:
-
Delete variable after assignment
If this is active, the value of the selected variable is deleted after the execution of the mapping. -
Ignore blank source content
The source content can be blank, e.g. because the XPath execution on a variable content produced an empty result.-
The option is activated: No error is thrown, the mapping rule is ignored.
-
The option is not activated: A
bpel:selectionFailureis output.
-
-
Ignore non-initialized source variable
A variable is not initialized if it was not assigned a value in the workflow execution.-
If the option is activated: In case of a non-initialized source variable, no error is thrown and the mapping rule is ignored.
-
If the option is not activated: In case of a non-initialized source variable, a
bpel:uninitializedVariableerror is thrown.
-
-
Validate content of modified variables
If this option is activated and a variable is assigned an invalid value that does not suit the schema type, an error is thrown. The error is calledbpel:invalidVariables.
Variables Docking Window
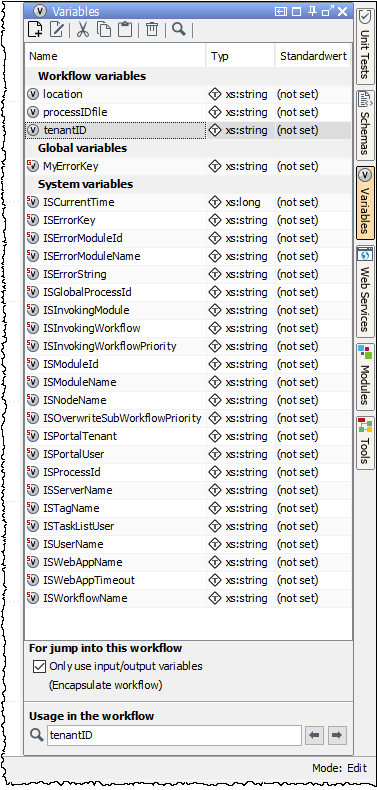
The docking window shows all variables that are defined in the currently displayed Technical Workflow. You can create new variables or edit user-defined variables and module variables.
Symbols on variables
The INUBIT software has the following variable types, which you can identify by the symbols:
-
 System variable
System variables are set by the INUBIT software and cannot be deleted.
Refer to System Variable Overview.
-
 User-defined variables
-
 : Workflow input variable
 -
 : Workflow output variable
 -
 : Workflow input/output variable
You can define any variables yourself and specify whether these act as input and/or output variables in linked workflows.
Refer to Defining Variables.
-
-
Module variable Some modules set variables when they are executed or they expect variables.
Refer to, for example:-
Module Variables of the AS2 Connector
-
Module Variables of the File Connector
-
HTTP Connector: Defining and Displaying HTTP Connector Parameters.
-
-
 Global variable
Refer to Using Global Variables.
For jump into this workflow
For encapsulating the workflow.
-
If this option is selected and the current workflow process is linked to another, the current workflow process only forwards variables that are explicitly marked as input/output variables. If this option is selected, there must be a mapping of input and output variables in all workflow connectors that refer to this workflow.
-
If this option is not selected, the transfer and copying of all variables can be configured in the workflow connector.
Usage in the workflow
Searching for modules in which a variable is used.
Refer to Searching for Variables in Diagrams.
Using Global Variables
Global variables can be used after defining (refer to Defining Variables with a Simple or Complex Type) and saving for all users/groups on the Process Engine.
|
Add a comment when creating or modifying a variable to tell other users how to use the variable. |
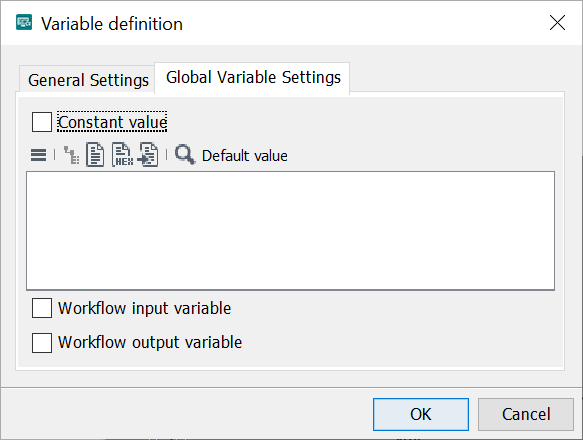
Global Variable Settings
Selecting the Constant value option preserves the variable value during the transfer in the variable mapping. Accordingly, the variable cannot be selected in the target.
|
If the Constant value option has been selected and the constant is in use, the option can no longer be deselected. |
With the options Workflow input variable and Workflow output variable, the variables can be defined as input and output variables, refer to Configuring the Variable Transfer for Linked Technical Workflows.
|
If the Constant value option is selected, the variable cannot be defined as input or output variable. |
Editing and Deleting
Global variables can be edited or deleted locally by any user of the Process Engine with appropriate rights, as long as the variable is not used by a workflow or as a property in an XML Converter module.
|
Creating, deleting, and renaming global variables takes effect immediately for the entire system, even without prior publishing of a workflow. |
|
Values of global variables and constants can be changed by editing the start point of the unit test. |