Business Process Center Portal
Usage
With the Business Process Center Portal, you can create a process-oriented portal that integrates internal and cross-company business processes. This process-oriented portal can serve as a corporate operating system and central user interface.
Portal users are not only restricted to your employees, but can also include customers, suppliers, and other business partners carrying out their tasks in a transaction-oriented way by means of a uniform interface. User interaction easily takes place via a Web browser with no software rollout necessary when processes are added or changed.
Business processes are implemented as Web applications on the basis of the workflow component and, at the push of a button, are straightly deployed to the portal server.
The main component of the BPC Portal is the INUBIT-BPC Integration that offers the most relevant functions as pre-configured BPM portlets.
Portal server versions
By default, the INUBIT software supports the following portal server
Refer to Software Requirements
Process Interaction in Business Process Center
Overview
The Task List is part of the INUBIT-BPC Integration.
In the Process Interaction module in BPC, all persons involved in a business process can display their individual tasks.
|
Make sure your browser uses UTF-8 character encoding, e.g. to avoid problems with filtering and sorting tasks. |
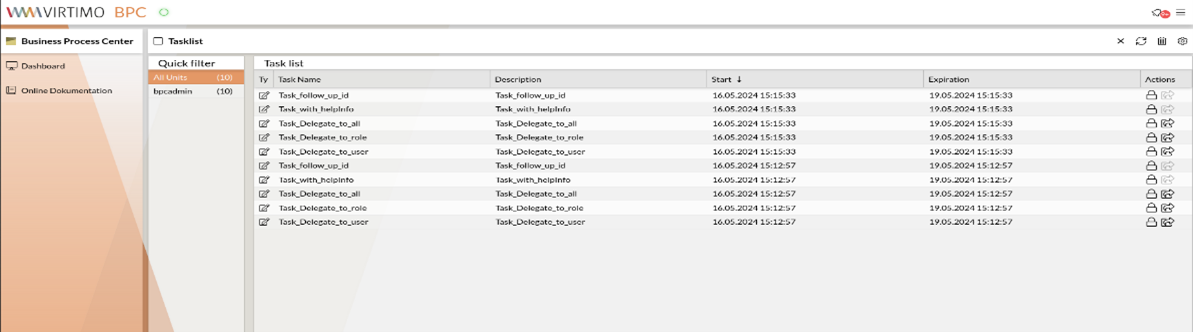
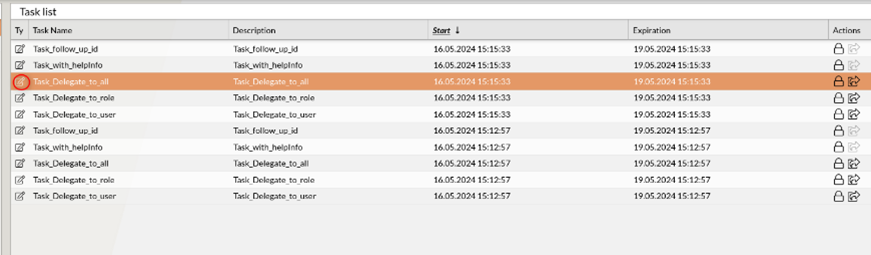
The tasks are represented in a table with the following columns:
-
Task Name
Displays the name of the task. The name originates from the correspondent dialog field, which was filled when creating the Task Generator.
The symbol signalizes the task type:
-
 Form
Form -
 Information
For more information about the different task types refer to Integrating Employees into Workflows by Tasks.
-
-
Description
A short description from the dialog of the same name that was filled in when the module was created.
-
Start
Date and time of the module activation.
-
Expiration
The point in time when the task will be removed from the task list. This point in time is calculated from the start time and the timeout entered when the module was created.
Sorting Tasks
Proceed as follows
-
Sorting in ascending order
Click the header of a table column. The corresponding tasks are sorted. The up arrow in the column header indicates that the table content was sorted in ascending order by the selected column, e.g.:

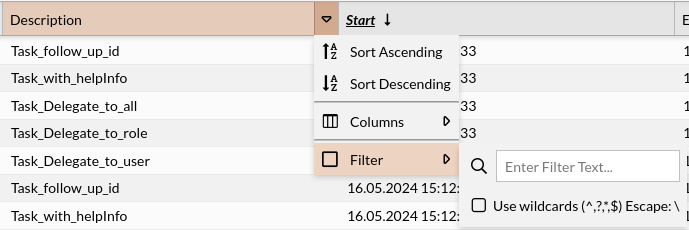
Alternatively, you can select the sort order directly from the column menu.
-
Reversing the sorting
A second click the table header reverses the sorting order.
-
Selecting columns
To display or hide columns, select the entry Columns from the column menu and activate or deactivate the checkbox next to the column.
|
For information on how to activate the sorting according to the German standard DIN 5007, refer to Using DIN 5007 sorting. |
Using DIN 5007 sorting
When using the sorting according to the German standard (refer to DIN 5007), umlauts and characters with an accent are sorted with the corresponding vowels without umlaut or without accent, e.g.: Ä=A, ä=a, Ö=O, ö=o, Ü=U, ü=u, ß=ss, é=e, á=a etc.
Sorting is applied on task name, description, and user-defined columns of string data type for BPC portal.
Task list on a BPC portal
-
Prepare the task list.
-
Existing Tasklist instance
Redeploy the Tasklist
Continue with step 2.
-
New custom Tasklist instance
-
Create a copy of the Tasklist, refer to Adjusting Task Lists.
-
In the following line, change the
enableDIN5007Sortparameter to: true<xsl:param name="enableDIN5007Sort">true</xsl:param> -
Save the changes and deploy the new custom Tasklist to the BPC portal.
→ DIN 5007 sorting is activated. No further steps are necessary. In the BPC portal, you can change the setting as described in the following steps.
-
-
Existing custom Tasklist instance
-
Add the following line below the line with the
caseSensitiveFilterparameter<xsl:param name="enableDIN5007Sort">true</xsl:param> -
Save the changes and redeploy the task list.
→ DIN 5007 sorting is activated. No further steps are necessary. In the BPC portal, you can change the setting as described in the following steps.
-
-
-
Log in to the BPC Portal as an administrator.
-
Choose the Administration item in the Global menu.
-
Open the Process Interaction tab.
-
In the Components section, choose the task list for which you want to configure the sorting.
-
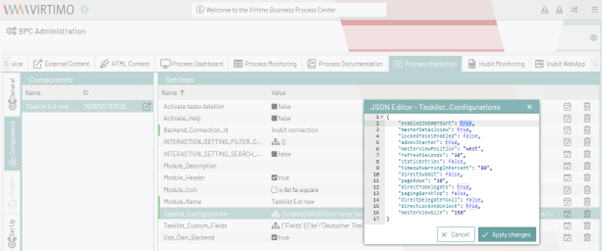
In the Settings section in the Tasklist_Configurations line, click in the Value cell. A JSON editor opens.
-
Check the Tasklist_Configurations file:
Check whether the
enableDIN5007Sortparameter is set as follows and change it accordingly if not:"enableDIN5007Sort": true -
Click the Apply changes button.
Filtering Tasks
If you filter the indicated tasks by a specific criterion, you can work with a subset of tasks quickly and easily.
Proceed as follows
-
From the column menu, select the Filters entry. A text field is displayed.
-
Click in the text field.
-
Enter the filter criterion, for example:
By default, the filtering is case-sensitive. For changing the filtering to case-insensitive, create a new Tasklist using the Task Lists on the portal option in the Administration > General settings > Portal > Portal Deployment menu in the Workbench, set the value of the
caseSensitiveFilterparameter tofalse. -
Press the Return key.
→ The table content is filtered. Only tasks are displayed which match the filter criterion.
To change the filter criterion, click the text field again and modify the text.
To remove the filter, deactivate the checkbox next to the Filters entry or delete the content of the text field.
Taking Over, Processing, Delegating and Releasing Tasks
You can take over a task before actually processing it. As long as you have taken over a task, it is locked and cannot be processed by others. You can release tasks, after you have taken them over, without processing them.
As soon as you start processing a task, it is taken over automatically and thus locked for other users.
When you have resolved a task, it is removed from the Task List automatically.
Proceed as follows
-
Assign/Lock the Task
In the Task List, click the unlocked icon next to the task, which you want to take over, e.g.:

The task is now locked:

-
Processing tasks
Click the row containing the task.
Depending on the type of the task, a form or some information is displayed.
The task type is signalized by the symbol displayed to the left of the task name.
-
Releasing tasks
Click the locked icon button to the right of the task, e.g.:
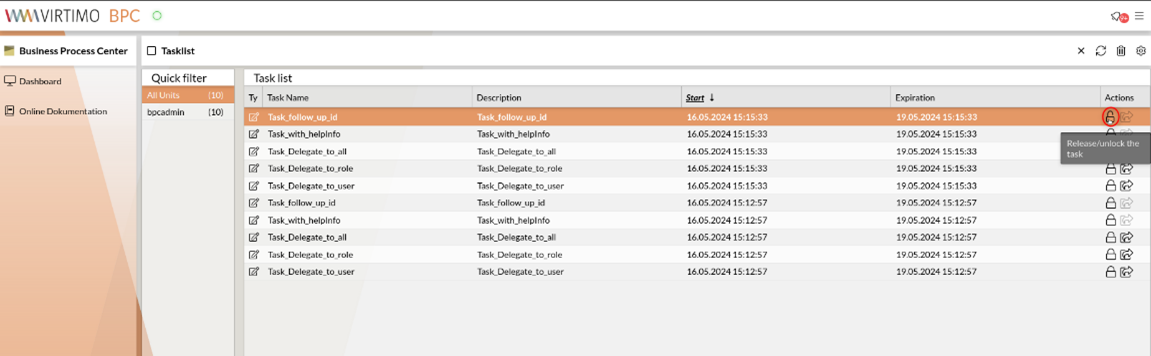
The task is released and displayed again with an unlocked icon.
-
Editing task properties, delegating task
Use the Edit button to open the page Settings where you can re-initialize the task or delegate it.
-
Prerequisites for delegating a task In order to delegate a task, you have to activate the task delegation and to link the task rule to an organizational chart.
-
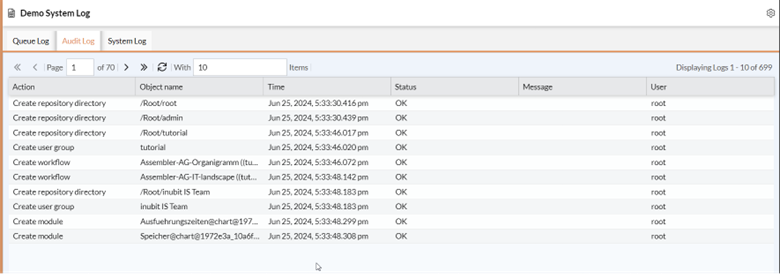
Recording task delegations in the INUBIT Workbench If you set the TaskAuditLogID module property, task delegations are recorded in the Audit Log.
-
-
Delegate task to all recipients (available only if the
directDelegateToAlloption is activated in the task list used)Refer to Adjusting Task Lists
Click the Delegate to all recipients icon in the concerning line to delegate the task to all members in all roles configured.

Adjusting Task Lists and Adding Columns
Overview
Task lists are generated with XSLT style sheets.
You can adapt the supplied task list Tasklist to your requirements by simply copying, renaming and adjusting their XSLT style sheets.
In this task list, data can also be sorted and filtered. In addition, the Tasklist provides a paging functionality. The Tasklist uses the Ext JS framework and displays task details in a window above the task list. The task details are loaded via Ajax.
Additionally, you can extend the task lists with customized columns in order to display business content.
Adjusting Task Lists
Proceed as follows
-
In the INUBIT Workbench, display the Administration > General Settings tab.
-
Display the configuration area Portal > Portal Deployment.
-
Next to the option Task Lists on the portal, click the
 button.
The following dialog opens:
button.
The following dialog opens: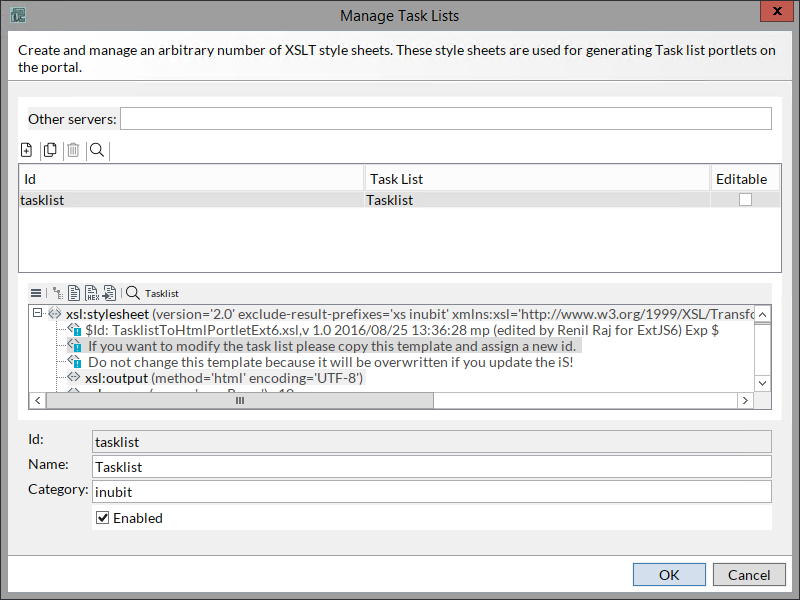
-
Select the task list that you want to copy and adapt.
-
In the Toolbar, click the
 button to copy the XSLT style sheet:
The XSLT style sheet is copied and a new entry is displayed in the table.
-
Enter a meaningful name for the new task list in the Name field
The Id is automatically generated. After generation, you can change the Id once. Please note that the Id must be unique and cannot be changed afterwards.
-
If the task list should also be listed in another application category in the Business Process Center Portal, enter this category in the Category field
-
In task lists, tasks from several INUBIT Process Engines can be displayed.
In the field Other servers, enter the list of INUBIT Process Engines from where tasks should be collected. If you do not enter anything, only the tasks of the current INUBIT Process Engine are displayed.
When entering the addresses in the field Other servers, you are expected to observe the format that is displayed for the option URL of the Process Engine. Several addresses are separated by blanks.
For all specified INUBIT Process Engines, the Process Engine password must be the same.
-
In order to deactivate the new task list, clear the checkbox for the option Enabled. Disabled task lists are not available as applications in the Business Process Center Portal and can therefore not be added to a portal page.
-
Adapt the task list: You can manipulate the parameters of the task list by changing the values of the
xsl:paramelement. The functions of parameters are documented in the XSLT style sheet.If you want to use the Process Documentation portlet on a portal page other than the default portal page, you must adjust the link to this portlet in the
processViewerLinkparameter. The link must be correctly set, if you want to link tasks from a task list with tasks in Business Process Diagrams.
Using the Process Documentation portlet on another portal page
Proceed as follows
-
Open the portal page with the Process Documentation portlet.
-
Click the plus icon in the portlet title to maximize it, the complete address is displayed.
-
Copy the link part after hostname, port, and language code (
https://<server>:<port>/de/) up to (but not including) the link part starting with?p_p_id=ProcessViewer_WAR_ispto the clip board. -
Open the desired task list for editing (refer to step Adapt the task list: You can manipulate the parameters of the task list by changing the values of the xsl:param element. The functions of parameters are documented in the XSLT style sheet).
-
In the task list, search for the parameter
processViewerLink. -
Replace the string
/group/inubit-cockpit/prozessmodellwith the link part you have copied to the clipboard. -
Click OK to save the task list.
-
Click the disk icon in the toolbar to save the changes.
Adding Columns to Task Lists
You can add further columns to the task list to display specific business-related contents. You can translate the column names in any languages and have them displayed.
The additional columns are generated for each Task Generator by using the variables mapping. In the task list, these columns are only displayed, if tasks are available that have been generated by a Task Generator based on a corresponding variables mapping.
|
You must determine the number of additional columns for each Tasklist when extending the Tasklist. This is due to the fact that each column in the XSLT style sheet of the Tasklist must be defined. |
Proceed as follows
-
Insert an Assign module before the Task Generator that generates the tasks with the additional columns, e.g.:

-
Configure the variables mapping at the Assign module as you like. In doing this, you can map any source values (e.g. static values, variables, contents from input message) to a target variable, e.g.:
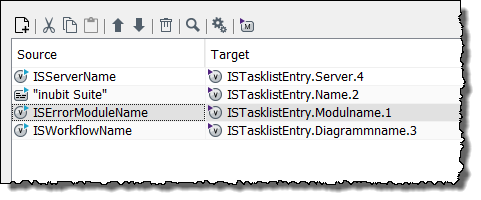
The target variables must be of the
xs:stringtype and observer the following structure:ISTasklistEntry.[<LanguageCode>.]<ColumnName>.[<ColumnPosition>]Additional columns are always displayed to the right of the default columns. An additional column with the position 1 is therefore the first column to the right of the last default column.
You can define variables for different languages by using an optional language code (de, en, etc.) followed by a period.
-
Only when enlarging the Tasklist:
-
Display the XSLT style sheet of the Tasklist.
Refer to Adjusting Task Lists
-
Set the value of the parameter
staticEntriestotrue:<xsl:param name="staticEntries"> true </xsl:param>In order to create a connection between the variable that provides the contents and the column that displays the contents, insert for each new column an
Entryelement in thexsl:variableelement, e.g.:<xsl:variable name="translations"> <Entry name="Invoice" en="Invoice No."/> </xsl:variable>
-
-
Multilingual column names
By using the
entryelement from step 3, you can also translate the column names in any language and have them displayed.When declaring variables for multilingual column names within the Task Generator, they must be extended by adding the language code attribute:
ISTasklistEntry.[<LanguageCode>.]<ColumnName>.<ColumnPosition>-
Display the XSLT style sheet of the task list.
Refer to Adjusting Task Lists.
-
Insert for each added column an
Entryelement in thexsl:variableelement, e.g.:<xsl:variable name="translations"> <Entry name="Invoice" en="Invoice No."/> </xsl:variable> -
Insert an attribute for each language. The attribute corresponds to the country code of the desired language according to ISO 3166. Enter the translation of the column name as attribute value, e.g.:
<xsl:variable name="translations">
  <Entry name="Invoice" en="Invoice No" de="Rechnungsnr."/>
</xsl:variable>
-
|
After applying changes to the XSLT style sheet, you must re-deploy the task list! |
Adjusting Task Lists for a BPC Portal
Usage
To display task list details in a panel in the BPC portal and to configure both the position and the size of the panel
Prerequisites
-
You have configured BPC as portal for you INUBIT installation.
-
You have created a tasklist to be used as portlet on the BPC portal.
Proceed as follows
-
In the INUBIT Workbench, display the Administration > General Settings tab.
-
Display the configuration area Portal > Portal Deployment.
-
Next to the option Task Lists on the portal, click the icon
-
In the task list table, click the task list you want to adjust.
-
Click the text view icon
 to edit the task list settings.
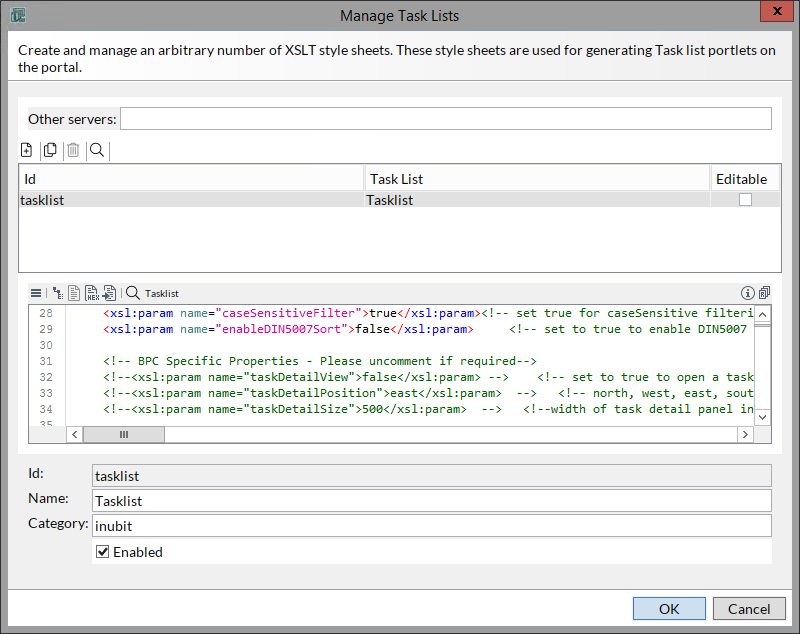
-
Adjust the following parameters:
-
taskDetailViewSet the
taskDetailViewparameter totrue(default:false) in order to enable displaying the task list detail panel. -
taskDetailPositionSet the
taskDetailPositionparameter to one of the following values:-
north: the panel is displayed on top. -
west: the panel is displayed on the left. -
east: the panel is displayed on right (default). -
south: the panel is displayed on the bottom.
-
-
taskDetailSizeSet the
taskDetailSizeto the width in pixels of task detail panel, default:500
-
-
Click OK to end editing the task list settings.
The changes are not yet saved.
-
Click the disk icon
 in the toolbar to save the changes.
 -
Deploy or re-deploy the tasklist.
Creating Ad Hoc Processes
Usage
From the Task list of the INUBIT-BPC Integration, you can spontaneously start processes, so-called ad hoc processes. By using it, you can e.g. generate a new task at any time, delegate it to employees and have it displayed in their respective task list.
Functional principle
Technically, an ad hoc process is generally implemented as a Technical Workflow with at least one Task Generator. In the module wizard of this Task Generator the option Entry in Task List > Form is selected.
When starting the ad hoc process from within the task list, the module of the workflow is started that is configured as the so-called ad hoc process starter. This can be the Task Generator itself or any module before the Task Generator. The module you select depends on the fact if the Task Generator should create an already pre-filled or an empty form:
-
The Task Generator is to create a pre-filled form:
Configure a module in front of the Task Generator as ad hoc process starter and use a sub-workflow between ad hoc process starter and Task Generator to create the form data.
-
The Task Generator is to create an empty form:
Configure the Task Generator itself as ad hoc process starter.
After submitting the form data by using the Submit button, the form data are handed over to the next module in the workflow and are processed further as defined in the Technical Workflow.
A click on the Cancel button transfers the task for further processing to the task list.
The ad hoc process starter receives as input message an XML structure containing the following information:
-
Name of process user who starts the ad hoc process
-
All available process user roles
You can use this information to create e.g. a further task in the workflow and delegate it to selected process user roles.
Configuring a Module as Ad Hoc Process Starter
Prerequisites
A process user server must already be active!
Proceed as follows
-
Open the Technical Workflow for editing.
-
Mark the module that you want to use to start the process.
You can start the Technical Workflow directly at the Task Generator or at any module in front of it, e.g. to fill the form with suitable data.
-
Open the context menu of the module and select Ad hoc process starter. The following dialog opens:
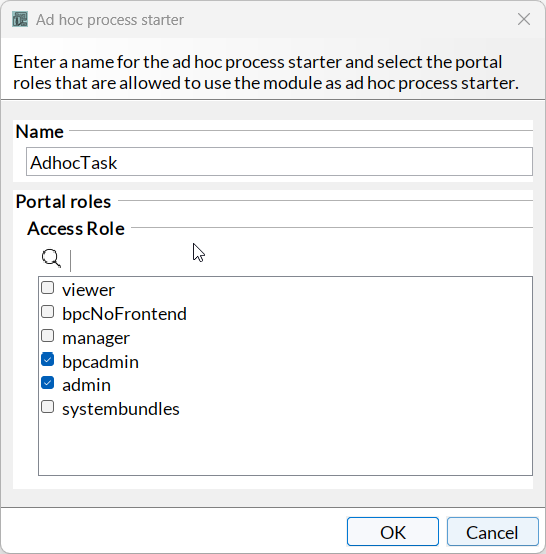
-
Enter a name and select the roles.
-
Click OK to close the dialog.
→ The ad hoc symbol is displayed on the module and indicates that the module is used as ad hoc process starter.
Starting an Ad Hoc Process
Proceed as follows
-
In the INUBIT-BPC Integration, display the Tasks tab.
At the bottom right of the Task List, a list of available ad hoc processes is displayed:

-
Select the desired ad hoc process from the list.
-
Click
 to start the ad hoc process.
→ The form that is defined in the Task Generator is displayed. If you fill in and submit the form, the data are handed over to the next module in the workflow.
Removing the Ad Hoc Process Marker from the Module
Proceed as follows
-
Open the Technical Workflow for editing.
-
Open the context menu of the module with the marker.
-
Select Ad hoc process starter. The dialog for selecting the process roles opens.
-
Cancel the selection of process roles.
-
Click OK to close the dialog.
→ The symbol on the module is removed. The module can no longer be used as ad hoc process starter.
Workflow Design of Web Applications
In contrast to desktop applications for example, web applications run in loops. Therefore, in the Business Process Center Portal, the last – not yet submitted – form of the web application is always displayed. Thus, the workflow that implements the web application always displays in the Queue Manager the status Waiting. In this status, the workflow does not consume any resources of the INUBIT Process Engine. In the workflow, the loop is e.g. implemented by a Joiner:
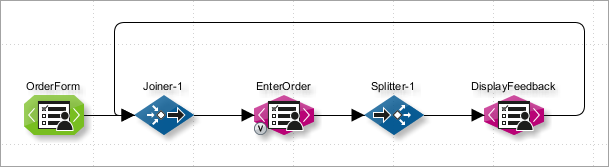
The Web Application Input Connector is directly followed by a Joiner. The last form of the web application is connected to this Joiner. Therefore, in the web application, the first form is again displayed after the last.
A web application is stopped as soon as a session or portal timeout occurs or the user logs out from the portal.
For a practical introduction into the development of individual web applications, refer to Developing Your Own Web Application.
Using INUBIT Web Application in Business Process Center (BPC)
Usage
To display INUBIT web applications in the BPC portal:
Prerequisites
-
The BPC Server is installed, configured, and started.
-
The INUBIT Process Engine is started.
-
The Business Process Center is configured as Portal server.
-
The Business Process Center is configured as Process Users Server.
-
Process Users and Roles from BPC are assigned to the INUBIT administrator.
Proceed as follows
-
Create, configure, and deploy the web application, refer to: Developing Your Own Web Application
-
Open the web application in the BPC, refer to Opening INUBIT Web Application in BPC.
Opening INUBIT Web Application in BPC
Prerequisites
You have logged in to the BPC portal.
Proceed as follows
-
In the BPC Global menu, choose the Settings item.
→ The BPC Administration page is displayed.
-
Open the Components section in the INUBIT WebApp tab.
→ The INUBIT WebApp(s) deployed to the BPC are displayed in the Components section.
When setting the Module_ReinitOnLoad option to true, a new entry is created in the Queue Manager on each WebApp load.
When setting the Module_ReinitOnLoad option to false, no new entry is created in the Queue Manager if the WebApp is already loaded.
-
Click the Open icon
 to open the desired INUBIT WebApp.
→ The INUBIT WebApp is displayed.
Click the Reload WebApp icon
 on the top-right of the portlet to reload the WebApp.
Click the Re-initialize WebApp icon
 on the top-right of the portlet to re-initialize the WebApp.
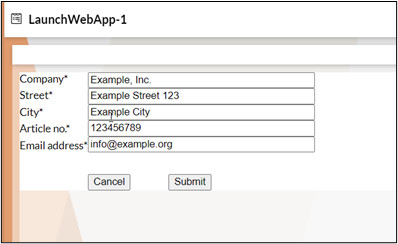
→ Now, the INUBIT WebApp can be used, for example, to submit an order as described in the Tutorial, refer to Developing Your Own Web Application