Lookup Table
With a Lookup Table you change values in messages.
Functional Principle of the Lookup Table
Replacement rules
A Lookup Table can execute a rule composed of multiple replacement rules. The values to be replaced and the replacement values are mapped to each other in tables Data sources. You can use both static XML tables and dynamic database tables as data sources:
-
XML data source
Suitable only if few values are to be changed.
XML data sources are created directly in the Lookup Table and filled with value pairs.
Refer to Defining XML Data Sources
-
DB data source
Suitable for executing numerous conversion steps as the table is only loaded once and then held in the memory.
Refer to Defining DB Data Sources
Stack processing
Replacement rules are processed in the order in which they occur. Each replacement rule is applied exactly once.
The Lookup Table calls up the first replacement rule and uses it to process the input message. Then the next replacement rule is applied to the already changed message. The input message changes step-by-step with each replacement rule.
Example
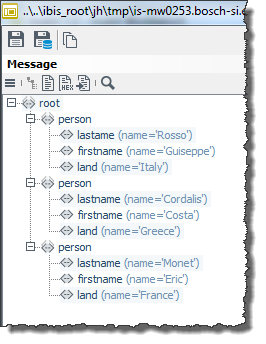
In the following example, English country names are replaced by German ones.
-
The input message has the following structure:

-
The replacement rule is:
-
Search the input message for the first occurrence of the element
/root/person/countrywith the valueItaly. -
Replace
Italywith the value in theCountry mappingXML data source in theOutputcolumn in the same row asItaly.Here:
Italien
-
Proceed in the same manner for all other values of the
countryelements entered in the XML table. In the Lookup Table the replacement rule looks as follows: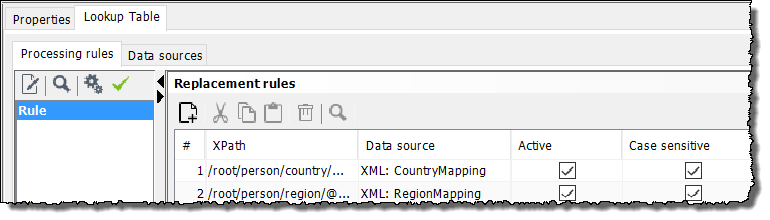
-
-
The input message looks like this:
Creating a Data Source
Usage
A data source contains the values for input and output. A replacement rule describes how the input values are to be replaced by the output values. You assign the values to an XML data source directly in the Lookup Table; you link a DB data source with an external database.
Defining XML Data Sources
Proceed as follows
-
Go to the Data sources tab.
-
Open the context menu in the left area and choose Add.
The dialog opens.
Refer to Add Data Source Dialog
-
Choose the option XML data source.
-
Name the data source.
-
Optional: Enter a detailed description of the data source.
-
Click Finish to save the data source.
The new data source appears in the list of data sources. In the right window area, an empty table with the columns Input and Output is displayed.
You can now import or manually add data.
Refer to
Importing Data into an XML Data Source
Manually Adding Data to an XML Data Source
Proceed as follows
-
Display the Data sources tab.
-
Select the data source to which you want to add values.
-
Optional: Enter a default value that the module uses if it does not find an entry in the data source for a value in the input message.
-
In the right area, open the context menu and choose Add to add a new row to the table.
-
Double-click in the field of the new row in the Input column to enter the value from the input message.
-
Double-click in the field of the new row in the Output column to enter the value for the output message.
-
Save your entries.
-
Repeat steps 3 through 6 for all possible values in the input message.
Editing and Deleting Data in an XML Data Source
Editing value pairs
-
Display the Data sources tab.
-
Select the data source whose values you want to change.
-
Execute one of the following steps:
-
Double-click in the field containing the desired entry in the Input column to enter a new value from the input message.
-
Double-click in the field of the desired row in the Output column to enter a new value for the output message.
-
-
Save your entries.
-
Repeat steps 3 and 4 for all values you want to change.
Defining DB Data Sources
Usage
A DB data source is used to read the input and output values from an external database. This database is maintained outside the Lookup Table.
Proceed as follows
-
Display the Data sources tab.
-
Open the context menu in the left area and choose Add.
The dialog opens.
Refer to Add Data Source Dialog
-
Choose the option DB data source.
-
Name the data source.
-
Optionally, enter a detailed description of the data source.
-
Click Next.
The dialog opens.
-
Configure the database settings.
-
Click Finish to save the data source.
The new data source is displayed in left area. In the right area, an empty table is displayed.
Now reference the desired database table.
Referencing Database Tables - Setting Table and Column Names
Prerequisites
-
You have opened a Lookup Table for editing.
-
You have defined a DB data source.
-
You have created a database with at least one table and two columns.
-
You have determined which column contains the input or output values.
-
The column with the input values must contain the values expected in the input message.
-
The column with the output values must contain the values with which the input values are to be replaced.
-
Proceed as follows
-
Display the Data sources tab.
-
In the left area, select the DB data source you want to link with a database.
Open the context menu in the right area and choose Table properties.
The dialog opens.
Refer to Table Properties Dialog
-
Select the desired table.
If you have not yet created a table with the appropriate columns, you can use the DB Manager to create the columns.
-
Activate the checkboxes for the Input and Output columns.
-
Click OK to save the entries.
-
In the right area, open the Add context menu to read data from the database into the table.
The read data is only to check the connection to the correct database. With larger data volumes, not all data is read and displayed.
-
Check whether the connection to the database table is correct and the data was read correctly.
-
To access a table from a different schema, go to Table Properties.
A dialog opens:
-
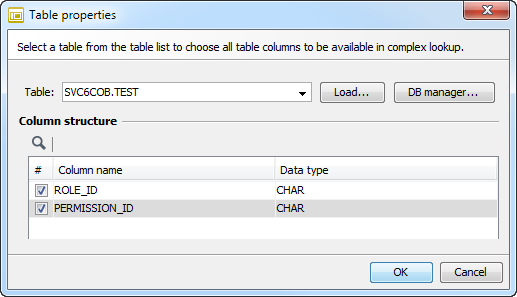
Enter the table name in the format
schemaname.tablenameas shown in figure. -
Click Load to access the table.
-
Click OK to save the selection.
Defining Tables and Columns with the DB Manager
Creating New Tables
-
Display the Data sources tab.
-
Select the desired DB data source.
-
Open the context menu in the right area and choose Table properties.
-
Click the DB Manager button.
The Dialog Database Manager opens.
-
Create a new table with the columns Input and Output with the attributes required for your input message and output message (type, length, null and default value).
-
Click OK to save the column definitions.
|
When using the module in a Technical Workflow, you can overwrite the table names and column names as well as the DB connection parameters using variable mapping. |
Defining Replacement Rules
Prerequisites
-
You have opened a Lookup Table for editing.
-
You have created a data source.
-
You have added values for the Input and Output columns to the XML data source or the referenced database.
Proceed as follows
-
Display the Processing rule tab.
-
In the Source document area, open a suitable input message.
-
Open the context menu in the Replacement rules area and choose Add.
A new row is created.
-
Double-click in the new row in the column XPath to define an XPath query with which you can search for the affected value in the input message.
-
Select the appropriate data source.
-
Activate the checkboxes as desired to influence the behavior of the replacement rules.
Refer to Processing Rules Tab
Dialog Descriptions in the Lookup Table
Data sources Tab
On the Data sources tab, you manage the static XML data sources and dynamic DB data sources. The tab consists of the following areas:
-
Left area: list of all data sources
Displays a list of all existing data sources.
Refer to Creating a Data Source
-
Right area: data view
Displays the column structure of the data source selected in the left area.
Using the context menu, you can change the column structure of an XML data source or modify the table properties of a DB data source.
Adding, changing and moving values as well as importing table data is only possible for XML data sources here.
You change the values of a DB data source directly in the database table.
Refer to
-
Referencing Database Tables - Setting Table and Column Names
Add Data Source Dialog
In this dialog you select the type of the new data source and name the data source.
Add Data Source Dialog for Database Settings
(Only for the data source type DB data source)
In this dialog, you enter the connection data for the database.
Data source
-
Database
Select a Database Connector whose current connection parameters can be copied and used to establish the database connection. You can always change these values later.
Database connection
-
Default
Used to select a database type. Based on this selection, a database sample URL and the correct database driver are set in the following fields.
Select the option Custom if you do not want to set anything.
-
Database URL
If a selection has been made in the Default field, a correct sample URL for addressing the database is displayed.
To address a different database than the one specified as the Default, ignore the default and enter the correct URL of your database.
-
Database driver class
Name of the database driver class. This is automatically set correctly if a database has been selected as Default.
The appropriate database driver for the selected database must be installed.
Refer to Managing Libraries
-
User
Valid username for the selected database.
-
Password
Password used to authenticate the user with the database.
-
Trim string values from database
Deletes leading and trailing spaces in string values.
-
Set special coding
If this is selected, you can select a character string or add any character string.
-
Connection pooling
Opens the Dialog Database Manager, in which you configure the reuse of physical databases in order to optimize the time-consuming opening and closing of database connections.
-
Special connection parameters
Here you create parameters (e.g. timeouts, number of active connections, etc.) with which you configure the database configuration dependent on the respective database in use. You define the parameters as name-value pairs.
Table Properties Dialog
In this dialog you define the properties of the tables of a DB data source.
-
Table
For the selection of a table from a list. You must have already created the table in the database.
The names of the DB table; the input and output columns can be overwritten dynamically via variable mapping. To do so, select module property as the target and then enter the name of the module property to be overwritten:
DB: <table name>.SQL_Table DB: <table name>.SQL_ColIn DB: <table name>.SQL_ColOut -
DB Manager button
For creating a new table and the required columns.
Refer to Database Manager
|
Synonyms (if available) are listed in the Table selection list but not in the DB Manager dialog. |
Processing Rules Tab
On the Processing rules tab you create and configure processing rules. The tab consists of the following areas:
-
Rule
For editing, testing and checking the rule:
-
Execute test
For testing the processing rules. The result is displayed in the Result area. If all replacements have been executed correctly, you can save the module configuration and publish the module.
-
Check rule
For checking the validity of processing rules.
-
-
Replacement rules
For creating individual replacement rules.
In the table you assign a data source to each of the selected XML elements in the input message. You can specify the following information for each assignment:
-
XPath
To select an XML node, double-click in the XPath column in a table row. Click the
 button to open the XPath assistant.
 -
Data source
To select a data source, click in the field and select a table. You can assign each replacement rule its own data source.
-
Active
Displays whether the row is to be processed.
-
Case-sensitive
If selected, value replacements are case-sensitive in case of XML data sources.
-
Invert
Defines that the data source is to be used in inverse order, hence, in incoming messages the system searches for the values in the Output column of the data source and maps them to the values in the Input column.
-
-
Source document
For opening and displaying an example source input message.
To create the XPath entries in the Action list area, the input message is automatically opened in the XPath assistant.
-
Namespaces
This area displays the namespaces defined in the input message. You can add, change and delete namespace definitions.
-
Result
This area displays the result once you have tested the processing rules.