Using the Editor
Call up
INUBIT Workbench, Burger menu Tools > Editor
Overview
The INUBIT editor offers a user-friendly graphic interface for creating and editing text, HTML, XML, XML Schema and WSDL files.
You can load existing files from the file system, Repository, and clipboard or via a URL.
For generating input messages, you have access to the following structure explorers:
-
Database Explorer
-
Rule File Explorer
-
SAP Explorer
-
Web Services Explorer
Format-specific display
Each file format is automatically displayed in a suitable editor:
| File format | Editor | Refer to |
|---|---|---|
XML, XSLT |
XML editor |
|
XML Schema |
Schema editor |
|
XML, TXT, XSLT, CSS |
Text editor |
|
WSDL |
WSDL editor |
|
HTML |
HTML editor |
|
EDI (only with valid license) |
EDI editor |
XML Editor - Tree View
Call up
INUBIT Workbench, Burger menu Tools > Editor. Load XML file
Overview
The XML Editor displays the current XML file in a tree view. Underneath the root element, all elements are displayed according to their hierarchical position and order.
Functions in the tree view
All functions such as the adding of elements, are available via the context menu of the nodes.
Finding an Error in the XML Structure
If your XML file is displayed in the text view instead of the tree view and you cannot switch to the tree view, there is an error in the XML file.
You can have the type and position of the error determined.
Proceed as follows
-
First, press Ctrl+a and then Ctrl+c to select the entire defect XML structure and copy it to the clipboard
-
Generate a new blank XML file.
-
Show the text view.
-
Copy the defect XML structure to the file.
-
Switch to the tree view.
→ An error message is displayed, informing you about the type and position of the error.
Generating an XML Schema Template from an XML File
You can generate a template for an XML Schema from any XML file.
Proceed as follows
-
Load an XML file.
-
Open the
 menu and choose Generate XML Schema template.
→ The XML Schema is generated and displayed in the schema editor. You can use it as a template and add further information so that it also depicts XML files with other values or structural differences.
Comparing Documents: Displaying the Diff
You can compare the currently displayed file to a file in the file system, in the Repository or with the content of the clipboard.
Proceed as follows
-
Load an XML file.
-
Open the
menu and choose Compare. -
Choose whether the file is to be compared to a file in the file system, a file in the Repository or the content of the clipboard.
→ A dialog opens showing the differences between the two files.
Refer to Comparing XML Documents.
Searching with XPath Expressions
If the search with XPath expressions is active, you can also use XPath expressions for the search in the input field of the search.
Proceed as follows
-
Load an XML file.
-
Open the
menu and choose XPath search.
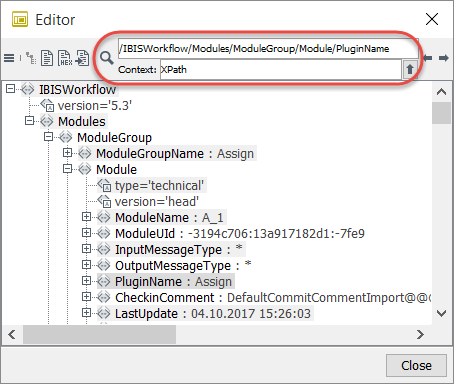
If you now click the Search button  , XPath is displayed in the input field.
Click the
, XPath is displayed in the input field.
Click the ![]() button next to the input field to open a second input field in which you can limit the context of your search:
button next to the input field to open a second input field in which you can limit the context of your search:
Schema Editor
Call up
INUBIT Workbench, Menu Tools > Editor. Load XML Schema file
Overview
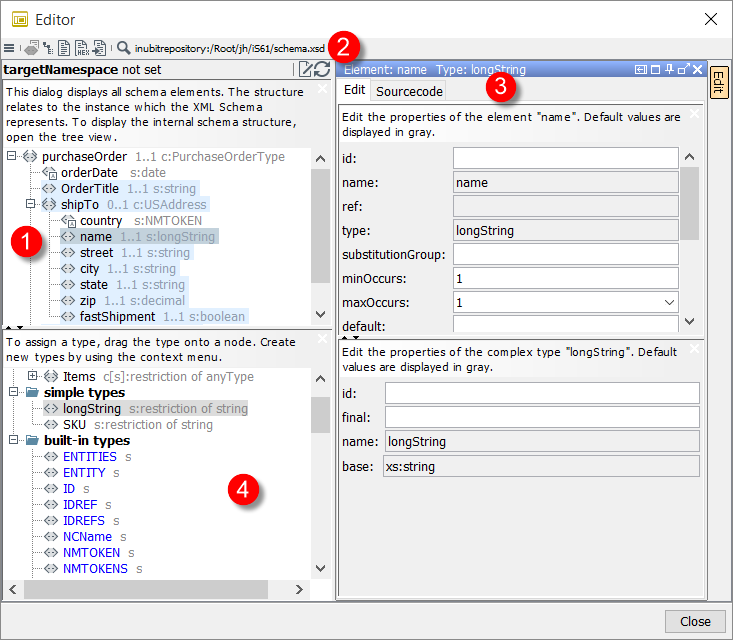
The XML Schema editor shows the simultaneous following views of the XML Schema in several areas that are coordinated with each other:
-
Structure of the instance document, element and attribute declarations,
-
Properties of the selected element or type
-
Actual source code of the selected element or type
-
Type definitions
For a basic introduction into XML Schema, refer to https://www.w3.org/TR/xmlschema-0/.
Functions in the Schema editor
You can use the following functions via the context menu of the element and type definitions:
-
Add root element
Adds another root element. You can specify the name and type of the element before it is inserted. -
Add element
Inserts a new element underneath the currently selected element. You can specify the name and type of the element before it is inserted. -
Add attribute
Adds an attribute to the currently selected element. You can specify the name and type of the attribute before it is inserted. -
Add enumeration
For adding an enumeration. You can use an enumeration to limit simple types (except for Boolean) to a clearly defined set of acceptable values. -
Edit
For changing the element name, type and frequency of occurrence. -
Remove
Deletes the current element. -
Children as sequence
Encapsulates the child elements of the selected element with asequenceelement and highlights the child elements in blue. In instance documents, the child elements must occur in the specified order. -
Children as choice
Encapsulates the child elements of the selected element with achoiceelement and highlights the child elements in green. Instance documents may contain only one of the child elements. -
Node > Top level
Generates a global element from the currently selected element directly underneath the Schema element. You can re-use global elements by referencing these e.g. via therefattribute: An element definition that references a global element makes it possible for the referenced element to occur in the instance document in the context of the referencing element declaration. -
Type > Top level
Refer to Generating a Type Definition from an Element Declaration. -
Expand all
Opens the structure so that all nodes are visible. -
Toggle this node as root node
Shows the selected node as the only root node; all other root nodes are hidden. -
Show all root nodes
(Only available if editing is deactivated)
Shows all available root nodes. -
Up/down
Changes the order of the selected element. -
Always generate xsi:type attributes in instance
(Only available if editing is deactivated)
If selected, every instance of the element receives the attributexsi:type. There, it is indicated that the element was derived and from which complex type it was derived.
Changing Schema Properties
Proceed as follows
-
In the Schema Editor, click the Schema properties button:
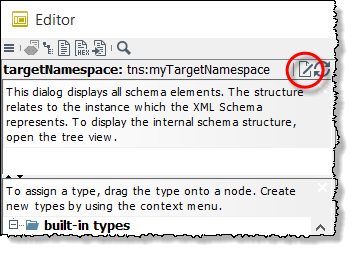
A dialog opens.
-
Fill in the form:
Properties Description Possible values attributeFormDefault
Specifies if local attribute definitions are by default qualified by a namespace.
qualified, unqualified, [not set=unqualified].
elementFormDefault
Specifies if local element definitions are by default qualified by a namespace.
qualified, unqualified, [not set=unqualified]
blockDefault
Default value of
blockattribute ofxs:elementandxs:complexType.#all, extension, restriction, substitution, [Empty].
finalDefault
Default value of
final`attribute of `xs:elementandxs:complexType.#all, restriction, extension, [Empty].
if
Schema ID
Any ID.
version
Version of the Schema.
Any characters.
targetNamespace
Address of the Schema where the element types and attributes of the target namespace are defined.
Any URI.
targetNamespacePrefix
Prefix of the target namespace.
Any characters.
-
Close the dialog by clicking OK.
Changing the Type of Element and Attribute Declarations
Proceed as follows
-
Drag the required type to the element or attribute declaration. A context menu opens.
-
Choose Set type.
→ The type is changed.
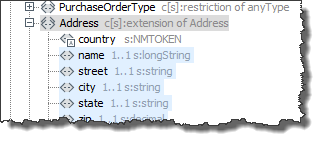
Deriving a Complex Type by Means of Extension
You can create a new complex type by creating a derivation from an existing complex or simply type.
Example
The following complex types exist:
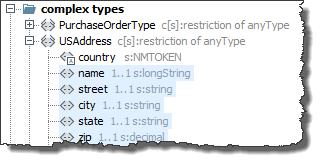
-
Addressused as basic type. -
Address_DEderived from the basic type and extended in the process.
The result looks like this:
Proceed as follows
-
Drag the basic type to the complex type that is supposed to be extended. A context menu opens.
-
Choose Use type as basis for target.
→ The content model of the complex type now contains the content model of the basic type in addition to the already existing content model. The two content models are child elements of a sequence group.
Generating a Type Definition from an Element Declaration
Example
A complex type is derived from the complex element declaration <Book>:
-
Element declaration
<Book>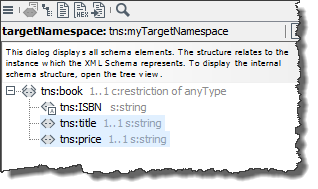
-
Complex type:
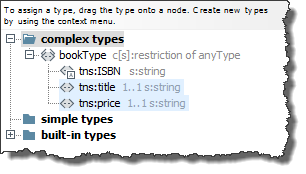
Proceed as follows
-
Select the declaration of the complex element.
-
Open the context menu and choose Type > Top level. A dialog opens.
-
Enter the name of the new type.
-
Choose OK to close the dialog.
→ A new complex type is generated with the specified name.
Text Editor
Call up
INUBIT Workbench, Menu Tools > Editor.
Overview
The Text Editor displays the current file as text.
If the displayed file is an XML file, you can insert the XML elements according to their positions in the hierarchy.
Functions in the text editor
Refer to
Choosing the Text Encoding
In Text view, you can choose the encoding.
Proceed as follows
-
In the Editor window, choose the Text view
 .
. -
Click on the text encoding icon
 on the top right of the Editor window.
 -
Choose the suitable text encoding.
→ A confirmation dialog is displayed:Changing the encoding might lead to broken characters. This cannot be undone.
-
Click OK to change the encoding.
→ The encoding is changed.
Aligning Text
If you are displaying XML files in the text editor, you can align the displayed text to improve readability.
Proceed as follows
Open the context menu of the work area and choose Align text.
Using Syntax Highlighting
In the Text Editor, you can use syntax highlighting for XML, JavaScript, Java, HTML, CSS, SQL or simple text files. In doing so, predefined words or characters are recognized and displayed in different colors to make them easier to detect.
Proceed as follows
-
In the Toolbar, click the info-button.
-
Choose the mime type that suits the format of your file.
→ The content of the Text Editor is highlighted according to the selected mime type.