OpenOffice Connector
Usage
With the OpenOffice Connector, you can automatically edit and convert Microsoft Word/OpenOffice Writer documents and print them on remote computers (Remote Printing Service) and maintain document templates with Office, e.g. for business cards or bills.
You can automatically convert Microsoft Excel and OpenOffice Calc documents into other formats.
Refer to XML schema as template for input messages.
Requirements
-
An OpenOffice.org installation of at least 3.3.0 can be reached from the INUBIT software.
-
OpenOffice has been started in the server mode:
For this, you go to the OpenOffice program directory
<OpenOfficeInstallDir>/App/openoffice/programand execute the following command:soffice[.exe] -headless -nofirststartwizard‑accept="socket,host=localhost,port=8100;urp;StarOffice.Service"
Principles
The OpenOffice Connector expects an XML input message with the following elements:
-
Base64-coded input document
-
Output filter (optional)
-
Operations (change, convert or print) that are to be carried out on the document.
The OpenOffice Connector opens the specified input document and carries out the operations. It then creates the target document in the specified format or sends it to the configured printer.
XML schema as template for input messages
You create the input messages for the OpenOffice Connector on the basis of the supplied XML schema OOC.xsd with an XSLT Converter.
-
OOWriter node: Attributes for Word/Writer documents
-
OOCalc node: Attributes for Excel/Calc documents
You will find the XML schema in the Repository in the following directory:
/Global/System/Mapping Templates/OpenOffice Connector
Creating an Example Workflow for the OpenOffice Connector
You can use the following example workflow to edit, convert or print Word and Writer documents, depending on the configuration of the XSLT Converter and the File Connector:

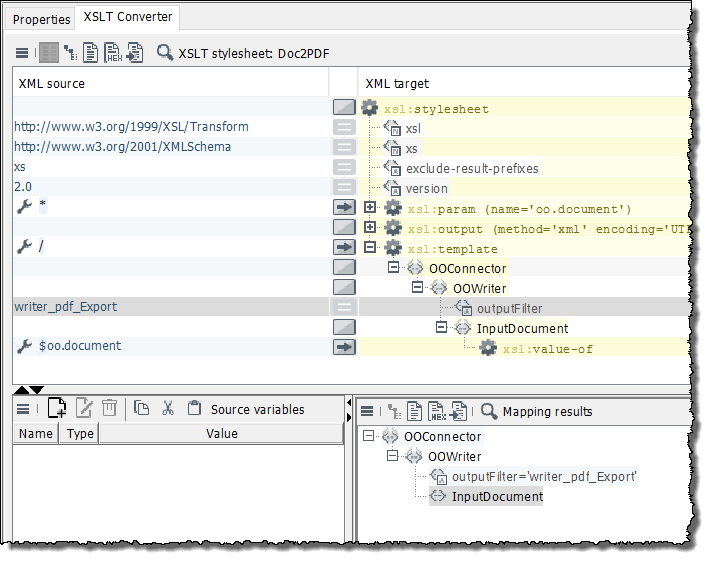
Converting the Document into the PDF Format Using the OpenOffice Connector
Proceed as follows
-
Create an input message in an XSLT Converter.
-
Activate the Ignore input message checkbox in the XSLT Converter Properties dialog.
-
Modify the XSLT stylesheet so that the message that is a result of the mapping has the following structure:
-
Assign the value writer_pdf_Export to the element outputFilter in the XSLT stylesheet.
-
In the example workflow, replace the XSLT Converter with the XSLT Converter you have just created and adjusted.
-
If applicable, adjust the file name and the directory in the File Connector on the page File to be written.
-
Set the start point before the assign module at the start of the example workflow.
-
Start the workflow with the document to be converted.
-
Check whether the document was converted correctly.
Editing a Document Using the OpenOffice Connector
Proceed as follows
-
Create a Word or Writer document with multiple bookmarks, e.g. for an address.
-
Create an input message with an XSLT Converter.
-
Activate the Ignore input message checkbox on the XSLT Converter Properties page.
-
Modify the XSLT stylesheet so that the message that is a result of the mapping has the following structure:
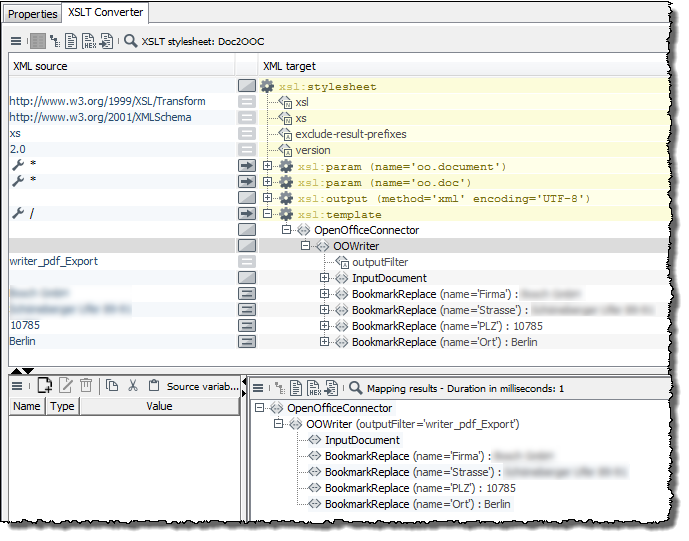
Depending on the type of changes desired, you can omit individual BookmarkReplace elements or add other elements in accordance with the schema file.
Refer to Principles section XML schema as template for input messages.
-
In the example workflow, replace the XSLT Converter with the XSLT Converter created in step 2.
-
If applicable, adjust the file name and the directory in the File Connector on the page File to be written.
-
Set the start point before the assign module at the start of the workflow.
-
Start the workflow with the document to be edited.
-
Check whether the document was edited correctly.
Printing a Document
Proceed as follows
-
Create an assign module to code the input document Base64.
-
Create an input message with an XSLT Converter.
-
Activate the Ignore input message checkbox on the XSLT Converter Properties page.
-
Modify the XSLT stylesheet so that the message that is a result of the mapping has the following structure:
The only attributes permitted are the name of the printer in the attribute printerName and the page(s) to be printed in the attribute pages.
You use a comma to separate the individual pages to be printed. You put a hyphen between the first and last pages of a print section.
-
Connect the assign module to the XSLT Converter.
-
Create an OpenOffice Connector.
-
Connect the XSLT Converter with the OpenOffice Connector.
-
Set the start point before the assign module.
-
Start the workflow with the document to be printed.
-
Check whether the document was printed correctly.
Basic Settings Dialog in the OpenOffice Connector
In this dialog, you have the following options:
OpenOffice Server
-
Server name
IP address or hostname of the system on which OpenOffice is installed.
-
Port
Port via which the OpenOffice Connector is accessed.
-
Standard
Resets the port to the standard value 8100.
Connection test
-
Test connection
For testing whether the connection can be successfully established using your configuration.