Providing a Web Service
Overview
In the INUBIT software, a Web service provider is modeled by using a Web Services Input Listener Connector in a Technical Workflow. The Web Services Input Listener Connector offers the functionality of an underlying Technical Workflow externally as a Web service.
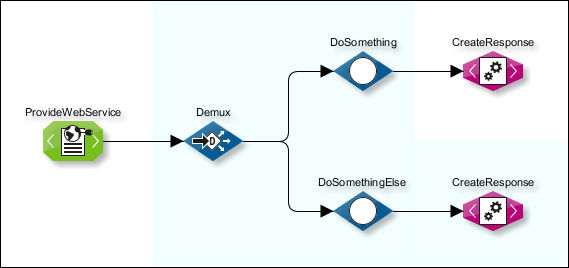
The following example illustrates the essential modules for a Web service provider (from left to right):
-
Web Services Listener Connector ProvideWebService
The Web Services Input Listener Connector provides amongst others the operation
SayHelloand waits for SOAP requests from other Web services.As soon as a SOAP request arrives, it is passed on to the following module, the Demultiplexer, and the workflow is started.
-
Demultiplexer Demux (optional)
With one SOAP request, exactly one operation of a Web service can be called, although the Web service offers several operations.
You use a Demultiplexer to specify on basis of the XML element contained in the request which operation is to be executed.
The Demultiplexer passes on the request into the appropriate branch of the workflow where the request is processed further. In the example above, the Empty modules DoSomething and DoSomethingElse are dummy modules representing additional processing modules.
-
XSLT Converter CreateResponse
The processing result, the SOAP response, is passed on by the last module in the Technical Workflow in a Web service-compliant form to the requesting Web service. This SOAP response is generated by using an XSLT Converter.
Configure a Web Services Input Listener Connector
Proceed as follows
-
Create a Technical Workflow.
-
Add a Web Services Input Listener Connector. During properties configuration, specify that the definition of the called Web service is stored with the module.
-
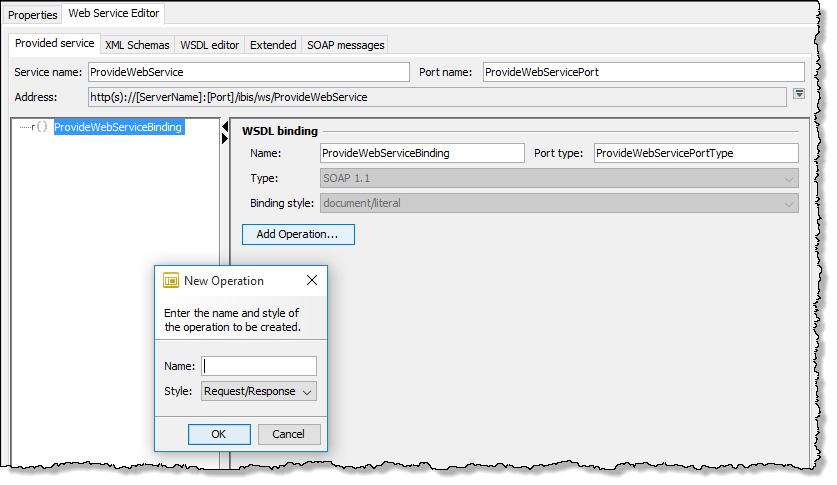
Refer to Dialog – Provided Web Service
Open the context menu of the connector and select Edit to display the Web Service Editor.
-
Click Add Operation. The following dialog opens:
-
Assign a name to the operation, e.g. SayHello.
-
In the Style field, select Request/Response. This specifies that your Web service returns a SOAP response to the requesting Web service, instead of only processing the request.
-
Click OK to close the dialog.
After closing the dialog, your specifications are converted into the WSDL of your Web service which defines e.g. the structures of the SOAP Request and Response.
You can display the WSDL in the WSDL editor tab and the SOAP Requests/Responses in the SOAP messages tab.
-
Publish the connector.
Create SOAP Response
Proceed as follows
-
Create an XSLT Converter, add it to the Technical Workflow and connect it to the Web Services Input Listener Connector.
-
Open the XSLT Converter for editing.
The result of the workflow execution must be structured in a WSDL-compliant form as a SOAP Response before it can be passed back to the requesting Web service.
-
In this example, no processing took place, therefore you only create an output mapping. To do this, click
 in the XML target file area and select Open from > Web Services Explorer.
A dialog opens.
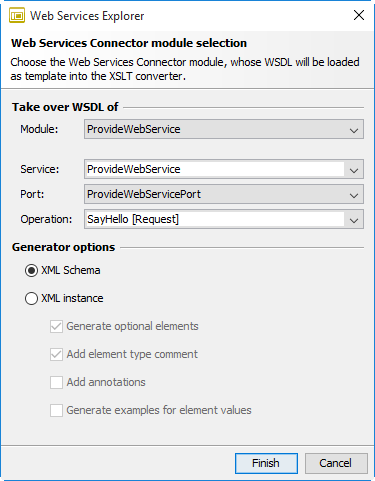
in the XML target file area and select Open from > Web Services Explorer.
A dialog opens. -
In the Module field, select your Web Services Input Listener and in the Operation field, select SayHello [Response]:
-
Click Finish. The structure of the SOAP message is displayed.
-
Drag the root element of the generated SOAP message in the upper XML target area on to the
xsl:templateelement and adapt the value of the `sayHelloResponse `element: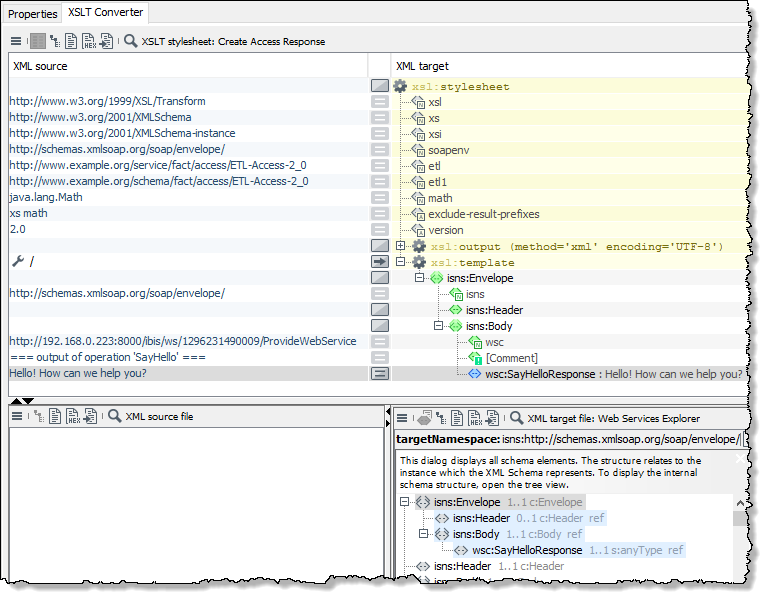
-
Publish the XSLT Converter.
-
Testing
Create a second Web service that calls your just newly created Web service.
Refer to Calling a Web Service
-
Publish the Technical Workflow.
You can make the created Web service available to other users by means of a UDDI registry.