HTTP Connector
Usage
Depending on its configuration, an HTTP Connector carries out the following tasks:
-
Input Listener Connector
Acts as HTTP server and waits for client requests. This connector type can communicate in a synchronous or asynchronous mode:
-
Synchronous mode
An incoming request starts the workflow behind the Input Listener Connector. After the workflow execution the Input Listener Connector sends back the output message of the last module in the workflow to the client. The HTTP status in the Response can be set in the workflow by using the module variable
httpstatus. -
Asynchronous mode
Upon receiving a request the Input Listener sends an HTTP status message back to the connector the request came from. Then, the workflow is started with the request. The workflow result is not returned. All parameters and headers which were transferred in a request are available as variables during workflow execution.
-
-
Input Connector
Acts as client and sends GET requests to an HTTP server to demand data. Parameters are handed over to the query part of the URL. The message content of the response is transferred as the output message of the module to the workflow. With status code < 200 or >= 300, an error is thrown.
-
Medium/Output Connector
These connector types send POST requests as clients to an HTTP server. Parameters and the input messages are handed over in the request body. If the response of HTTP server is a status code < 200 or >= 300, an error is thrown. Other status codes are issued by the Medium/Output Connector as output messages.
The HTTP connector supports the HTTP and HTTPs protocols.
Defining and Displaying HTTP Connector Parameters
Defining parameters
Parameters are any name/value pairs and are passed on as follows, depending on the connector type:
| Connector type | Method | Parameter passing |
|---|---|---|
Input Connector |
GET |
As parameter of the server URL, e.g. https://<server>:<port>/ibis/servlet/IBISHTTPUploadServlet/HTTPinputCon?PAR1=1234&PAR2=abc + Refer to Dialog HTTP Connector Properties |
Medium/Output Connector |
POST |
As parameter in the request body, e.g. Par1=1234&Par2=abc. + You define these parameters when creating or editing a Medium or Output Connector. + Refer to Dialog HTTP Connector Properties. |
All parameters are available as variables during workflow execution and can be changed dynamically.
The variables are named according to the pattern: <Key>=<Value>.
You can modify these variables dynamically by using the variables mapping.
Refer to Workflow Variables and Mappings
Displaying parameters
-
Input Connector
You can display the parameters
par1="123"andpar2="abc", which were passed on by an HTTP Input Connector in a GET request to an HTTP Input Listener, at the watch point before the HTTP Input Listener: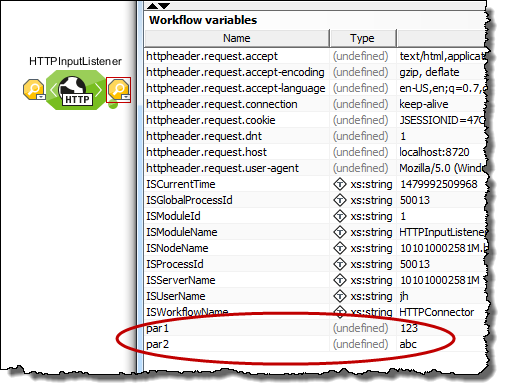
-
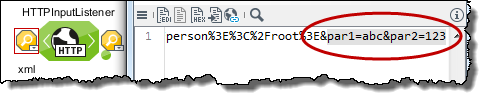
Medium/Output Connector
Parameters which were passed on by an HTTP Output Connector, to an HTTP Input Listener, are displayed at the watch point before the HTTP Input Listener as well:
Defining and Displaying Headers
Displaying headers
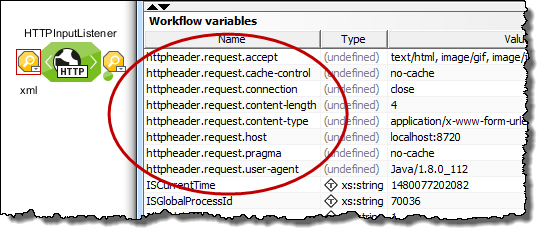
All headers are available as variables in the workflow:
-
Request headers can be displayed at the watch point before an HTTP Input Listener Connector:
-
Response headers can be displayed at the watch point behind an HTTP Output Connector:

Defining headers
You can define request and response headers when creating and editing an HTTP Connector.
Refer to Dialog HTTP Connector Properties:
-
Input Listener Connector: HTTP header configuration
-
Input Connector: HTTP header configuration
-
Medium/Output Connector: HTTP post configuration
Setting and overwriting headers dynamically
By using the variables mapping you can dynamically overwrite headers and set new headers.
-
For overwriting the response headers in a workflow with a HTTP Listener:
Set the
httpheader.[headerName]workflow variables somewhere in the workflow, but before the output is returned as the response. -
For overwriting the request headers for an outgoing HTTP Connector request:
Overwrite the
httpheader.[headerName]module properties of the HTTP Connector.
Proceed as follows
Define a mapping rule according to the following pattern: Source value > Target value=httpheader.<headerName>
Example:
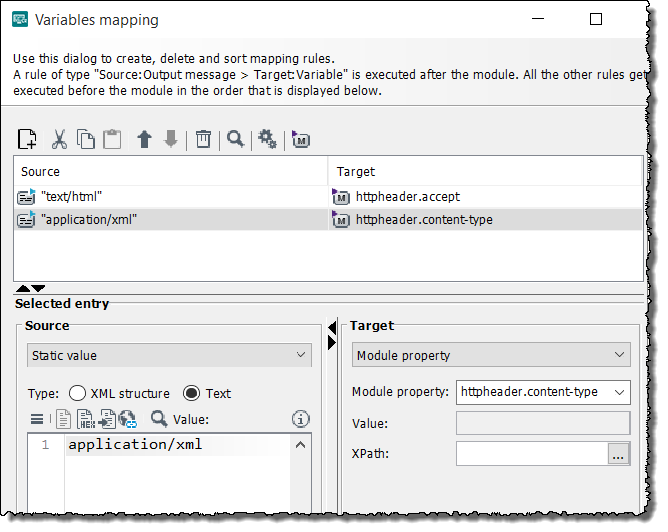
Refer to Workflow Variables and Mappings
Dialog HTTP Connector Properties
This dialog offers the following options:
|
For Listener Connector, open the System Connector Properties tab and select the Wait for data input (Listener connector) option. |
Base configuration
-
Server URL
-
Input Listener Connector:
URL of the Input Listener waiting for requests. The URL is generated automatically according to the following pattern:
https://<server>:<port>/ibis/servlet/IBISHTTPUploadServlet/NameOfTheInputListenersThe part behind
/IBISHTTPUploadServlet/can be customized and can include additional path components, e.g./IBISHTTPUploadServlet/X/Y/NameOfTheInputListenersor/IBISHTTPUploadServlet/X/NameOfTheInputListeners/Y.Share the server URL with anyone who sends messages to the HTTP listener for processing.
-
-
Input Connector:
URL of the server or HTTP Input Listener which calls the Input Connector.
-
Medium/Output Connector:
URL of the server the connector sends its POST request to, for example the address of an HTTP input listener.
-
SSL (button)
(not available for an input listener connector)
For securing the communication by means of SSL, refer to Dialog SSL Configuration.
Authentication Required
For Input listener connector.
Select this option if the server requires an authentication. If selected, the following data will be available:
-
Use static login data
-
Scheme
-
Basic
Username and password are required and transmitted unencrypted.
-
-
Username: Username for the authentication
-
Password: Password for the authentication
-
-
Select from Credentials Manager
For authentication, you can also use credentials managed by the Credentials Manager. Refer to Using the Credentials Manager for Authentication.
-
Use process User
This option is only available if a portal is installed, properly configured for INUBIT, and both the portal server and the process user server are configured correctly in the INUBIT Workbench.
-
Use Process Engine user (password from the server configuration)
Uses the internal Process Engine user (
inubitISPortalUser@@@intern) and the password set in the property Administration > Server > Password for the Process Engine on the Configuration tab. -
Use Kerberos authentication (for medium and output connectors only)
Activate this checkbox to use the Kerberos protocol to authenticate. Configure the following parameters:
-
User name
Username to authenticate
-
Password
Password of the user to authenticate
-
Kerberos conf file path
Click the icon
 to open a dialog to choose the Kerberos configuration file.
An example file is available in the INUBIT Repository at:
/Global/System/Mapping Templates/HTTPConnector/krb5.conf.To use this file as a template, copy it as administrator
rootto a directory outside the Global directory hierarchy and adjust it accordingly. -
Login conf file path
Click the icon
to open a dialog to choose the login configuration file.An example file is available in the INUBIT Repository at:
/Global/System/Mapping Templates/HTTPConnector/login.confTo use this file as a template, copy it as administrator
rootto a directory outside the Global directory hierarchy and adjust it accordingly.To load different
krb5.conffiles without restarting the Process Engine, make sure thatrefreshKrb5Config=trueis set in thelogin.conffile.By default,
refreshKrb5Configis set totrue. -
Login module name
Name of the login module. Use the same module name as provided in
login.conffile. -
Enable Kerberos debug
Activate this checkbox to analyze errors or malfunctions.
-
Use Authentication
For non-listener connector.
Select this option if the server requires an authentication. If selected, the following data will be available:
-
Use the following login data
-
Scheme
-
Basic
Username and password are required and transmitted unencrypted.
Use Basic authentication only if the connection between client and server can be classified as secure.
-
Digest
Username and password are required. The password is transmitted in encrypted form. You can use the Digest authentication to encrypt several parameters, including randomly generated values.
-
NTLM
Username and password are required. The password is transmitted in encrypted form. The NTLM authentication can be used for encrypting several parameters, including randomly generated values.
-
-
Use static login data
-
Username: Username for the authentication
-
Password: Password for the authentication
-
-
-
Select from Credentials Manager
For authentication, you can also use credentials managed by the Credentials Manager. Refer to Using the Credentials Manager for Authentication.
-
Domain: Domain name indicating where the NTLM server is running
This option is only enabled if the NTLM authentication is selected.
-
Use authentication for accessing the Process Engine (password from the server configuration)
Use this option to access the INUBIT Process Engine.
Authorization
(only for medium and output connector)
-
Use OAuth2 Authorization
Activate this option to use the OAuth2 authorization.
If the Use OAuth2 Authorization option is selected, OAuth2 authorization will have priority over the settings in the Use Authentication section.
-
Grant Type
-
Client Credentials: Recommended for INUBIT because no user interaction is required.
-
Password Credentials
-
Custom: Select this option to configure any other grant type (e.g. refresh token flow, implicit flow)
-
-
Access Token URL
Insert the URL of the OAuth server. In addition, you can specify whether HTTP request should be sent via GET or POST.
-
-
Parameters
Add the parameters the selected grant type requires. You can find out which of these are in the documentation of the OAuth server you are using.
The parameter table can hold any number of entries.
All parameters configured in the module wizard are available as module properties with the prefix
OAUTH_PROPERTYfor use in the variable mapping.Variable mapping can only be used to overwrite properties that were previously set in the wizard. If further parameters are to be set via variable mapping, they must first be entered in the table via the module wizard (with empty or placeholder value).
Connection test
For non-listener connector.
-
Test connection
For testing whether the connection can be successfully established using your configuration.
HTTP header configuration
HTTP headers are used for transferring information, for example, file size, HTTP server, and user agent or MIME type between client and HTTP server.
The Header listing… button opens a dialog for manually defining headers as name/value pairs.
For information about headers, refer to HTTP header specification.
|
In case a request already contains headers of the same name, these are overwritten with the values defined in the dialog. |
Encoding
-
Encode/decode Base64 (important for binary data)
When activated, then incoming data is Base64-encoded before sending it. This option is useful for receiving binary data.
Conversion
For Input listener connector.
-
AJAX/XML conversion
When activated, then incoming AJAX requests generated by a Task Generator are converted to XML, as it is available in the output mapping.
If not activated, these requests are handed over as byte stream.
-
Group input fields
When activated, all text fields in the input message having the same index are wrapped by a Group element. This allows to iterate over groups of text fields using
xsl:for-eachin a subsequent XSLT Converter.Example:
IN: list of text fields Out: List of groups First name.1
<Group>
  <Firstname/>
  <Surname/>
  <Street/>
  <City/>
</Group>
Surname.1
Street.1
City.1
First name.2
<Group>
  <Firstname/>
  <Surname/>
  <Street/>
  <City/>
</Group>
Surname.2
Street.2
City.2
Text fields have an index when they were generated by copying using the JavaScript function copyComponentIS().
This function is available in all forms of the Task Generator.
-
Convert HTTP-InputMessage to XML
When activated, incoming HTTP or Multi-part/form requests (incl. header etc.) are converted to XML.
When not activated, the body of the http request is written into the output message without being converted. Multipart MIMEs must then be parsed.
Synchronous HTTP answer
For Input listener connector.
-
Activate
If activated, the Input Listener receives the request, starts the workflow, and waits for its result. The result is the output message of the last module in the workflow.
As soon as the result is available, the Input Listener returns it to the module that called the Input Listener, together with a status message.
If not activated, the Input Listener receives a request, returns the status message immediately, and starts the workflow. No result is returned.
-
Return error message
If activated, an exception or a detailed error message is returned to the client if an internal server error (code:
500) occurs.If not activated, only the error code
500is returned without any additional information.
Output formatting as HTTP Post request
For Medium/Output connector.
Select this option to pass on parameters. If selected, input messages in the request body are URL-encoded and formatted as if they were sent by a browser via an HTML form, for example:

-
Post field name for data
You can replace the POST field
xml(s. fig. above) by an arbitrary name, for example,Input data:
-
Add HTTP post value pairs
Opens a dialog where you can define parameters as name/value pairs. The parameters are added at the end of the request body, for example: