Asynchronous Web Services
Usage
In an asynchronous Web Service, the sending of the request message and the receipt of the response message are uncoupled. The two messages are sent using separate HTTP connections. Thus, the processing of the request can take longer without the connection being terminated due to a timeout.
Asynchronous Web Services are therefore suitable in particular for long-running services.
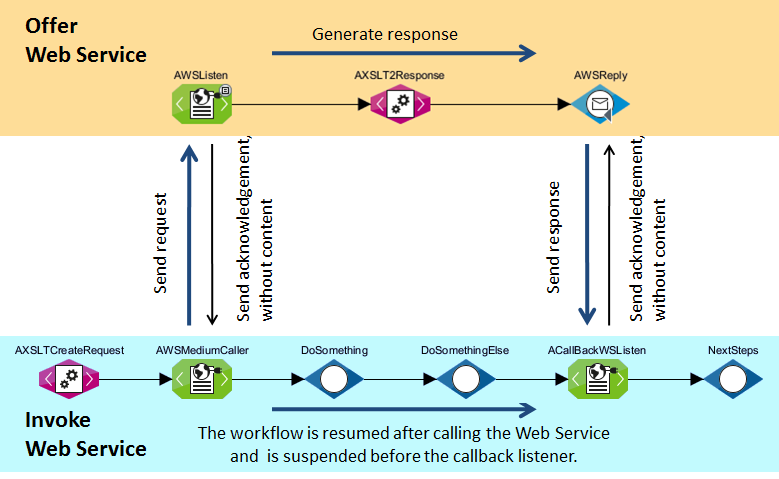
The communication process for an asynchronous service call is outlined below. In this example, both communication partners are implemented using Technical Workflows. Of course, this does not have to be the case in real life.
Functional principle
A workflow that requests an asynchronous Web Service is processed up to a callback listener. The workflow of the called Web Service generates the response in the meantime. A Reply module at the end of the called workflow sends the response to the calling workflow. The callback listener in the calling workflow receives the response and continues the workflow.
WS Addressing
Prerequisites
-
To call an asynchronous Web Service with any Web Service client, the client must support WS addressing and use a non-anonymous reply address (
wsa:ReplyTo). -
An asynchronous Web Service that expects a non-anonymous reply address (
wsa:ReplyTo) must be called using a medium Web Service Connector.
Offering an Asynchronous Web Service
A workflow that is supposed to offer an asynchronous Web Service must consist of the following modules at minimum:
-
Asynchronous Web Service listener
-
XSLT Converter for creating the response
-
Reply module for sending the response to the callback listener
Calling an Asynchronous Web Service
A workflow that is supposed to request an asynchronous Web Service must consist of the following modules at minimum:
-
Module for creating the call, e.g. an XSLT Converter or variable mapping
-
Asynchronous Web Service medium connector for sending the call
Web Services callback listener for asynchronous receiving of the response sent by the called Web Services. You can insert any modules you wish between the calling Web Services Connector and the Web Services callback listener.
|
You must create the modules of the calling and the called Web Service in two different workflows. |
Securing Web Services Providers by a Security Token Service
This section explains how you secure a Web services provider by a Security Token Service (STS).
|
Securing a Web Services Providers by a Security Token Service is only possible in Single Mode. |
Prerequisites
-
The Web service provider that is to be secured was generated using the INUBIT software. Its URL is known.
-
The following data is available:
-
A keystore with the private key of the Web service to be secured,
-
a truststore with the public key of the STS.
-
Proceed as follows
-
Open the Web Services Connector for editing.
-
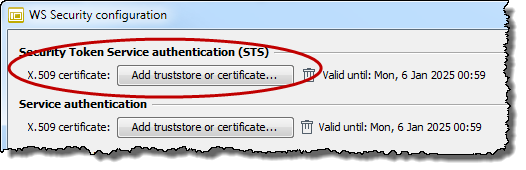
In the Extended tab in the W3C Standards area, activate the WS-Security option and click the Settings button.
The WS-Security configuration dialog opens.
-
In the Service authentication area, enter the keystore password and import the keystore.
-
In the Consumer authentication area, under Security mechanism, choose the Security Token Service issued Token with service certificate (STS) option.
-
In the Consumer authentication area, in the STS address field, enter the URL of the STS that is supposed to secure your Web service.
-
Specify how the communication of your Web service provider with the STS is supposed to be secured:
Choose X.509 and import the truststore containing the public key of the STS.
The result looks like this:
-
Click Finish.
-
Publish and activate the module as well as the relevant workflow, if it exists.
As the result of this configuration, the WSDL security policies of the Web service provider describe how and on which STS consumers have to authenticate.
Creating Key Pairs for WS Security
Usage
-
Securing a Web service provider without a Security Token Service
Refer to Creating Key Pairs for WS Trust
-
Authenticating a client with a Web service provider without a Security Token Service
Authentication is performed once per session via a self- or externally-signed key pair directly in the Web service.
Creating a Self-Signed Service Key Pair
Use
Authentication of a client on a Security Token Service-protected Web service
Proceed as follows
-
Generate a key pair with the extension
SubjectKeyIdentifier.Set the options according to your requirements:
openssl req -x509 -days 9999 -nodes -newkey rsa:2048 -subj "/C=myCountry/ST=myState/L=myCity/O=myOrganization/OU=myDepartment/CN=myServerName" ‑keyout SecuredService.key -out SecuredService.crt -extensions v3_ca -
Convert the key pair generated in step 1 into the PKCS12 format in order to enable import into the Java keystore. You must assign a password.
openssl pkcs12 -export -in SecuredService.crt -inkey SecuredService.key ‑out SecuredService.p12 -
Import the PKCS12 file into the Java keystore.
keytool -importkeystore -srckeystore SecuredService.p12 ‑srcstoretype pkcs12 -srcalias 1 -srcstorepass INUBIT ‑destkeystore SecuredService.keystore.jks -destalias tomcat ‑deststorepass <yourPassword>
Calling an STS-Secured Web Service Provider
This section explains how you configure a Web service consumer so that it can call an STS-secured Web service provider.
Prerequisites
-
You need a truststore with the public key of the STS or its certificate.
-
Both Web services and the STS are implemented in the INUBIT software.
|
To call a Web service that is secured using an STS of the INUBIT software with an external consumer, configure its security settings according to the provider instructions. |
Proceed as follows
-
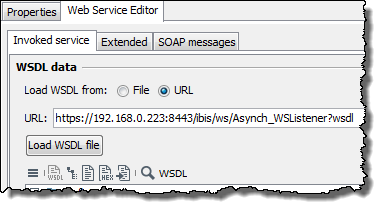
Open the Web Services Connector of your Web Service Consumer for editing.
-
In the Invoked service tab, enter the URL under which the WSDL of the STS-secured Web service is available:
-
Load the WSDL.
-
In the Extended tab, in the W3C Standards area, click the WS Security button. The WS-Security configuration dialog opens.
-
Import the truststore of the STS or its certificate.
The public key of the STS contained herein is required to read the token signed by the STS. With the signature, the STS ensures that the token was actually issued by the STS.
After the successful import, the validity of the key is displayed.
-
In the Consumer authentication area, specify how your consumer is supposed to authenticate with the STS to secure communication with the STS.
The consumer sends this username/password combination to the STS as part of its security token request.
In addition, you can specify an X.509 keystore for extra security. In this case you must specify the valid password and the alias of a key pair contained in the keystore.
-
Click Finish.
-
Publish and activate the workflow
Creating a Self-Signed Key Pair
Proceed as follows
-
Generate a key pair with the extension
SubjectKeyIdentifier.Set the options according to your requirements:
openssl req -x509 -days 365 -nodes -newkey rsa:2048 -subj "/C=myCountry/ST=myState/L=myCity/O=myOrganization/OU=myDepartment/CN=myServerName" ‑keyout selfsigned.key -out selfsigned.crt -extensions v3_ca -
Convert the key pair generated in step 1 into the PKCS12 format in order to enable import into the Java keystore. You must assign a password.
openssl pkcs12 -export -in selfsigned.crt ‑inkey selfsigned.key ‑out selfsigned.p12 -
Import the PKCS12 file into the Java keystore.
keytool -importkeystore -srckeystore selfsigned.p12 -srcstoretype pkcs12 ‑srcalias 1 -srcstorepass INUBIT -destkeystore selfsigned.keystore.jks ‑destalias tomcat -deststorepass <yourPassword> -
Generate a JKS truststore with the service certificate. Enter the password assigned in step 2 as the password.
keytool -importcert -keystore selfsigned.truststore.jks -file selfsigned.crt -alias tomcat -storepass <yourPassword>
Creating an Externally Signed Key Pair
Proceed as follows
-
Generate a keystore with an automatically generated certificate.
Set the options according to your requirements:
keytool -genkey -keyalg RSA -dname "CN=myServerName, O=myCompany IS, C=de" -validity 999 -keystore private.keystore -keypass <yourPassword> ‑storepass <yourPassword> -alias tomcat -
Export the certification request using the private key.
keytool -certreq -v -alias tomcat -keystore private.keystore -storepass <yourPassword> -file server_request.csr -
Transmit the certification request to one of the certificate authorities (CA), e.g. D-Trust. The certificate authority returns a signed certificate for the Web service (in this case
CAcert.cer) and your own public key (in this casepublic.cer). -
List all information on the service certificate. 509v3 and SubjectKeyIdentifier must be displayed.
keytool -printcert -v -file public.cer -
Import the CA certificate to the private keystore.
keytool -import -trustcacerts -alias cacert -file CAcert.crt -keystore private.keystore -storepass <yourPassword> -
Import the public key to the private keystore.
keytool -import -trustcacerts -alias tomcat -file public.cer ‑keystore private.keystore -storepass <yourPassword> -
Generate the truststore with the public key.
keytool -import -alias tomcat -file public.cer -keystore public.keystore ‑storepass <yourPassword> -
Import the CA certificate to the truststore to check the certificate chain.
keytool -import -alias cacert -file CAcert.crt -keystore public.keystore ‑storepass <yourPassword>
Creating Key Pairs for WS Trust
|
WS Trust Web Services Security is only possible in Single Mode. |
Usage
Securing (generally) multiple Web services through a Security Token Service (STS) with two key pairs
-
Key for authentication of a client on the STS server
-
Key for authentication of a client on the Web services
How it works
In the initial call of a Web service, the client authenticates itself first on the STS.
After successful authentication, the calling service receives the public key of the Web service from the STS, which enables access to the Web service.
Authentication on the STS is done with WS-Secure-Conversation just once.
To enable access to multiple Web services with a one-time authentication on the STS, all Web services in the group must use the same key pair.
Creating Self-Signed Security Token Service/STS Key Pair
Use
Authentication of a client on a Security Token Service
Proceed as follows
-
Generate a key pair with the extension
SubjectKeyIdentifier.Set the options according to your requirements:
openssl req -x509 -days 9999 -nodes -newkey rsa:2048 -subj "/C=myCountry/ST=myState/L=myCity/O=myOrganization/OU=myDepartment/CN=myServerName" ‑keyout STS.key -out STS.crt -extensions v3_ca -
Convert the key pair generated in step 1 into the PKCS12 format in order to enable import into the Java keystore. You must assign a password.
openssl pkcs12 -export -in STS.crt -inkey STS.key -out STS.p12 -
Import the PKCS12 file into the Java keystore.
keytool -importkeystore -srckeystore STS.p12 -srcstoretype pkcs12 ‑srcalias 1 -srcstorepass <yourPassword> -destkeystore STS.keystore.jks ‑destalias tomcat -deststorepass <yourPassword>
Generate a JKS truststore with the service certificate. Enter the password assigned in step 2 as the password.
keytool -importcert -keystore STS.truststore.jks -file STS.crt ‑alias tomcat -storepass inubitWS Correlation
Prerequisites
-
When calling an asynchronous web service using a CorrelationSet, a request ID must be set by the calling Web Service Connector or the called web service. The request ID serves to identify the calling process when sending the reply later on.
-
After the reply to the request has been generated, the called web service must sent the request ID together with the reply to the calling Workflow.
-
The request ID must be verified by the call back listener to ensure that the reply is assigned to the workflow with the corresponding process ID.
-
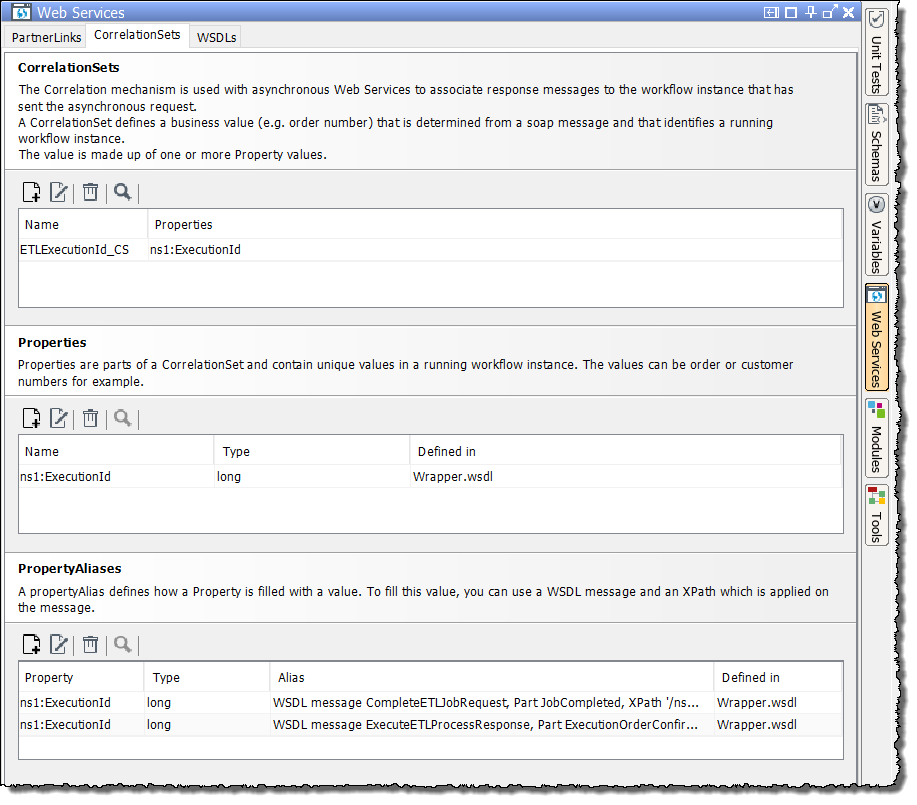
A CorrelationSet has been defined to set and verify the request ID.
Configuring CorrelationSets
Usage
To create, configure, or delete CorrelationSets
Prerequisites
On the WSDLs tab on the Web Services panel, you have assigned a WSDL file to the Web Services Connector, refer to Assigning WSDL File.
Proceed as follows
-
Open the workflow that contains the Web Service Connector for which you want to configure the CorrelationSet for editing.
-
Open the Web Services panel on the right-hand side of the window.
→ The Web Services dialog opens.
-
Open the CorrelationSets tab.
-
Click on the new icon
 in the Properties section to create a new property.
→ The Edit/add property dialog opens.
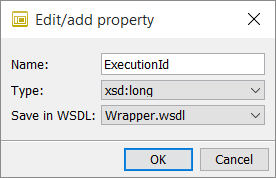
-
Enter the property’s Name. Do not change the values in both the Type and the Save in WSDL field.
-
Click OK to save the changes.
-
Add a CorrelationSet.
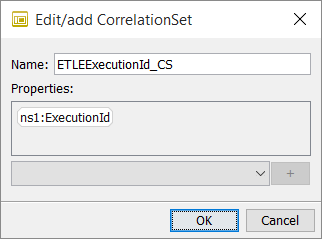
-
Choose a property and click the plus icon to assign it to the CorrelationSet.
-
Click on the new icon
in the PropertyAliases section to create a new property alias.→ The Edit/add propertyAlias dialog opens.
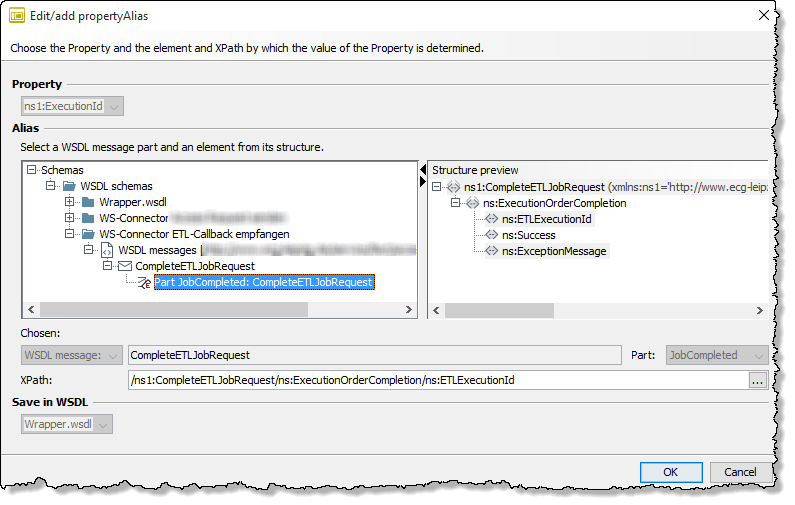
-
Navigate to the desired message part.
→ The XPath is generated automatically.
-
Click OK.
Assigning WSDL File
Usage
To assign a WSDL file to a Web Service Connector
Prerequisites
You have access to the WSDL file of the desired Web Service.
Proceed as follows
-
Open the workflow that contains the Web Service Connector for which you want to configure the CorrelationSet for editing.
-
Open the Web Services panel on the right-hand side of the window.
-
Open the WSDLs tab.
→ The WSDLs dialog opens.
-
Click the open icon
 and open a valid WDSL file.
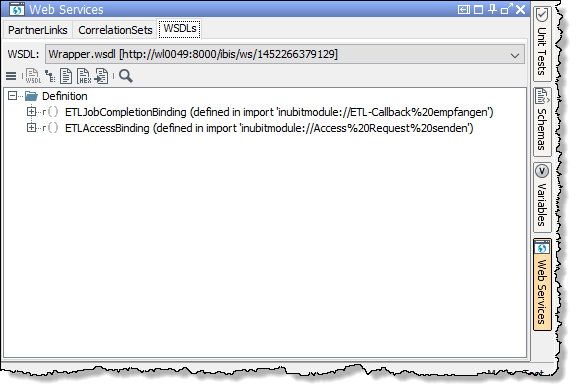
→ The WDSL file is loaded and can be used to configure a CorrelationSet.