JMS Connector
Usage
The JMS (Java Message Service) connector connects the INUBIT Process Engine with any JMS provider.
Connector types
The connector provides the following functions depending on its configuration:
-
Input Connector
Fetches time-driven messages from a JMS provider and passes them on to the subsequent module in the Technical Workflow.
-
Input Listener Connector
Waits for messages from a JMS provider. When these have arrived, the connector starts the Technical Workflow by handing over the messages to the subsequent module.
-
Medium Connector
Is started by receiving a message from the preceding module in the workflow, fetches messages from a JMS provider and passes them to the subsequent module in the Technical Workflow.
-
Medium Listener Connector
Is started by receiving a message from the preceding module in the workflow, and then waits for messages from the JMS Provider. As soon as a message is received, it is passed on to the subsequent module in the Technical Workflow.
-
Output Connector
Sends messages from the Technical workflow to a JMS provider.
Configuring the Access on the JMS based Queuing Server
Overview
For deploying an JMS Connector you need a JMS based application server with queuing interface, like, for example, the integrated Tomcat server.
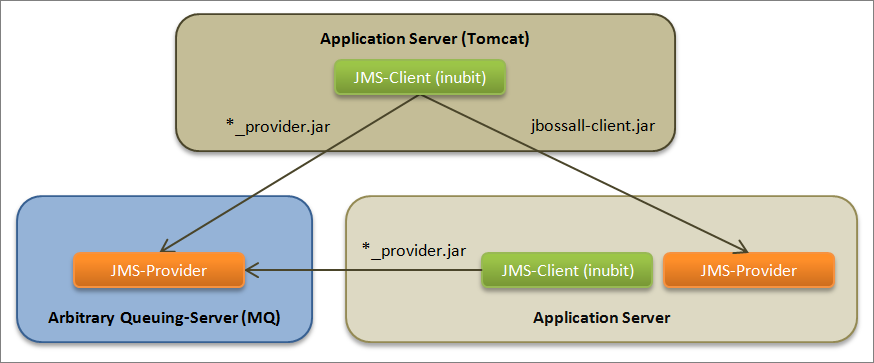
You can use the application server integrated in a remote INUBIT or any other JMS based queuing server.
Proceed as follows
-
Request the *.jar file:
If you want to access any other JMS based queuing server, request the file
*-provider.jarfrom your JMS provider.To avoid conflicts make sure there is no
*-provider.jarin folder/lib/systeme.g. from a previous Tomcat version! -
Copy the file into the directory
<SUITE-INSTALL-DIR>/inubit/server/process_engine/webapps/ibis/WEB-INF/lib. -
Restart Tomcat.
-
When configuring the JMS Connector, enter the URL of the remote queuing server in the field URL of JNDI server.
Refer to Dialog Connection Configuration.
Configuring an Asynchronous JMS Listener Connector
Usage
The JMS Connector can be configured as an asynchronous listener connector to pull a message from an Apache ActiveMQ server. This connector receives a message with a unique ID sent by a JMS Medium Connector.
After having sent the message, the requesting JMS Medium Connector suspends the current (request) workflow and waits for a response with this ID. Just after receiving this response message, the workflow is resumed.
Once the Listener workflow is finished, the response workflow is called to generate the response message and send it to the requesting JMS Connector.
Prerequisites
-
You have installed and started Apache ActiveMQ.
-
You have created an Apache ActiveMQ queue, e.g.:
locationDaoQueue, using the following link:https://<server>:<port>/admin/queues.jsp -
The JMS Listener Connector is registered with the Apache ActiveMQ server.
For test purposes, you can, for example, create three workflows containing the following modules.
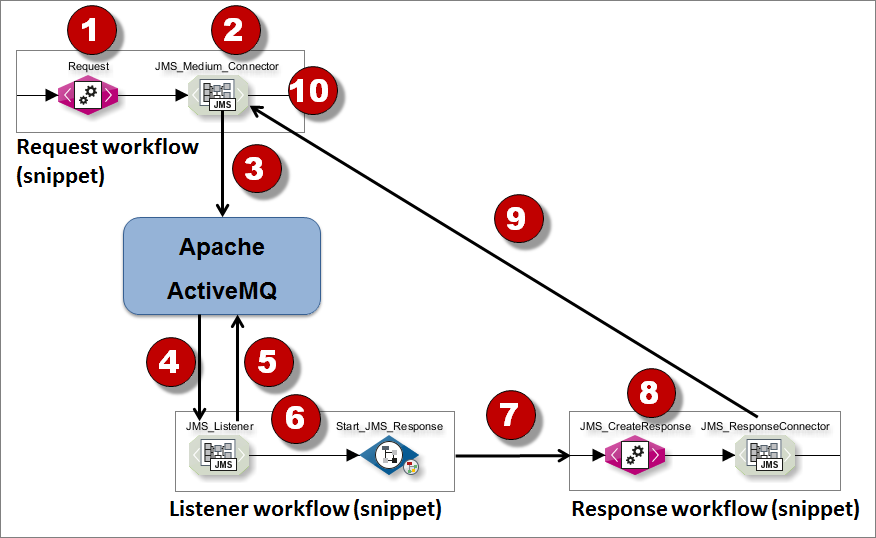
If the request workflow starts, the following steps are executed:
-
The XSLT Converter creates the content of the request (request workflow).
-
The JMS Medium Connector creates the request.
-
The JMS Medium Connector sends the request together with a unique message ID to the Apache ActiveMQ server. The JMS Medium Connector stops the request workflow and waits for the response.
-
Once the request has arrived in the configured queue of the Apache ActiveMQ server, it notifies the JMS Listener Connector about that.
-
After notifying the JMS Listener Connector about a new request, it polls the request from the Apache ActiveMQ server (listener workflow).
-
The JMS Listener Connector starts the workflow to process the request.
-
A Workflow Connector starts the response workflow.
-
The XSLT Converter creates the content of the response (response workflow).
-
The JMS Output Connector sends the response together with the message ID generated by the JMS Medium Connector in step 2.
-
The JMS Medium Connector receives the response (message plus correct message ID) and the request workflow is resumed.
Configuring the Request Workflow with a JMS Medium Connector
Proceed as follows
-
Log in to the INUBIT Workbench.
-
Create a new workflow.
-
Create an XSLT Converter that can create the output message containing the request content, e.g.:
<?xml version="1.0" encoding="UTF-8"?> <org.springframework.remoting.support.RemoteInvocation xmlns:xsi="http://www.w3.org/2001/XMLSchema-instance"> <methodName>retrieveAll</methodName> <parameterTypes/> <arguments/> </org.springframework.remoting.support.RemoteInvocation> -
Create a JMS Medium Connector to create a request using the request content generated by the XSLT Converter.
-
On the System Connector properties tab, activate the connector.
-
On the Connection configuration tab, configure the connection to the Apache ActiveMQ server as follows.

-
Enter the URL of the JMS provider (currently only Apache ActiveMQ is supported), e.g.
tcp://localhost:61616 -
Enter the following Naming context factory:
com.inubit.ibis.plugins.jms.jndi.ActiveMQInitialContextFactoryWithTempQueueSupportNo other values are supported.
-
Enter the following Additional JNDI properties:
queue.locationDaoQueue=locationDaoQueueThe name of the queue can be configured in the Apache ActiveMQ via the URL
https://<server>:<port>/admin/queues.jsp.
-
-
Click Finish to save the module.
-
Publish the workflow.
Configuring the Listener Workflow with a JMS Input Connector
Proceed as follows
-
Create the listener workflow.
-
Create a JMS Listener Connector.
-
Configure the variables mapping of the JMS Input Connector. Refer to Configuring the Variables Mapping of the JMS Listener Connector
-
Create a Workflow Connector. Refer to Configuring the Workflow Connector to the Response Workflow
-
Connect the JMS Listener Connector with the Workflow Connector.
-
Publish the workflow.
Configuring the JMS Listener Connector
Proceed as follows
-
Log in to the INUBIT Workbench.
-
Create a new workflow.
-
Create a JMS Listener Connector to pull the request from the Apache ActiveMQ server.
-
On the System Connector properties tab, choose Input connector as Connector type in the Base configuration section.
-
Select the checkbox Wait for data input (Listener connector).
-
Activate the connector.
-
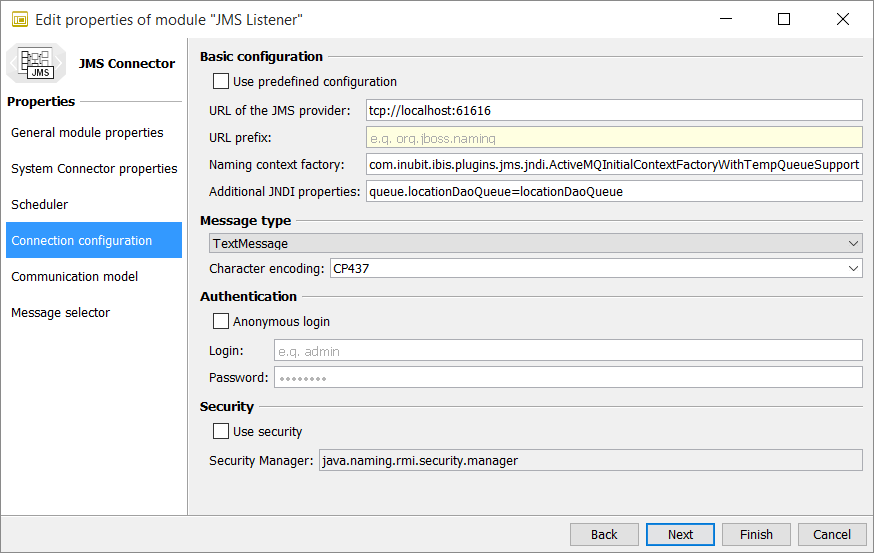
On the Connection configuration tab, configure the connection to the Apache ActiveMQ server as follows.
-
Enter the URL of the JMS provider (currently only Apache ActiveMQ is supported), e.g.:
tcp://localhost:61616 -
Enter the following Naming context factory:
com.inubit.ibis.plugins.jms.jndi.ActiveMQInitialContextFactoryWithTempQueueSupportNo other values are supported.
-
Enter the Additional JNDI properties:
queue.locationDaoQueue=locationDaoQueueThe name of the queue can be configured in the Apache ActiveMQ via the URL
https://<server>:<port>/admin/queues.jsp.
-
-
Click Finish to save the module.
-
Publish the module.
Configuring the Variables Mapping of the JMS Listener Connector
Proceed as follows
-
Log in to the INUBIT Workbench.
-
Open the Variables Mapping of the JMS Listener Connector in the listener workflow.
Refer to
-
Configuring the JMS Listener Connector
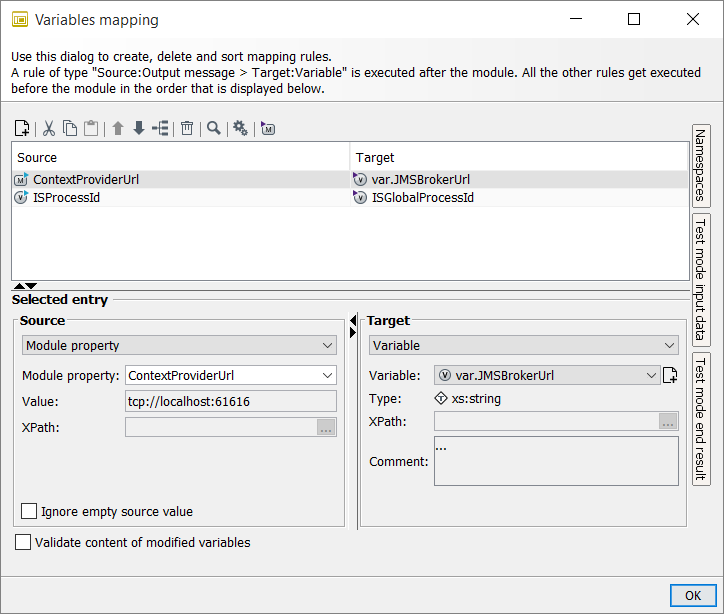
Create the following variables:
-
Create the mapping for the source module property
ContextProviderUrlto the target variablevar.JMSBrokerUrl.The value
tcp://localhost:61616for the source module propertyContextProviderUrlis set automatically depending on the value set in the URL of the JMS provider field on the Connection configuration tab.If the target variable
var.JMSBrokerUrldoes not exist, you have to create it using thexs:stringtype by clicking the create variable icon .
. -
Create the mapping for the source variable
ISProcessIdto the target variableISGlobalProcessId.
-
Click OK to save the variables mapping.
Configuring the Workflow Connector to the Response Workflow
Prerequisites
-
You have created the response workflow.
-
You have created at least a start module in the response workflow.
-
You have published the response workflow.
Proceed as follows
-
Log in to the INUBIT Workbench.
-
Open the listener workflow for editing.
-
Create, name, and activate a Workflow Connector.
-
On the Workflow selection and properties tab, navigate to the response workflow.
Ensure that the Communication mode is set as follows:
-
The Synchronous mode is activated.
-
The checkbox Enable error handling is checked.
-
The checkbox Mind the workflow call stack when handling errors is checked.
-
-
On the Module selection tab, click the module in the response workflow that is to be started by the listener workflow.
-
Click Finish to save the settings.
-
Publish the response workflow.
Configuring the Response Workflow with a JMS Output Connector
Proceed as follows
-
Create the response workflow.
-
Create an XSLT Converter.
-
Create a JMS Output Connector.
Refer to Configuring the JMS Output Connector
-
Configure the variables mapping of the JMS Output Connector. Refer to Configuring the Variables Mapping of the JMS Output Connector
-
Connect the JMS Output Connector with the Workflow Connector.
-
Publish the workflow.
Configuring the Response XSLT Converter
Proceed as follows
-
Log in to the INUBIT Workbench.
-
Open the response workflow for editing.
-
Create an XSLT Converter that can create the output message containing the response content, e.g.:
<?xml version="1.0" encoding="UTF-8"?> <org.springframework.remoting.support.RemoteInvocationResult xmlns:xsi="http://www.w3.org/2001/XMLSchema-instance"> <value class="com.inubit.lcag.wfs.service.ProcessResult"> <ok>true</ok> <messageId>0</messageId> <followStatus>CLOSED</followStatus> <detailsNecessary>true</detailsNecessary> </value> </org.springframework.remoting.support.RemoteInvocationResult> -
Click Finish to save the settings.
Configuring the JMS Output Connector
Proceed as follows
-
Log in to the INUBIT Workbench.
-
Open the response workflow.
-
Create a JMS Output Connector to create a response message using the response content generated by the response XSLT Converter.
-
On the System Connector properties tab, activate the connector.
-
On the Connection configuration tab, configure the connection as follows.
These properties must be set, although they are overwritten by the variables mapping.
-
Enter the URL of the JMS provider, e.g.:
tcp://localhost:61616 -
Enter the following Naming context factory:
com.inubit.ibis.plugins.jms.jndi.ActiveMQInitialContextFactoryWithTempQueueSupport -
Enter the Additional JNDI properties:
queue.locationDaoQueue=locationDaoQueue
-
-
Click Finish to save the module.
-
Publish the workflow.
Configuring the Variables Mapping of the JMS Output Connector
Proceed as follows
-
Log in to the INUBIT Workbench.
-
Open the Variables Mapping of the JMS Output Connector in the response workflow.
Refer to
-
Create the following variables to overwrite the module properties
QueueNameandJNDIProperties: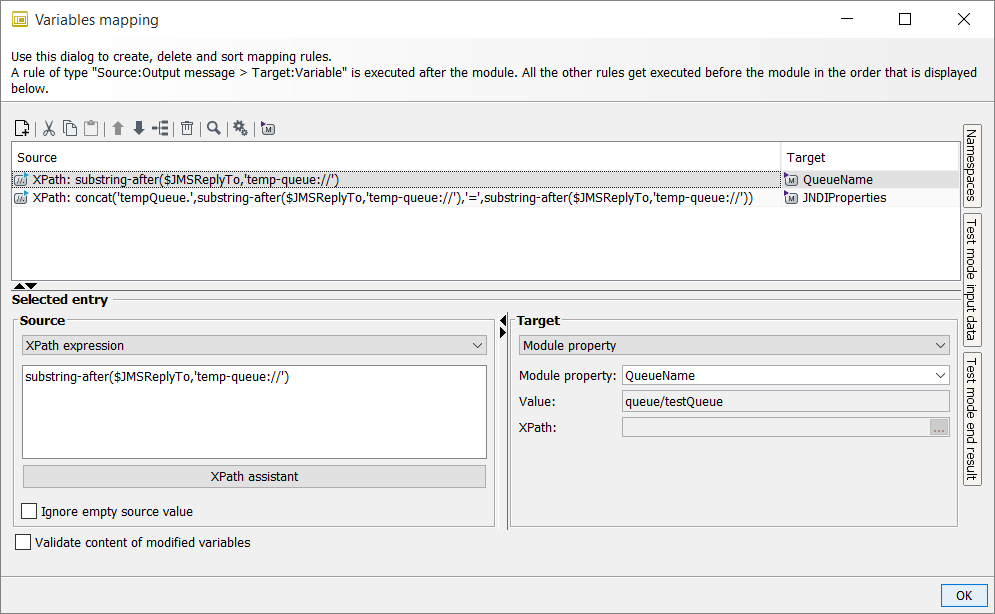
-
Create the mapping for a source XPath expression to the target variable
QueueName.-
Choose XPath expression as source.
-
Enter the following XPath expression:
substring-after($JMSReplyTo,'temp-queue://')3. Choose theQueueNameModule property as target.
-
-
Create the mapping for a source XPath expression to the target variable
JNDIProperties.-
Choose XPath expression as source.
-
Enter the following XPath expression:
concat('tempQueue.',substring-after($JMSReplyTo,'temp-queue://'),'=',substring-after($JMSReplyTo,'temp-queue://')) -
Choose the
JNDIPropertiesModule property as target.
-
-
-
Click OK to save the variables mapping.
Dialog Descriptions
Dialog Connection Configuration
You use this dialog to specify the properties required to connect to a JNDI (Java Naming and Directory Interface) provider. JMS uses the JNDI to find required resources.
Basic configuration
-
Use default JNDI configuration
Select this option if you have the
jndi.propertiesfile in your class path, and want to use the properties specified there. -
URL/Prefix/Naming Context Factory
Default values for the most common JMS providers:
-
MQSeries:
URL =
ldap://<name>:389/<LDAP DN>
Prefix =com.ibm.jndiNamingContextFactory = com.sun.jndi.ldap.LdapCtxFactory
-
SonicMQ:
ContextProviderUrl =
file://localhost/d:sonicmq
ContextUrlPrefixes =<empty>NamingContextFactory =
com.sun.jndi.fscontext.RefFSContextFactory -
WebLogic:
ContextProviderUrl =
t3://localhost :7001
ContextUrlPrefixes =<empty>NamingContextFactory =
weblogic.jndi.WLInitialContextFactory
-
-
Additional JNDI properties
Enter arbitrary JNDI properties as property value pairs, e.g.:
com.sonicsw.jndi.mfcontext.domain=Domain2 com.sonicsw.jndi.mfcontext.idleTimeout=6000Separate multiple properties with a blank.
If problems occur, contact the system administrator responsible for the installation of your JMS provider.
Message type
-
Messages can be sent/received in the following formats:
-
TextMessage
Data is stored as a string. This message type is useful for exchanging simple text messages and for more complex character data, such as XML documents.
-
ObjectMessage
The Object message carries a serializable Java Object as its payload. It is useful for exchanging Java objects.
-
BytesMessage
The payload is stored as an array of bytes. This message type is useful for exchanging data in an application’s native format and when JMS is used as transport between two systems, where the JMS client does not know the message payload type.
-
StreamMessage
A Stream message is a sequence of primitive Java types. The message object keeps track of the order and the types of these primitives within the stream. Formal conversion rules apply; for example, an exception is thrown if a JMS application tries to read a double value as a short value. Refer to the Java Message Service Specification, version 1.1 for a full list of the conversion rules.
Example: 21ABCDEFGH32.345 consisting of the following fields:
-
Integer: 21
-
String: ABCDEFGH
-
Float: 32.345
If the data structure is unknown, the generic method
readObject()can be used to return the next object in the stream. If the structure of the data is known, the JMS client can be specific about the type of object being accessed.
-
-
-
MapMessage
The payload of a MapMessage is stored as a set of name-value pairs. The name is defined as a string and the value is typed. The MapMessage is useful for delivering keyed data that can change from one message to the next.
Example:
NumberOfCopies:5whereNumberOfCopiesis the key and5is the value.
Data can be accessed by usinggetMapNames(), which returns a Java Enumeration object. It is possible to iterate through the MapMessage by usinghasMoreElements()to retrieve the mapped name-value pairs. -
Character encoding
Select an encoding from the list.
Authentication
-
Anonymous login
Select this option when the JMS Provider does not expect the client to authenticate itself.
-
Use static login data
-
Login/Password
Login data of the client for the JMS provider.
-
-
Select from Credentials Manager
For authentication, you can also use credentials managed by the Credentials Manager. Refer to Using the Credentials Manager for Authentication.
Security
-
Use security manager
For activating the security manager.
The security manager is specific for JMS/JNDI providers, and it should be used only when required following the JMS provider security manager’s configuration.
-
Security manager
Enter the name of the class implementing the security manager. This class is included in the JMS jar files delivered by your JMS provider.
Dialog Communication Model
In this dialog, you have the following options:
Communication model
Select one of the following models:
-
Publish/subscribe
Used for general broadcast applications where a message is sent to multiple subscribers.
A message producer sends messages concerning a certain topic to all consumers having subscribed to this topic before.Consumers do not receive the message if they are not subscribed at the point of time when the message is sent.
Exception Durable subscription:
Consumers must have subscribed for a topic. However, they need not wait actively for messages but can retrieve them later.
-
Point-to-point
This model is used if messages only have one consumer:
Messages sent by a message producer are queued fifo. Consumers can retrieve them sequentially from the queue at a later point in time.
Settings
The following options are displayed, if Point to point is selected as communication model:
-
Queue name
Identifies an object generated with the JNDI server and registered by the JMS provider. The JMS Connector searches the JNDI server for the given queue and obtains a reference to the registered object.
-
Class for establishing the connection
Name of the connection factory. The connection factory is the object that the client uses to create a connection to the JMS provider.
The object was generated and registered with the JNDI server by the JMS provider. The JMS connector searches the JNDI server for the specified class and obtains a reference to the specified object.
-
Synchronous mode
If selected, messages are received from the JMS server in synchronous mode. This implies that the receipt of a message starts the workflow, which is completely processed before the next message can be received. The running workflow processing blocks the receipt of new messages, and it is only the end of the workflow processing that triggers the receipt of the next message in the queue. The JMS server can also process several messages in parallel and synchronously; see option Number of messages to import.
If not selected, messages are received in asynchronous mode and are therefore handed over to the workflow once they have arrived.
-
Number of messages to import
If synchronous mode is selected, the number of messages to be imported defines how many messages can be received from the queue and can be processed in parallel and synchronously (the default value is 1). This depends on the number of parallel processes defined for the workflow.
The following options are displayed, if Publish/subscribe is selected as communication model:
-
Topic name
A topic is a string describing the nature of the data being published in the publish/subscribe system.
The topic name describes an object generated by the JMS provider and registered with the JNDI server. The JMS connector searches the JNDI server for the specified topic name and gets a reference to the object.
-
Class for establishing the connection
Name of a connection factory. The connection factory is the object that the client uses to create a connection to the JMS provider.
The object is generated by the JMS provider and registered with the JNDI server. The JMS connector searches the JNDI server for the specified name and obtains a reference to the registered object.
-
Topic No Local
Blocks the reception of messages delivered using the subscriber’s own connection.
-
Message acknowledgment
For selecting a control level when acknowledging messages. There are the following acknowledgment types:
-
AUTO_ACKNOWLEDGE: The JMS session automatically acknowledges that the client has received the message, either when the client successfully executes a message receipt call or when the listener’s message receipt call is executed.
-
CLIENT_ACKNOWLEDGE: The client acknowledges a message by calling the message acknowledgement method. In this mode, the acknowledgement takes place at session level.
-
DUPS_OK_ACKNOWLEDGE: If this option is selected, the JMS session is instructed to acknowledge the delivery of a message lazily. In general, this results in the delivery of an additional copy of the message when the JMS provider does not provide immediate acknowledgement. This means that it should only be used by consumers that permit message copies.
-
Use durable subscription
+ (Only if Publish/subscribe is selected as communication model)
Special case within the publish/subscribe communication model. Consumers must subscribe to topics, but they do not need to wait actively for messages. Instead, they can fetch them at any later point in time.
-
Subscription ID: Client ID for the connection.
-
Login: Client login name.
-
Password: Client password.
Connection test
-
Test connection
For testing whether the connection can be successfully established using your configuration.
Dialog Message Selector
This dialog offers the following options:
Use message selector
A message selector allows a consumer to specify the messages in which the consumer is interested.
Message selectors allow message consumers to be more selective about the messages from a topic or queue. If a message selector is specified, messages are passed on to the client only when their headers and/or properties match the message selector.
|
Message selectors cannot access values in the messages’ body! |
A message selector is a conditional expression consisting of an identifier and an operator followed by a literal. The following table shows how message selectors are constructed:
| Element | Valid values |
|---|---|
Identifier |
Property or header field reference |
Operator |
AND, OR, LIKE, BETWEEN, =, <>, <, >, ⇐, >=, IS NULL, IS NOT NULL |
Literal |
|
Dialog Additional Properties in the JMS Connector
The additional properties are for establishing compatibility with other message systems or creating message selectors.
To add a property, click the Add Properties button. Then fill in the Name, Type, and Value input fields in the displayed dialog.
Refer to Dialog Message Selector.
Optional Configuration Steps
These steps may be optional for some JMS providers and necessary for only a few of them.
-
Request the *.jar file: If you want to access any other JMS based queuing server, request the file
*-provider.jarfrom your JMS provider. -
Copy the file into the directory
<SUITE-INSTALL-DIR>/inubit/server/process_engine/webapps/ibis/WEB-INF/lib. -
Restart Tomcat.