EDI Adapter
Usage
The EDI Format Adapter is used to convert EDI messages based on certain rules. EDI messages can be used to automatically continue processing business correspondence in the recipient’s software system without manual intervention.
For popular EDI standards, such as UN/EDIFACT, ANSI X12, or VDA, there are conversion rules which can be applied immediately. If no matching rules can be found for your EDI messages in the INUBIT software, the EDI Rule Editor will help you create a new rule.
|
A license is required to use EDI rules. Only EDI standards for which you own a license will be displayed. X12 rules are supported only in two versions 3030 and 4010. |
Adapter types
There are two types of adapters that can convert EDI messages:
-
EDI-XML Adapter: Converts EDI messages to an XML format.
-
XML-EDI Adapter: Converts XML messages to EDI messages.
|
HL7 messages via TCP/IP
For transferring and confirming HL7 messages via TCP/IP, use the HL7 TCP/IP Connector. |
Functional Principle of the EDI > XML Conversion
An EDI module generally requires two files to operate:
-
EDI input message
Sample message that you receive from your business partner or a message that your business partner expects.
-
Conversion rule
An XML file containing the conversion rules. The rules can typically be used for both conversion directions. The rule file will either be saved with the adapter, or on the INUBIT Process Engine (when using message auto-detect).
During the conversion, the message syntax is automatically checked.
The following image illustrates the connection between an EDI input message and the conversion rule:

Input EDI message
To ensure that the recipient can process EDI messages, the characters in the message must match a known structure in terms of their order (syntax) and meaning (semantics). These structures are defined in the various EDI standards.
In principle, an EDI message consists of metadata and usable content (payload).
-
Metadata contains processing information, especially about routing to the recipient. In the image, it is the
UNHEDI element that corresponds to theMessageHeaderXML element. -
The payload is the data captured by the receiving system. In the message shown, the payload begins with the
BGMEDI element (which corresponds to the BeginningOfMessage XML element).
Payload and metadata consist of elements made up of continuous segments:
-
For each element, properties such as length, position in the segment, type (numeric/alphanumeric), conditional or mandatory occurrence, and delimiters are defined.
-
Each segment’s definition specifies in which order the segment may or must appear.
Conversion rule
Based on the standard, this rule defines how EDI elements or EDI segments are mapped on XML elements. The image shows the same conversion rule in the EDI-XML adapter in two different views:
-
Attribute ID view
Displays all of the rule file’s attributes with the name ID. This ID matches the EDI element’s or segment’s identifier. The message will only be processed if the identifiers in the message match the IDs in the rule file.
Following the ID, the letter
CorMshows whether the element is conditional or mandatory. The numbers in square brackets define how often the element may appear in the message structure.The image shows that the CNT element appears three times in the EDI message. The element complies with the rule, because the rule states that the element may appear zero or up to nine times:
CNT C[0…9]. -
XML tag view
Instead of EDI IDs, this view shows XML tags to which the IDs are mapped; after the conversion, for instance, the
CNTelement receives theControlTotalidentifier.
|
Self-documenting XML element names in rules improve the readability of XML messages and make it easier to process them, for example, in subsequent XSLT conversions. To emit element names, in the module’s properties set the option Output format of XML tags to xmlTag. Note that long XML element names result in large XML structures which affect the performance. If performance is important, set short XML element names (max. 3 characters) or in the module’s properties set the option Output format of XML tags to ID. |
Creating an EDI Adapter and Configuring a Rule
Prerequisites
You will need the following information:
-
The standard and the version of the standard with which the messages comply, such as EDIFACT, IFCSUM, 1996 version, Release A.
If the messages merely resemble a standard, or if they do not adhere to a particular standard, you will need detailed information about the message structure (segments, elements).
-
List of separators used
Proceed as follows
-
Create an EDI adapter:
-
If the message is compliant with EDIFACT, ANSI X12, or HL7 format or with a subset of these, for example EDIGAS, activate automatic rule detection (refer to Dialog Auto Detection). You will not need to create a rule for the module.
This option is available for all EDIFACT, ANSI X12, and HL7 messages if the appropriate rule exists on the server. After closing the wizard, you can immediately begin using the EDI adapter.
-
If the message format is different, or if the message does not comply with any standard format, follow the adapter’s wizard to create the module.
Alternatively, you can download rules from the Process Engine: Open the
 menu and select Download from Process Engine.
Use this command to deploy a rule as template that was already published to the INUBIT Process Engine.
Several standards are already included in delivery.
menu and select Download from Process Engine.
Use this command to deploy a rule as template that was already published to the INUBIT Process Engine.
Several standards are already included in delivery.EDIFACT rules included in the delivery do not contain qualifier lists. You can define the qualifiers by yourself or you can create a new rule based on the library.
-
-
For creating a new rule open the Module Editor tab, open the
menu and select New > Rule.
The rule wizard opens. -
Select one of the following options depending on your message type:
-
Create user-defined rule: If no suitable or similar rule can be found. A rule file containing only the
Messageroot element is created. In addition, you can select a standard as a template to populate automatically structure data in the Structure field. If this value is not suitable, select Custom as a standard value, and manually define the structure.Refer to Creating a New Rule in the EDI Adapter.
-
Create rule from the library: For the standards EDIFACT, ANSI X12 and HL7 you can apply existing complete rules as templates and customize them to your particular format.
-
Create rule from XML Schema: For SAP IDoc you can load the appropriate schema as a template.
-
-
The rule wizard guides you through the process of creating the rule. For rules created from the library, you select the version. For rules created from an XML, no further information is required.
After finishing the wizard, you can edit the complete structure of the new rule manually in the rule editor.
Refer to Using Rule Editors in the EDI Adapter.
|
You can publish your own rules to the server to make them available to others. |
Creating XML Input Messages for XML-EDI Adapters
The XML-EDI Adapter expects input messages with a specific format depending on the EDI target format. This section describes how to create the expected input message.
Under certain conditions (see below), the EDI Adapter can process several EDI interchanges within a single EDI message.
Prerequisites
-
The XML-EDI Adapter is already created and configured as follows:
-
The auto-detection is not activated.
-
The rule file is defined and stored in the XML-EDI Adapter.
-
-
The XML-EDI is already published.
-
You dispose of an XML sample input message.
-
To process multiple EDI interchanges within a single EDI message, the following prerequisites must be met, too:
-
The headers of all interchanges must be of the same type.
-
All EDI interchanges must be of the same EDI format.
-
All EDI interchanges must use the same delimiters.
Example
The following example contains two EDI interchanges in one message:
UNB+UNOC:3+0013000017SACHS-DSSM+O0013001094SSF:ZZ+140528:0145+4208'
UNH+1+DELFOR:D:97A:UN'
...
UNT+209+1'
UNZ+1+4208'
UNB+UNOC:3+0013000017SACHS-DSSM+O0013001094SSF:ZZ+140507:0046+4031'
UNH+1+DELFOR:D:97A:UN'
...
UNT+152+1'
UNZ+1+4031'
-
Proceed as follows
-
Create an XSLT Converter.
-
From the XML target file area, open the
menu and select Open > Rule File Explorer.
The dialog Rule File Explorer is displayed. -
Select your XML-EDI Adapter from the list.
-
Optionally:
Select any of the displayed options in order to obtain further information about the rule structure. This information is displayed as comments in the XML template.
-
Click Finish to close the dialog.
Based on the rule file, which is stored in the adapter, the structure of the XML input message at the selected XML- EDI Adapter is created and displayed.
-
Drag the root element of the structure upwards and drop it on the
xsl:templateelement in order to take over the structure into the mapping. -
Load your XML sample message into the XML source file area.
-
Fill the structure by dragging and dropping elements from your XML sample message on the structure elements.
Creating a New Rule in the EDI Adapter
If there are no rules you can modify for your purposes, generate an empty rule and manually add elements to the new rule.
|
You will need the default specifications for this process. |
Proceed as follows
-
Open a rule editor.
-
Click
, and select New > Rule.
The dialog opens.
Refer to New Rule Wizard: Select creation method. -
Select Create customized rule > New rule.
-
Click Next. The dialog is displayed. Complete the fields. Refer to New Rule Wizard: New rule.
-
Click Finish.
The rule editor shows an empty rule in the target window. This rule contains only the Message root element.
-
If the structure or the new rule is similar to that of an existing rule, load the existing rule as a support rule: Click
and select Support rule tree.
The Support rule area is displayed (highlighted in red). -
In the Support rule area, click
, and select Open to load a rule from the file system, or repository or select Download from server.
The template rule is displayed and highlighted in red. -
Drag the entire rule or selected segments or elements into the target window to build the new rule step by step:

-
Use the context menu in the target window to add, delete, or move segments, segment groups, or elements.
On the same level, IDs must be unique.For IDs with variable length, you are not allowed to use e.g. the following values:
B
BB
BBB
This is because
Bis contained inBBas well as inBBBandBBis contained inBBB. If the EDI parser finds an element starting withBBB, interpretation is ambiguous: is itB | B | BorB | BBorBBBorBB | Betc.But, IDs with variable length are supported, as long as there are no repetitive letters in the ID, e.g., BGMS, DTMB, etc.
-
For each component, fill in the fields in the properties window on the right.
Depending on the rule editor used, you can publish the EDI adapter after editing the rule, or you can publish the rule to the server.
Refer to Using Rule Editors in the EDI Adapter.
If you have opened a support rule and load a new rule with a different structure, an error message is displayed. You can cancel the action, otherwise the support rule is removed. Opening a support rule with another structure than that of the rule is also prevented.
Publishing EDI Adapter Rules to the INUBIT Process Engine for Re-use
Once created, rules can be re-used in different EDI adapters. To do this, the rules must be published to the INUBIT Process Engine.
You can then access these rules from any EDI adapter and load a rule as a template.
Prerequisites
The rule already exists at an EDI adapter.
Proceed as follows
-
Display the EDI Adapter in local mode.
-
Open the
menu, and select Save as to temporarily save the rule in the file system. -
Select Administration > EDI Rule Management to open the EDI Rule Management.
-
Open the
menu and select Open > File to load the rule from the file system.
The rule is displayed. -
Open the
menu and select Publish rule file to Process Engine.
The rule is published.
This automatically generates a file name for the rule.
The file name will be generated from the information entered in the message’s root element (Message element).
If a file with the same name already exists on the INUBIT Process Engine it will be overwritten.
A confirmation message is displayed after the publishing.
|
Do not change the generated file name!
If the file name does not comply with the naming convention, the rule can no longer be used for auto detect.
The name must have the following format: If you do not know the release or version, enter a hyphen, e.g. EDIFACT-ORDERS---96A.xml. The file name must be entered in all caps. |
Publishing Multiple EDI Rules to the INUBIT Process Engine
To re-use multiple EDI rules, these rule files or folders that contain the corresponding rule files can be published to the Process Engine.
Proceed as follows
-
Select Administration > EDI Rule Management or the Module Editor tab in the respective EDI Adapter module to open the EDI Rule Management.
-
Open the context menu and select Publish Rule Folder to Process Engine.
-
Select the rule folder or the EDI rules you want to publish.
-
Click Open.
→ INUBIT checks the rule files for validity and displays the corresponding results in a dialog.

-
In the first column, there is a checkbox to select the rule files to be published.
Rule files marked as invalid in the Result column cannot be selected and, hence, they cannot be published.
-
Select the rule files to be published and deselect those the rule files that should not be published.
-
Optional: Double-click the file name in the Publish Rule Filename column to rename or extend the rule file name.
-
Activate the Use extended rule file names checkbox to display the extended rule file names.
To display the basic names, deactivate the Use extended rule file names checkbox.
-
Close the window with
-
OK to publish all valid (Result: Valid) files.
-
Cancel to not publish any of the listed files.
-
Creating an SAP IDoc XML Rule in the EDI Adapter
Prerequisites
You will need an SAP IDoc schema file which must be saved on a computer that can be accessed via your network.
|
The SAP Interface Repository, which used to be available for loading schemas, was discontinued by SAP in 2006. To date, no replacement has been made available. |
Proceed as follows
-
Open a rule editor.
-
Click
, and select New > Rule.
The dialog opens.
Refer to New Rule Wizard: Select creation method. -
Select SAP IDoc.
-
Enter the path and name of the SAP IDoc schema file, or click Browse file to navigate to the schema file.
-
Click Finish.
The rule is created based on the schema and displayed. Depending on the rule editor used, you can publish the EDI adapter after editing the rule, or you can publish the rule to the server.
Using Rule Editors in the EDI Adapter
You can use the rule editors to display and edit rules for EDI message conversion and to create new rules. The INUBIT Workbench includes the following rule editors:
-
EDI rule editor
You can use this editor to edit rule files on the INUBIT Process Engine, to create new rules and publish them to the server.
The rules are used for message auto detect, and are available as templates to all INUBIT Workbench users with access to EDI Adapters.
-
XML-EDI Adapter or EDI-XML Adapter tab in a local adapter
You can use this editor to create and edit a rule to be saved with the adapter.
This rule cannot be used for auto detect and no be re-used by other adapters.
If the Auto detection for EDIFACT, X12 and HL7 option in the is selected, an empty tab with a corresponding note is displayed.
Refer to EDI-XML Adapter Properties Dialog.
Edit
To expand and edit the rule, select an element and open the context menu.
Menu bar
The Editor menu bar includes the following commands:
-
: Opens a sub-menu with the following commands:
-
New
Opens the dialog, refer to New Rule Wizard: Select creation method.
-
Open
For loading a rule from the file system, the Repository or out of the clipboard.
-
Save
For storing the rule in XML format into the file system, the Repository or the clipboard.
-
Print
Opens a print dialog enabling you to send the currently displayed rule to your default printer.
-
Download from Process Engine
For selecting a supplied rule. Refer to Publishing EDI Adapter Rules to the INUBIT Process Engine for Re-use.
-
Remove rule from Process Engine
To choose one or more EDI rules to be deleted from the Process Engine. When clicking OK, the selected rules are deleted immediately without confirmation.
-
Publish rule file to Process Engine
(only, if you open the EDI Rule Management via the Administration menu) Loads the current rule to the INUBIT Process Engine as an XML file. This makes the rule available for auto detecting messages.
-
Validate rule structure
(only in the rule editor of a local adapter) Starts validating the rule against an internal XML Schema file.
-
Generate mapping template
Generates an sample message containing all structural information in the currently displayed rule. You can, for example, load this mapping template into an XSLT Converter and use it for generating an input message.
Refer to
-
Generate XML Schema…
Creates an XML out of the rule. You can use the XML Schema for validating incoming messages, for example. For the validation you can use an XML Validator or activate the Schema check at the EDI Adapter.
Refer to
-
Rule view
-
Attribute id: ID, complies to the entry in the ID field in the properties area.
-
Attribute xmlTag: XML element name, complies to the entry in the XML tag field in the properties area.*
-
Element type: Default name of the rule node, e.g. segment.
-
Description: Displays next to each element its description in the tree, complies to the Description field in the properties area.
-
Conditional option: Shows in the tree whether an element is optional (C for conditional) or mandatory (M).
-
Repetition: Shows for each element its frequency of occurrence in the tree, e.g. [0…n].
-
Length (or position of element): Shows the type and length or position of elements in the tree, e.g. {an 1-7}.
-
-
Support rule tree
Displays an additional area, into which you can load another rule as template for a new rule.
-
Clear view (only available in support rule tree view)
Removes the support rule and all its information.
-
-
 : Opens an entry field for a string search within the rule tree.
Edit menu
Validating the rule file for publishing
If activated, each rule is verified against an internal XML schema describing the rule structure before publishing. The module will not be published unless all rule files correspond to this structure.
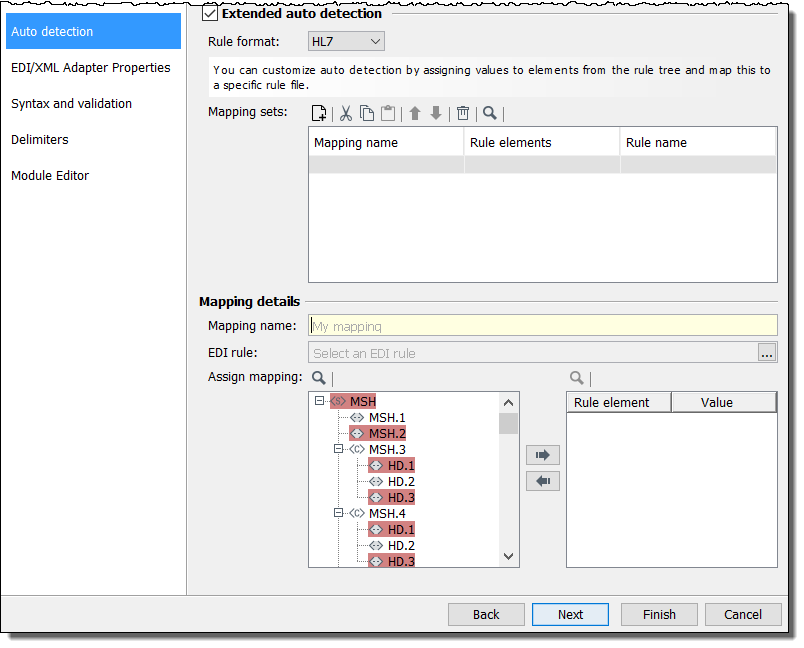
Creating a New Mapping Set
If you want to use your individual EDI rules for auto detection, you can create mapping sets.
For each rule a mapping line is stored in the mapping set and specific field information is defined to detect them.
|
Auto detection as well as advanced auto detection have to be activated. Rule format is set to HL7. |
Proceed as follows
-
Display the dialog auto detection of the EDI-XML adapter.
-
Click
 .
The mapping details are displayed.
.
The mapping details are displayed. -
Enter a mapping name.
-
Click
 .
The dialog select rule file opens.
Select an EDI rule file.
.
The dialog select rule file opens.
Select an EDI rule file. -
Click OK.
The rule tree displays the header elements of the selected EDI rule file.
-
Select a single element or multiple elements and click
 .
The selection is stored in the mapping table.
.
The selection is stored in the mapping table. -
In the mapping table double-click the field value and enter a value.
|
When creating multiple mapping sets they are combined in disjunction. Mapping sets are processed from top to bottom. You can change the order of the mapping sets. If none of the created mapping set conditions match, the standard rule name creation is used. |
|
Mapping details are used to verify single elements from the rule tree against values. The verification is done in conjunction and from top to bottom. |
Dialog Descriptions in the EDI Adapter
Dialog Qualifier Definition
Call up
Administration > EDI Rule Management tab, edit a rule, select an element in the Element > Type area, select the Qualifier option > click the arrow button.
In the dialog for qualifier definition you can assign a qualifier to the currently displayed element and create new qualifiers. Elements of the Qualifier data type can only have values contained in a pre-defined, named list. The element values can be checked when reading the messages.
This dialog consists of the following areas:
-
Left: List containing all existing qualifiers
-
Right: Detailed information about the qualifier selected in the list.
-
Qualifier name: Unique name for the qualifier.
-
Description: Explanation of the qualifier.
-
Column R (restricted):
You can restrict the number of values. This can be helpful in creating EDIFACT subsets. The following rules apply:
-
If no value is selected, all values can be used.
-
Once a value is selected, only the selected values can be used.
-
-
Functions in the dialog
-
Assigning a qualifier to an element
In order to assign a qualifier to the currently selected element, select the qualifier in the list, and click OK.
-
Adding and editing qualifiers
Use the toolbar above the table.
-
Checking qualifier lists
To let elements with the data type Qualifier check on reading messages, activate the option Validate field values against qualifier list in the module’s properties. If message values do not match the given qualifier lists an error is thrown.
Refer to Syntax and Validation Dialog.
Dialog Auto Detection
Rule file auto detection
-
Auto detection for EDIFACT, ANSI X12 and HL7
Activate the checkbox to auto detect incoming EDI message formats. The format detected will determine the conversion rule. If there is no matching rule file, the system will generate an error message.
For a list of all EDIGAS messages the EDI Adapter uses for auto detection, refer to
/Global/System/EDI Specification/Rule Metadata.To let new EDIGAS messages detect automatically, you must add them to the file
EDIGAS‑MESSAGES.xml. To do so, update theEDIGAS‑MESSAGES.xmlwith the appropriate content. The new structure is as below:<subsets> <subset edifact-type="{value1}" edifact-version="{value2}" edigas-type="{value3}" edigas-version="{value4}"/> </subsets>The EDI Adapter will then detect this message type automatically.
After workflow execution the EDI Adapter writes a new variable into the workflow:
edi.autodetect.rule.name.This variable contains the name (no path information) of the rule file, that has been used for parsing the message. This information can be used for workflow automation.
-
Load rule from:
Select where to obtain the rule file from: server or repository.
A path has to be set for loading the rule file from repository. Optional you can select if all sub-directories are included in the search.
If the rule file is obtained from the server make sure the rule file has been published!
Extended auto detection
-
Extended auto detection
This option allows to evaluate more header information to detect the appropriate rule file (required for EDIFACT/ EDIGAS, HL7).
-
Rule format
Rule format valid for the extended auto detection. EDIFACT-subversions on basis of the same year and the same version are detected.
If the rule format is set to HL7 you can modify the auto detection by assigning values to elements from the rule tree and link this assignment with a dedicated rule file.
-
-
Mapping sets
Here you can create mapping sets that store the mapping of values to rule tree elements. When creating multiple mapping sets they are combined in disjunction. Mapping sets are processed from top to bottom. You can change the order of the mapping sets. If none of the created mapping set conditions match, the standard rule name creation is used.
-
Mapping details
Mapping details are used to verify single elements from the rule tree against values.The verification is done in conjunction and from top to bottom.
EDI-XML Adapter Properties Dialog
XML elements names
-
Use attribute "id"
When selected, the output message contains XML elements with abbreviated identifiers (
X_<ID>orD_<ID>). -
Use attribute "xmlTag"
When selected, the message is output with meaningful element names based on the value for XML tag in the conversion rule. Though meaningful element names improve the message’s readability, they also increase the file size and thus have an impact on the performance.
EDI message formatting
-
End of line character/Line length
If the EDI file should be prepared for display in an operating system that requires specific end-of-line characters or a maximum line length, you must define these specifications.
Example: EDIFACT messages normally do not have line breaks while the OS/400 operating system only allows line length to a maximum of 80 characters. Here, you should define \n as end-of-line character and 80 as line length.
The end-of-line character must not be identical with any of the delimiters used in the message!
-
Character encoding
Character encoding for incoming messages. This setting ensures that the incoming message is correctly converted to XML and that German umlauts, for instance, are correctly displayed.
By default, the ISO-8859-1 character set is used. It contains all characters of the common Western European languages, including their special characters. You can also select any other character set.
Other character sets that are not present in the drop-down list can be added by entering them. The following character sets are supported:
-
ISO:
-
ISO-8859-1 to ISO-8859-9, ISO-8859-11, ISO-8859-13, ISO-8859-15
-
ISO-2022-JP, and ISO-2022-KR
-
-
Codepage:
-
CP437, CP737, CP850, CP852, CP855, CP857, CP858, CP860 to CP863, CP865, CP869
-
-
MS Windows:
-
Windows-1250 to Windows-1258
-
-
Other:
-
KOI8-R and KOI8-U
-
ISCII
-
EUC-JP and EUC-KR
-
Shift-JIS
-
GBK
-
Big5
-
XML message formatting
-
Remove leading zeros which were added to fill numeric fields
This option is self-explanatory.
-
Add EDIFACT messages group to XML message
The output message additionally contains the body of the EDI input message.
-
Output decimal fields with uniform separator
If checked, the separator is set uniformly for all decimal fields. Select from the list to define the unique decimal separator:
-
. (point on the line): in all decimal fields, a point is used to set digits after the decimal point.
-
, (comma): in all decimal fields, a comma is used as decimal mark to separate numeric data.
-
UNA defined: the separator for all decimal fields is determined on basis of the UNA segment. If UNA defined is selected, but no UNA segment is present, the point is used as separator by default.
The XML-EDI adapter dynamically generates UNA segments from
@unaDataAttribute.Example:
<Interchange format="EDIFACT" unaData="UNA:+.? '">
...
</Interchange>
The
unaDataAttribute must have a fixed length of 9 characters!
-
-
Transfer optional existing (empty) elements from EDI message
If checked, empty elements from the EDI message are depicted in the XML structure.
White Spaces
-
XML output remains untouched
This option is self-explanatory.
-
Remove leading and trailing white spaces
This option is self-explanatory.
-
Trim all white spaces
Removes all white spaces.
Syntax and Validation Dialog
To let an EDI message check completely against a rule file, activate the options XML validation, Ignore syntax errors occurring in input message and Validate field values against qualifier list.
Analysis
-
Cache rule file
When selected, the rule file will remain cached during the entire workflow execution.
This setting is useful when a number of consecutive messages need to be converted, because the conversion can be completed more quickly if the rule file does not need to be reloaded for each message. Caching is useful for messages larger than 300 KB.
|
When dimensioning your memory, you should remember that caching uses additional memory. |
-
Ignore syntax errors occurring in input messages
When selected, the conversion will not be cancelled in case of an error. Instead, sections containing erroneous formatting will be skipped.
|
Note that if sections in the input message have been skipped due to erroneous formatting, those sections will be missing in the outbound message. To identify erroneous sections, activate the Server Trace. This will create a log of error messages generated while using the EDI format adapter. The log will be displayed on the Monitoring > Trace Log tab. |
-
Add error info to output message
Enable this option to identify the skipped, and thus missing, segments.
|
Do not activate this option at the same time as you run the XML validation. Otherwise, the additional error information produces further errors when handed over in the XML output message to the XML validation. |
-
Generate EDIFACT CONTRL message
Automatically generates CONTRL messages. Depending on the processing result an Error or Acknowledge CONTRL message is created and stored into one of the following variables:
-
Error:
edifact.contrl.reject -
Acknowledged:
edifact.contrl.acknowledged
-
Validation
-
Validate field values against qualifier list
If activated, element values of type Qualifier are checked when reading the input messages.
Refer to Dialog Qualifier Definition.
-
XML validation
If active, the XML messages are validated against an XML Schema which is generated after each rule modification based on the conversion rule. In this process, the element type and the qualifier list are checked, in contrast what happens during the normally carried out automatic syntax check.
Activate the option Ignore syntax errors if you use the XML validation. Then, all checks are executed against the XML Schema and in case of an error only one error type is output. If the option Ignore syntax error is deactivated, an erroneous with an element exceeding the limit generates another error type than an erroneous message with a faulty qualifier.
-
In case of defective Schema validation, use error branch
When selected, this option will cancel the workflow execution if the schema validation fails. The message will be directed to error output.
-
Schema style
Only activate this option, if you have problems when validating your messages against an XML Schema created on basis of the rule.
-
Russian Doll Design (elements are defined inline)
Default design for non-EDIFACT rule files. The Schema structure reflects the structure of the instance: all element declarations are nested, there are no references to identical elements.
-
Venetian Blind Design (elements are referenced)
Default design for EDIFACT rule files. The element types are declared globally. Elements reference these declarations.
Delimiters Dialog
Delimiter detection
-
Auto detection for EDIFACT, ANSI X12 and HL7
For EDIFACT, ANSI X12, and HL7, you can activate delimiter auto detect. For all other standards, delimiters must be indicated manually.
Even auto detect cannot always recognize all delimiters. You should therefore verify the result or set the values manually. You will need the specifications of the standard on which your EDI message will be based.
Standard
Select a standard to prepopulate the delimiter fields.
|
Only standards for which you own a license will be displayed. |
Delimiters
If you selected a standard, the fields are correctly prepopulated.
You can overwrite the defaults by selecting other delimiters from the lists or by entering them manually.
EDIFACT
(only for XML/EDI Adapters)
-
Create EDIFACT UNA segment
Adds a string as first segment into the EDI message describing the delimiters in use, e.g.
`UNA:+.?'.This option is only useful when using EDIFACT rule files.
Module Editor Dialog
Refer to Using Rule Editors in the EDI Adapter.
XML-EDI Adapter Properties Dialog
|
Besides the following options, this dialog is identical to EDI-XML Adapter Properties Dialog. |
XML message formatting
-
Insert optional elements of the rule file into EDI message
-
If this option is enabled and the rule file contains optional elements that cannot be matched with values in the incoming XML message, empty EDI structures are generated for these optional elements in the outbound EDI message.
-
If this option is disabled, those elements are ignored.
-
-
Ignore empty XML elements and structures
When enabled, elements without value in the XML message are not converted to EDI.
|
This option is not applied to messages with fixed elements. |
Empty elements could have been generated in a previous conversion from EDI to XML, when empty XML structures were created for optional parts of the XML file to enable a successful structural validation.
New Rule Wizard: Select creation method
|
A license is required to use EDI rules. Only EDI standards for which you own a license will be displayed. |
New Rule Wizard: New rule
Message standard
-
Default
Pre-selection for the rule being created. If the desired default is not available, select Custom to create an entirely new rule.
|
When selecting the S.W.I.F.T standard, currently only MT940 messages are supported. MT940 is used for the paperless transmission of account information. Currently, it is only possible to convert MT940 messages to XML, not vice versa. |
|
A license is required to use EDI rules. Only EDI standards for which you own a license will be displayed. |
-
Custom name
Enabled when the Custom standard has been selected. The name of the standard being generated.
-
Structure
Enabled when the Custom standard has been indicated. Select a rule structure. Based on the pre-selected structure, the rule editor will display the appropriate controls that will make it easy for you to build your rule.
-
Hierarchical with element delimiters,
such as EDIFACT
-
Hierarchical structure:
A message can contain several other messages. A message can consist of groups > segments > elements
-
Elements vary in length and are separated by delimiters
-
-
Hierarchical structure with fixed elements
such as VDA
Like a., but with fixed lengths. Non-occupied places are filled with fill characters.
-
Mixed segments with element delimiters
such as DATANORM
Like a., but without a hierarchical structure
-
Properties
Enter a name for the rule you are creating. All other entries are optional and can be modified at a later point.
Refer to Creating a New Rule in the EDI Adapter.
Rule File Explorer for EDI Adapter Incoming Messages
Usage
Generate an incoming message for an XML-EDI adapter
Call up
XSLT Converter: Module Editor > XML target file area > icon > Open > Rule File Explorer
-
Choose module
Displays a list with all available XML-EDI adapters to select the module for which the incoming message should be generated.
-
Use attribute ID
When selected, the output message contains XML elements with abbreviated identifiers (
X_<ID>orD_<ID>). -
Use attribute XML tag
When selected, the rule template is output with meaningful element names based on the value for XML tag in the conversion rule. Though meaningful element names improve the message’s readability, they also increase the file size and thus have an impact on the performance.
-
Create segment/element condition
When selected, a comment with the segment/element condition (
mandatory[M]/optional[C], e.g.req='M') is added to the rule template below segment groups, segments, complex elements, and elements. -
Create segment/element type
When selected, a comment with the type (
alpha-numeric [AN]/numeric[N]/qualifier[QL]/decimalplaces[D]/Base64 coded[B], e.g.type='AN') is added to the rule template below segment groups, segments, complex elements, and elements.The syntax of the regular expression follows the W3C standard:
-
Create description
When selected, a comment with the description, e.g.
name='Beginning of message', is added to the rule template below segment groups, segments, complex elements, and elements. -
Create segment repetition
When selected, a comment with the repetition, e.g.
loop='1' ('n'stands for unlimited), is added to the rule template below segment groups, segments, complex elements, and elements. -
Create element minimum length (available only for rules with variable length formats, e.g. EDIFACT)
When selected, a comment with the minimum length, e.g.
min='1', is added to the rule template below elements. -
Create element maximum length (available only for rules with variable length formats, e.g. EDIFACT)
When selected, a comment with the minimum length, e.g.
max='14', is added to the rule template below elements. -
Create element start position (available only for rules with fix length formats, e.g. VDA)
When selected, a comment with the start position is added to the rule template below elements.
-
Create element end position (available only for rules with fix length formats, e.g. VDA)
When selected, a comment with the end position is added to the rule template below elements.
-
Create Interchange Header (UNB) and Trailer (UNZ) (available only for EDIFACT rules)
When selected, header and trailer segments are added to the rule template and commented in the previous settings.
-
Create Interchange Header (ISA) and Trailer (IEA) (available only for ANSI.X12 rules)
When selected, header and trailer segments are added to the rule template and commented in the previous settings.
-
Create Datanorm Header (V) (available only for DATANORM rules)
When selected, a comment containing header information is added to the rule template.
-
Create Functional Group Header (UNG) and Trailer (UNE)
When selected, both the functional group header and the trailer are created when generating an XML schema or a mapping template.
-