Complex Lookup Table
With a Complex Lookup Table you can replace values in XML messages, add elements to XML messages or remove elements based on complex processing rules.
Functional Principle of the Complex Lookup Table
Processing rules and actions
Each module can contain several processing rules. In turn, a processing rule consists of several actions, which are executed on the input messages, as for example, first searching for a defined value and then replacing it.
The values, which are to be replaced, and the replacement values are stored and mapped onto each other in tables. As tables, you can use static XML tables and dynamic database tables:
-
Static tables are directly created in the Complex Lookup Table and filled with value/value pairs.
-
Dynamic tables can be loaded from a database.
Batch processing
The processing rules are executed in the order of their appearance. Each processing rules is applied exactly once to the input message.
The Complex Lookup Table calls the first processing rule and uses it to process the input message. Then, the next processing rule is applied to the already modified message. The input message changes step-by-step with each processing rule.
Example: Replacing values
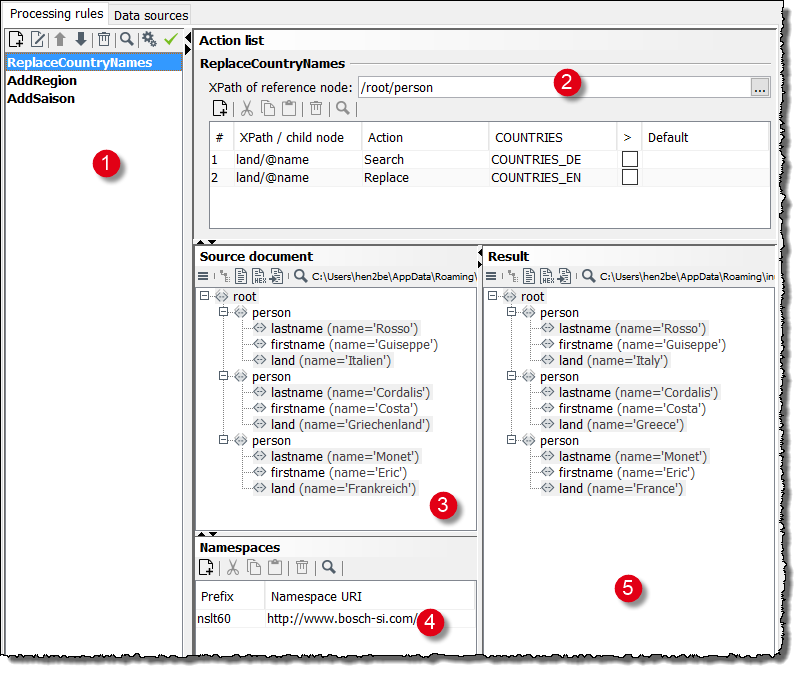
In the following example, German country names are replaced by their English equivalents.
-
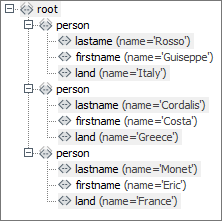
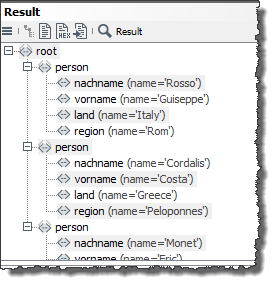
The input message has the following structure:
-
The processing rule is:
-
Search for the value of the first
landelement, which is a child element from/root/personand whose value can be found in the tableMappingCountriesin the columnName_In.Here:
Italien -
Replace the existing value by the value, which can be found in the same table in the column
Name_Outin the same row asItalien.Here:
Italy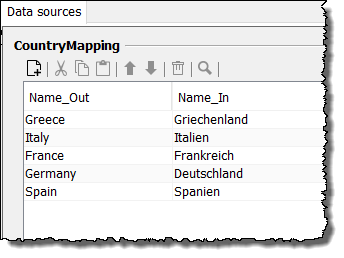
-
Do the same with all further values of the
landelements.Within the Complex Lookup Table, the processing rule is expresses like this:
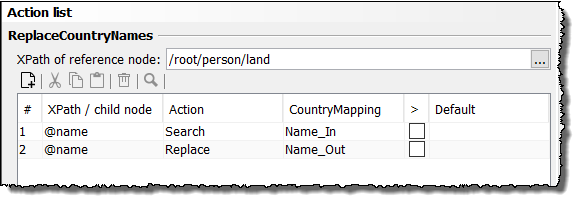
-
-
The output message looks like this:

Creating Processing Rules
Prerequisites
-
You need an XML based sample message with the same structure as the input messages, which are processed by the Complex Lookup Table in productive operations.
-
If you wish to use a database as data source:
-
The driver appropriate for your database must be installed.
Refer to Managing Libraries
-
You need the access data (username and password) for the database.
-
Proceed as follows
-
Creating a data source
-
Display the Data sources tab.
-
In the left area open the context menu and select Add. The dialog opens.
-
Check one of the options XML data source or DB data source.
-
Enter an unambiguous name and optionally a description for the new data source.
-
Only for DB data sources
Click Next.
The dialog opens.
Configure the connection to the database.
-
Click Finish.
Your data source is displayed in the left area. XML data sources are labeled by the prefix XML:, DB data sources by the prefix DB:.
-
-
Entering/displaying data in the data view
-
XML data sources
You can import data or enter it manually:
-
For importing data, open the context menu in the right area and select Import table data.
-
For entering data, manually open the context menu in the right area and select Add.
-
-
DB data sources
-
In the right area open the context menu and select Table properties. A dialog opens.
-
Select the database table and check the checkbox of all columns, which you want to edit with the processing rule.
-
Click OK to save the selection. In the data view, an empty table is displayed. The column names are used as headings.
-
To load the data from the database open the context menu and select Add.
The first 25 database records are read from the database and displayed.
-
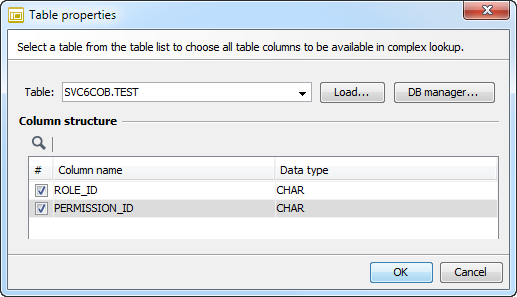
To access a table from a different schema, go to Table Properties.
A dialog opens:
-
Enter the table name in the format
schemaname.tablenameas shown in figure. -
Click Load to access the table.
-
Click OK to save the selection.
-
-
-
Creating a processing rule
-
Display the Processing rules tab.
-
In the left area open the context menu and select Add.
The dialog opens.
-
Enter a name for the processing rule. The name is displayed in the processing rules list and as heading of the action list. Define the other parameters and select data source to be used.
-
Click OK to save the processing rule.
-
-
Loading sample messages
-
In the Source document area click the
 button and select Open.
A file explorer opens.
-
Navigate to the sample message and load it. The message is displayed in the same area.
-
-
Defining the XPath of the reference node For each processing rule, you must define a common reference node for all actions with XPath. You can enter the XPath manually or drag the element out of the sample message and drop it onto the XPath of reference node entry field.
-
Defining actions The first action must always be a search for an element. If the search was successful, you can have values replaced or new elements created.
-
Searching
In order to search for an element, you can define multiple actions. All actions are connected by a logic AND implicitly.
In case the first search criterion for the first data source does not match, the next conditions for the next data sources are checked (if exists). If no other condition exists, the following actions are performed:
-
The next processing rule is executed (if there is one).
-
If there is none and the action is a replacement, the default value is used (if one exists).
-
If no default value is given, an error message is displayed and the module processing is cancelled.
The first search must always be carried out in a table. The following search can refer to values in the input message or to additional fixed values if the column entry is not sufficient for uniquely identifying a row or if the search is to be restricted to values of a specific row.
You also can search for workflow variables. For this purpose enter the name of the desired variable prefixed with a $-sign into the Fixed field.
Refer to
-
Example: XPath Expression as Additional Search Condition
If the search is to be carried out within a data source, the XPath expression must end square brackets, e.g. like in
book[@id='20']. Instead, use the XSLT functiontext(), z.B.book[@id='20']/text().
-
-
Replacing
The element whose value is to be replaced is addressed via an XPath expression. The element must be positioned underneath the reference node.
-
Creating
An XML element is created and assigned a value. Position and name of the new element are defined via an XPath expression, for example, the expression
/root/person/Ortcreates an elementOrtbelow the XML nodeperson. The element must be positioned underneath the reference node.If you have phrased a search and configured a creation or replacement afterwards, you cannot define any further actions in the same processing rule. For further actions, you must create a new processing rule.
-
-
Testing processing rules
In the toolbar, click  .
.
The test result is displayed in the Result area. If errors occur, these are output as message.
Example: Creating Elements
The example illustrates how to create elements.
Processing rule
-
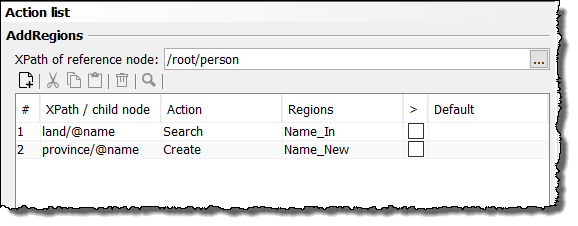
Search for the value of the first
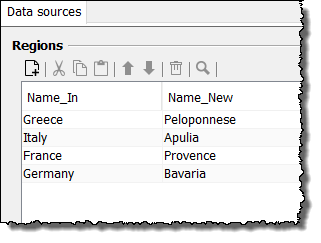
landelement, which is a child element of/root/personand whose value can be found in the data sourceRegionsin the columnName_In.Here:
Italy. -
Create the element
provinceand assign the value, which can be found in the same data source in the columnName_Newin the same row asItaly.Here:
Apulia:
In the action list the processing rule looks like this:

Example: Fixed Values as Additional Search Condition
The example illustrates how to use fixed values as additional search condition. This is necessary if defining the column is not sufficient for identifying a row, or if only values from a certain row are to be searched.
In the example, the current value of the land element is to be replaced by the value, which stands in the column
Name_New.
However, the output values cannot be assigned to input values unambiguously because some values occur more than once in the data source and are assigned to different output values.
Thus, an additional criterion must apply: exactly the value must be output, where in the column Season a very distinct value can be found.
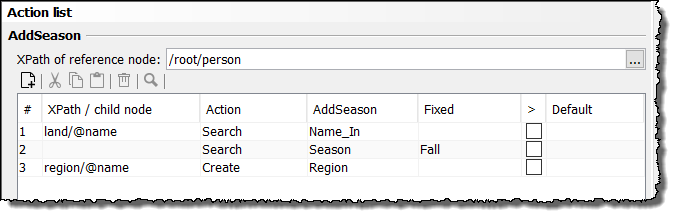
Processing rule
In the Lookup Configuration area, the option Use fixed values as additional search key is selected. Then, the column Fixed is displayed.
The following actions are defined:
-
In the
AddSeasondata source in theName_Incolumn, search for the value of the first occurrence of thelandelement from the input message.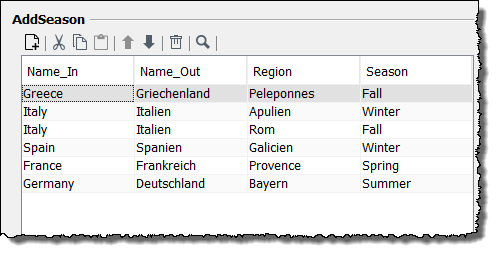
Result:
Italy.But this value occurs twice in the column.
-
In addition, check in both rows where the value
Italyappears, whether the columnSeasonhas the valueFall.This applies to row 3.
The current value of the column Region in row 3 is Rom, thus the entry province with the value Rom is created in the output message.
In the Complex Lookup Table, these actions are expressed as follows:
Example: Values of Variables as Additional Search Condition
You can use the value of workflow variables (both system variables and user-defined variables) as an additional search condition to limit the result set.
Prerequisites
-
You have defined the variable
VarAddCommentat the Complex Lookup Table as follows:-
Source: Static value, Type: Text, Value: true
-
Target: Variable
VarAddComment, Type:xs:string
-
-
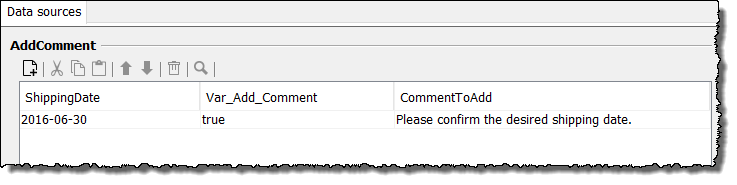
You have created a data source with the following entries:
-
You have created an input message using the following structure, and you have opened it in the XML source file area:
-
You have created a new processing rule, and you have selected the data source described above.
-
You have activated the checkboxes Active and Use fixed values as additional search key.
Processing rule
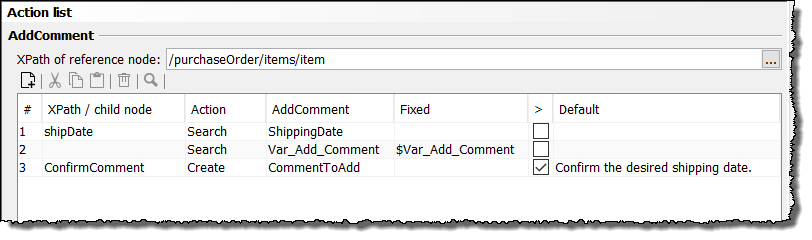
Create the following actions:
-
Search for a value for the
shipDatenode in the input message, which is equal to the first value of the ShippingDate entry in the database (2010-06-30). For this purpose, proceed as follows:-
Enter the following XPath in the field XPath of the reference node:
/purchaseOrder/items/item -
Enter
shipDatein the first line of the column XPath/child node. -
Select the Search action.
-
From the column AddComment ( name of the data source) select the entry ShippingDate (name of the first column of the data source).
-
-
Search for a column
Var_Add_Commentin the data source and check if the value in the current line is equal to the value of the variableVarAddCommentwhich has been handed over from the predecessor module. For this purpose proceed as follows:-
Select the Search action in the second line.
-
Select the entry Var_Add_Comment in the second line of the column AddComment.
-
Enter the name of the variable with a prefixed $-sign in the field Fixed:
$VarAddComment
-
-
When both of the conditions are met, create the element ConfirmComment below the reference node of the input message with the value of the current line of the column CommentToAdd in the data source. For this purpose, proceed as follows:
-
Enter
ConfirmCommentin the third line of the column XPath/child node. This element should be appended below the reference node. -
Select the Create action.
-
Select the entry CommentToAdd in the column AddComment to assign the value of the current line of the column CommentToAdd in the data source to the new element ConfirmComment: Confirm the desired shipping date.
-
Optionally, you can enter a default value in the column Default which will be added to the new element in the case one of the conditions is not met.
-
Save your changes.
-
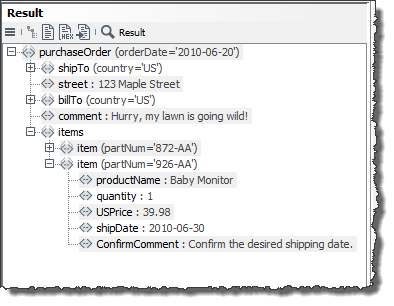
Start the module with the input message.
-
In the Complex Lookup Table, these actions look like this:
Example: XPath Expression as Additional Search Condition
To restrict your search, you can use as additional search condition an XPath expression referring to values in the input message rather than to XML or database tables.
Processing rules
The following actions are carried out:
-
In the
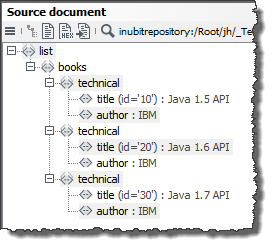
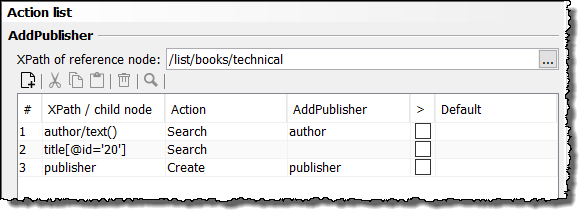
booksdata source, in theauthorcolumn, search for the value of the firstauthorelement. In the data source, the firstauthorelement is mapped to the valueIBM. -
In the input message, search for the value of the
titleelement which in parallel is associated with the attributeidand the corresponding value20. This is true for the book Java 1.6 API. -
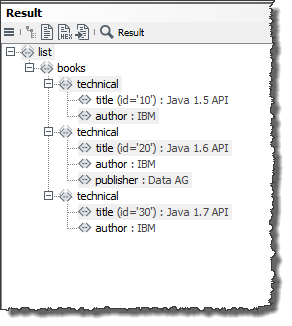
Create a
Publisherelement directly under thistitleelement and assign to this element the value which - in thebooksdata source - corresponds to the value found in step 1 (IBM) in thepublishercolumn. This is true for the valueDATA AG.
In the Complex Lookup Table, these actions look like this:
|
When executing a Complex Lookup Table module directly or within a workflow using XPath string functions, an XML node must be returned. If a value of another type is returned, a corresponding error message is displayed. |
Dialog Descriptions in the Complex Lookup Table
Data Sources Tab in the Complex Lookup Table
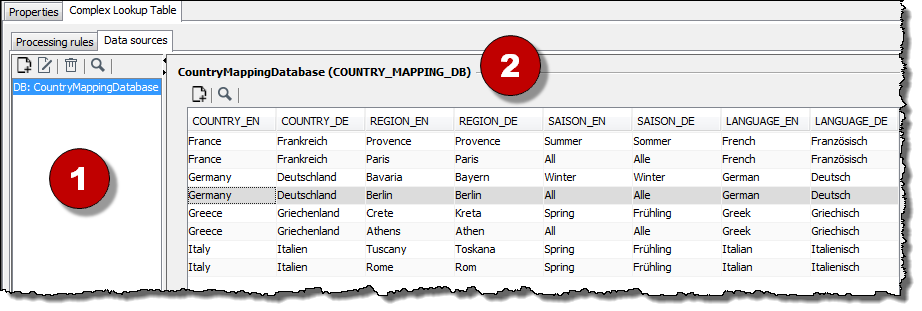
In the Data sources tab you administrate static XML data sources and dynamic DB data sources. The tab consists of the following areas:
-
List of all data sources
Displays a list of all existing data sources.
Refer to Creating Processing Rules
-
Data view
Display the column structure of the data sources selected in the List of all data sources area.
+ Using the context menu, you can edit the column structure of an XML data source or adjust the table properties of a DB data source.
+ Here, you can only add, modify and move values and import table data for XML data sources. You modify values of DB data sources directly in the database table.
Dialog Add Data Source in the Complex Lookup Table
In this dialog, you select the type of the new data source and name it.
Type
-
XML Data source
You create XML data sources directly in the Complex Lookup module. Alternatively, you can also import existing XML data sources.
Refer to Creating Processing Rules
-
DB data source
A DB data source references an external database table, either via the table name or its synonym.
Dialog Add/Edit Data Source - Configure Database Settings in the Complex Lookup Table
(Only for DB data sources)
In this dialog, you enter the database connection data.
Data source
-
Database
Select a Database Connector. Its current connection parameter are copied and used for creating the database connection. You can modify these values later on.
You can configure the connection parameters of the first database data source centrally in a system diagram. When editing a module that is managed centrally, a warning appears below the window title.
Database connection
-
Presetting
Selects a database type. Based on the selection, a database sample URL and the correct database driver are set in the following fields.
Choose the option Custom for not setting any defaults!
-
Database URL
If a selection has been made in the Presetting field, the correct sample URL for accessing the database is displayed.
To access a different database than the one shown in Presetting, ignore the presetting and enter the correct URL for your database.
-
Database driver class
Name of the database driver class. Automatically set if a database is selected in Presetting.
The database driver matching the selected database must be installed!
Refer to Managing Libraries
-
User
Valid username for the selected database.
-
Password
The password the specified user will use to log on to the database.
-
Set special encoding
When activated, you can select a character set from the list or enter another one.
-
Trim string values from database
Deletes leading and trailing blank spaces from text values.
-
Connection pooling
Opens the Dialog Connection Pooling Properties in the Database Connector dialog in which you can configure the reuse of physical database connections in order to optimize the time-consuming process of establishing and disconnecting the database connection.
Refer to Dialog Connection Pooling Properties
-
Specific connection parameters
For creating parameters like timeouts or number of open connections, which are used for configuring the database connection depending on the used database. Parameters are defined as name/value pairs.
Processing Rules Tab in the Complex Lookup Table
In the Processing rules tab, you create and configure processing rules. The tab consists of the following areas:
-
List of all processing rules
Displays a list of all already created processing rules.
You can create, edit, and delete processing rules via the context menu of this area.
Refer to Creating Processing Rules
-
Action list
For configuring the selected processing rules and for defining the individual actions.
-
Source document
For loading sample input messages.
For creating XPath expressions in the Action list area, the input message is automatically displayed in the XPath assistant.
-
Namespaces
In this area, the namespaces are displayed which are defined the input message. You can add, modify, and delete namespace definitions.
-
Result
In this area, the result is displayed after testing the processing rules.
Dialog Processing Rule Properties in the Complex Lookup Table
Processing rule settings
-
Active
Specifies whether a processing rule should be included in the message processing. Only active processing rules are included.
-
Use fixed values as additional search key
Select this option, if the value in a column is not sufficient to uniquely identify a row, or if you want to search for values in a particular row only.
When you have activated this option, you can also use workflow variables as an additional search condition.
Refer to
-
Case-sensitive
When selected replacing values is case-sensitive in case of XML Datasources.
-
Throw exception if no value is found
When activated, an error message is displayed if there is an element matching a mapping rule but it is not equal to the value in the data source.
-
Ignore error if source node is not found
When activated, no error message is displayed even if no matching element for a mapping rule can be found.
-
-
Convert empty string value to NULL during database lookup
When activated, empty character strings are replaced by NULL values. Select this option if undefined empty values are to be output as NULL values from a database.
Action List Area in the Complex Lookup Table
-
XPath of the reference node
Path to the element serving as a reference for all created actions. Searches, replacements, and creations must refer to elements whose path includes the reference node.
-
Table
-
# (First column)
Sequential number of the row.
-
XPath/Child node
Path to an element in the input XML message. Select the element in the XML source file and drag the node to the desired row.
-
Action
The actions Search, Replace and Create are available.
-
<Name of data source>
Names of the tables displayed in the Tables tab and referenced in the processing rules.
Name of the data sources activated in the Used data sources table.
The cells in this column are lists from which you can select all the column names in the table. If you use several data sources, they appear as additional columns from the left to the right in the same order you have configured on the Processing rule properties page. If the search condition is not satisfied by the first data source, the other data sources are searched. Once a search criterion matches, the next action is processed.
-
Fixed
Enter a fixed value or a reference to a workflow variable. Refer to
-
Example: Values of Variables as Additional Search Condition
This column is only displayed if you have selected the Use fixed values as additional search key option.
-
> (Operator)
When selected and a Replace or Create action is chosen, you can enter a default value in the next column.
-
Default
Default value. The XML element in the same row is always used as a replacement or for creation if no value is found that fulfills the specified condition.
When you have activated the option Throw exception if no value is found the processing will end if one of the conditions defined is not met. In this case, the default value will be ignored.
-