Mail Connector
Usage
You can use a mail connector to fetch e-mails from a POP3, IMAP, or IMAPs server or to send e-mails via an SMTP or SMTPs server.
Connector types
-
Input Connector
Fetches all unread e-mails. The Connector becomes active only, if the scheduler is activated.
-
Output Connector
Formats e-mails in MIME format and sends them.
Make sure that the SMTP server can be reached from the computer where the INUBIT Process Engine is installed. Check, whether mail relaying is required from the INUBIT Process Engine and adjust the configuration of the SMTP server accordingly. Refer to https://en.wikipedia.org/wiki/Simple_Mail_Transfer_Protocol.
In order to use the Mail Connector anonymously as mail relay, ask your mail administrator for the relay configuration. With this form of usage, you cannot test the connection.
As of INUBIT 7.4.0.39, RFC 2231 support is enabled by default. With this new behavior, in the MIME format, both long parameter values and parameter values being not coded in US-ASCII character set are displayed differently. For more information, refer to https://datatracker.ietf.org/doc/html/rfc2231.
If your mail server does not support RFC 2231, proceed as follows:
Linux
-
Open the
<SUITE-INSTALL-DIR>/inubit/server/process_engine/bindirectory. -
Open the
setenv.shscript for editing. -
In the
JVM_PARAMSsection, add the following line:JVM_PARAMS="$JVM_PARAMS -Dmail.mime.encodeparameters=false" -
Restart your INUBIT Process Engine(s) for the changes to take effect.
Windows
-
Open the
<SUITE-INSTALL-DIR>/inubit/server/process_engine\bindirectory. -
Open the
setenv.batscript for editing. -
In the
JVM_PARAMSsection, add the following line:set JVM_PARAMS=%JVM_PARAMS% -Dmail.mime.encodeparameters=false -
If you want to start your INUBIT Process Engine(s) as a service and depending on how you want to start them, repeat step 1 to 3 with the following scripts:
-
ibis_nt_service_install.cmd -
ibis_nt_service_uninstall.cmd -
ibis_nt_service_nssm_install.cmd -
ibis_nt_service_nssm_uninstall.cmd
-
-
Restart your INUBIT Process Engine(s) for the changes to take effect.
Module Variables
When executing a Mail Connector, the following variables are set, which you can analyze or overwrite:
-
Message-IDIn output connector, you can use the module property
messageIdto assign a custom ID to theMessage-IDmodule variable of an outgoing mail. Having not setmessageId, theMessage-IDgets a unique value generated by the Java mail API. -
From(only input connector) -
Reply-To(only input connector) -
Subject(only input connector)
For more information about variables and their usage, refer to Workflow Variables and Mappings.
Dialog Descriptions
Dialog Mail Connector Properties
(Input Connector)
In this dialog, you specify the access data of the mail server.
Base configuration options
-
Protocol
Select the protocol that the Mail Connector is to use.
The protocol must be supported by your e-mail server.
-
POP3
POP3 enables the copying of e-mails from a mail server to a local host. If required, the e-mails can be deleted from the mail server.
-
POP3S (POP3 over SSL/TLS)
The connection to the mail server is SSL encoded.
-
IMAP
IMAP permits access to and the administration of received e-mails. As a rule, the e-mails remain on the mail server and are only copied to the client host on request. This enables the central management of e-mails from different locations.
-
IMAPS (IMAP over SSL)
The connection to the mail server is SSL encoded.
-
-
SSL (for POP3S and IMAPS only)
For authenticating servers and/or clients. Refer to Dialog SSL Configuration.
-
Enable TLS
To enable TLS, check the Enable TLS box.
-
Server name
Name or IP address of the e-mail server.
-
Port
Port which is used for communication. The Default button restores the settings after modifications.
TOP and CAPA Options
For POP3 and POP3S protocols, it is possible to disable TOP and CAPA.
-
Enable TOP
To disable TOP, uncheck the Enable TOP box.
-
Enable CAPA
To disable CAPA, uncheck the box Enable CAPA box.
By default, the Enable TOP and Enable CAPA options are checked.
Authentication
-
Use static login data
-
Account
Username used for accessing the account.
-
Password
Password for accessing the account.
-
-
Select from Credentials Manager
For authentication, you can also use credentials managed by the Credentials Manager. Refer to Using the Credentials Manager for Authentication.
Authorization
(only if IMAP, IMAPs, POP3, or POP3s is selected as protocol)
-
Use OAuth2 Authorization
Activate this option to use the OAuth2 authorization.
If the Use OAuth2 Authorization option is selected, OAuth2 authorization will have priority over the settings in the Use Authentication section.
-
Grant Type
-
Client Credentials: Recommended for INUBIT because no user interaction is required.
-
Password Credentials
-
Custom: Select this option to configure any other grant type (e.g. refresh token flow, implicit flow)
-
-
Access Token URL
Insert the URL of the OAuth server. In addition, you can specify whether HTTP request should be sent via GET or POST.
-
Parameters
Add the parameters the selected grant type requires. You can find out which of these are in the documentation of the OAuth server you are using. The parameter table can hold any number of entries.
All parameters configured in the module wizard are available as module properties with the prefix
OAUTH_PROPERTYfor use in the variable mapping. Variable mapping can only be used to overwrite properties that were previously set in the wizard. If further parameters are to be set via variable mapping, they must first be entered in the table via the module wizard (with empty or placeholder value).
Additional options
(only if IMAP or IMAPs is selected as protocol)
-
Prevent AUTHENTICATE PLAIN command at authentication
If selected, the PLAIN authentication is disabled.
This option is useful for the connection to an Exchange server 2007.
-
Disable partial fetch
If selected, partial fetch is disabled (default).
Connection test
-
Test connection
For testing whether the connection can be successfully established using your configuration.
Dialog Configuring Data Transfers
(Input Connector)
In this dialog, you have the following options:
Read e-mails from the following sub-folder of a mailbox (default: INBOX)
For imap/imaps protocols only: In this field, you can specify a sub-folder from where the e-mails shall be read, copied, moved, or deleted.
Configuration data transfer
-
MIME
For e-mails in MIME format. E-mails are passed in unchanged form to the next module in the workflow. The MIME specification enables the exchange of messages in languages with different character sets and e-mails with multimedia enhancements. A MIME e-mail contains additional default fields in the header that describe the data type of the content and the structure of the message.
-
Ignore header error
The Mail Connector ignores the header error and continues processing of MIME/MIME-XML fetching. If the checkbox is not marked, then the old behavior (giving out an error and logging in the Queue Manager) is retained.
-
-
MIME XML
For e-mails in MIME format. An e-mail is encoded in accordance with its MIME type and its content is converted to
IBIS-MIME.XMLformat.For the conversion the following schema is used
Global > System > Mapping Templates > MIME Adapter >IBISMIME1.0.xsd.-
Ignore header error
The Mail Connector ignores header error and continues processing of MIME/MIME-XML fetching. If the checkbox is not marked, then the old behavior (giving out an error and logging in the Queue Manager) is retained.
-
Store header names inside XML lowercase
Element names written in lowercase simplify the access to the elements via XPath.
-
Encode content always base64
For transporting binary data as for example graphics.
-
Character set of the target document
The default setting is the UTF-8 character set. In addition, the following character sets can be selected: CP437, CP850, ISO‑8859‑1, US-ASCII, UTF‑16, UTF-16BE, and UTF-16LE. You can also enter any other character set manually, if needed.
-
-
Index of content of the mailbox as MIME XML or MIME
Loads the header information from the specified mailbox and converts it to MIME XML or MIME. As a rule, the header information contains the subject, sender, date, and priority.
-
Don’t mark message as read
This option is applicable only for both protocols IMAP and IMAPs. When this option is selected, on the Message configuration dialog, the Delete after reading option will be disabled. If the Delete after reading option was already selected, it will be unselected and disabled.
If activated, read messages are not marked as read. By default, the option is deactivated.
If the directory contains read and unread messages, the status is not changed.
If activated, the options underneath are disabled.
When migrating workflows of the Mail Connector from source system to target system, the option has to be checked manually.
-
Including message data
-
Encode content always base64
For transporting binary data as for example graphics.
-
Store header names inside XML lowercase
Element names which are all written in lowercase simplify the access to the elements via XPath.
-
MIME
Loads the header information from the specified mailbox.
-
Character set of the target document
The default setting is the UTF-8 character set.
In addition, the following character sets can be selected: CP437, CP850, ISO‑8859‑1, US-ASCII, UTF‑16, UTF-16BE, and UTF-16LE.
You can also enter any other character set manually if needed.
-
Number of Mails
In this field, you can mention the number of mails you wish to receive as opposed to receiving all mails in the inbox.
-
Data
-
Of the message body
The message is taken from the message body (the part that usually contains the message content).
-
From the attachment
The message is taken from the attachment. Note that some e-mail programs such as Outlook also send plain text messages as attachments.
-
Attachment name/Or the number of the attachment index
If you leave these fields blank, the first file attached to the e-mail is forwarded to the workflow. Only the first file is forwarded, even if the e-mail has several attachments.
To forward a specific attachment for an e-mail with several attachments, specify its name or position.
-
-
Dialog Message Configuration
(Input Connector)
In this dialog you have the following options:
Delete after reading
Delete
If activated, the messages are copied from the mail server to the INUBIT Process Engine and are then deleted from the mail server.
|
If this option is activated and the e-mail contents are empty (Body = 0 Byte), but the e-mail has an attachment, the e-mail will be deleted after being read and no workflow is started. To prevent this from happening, you must activate the MIME XML option in the Configure data transfer tab. |
Copy or Move after reading
-
Copy
If activated, e-mails are copied to the target directory and kept in the inbox.
-
Move
If activated, e-mails are copied to the target directory and removed from the inbox.
-
Directory
Select the target directory to which e-mails are copied or moved.
Filter options
For defining filter criteria with which e-mails must comply in order to be fetched from the server.
-
Ignore messages that are already marked as read (IMAP and IMAPs protocol)
If activated, e-mails marked as read are ignored.
-
Filter relation
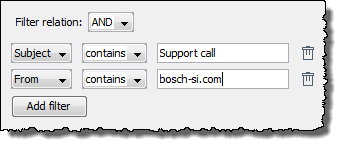
If more than one filter is defined:
-
AND
A message must comply with all filters in order to be fetched.
-
OR
The message must comply with at least one filter in order to be fetched.
-
-
Add filter
The button adds a row with which you define a new filter criteria:
-
Subject/From/To: List for selecting the field which is to be filtered. Furthermore, you can enter arbitrary e-mail header field names directly, e.g. Message-ID.
-
contains/does not contain: Select whether a certain string must be present in the selected field.
-
Entry field: For entering the string which must or must not be present.
-
-
Delete filter criteria
Click the
 icon to delete a filter criteria.
Dialog S/MIME Decryption in the Mail Connector
(Input Connector)
In this dialog you have the following options:
-
Activate decryption
If the e-mails you fetched using the Mail Connector are encrypted, check this option to decrypt them
Add private key
-
Add (button)
The button opens a file explorer for loading the keystore file containing the key for decrypting the e-mails.
Before loading the keystore you must enter the alias and password of the key.
Public key data
Displays the public data of the certificate after loading it.
Dialog Properties of Input Data
(Output Connector)
In this dialog, you have the following options:
Configuration for sending
-
MIME formatted (RCF 822)
For sending Mime-formatted input messages.
-
MIME XML
For sending input messages which are formatted in accordance with the XML schema file at Global > System > Mapping Templates > MIME Adapter > IBISMime1.0.xsd.
If you have selected Mime formatted or Mime XML, the content of the input messages are only utilized, if you leave the Message area empty.
Refer to Dialog SMTP Connector Properties.
-
Data
For sending messages in any formats.
-
Mime type of data
Information about the type of data to be sent.
-
Content-Transfer-Encoding
For defining a secure encoding for non-ASCII characters (for example special characters) and non-text parts (for example binaries) when transferring data. Guarantees a lossless data exchange.
-
auto:
The value of the header Content-Transfer-Encoding is defined automatically according to the content-type and the data which are to be send.
-
base64
For transferring binary or 8-bit-encoded messages.
-
-
-
As e-mail attachment
Sends the input message as an attachment to an e-mail.
-
Name of the attachment
For defining the name of the attachment.
You can have a date, timestamp or process ID added to the name of the attachment:
Date
You have different options for outputting the date:
-
As definition without date format,
name_%TimeStamp%%.xmlgeneratesname_12122020-151047.xmlwith name=attachmentname, 12122020=Date formatted asddMMyyyy, 151047=time formatted ashhmmss. -
As definition with date format
hh,name_%TimeStamp%hh%.xmlgeneratesname_11.xml. -
As definition with date format
ddMM,name_%TimeStamp%ddMM%.xmlgeneratesname_2309.xml.
Timestamp
The timestamp additionally contains a specification in milliseconds:
name_%TimeStamp%ddMMyyyy-HHmmss-SSS%.xmlresults inname_12122020-151304-027.xml.Process ID
In order to output the process ID, enter the attachment name in the following format:
name_PID_%ProcessId%.xml. -
-
Additional text attachment
You can generate an additional text attachment that you insert into the input field.
-
Additional HTML text for attachment
You can generate an additional HTML text for the attachment that you insert into the input field.
You can use only one of the two options.
Dialog SMTP Connector Properties
(Output Connector)
You use the dialog to define the properties of the SMTP server and the message.
Basic configuration
-
Protocol
-
SMTP: Protocol for sending and forwarding e-mails.
-
SMTPs: (SMTP via SSL) Encrypts the connection by using SSL.
-
-
SSL (for SMTPs only)
For authenticating servers and/or clients. Refer to Dialog SSL Configuration.
-
enable TLS
To activate/deactivate secure data transfer
-
enable DSN
To activate/deactivate sending a Delivery Status Notification. When enable DSN is activated, a mail delivery mail is sent to the sender of the e-mail for both success and failure.
This option can be used only if mail server supports the DSN feature.
-
enable SSL
To activate/deactivate the Secure Sockets Layer. When enable SSL is activated, SSL is enabled for mailboxes.
As Microsoft Outlook does not support SSL, this option should not be activated. All other mailboxes such as Gmail support SSL so this option should be activated.
-
Server name
URL of the SMTP server (domain name or IP address). If you do not make a specification,
localhostis set automatically. -
Port
Preset to 25 and 465, respectively. The Default button restores the default setting after changes.
Authentication/Authorization
Check the option, if the mail server requires an authentication.
-
Use static login data
-
Account: Username.
-
Password: Password you received along with the username.
-
-
Select from Credentials Manager
For authentication, you can also use credentials managed by the Credentials Manager. Refer to Using the Credentials Manager for Authentication.
-
Use OAuth2 Authorization
Activate this option to use the OAuth2 authorization
If the Use OAuth2 Authorization option is selected, OAuth2 authorization will have priority over the settings in the Authentication section.
-
Grant Type
Type of granting access
-
Client Credentials
-
Password Credentials
-
-
Access Token URL
Endpoint at authorization server to obtain access token.
-
Client Id
Client identifier issued to the client during the application registration process.
-
Client Secret
Client secret issued to the client during the application registration process.
-
Scope of the access request
Scope of the access request; multiple space-delimited constraints are possible, e.g.: read write
-
Username
Name of the user to be authorized
-
Password (for Password Credentials as Grant Type only)
Password of the user to be authorized
Message
You can leave the fields empty, if the input message is sent as XML or MIME because then sender, recipient, and subject are normally already included.
A list of recipients in the sequence TO, CC, BCC is created from the existing MIME headers.
For each address in the list, an RCPT TO: command is sent to the mail server.
|
If you fill in the fields in the Message area, these values overwrite the values from the XML or MIME input message. |
-
From: Sender address.
-
To: Recipient address. Separate multiple recipient addresses with commas.
-
Cc: Additional recipient addresses; separate recipient addresses with commas.
-
Bcc: Recipient addresses that are not visible to To and Cc recipients. Separate multiple recipient addresses with commas.
-
Reply to: Fill in this field if the sender address is not the address to which you want recipients to reply.
-
Subject: Specify the subject of the e-mail.
You can have a date, timestamp or process ID added to the subject:
Date
You have different options for outputting the date. As definition without date format,
subject_%TimeStamp%%.xmlgeneratessubject_06082008-151047.xml. As definition with date formathh,subject_%TimeStamp%hh%.xmlgeneratessubject_11.xml. As definition with date formatddMM,subject_%TimeStamp%ddMM%.xmlgeneratessubject_2309.xml.Timestamp
The timestamp additionally contains a specification in milliseconds:
subject_%TimeStamp%ddMMyyyy-HHmmss-SSS%.xmlresults insubject_12122002-151304-027.xml.Process ID
In order to output the process ID, enter the subject name in the following format:
subject_PID_%ProcessId%.xml.
Connection test
-
Test connection
For testing whether the connection can be successfully established using your configuration.
Dialog S/MIME Encryption in the Mail Connector
(Output Connector)
In the dialog S/MIME encryption, you can encrypt messages with S/MIME.
Activate encryption: Activates encryption
-
Encryption algorithm
Select the encryption algorithm from the drop-down list.
-
Key encryption algorithm
|
If no key encryption algorithm is selected, the key encryption algorithm configured in the certificate is considered. You can also use the |
Add recipient’s public certificate
Add: Clicking on Add opens a file explorer for loading the keystore file with the key.
|
You need to enter the alias and password used to store the certificate! |
Certificate data
After loading the certificate its public data is displayed.