Using BPM Rules
Usage
The BPM Rules component of the INUBIT software offers the possibility to formalize and automatize decisions in business processes using rules, to select data from data structures by using rules and to forward tasks to employees based on these rules.
BPM Rules are created in the INUBIT Workbench, filled with default values and centrally stored in the Repository. Thus, BPM rules can be deployed company-wide on a technical and functional level.
Besides their technical definition, BPM rules do always have a business representation. This representation can be used by business users to assign BPM rules to elements of their business process description and to adjust them.
BPM Rules can be instantiated and thus make it possible that global rules that have been created on a company-wide level can be adapted for individual departments and can thus be assigned individual values.
The resulting process models are made available in the BPC Portal where they can also be adjusted by business users.
Controlling business process via BPM rules which are managed centrally increases the flexibility of applications and allows for even faster adaptations of complex process implementations through business users.
Example
With BPM rules, the Assembler AG ensures that all orders exceeding a given order value are released by the respective department managers before they are sent to the suppliers.
In order to implement this, the Assembler AG had their order process mapped onto a Business Process Diagram and realized technically by a Technical Workflow. The BPM rules are stored on the business level as well as on the technical level. The company‘s organizational structure is defined in an Organization Diagram.
The order process looks as follows:
-
Employee Smith needs a new office chair. He fills in an order form in the BPC Portal and submits it.
-
By clicking the Submit button the Technical Workflow is started which spots a BPM rule checking the order value.
Because the office chair costs more than the maximum order value, the order is routed into the corresponding release workflow.
Refer to Rule Type Decision Rule. -
In the release workflow at the Task Generator, the order meets the BPM rule Assign task to employee having the role department manager.
Refer to Rule Type Task Rule.
On basis of the Organization Diagram Mr. Smith‘s department manager is determined. -
The Task Generator creates a task Release order for the department manager. The department manager finds the task in his task list within the BPC Portal, checks the order and releases it.
Now, the order is send to the supplier. -
Besides the ordinary order process, the sales department needs regular access to customer numbers for orders exceeding a certain order sum. This action is represented by a data-based BPM rule.
Refer to Rule Type Data Rule.
In case the Assembler AG wants to modify the sum above which orders must be released officially or customer data are required and extracted, the Assembler AG only needs enter the new value in the BPM rules in the Process Viewer of the BPC Portal or in the Business Process Diagram in the INUBIT Workbench. No changes of Technical Workflows are required.
Rule Type Task Rule
Usage
With the rule type task rule you can let forward tasks to employees and define, to whom these employees may delegate their tasks.
Proceed as follows
-
Depicting an organization as Organization Diagram
-
Creating a task rule
A task rule consists of an XPath expression which is executed on the XML Schema representation of the Organization Diagram:
Example Explanation Business definition
Assigning tasks to employees with the role
$roleNameTechnical definition
/Model/orgUnit/orgRole[@name=$roleName]/orgPersonParameter
$roleNameParameter value
The values which can be selected on the business level are restricted by means of the XPath expression
/Model/orgUnit/orgRoleto those roles which exist in the Organization Diagram:
You can display the task rules which are executed on an Organization Diagram directly at this Organization Diagram.
Refer to -
Assigning task rules
-
On the technical level:
Refer to Task Rules in Task Generators. -
On the business level:
Refer to Assigning Task Rules to Tasks and Adjusting Values.
-
-
Adjusting task rule in the portal
Refer to Adjusting Rules in the BPC Portal.
Identifying Tasks for a User
Rules defined for an organizational chart can be reused to assign tasks to all elements of an organizational chart (users, roles, and organizational units – even combined).
If a user requests his task list, the tasks are identified as follows:
-
All organizational charts are identified where he is registered with his portal login name.
-
All organizational units and roles are identified which are valid for the user.
-
It is identified if there are tasks for the organizational units and roles identified in step 2 as well as for the user himself.
-
All tasks are identified for the process user roles where the user is a member of.
-
All identified tasks are displayed.
The organizational charts and the portal user management or the LDAP user management can be synchronized using workflows.
Rule Type Decision Rule
Usage
The rule type decision rule renders it possible, to control the message flow with rules. To achieve this, you define branching conditions as a rule and connect the rule with workflow controls like, for example, Demultiplexers.
Proceed as follows
-
Creating a decision rule
Example Explanation Business definition
Check whether the sum of an order value is larger than
$maxAmountTechnical definition
//Order/Amount/sum > $maxAmountAdjustable parameters
$maxAmountParameter values
For
$maxAmounta default value is defined, which can be adjusted on the business level.Refer to Creating Tasks, Data, or Decision Rules.
-
Assigning the decision rule
-
On the technical level: Refer to Decision Rules at Demultiplexer, Switch and If.
-
On the business level: Refer to Using Decision Rules at Gateways.
-
-
Adjusting decision rule in the portal Refer to Adjusting Rules in the BPC Portal.
Rule Type Data Rule
Usage
The value-based rule type Data Rule contains an XPath expression used to select any data from a given data structure (e.g. an XML-based order list) or from parameter/variable values. To do this, you define a condition that delivers a return value that can be used for parameterization or you only define parameters that are directly used in the workflow.
Proceed as follows
-
Creating a data rule
Example Explanation Business definition
Provides as return value client data for clients with an order value exceeding
$maxAmount.Technical definition
//Order/Customerdata[../Amount/sum > $maxAmount]Adjustable parameters
$maxAmountParameter values
For the parameter a default value is defined, which can be adjusted on the business level.
Refer to Creating Tasks, Data, or Decision Rules.
-
Assigning data rule
-
On the technical level:
Refer to Task, Decision and Data Rules in Variables Mapping. -
On the business level: Refer to Using Data Rules at Tasks.
-
-
Adjusting decision rule in the portal Refer to Adjusting Rules in the BPC Portal.
Creating Tasks, Data, or Decision Rules
Tasks, data, and decision rules can be created, edited and deleted in the Repository view BPM rules.
For information about the functional principle of these rules refer to
Proceed as follows
-
In the INUBIT Workbench, display the Repository tab.
-
Display the BPM rules view.
Refer to View (DropDown list) in section Repository User Interface. -
Navigate to the directory where the rules are to be stored.
In case there are already rules stored in the directory, these rules are displayed. -
To create a new rule, do one of the following:
-
Click the
 button.
 -
Open the context menu of the directory area and select Add rule. The dialog for creating rules opens up:
Refer to Dialog Adding Rules.
-
-
Select the type of rule.
-
Name the rule.
Creating functional definition
-
In the Functional definition tab, enter the business representation of the rule.
This representation is displayed in the Business Process Diagrams and in the Process Viewer for business users. This means, you should phrase the representation in such a way that the meaning of the rule and the adjustable parameters become clear.
Creating technical definition
-
In the Technical definition tab define the technical rule:
-
Decision rule:
-
In case the structure of the rule is defined by an XML Schema you can select this Schema and the element to make creating the XPath expression easier.
-
Define the XPath version and the XPath expression. Parameters business users can adjust are marked with $, e.g.
$maxAmount.
The XPath wizard can help you with creating the expression: Click the button to open the XPath wizard.+ Refer to XPath Assistant.
-
-
Task rule:
-
Specify the Organization Diagram on which the XPath expression is to be executed.
-
Define the XPath version and the XPath expression in such a way that XML elements of the organization diagram are selected. You can use the XPath wizard here as well.
-
-
Data rule:
-
If the rule applies to a schema, select the respective schema and the element, for which the condition applies, here.
-
Define an XPath expression and select an XPath version.
The XPath assistant supports you in defining the expression: Click the button to open the XPath wizard.
-
-
-
To define the parameters which can be adjusted by business users later, open the context menu of the Parameter area and select Add parameter, e.g.
maxAmount.
Define the types, default values and allowed values of the parameters. Parameters that can be adjusted by business users are characterized by $ in the functional definition, e.g.$maxAmount. -
To define who may be allowed to adjust the parameters in the BPC Portal display the Process user roles tab and select the appropriate roles.
-
Click OK to save the rule.
The rule is displayed in the directory area.
Creating Rule Instances
You can create instances of individual rules. Thus, it is possible - without the bother of creating copies - to adapt company- wide created global rules for individual departments and to assign individual values to them.
Proceed as follows
-
In the INUBIT Workbench, display the Repository tab.
-
Display the BPM rules view.
Refer to View (DropDown list) in section Repository User Interface. -
Navigate to the directory where the rule is stored that is to be used as basis for the new rule instance.
-
Select the rule that is the basis for the new instance.
-
To create a new rule instance, perform one of the following operations:
-
Click
 .
. -
Open the context menu of the selected rule and select Add rule instance for selected rule.
A dialog opens and displays the data of the original rule.
Refer to Dialog Adding Rules.When creating rule instances, you can only change the values of the Name and File name fields as well as assignment of process user roles and the parameter values. All other data of the original rule cannot be edited.
-
-
If necessary, change name, file name, parameter values and process user role assignments.
-
Click OK to save your changes.
→ The rule instance is displayed in the directory area. Rule instances are characterized by another icon as rules themselves.
|
Due to the reference between original rule and rule instance, all subsequent changes to technical and/or business definition of the original rule are automatically inherited by all rule instances. |
Combining Rules to Rule Sets
You can combine rules to rule sets. By default, all rules are connected to one rule by using the AND operator.
In order to create complex decisions, you can also combine rules with other operators thus create rule trees. There are specific operators for each rule type.
Rules can only be combined to a rule set if they have the same type and are executed on the same data structure:
-
All rules of a task rule set are task rules and refer to the same Organization Diagram.
-
All rules of a data or decision rule set are either data or decision rules. In case XML Schemas are given, it must always be the same XML Schema.
Proceed as follows
-
In the INUBIT Workbench display the Repository tab.
-
Display the BPM rules view. Refer to View (DropDown list) in section Repository User Interface.
-
Navigate to the directory where the rules are stored which you want to combine.
-
Do one of the following to create a rule set:
-
Click the
 button.
 -
Open the context menu of the directory area and select Add rule set.
The dialog for creating a rule set opens up.
Refer to Dialog Adding Rule Set for BPM Rules.
-
-
Name the rule set.
-
To add rules, click the
button.
The rule browser opens. -
Select all rules which are to be added.
-
Click OK to accept the choice.
The selected rules are displayed in the Contained rules area.By default, decision rules are combined by the AND operator. Task rules and data rules are, by default, combined by the Union operator.
-
By using the extended combination possibilities with AND, OR and IF-THEN for rule definition, you can create complex decisions. To do this, select for each rule type operators available in the Rule definition window to add to the definition.
-
Click OK to save the rule set.
→ The rule set is displayed in the directory area.
|
You can copy available rule sets by using the |

Assigning Rules on the Technical Level
In order to control the task forwarding, task delegation or the message flow on the technical level, task and decision rules must be assigned to modules in Technical Workflows or use them in the variables mapping. Data rules on workflow level are only used in the variables mapping.
Task Rules in Task Generators
Task rules must be assigned to Task Generators.
Proceed as follows
-
Open the Task Generator for editing.
-
In the dialog, select a task rule or rule set
Refer to Permissions Dialog
Decision Rules at Demultiplexer, Switch and If
You can use decision rules at the connection lines of the following modules:
-
Demultiplexer
Refer to Demultiplexer. -
Switch elements
Refer to Using Switch Elements. -
If element
Refer to Tools in Technical Workflow Diagrams
Task, Decision and Data Rules in Variables Mapping
All rule types can be used as source for a mapping rule in the variables mapping.
Refer to
Proceed as follows
-
Display the desired Technical Workflow in the local mode.
-
Select the module where you want to use the variables mapping. A V button is displayed at the lower left side of the module.
-
Double-click the V button.
The dialog Dialog Variables mapping opens.
-
To create a new mapping rule, click
 in the toolbar.
 -
Select BPM rule as source.
-
To select a rule, click the
button in the Rule field.
The Repository Explorer opens. -
Navigate to the directory in the Repository where the rule is stored and select it.
-
Confirm the selection by clicking OK.
-
The Repository Explorer closes. The selected rule is displayed.
-
Select if you want to use the Rule XPath result or the Rule parameter. Depending on your choice, the respective values are displayed.
-
If you use the Rule XPath result, select the structure in the Execute on field that you want to use in the XPath.
If you only use variables or parameters in the XPath, you can also select Empty document.
Assigning Rules on Business Level
To control task forwarding, task delegation or the message flow on the business level, you must assign task and decision rules to elements in Business Process Diagrams. You assign data rules to task elements in Business Process Diagrams.
Assigning Task Rules to Tasks and Adjusting Values
Proceed as follows
-
Open the Business Process Diagram for editing.
-
Point at a task element with your cursor. A rule button ® is displayed:
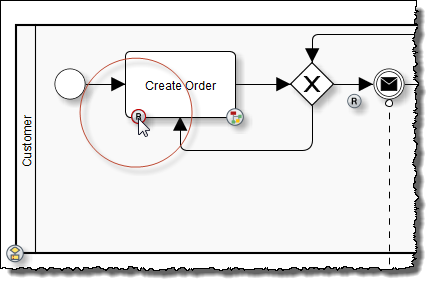
-
Double-click the rule button. The dialog for assigning a rule opens.
-
To assign a rule, click
in the Rule field.
The Repository Explorer opens. -
Navigate to the Repository directory, where the task rule is stored and select it.
-
Confirm your choice with OK.
The Repository Explorer closes. The selected task rule is displayed. -
Adjust the parameter values.
You can also adjust parameters in the BPC Portal in the Process Viewer.
Refer to Adjusting Rules in the BPC Portal. -
Save the assignment with OK.
Using Decision Rules at Gateways
Proceed as follows
-
Open your Business Process Diagram for editing.
-
With the cursor, point at a connection after a Gateway element. A rule button is displayed:
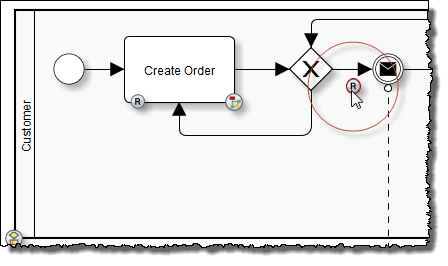
-
Double-click the rule button. The dialog for assigning a rule opens.
-
Proceed as described in step 4 of section Assigning Task Rules to Tasks and Adjusting Values.
Using Data Rules at Tasks
Proceed as follows
-
Open the Business Process Diagram for editing.
-
Continue as described in step 2 in paragraph Assigning Task Rules to Tasks and Adjusting Values. Instead of Task rule, use Data rule.
Displaying the Use of Rules
In the BPM rules view of the Repository, the Usage tab lists where the different rules are used in diagrams:
-
Usage of rules in Business Process Diagrams
-
Usage of rules in workflows
-
Usage of task rules in modules where the rules are used as delivery and/or delegation rules
Proceed as follows
-
In the INUBIT Workbench, display the Repository tab.
-
Display the BPM rules view.
Refer to View (DropDown list) in section Repository User Interface. -
Navigate to the directory containing the rule the usage of which you want to display.
-
Select the rule and display the Usage tab.
→ The usage of the rules is displayed in different categories, depending on whether they are used in workflows and Business Process Diagrams.
Jump from Repository to diagram
Double-click the line that lists the usage of the rule.
→ The corresponding BPD or the corresponding workflow is displayed and the element or module to which the rules is assigned is highlighted.
Afterward, you can jump back from the diagram to the Repository.
|
Jumping back from the diagram to the Repository is only possible if the rule is configured via the mapping of variables, at the if frame exit, at the switch frame exit, or at a Demultiplexer. A Task Generator’s task rule does not allow jumping to the Repository. |
Jump from diagram to Repository
Depending on whether you are in a workflow or BPD, perform one of the following operations:
-
Jump from BPD to rule in Repository:
-
Open the diagram for editing.
-
With the cursor, point at a task element. A rule button is displayed.
-
From the context menu of the rule button, click Show BPM rule in the Repository.
→ You are automatically directed to the Repository. The used rule is highlighted in the directory area.
-
-
Jump from Technical Workflow to rule in the Repository:
-
Open the diagram for editing.
-
With the cursor, point at the concerning Technical Workflows module. A V button is displayed on the bottom left.
-
From the context menu of the V button, click Show BPM rule in the repository.
For the modules Demultiplexer, If, and Switch, you must open the context menu(s) of the connection(s) with the previous module(s) and click Show BPM rule in the repository.
-
Select a rule.
→ You are automatically directed to the Repository. The used rule is highlighted in the directory area.
-
Adjusting Rules in the BPC Portal
You can display rules in the INUBIT BPC Documentation module and adjust its parameters.
Prerequisites
-
The rules are already assigned to elements in a Business Process Diagram.
-
You have a process user role with the permission to adjust rules.
The right is assigned when creating the rule, refer to "Process user roles" tab in section Dialog Adding Rules.
Proceed as follows
-
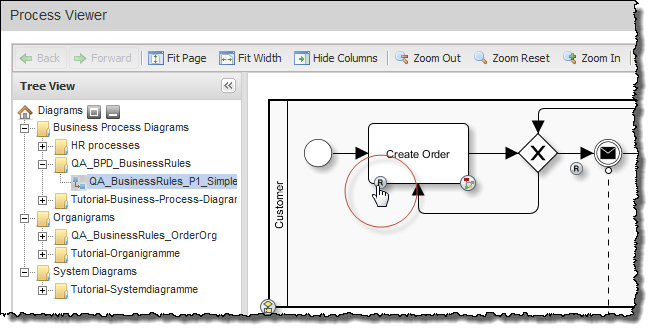
Display the Business Process Diagram in the Process Viewer of the INUBIT-BPC Integration.
-
Click the rule button of the rule that you want to edit:
The rule is displayed:
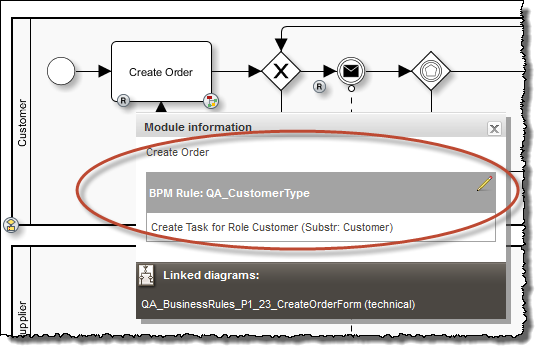
Parameters which you can adjust are displayed on bold.
-
To adjust a parameter, click the
 button.
The rule is opened for editing:
button.
The rule is opened for editing: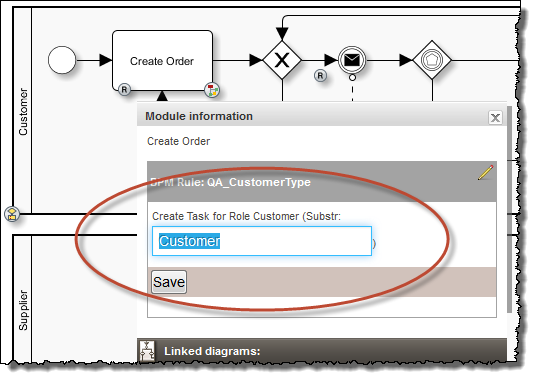
-
Adjust the parameter value.
-
Click Save to store your changes into the Business Process Diagram on the INUBIT Process Engine.
→ The page is refreshed. If you display the rule again, the new parameter values are displayed.
Dialog Descriptions for BPM Rules
Dialog Adding Rules

General definition
-
Name
Name of the rule. Is displayed everywhere, where the rule can be assigned to elements/modules and should thus be meaningful.
The name is also used as file name for storing the rule automatically. -
Type
For defining whether you want to create a decision, data or a task rule.
Refer to -
File name
Name of the file in which the rule is stored in the Repository. -
Directory
Place where the rule is stored. As a default the Repository folder of the user who creates the rule is suggested. You can change the place.
Functional definition tab
Business-related description of the rule including its parameter, which can be adjusted by business users.
The business-related description is displayed for business users in the Business Process Diagrams and in the Process Viewer.
Technical definition tab
-
Data structure the rule works on
The following options depend on the rule type:-
Organization diagram: For task rules for selecting an organization diagram the rule refers to.
-
Schema: For decision and data rules for selecting the XML Schema the rule refers to.
-
Element: For decision and data rules for selecting the element the rule refers to.
-
-
Expression
XPath/XPath 2.0/XPath 3.1:
For selecting the XPath version and defining the XPath expression. In the XPath wizard, the XPath expression is executed immediately, and its result is displayed in the Result field!
Process user roles tab
(Only, if process user server is activated)
For selecting the roles which are permitted to adjust rules in the portal.
Parameters
For defining the parameters, business users can adjust in Business Process Diagrams and in the Process Viewer of the BPC Portal. the following:
-
Name
Parameter name -
Type
Parameter type Possible values:-
string: sequence of characters
-
boolean: Boolean value
-
true: yes
-
false: no
-
-
int: 32-bit integer
-
long: 64-bit integer
-
-
Value
parameter value -
Value restriction
Defines which value can be entered or selected in the value column.-
None
All values allowed by the selected data type can be entered. -
List
Only values entered in the Possible values column can be selected. -
From workflow variable
The parameter value is imported from a workflow variable with the same name. -
XPath (for task rules only)
Allows to enter an XPath expression in the Possible values column, e.g., to query roles or users in an organizational chart.
This XPath expression is executed on the organizational chart referenced in the task rule. All objects whose name is available as a possible value are selected. Therefore, the XPath has to reference one or more elements (orgUnit/orgRole/orgPersonetc.), e.g.:/Model/orgUnit[@name='Company X']/orgUnit
The selected organizational chart elements are displayed separately beneath the XPath result in the XPath assistant.
In this case, select thexs:stringparameter type.
-
-
Possible values (for the List value restriction only)
For entering valid parameter values.
To add, edit, or delete values double-click the field for editing. Afterwards, click the icon at the end of the line.
Dialog Adding Rule Set for BPM Rules
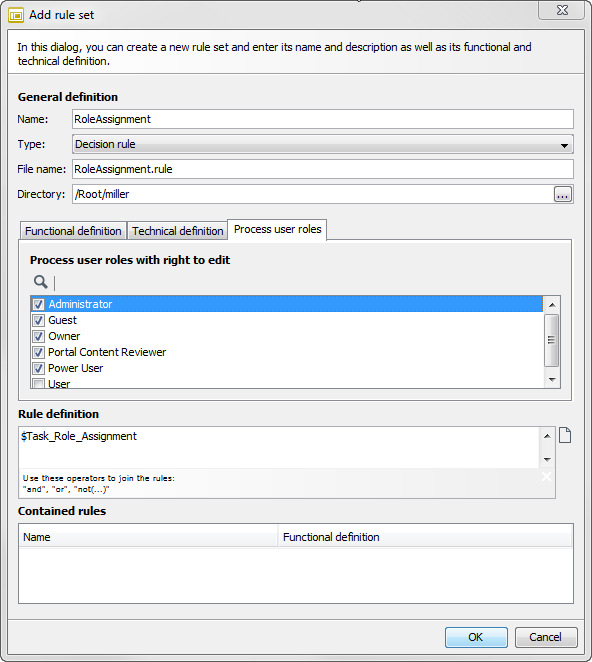
General definition
Here, you create the same definitions as in the dialog for creating new rules:
Refer to General definition in section Dialog Adding Rules.
The settings in the different tabs are the same as in the dialog for creating rules:
Refer to Functional definition tab in section Dialog Adding Rules.
Rule definition
For adding and aggregating the rules of the new rule set. For connecting the rules you use operators which are specific for each rule type.
Refer to Combining Rules to Rule Sets.
Contained rules
The table provides an overview about all rules contained in the rule set and their business definitions.