Use OpenID Connect Authorization in REST Connector
REST Listener
If Keycloak is selected as authentication on the REST connector, the listener forwards the authentication information for verification accordingly. Thus, any incoming request to this listener will be authenticated by the configured Keycloak OIDC (OpenID Connect) server.
To add the required information for Keycloak authorization, enter the well-known URL of Keycloak in the text field (https://<hostname>:<port>/auth/realms/<keycloak-realm-name>/.well-known/openid-configuration) and click Select configuration file to open the Select JSON configuration dialog. The keycloak.json file stored in the INUBIT repository can be loaded by clicking the corresponding button in the Select file from repository input field.
Alternatively, you can directly copy the contents of the keycloak.json file and paste it in the Keycloak JSON content text area.

Call the REST Connector listener
The REST medium/output connector allows access to authorized REST Connector listener resources through Basic Authorization and Bearer Token Authorization.
-
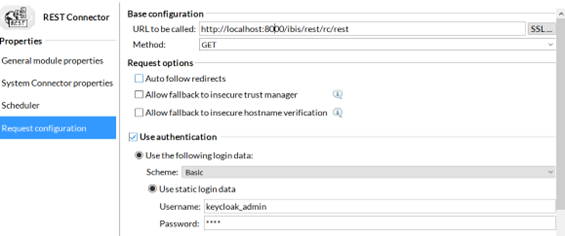
Basic Authorization: To access the REST Connector listener, use the Listener URL, Basic scheme authentication, and provide the username and password of Keycloak in the Request configuration page.
For example, in Keycloak server, the user and credentials for the user would be created as keycloak_admin and Test. We need to provide the same credentials here.
-
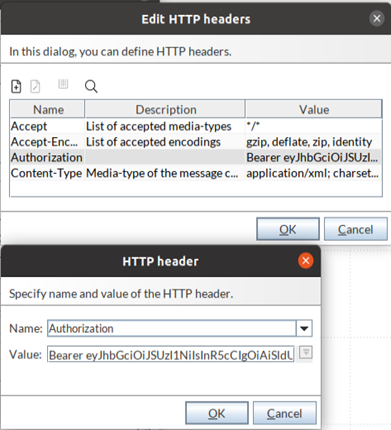
Bearer Token Authorization: To access the REST Connector listener using a Token, in the REST Medium/Output Connector, use the Listener URL and edit the HTTP headers on the Request configuration page. In the HTTP headers, specify the name as Authorization and the value as Bearer <Token>.
Username and password are not required to access the REST Connector listener using the authorization token.
Generate a Keycloak bearer token
Utilize this CURL command to generate a Keycloak bearer token.
Input
curl --request POST --url https://<keycloak-server>:<port>/auth/realms/<realm-name>/protocol/openid-connect/token --header 'Content-Type: application/x-www-form-urlencoded' --data 'grant_type=password&client_id=<client-id>&client_secret=<client-secret>&username=<username>&password=<password>'Enter appropriate values for <keycloak-server>, <port>, <realm-name>, <client-id>, <client-secret>, <username>, <password> according to your configuration.
Output
{
  "access_token": "eyJhbGciOiJSUzI1NiIsInR5cCIgOiAiSldUIiwia2lkIiA6IC...",
  "expires_in": 300,
  "refresh_expires_in": 1800,
  "refresh_token": "abcJhbGciOiJIUzI1NiSDLFOEWJVNejfiifeL485fsdBWIXURNVll..."
}
To get the token, copy only the access_token value from the output.
eyJhbGciOiJSUzI1NiIsInR5cCIgOiAiSldUIiwia2lkIiA6ICUse this value to authorize with "Bearer <auth-token>".
Steps to increase token expiry time in Keycloak
-
Log in to Keycloak with Admin credential in the browser.
-
Navigate to Realm Settings.
-
Go to the Tokens Tab.
-
You can find Access token content under that; there is a field for Access Token Lifespan. Here you can increase the value to the desired duration (default 5 minutes).
-
Click Save.