Creating Forms with the Form Designer
|
You find a hands-on introduction into working with the form Designer in the tutorial in the sections Creating the Form Mapping and Creating Output Mapping. |
To use JavaScript to submit a form in the BPC portal, refer to Using JavaScript to Submit a Form in the BPC Portal.
Defining Form Layouts and Positioning Elements on Panels
When configuring a Task Generator you already define the basic layout of your form by specifying the so-called panel layout.
Having finished the Task Generator, the form Designer is displayed. You use it to arrange different form elements like, for example, entry fields, labels and buttons via Drag-and-Drop to a form.
Refer to
Proceed as follows
-
Using multiple panels
Initially, the form Designer displays an empty area. This area is the first panel of the form named main. A form can consist of one or more panels.
-
To create a panel, click the Panel button:
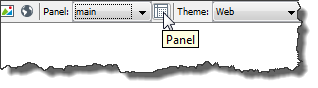
A dialog opens where you can name this panel. Name the panel and close the dialog with OK.
The new, empty panel is displayed.
-
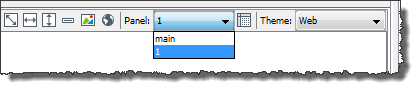
For changing between panels in the form Designer, use the panel list:
-
Changing between panels in the form:
Add a button to the panel. Clicking the button displays a specific panel. Enter the name of the panel which is to be displayed, in the Properties tab at the button’s attribute
event, e.g.:
You can assign different layouts to a panel. When creating a new form, you must define in the wizard in which way the form should be started.
A panel for which you have defined a
xsl:iforxsl:for‑eachdependency remains visible in the Designer.
-
-
Positioning form elements
-
Drag a form element from the toolbar to the panel underneath the toolbar. It is displayed in its default configuration.
-
Drag another form element to the panel. To specify how this new element should be positioned, use your mouse to drag the element just to the side of the existing element next to which you want to position the new element.
A thin red line shows where the element will be inserted:

To the right of the form element

To the left of the form element

Above the form element

Below the form element
-
Previewing the Form in the Task Generator
You can view the form during any phase of its development:
-
INUBIT Workbench form preview
Used for forms that are displayed in the INUBIT Workbench.
In the toolbar, click the
 button.
 -
Browser form preview
Used for forms that are displayed in a browser.
In the toolbar, click the
 button.
If a Web Application Connector is selected in the Task Generator dialog (refer to Permissions Dialog), the CSS style sheets and the JavaScript code of this Web Application Connector and of the BPC Portal are considered in the preview.
It depends on the settings of your application profile which browser is used for displaying your form.
Refer to Application Profiles
Designing Forms with CSS
Defining CSS Classes Centrally
You can create CSS classes for form elements and define the properties of these classes centrally in a Web Application Connector.
The advantage of this approach is that you can use the CSS classes in all Task Generator forms, which reference the Web Application Connector.
Proceed as follows
-
Select the element in the form Designer.
-
To connect the element with a CSS class, display the Properties tab and, at the attribute
classenter the class name. -
Create a Web Application Connector and define the properties of the class in the dialog Dialog Internal Resources in the Web Application Connector. For information about the syntax of class format definitions, refer to https://developer.mozilla.org/en-US/docs/Web/CSS.
-
Publish the Web Application Connector.
The Web Application Connector must be published and deployed, but it does not need to be part of any workflow!
-
Display the dialog of the Task Generator (refer to Permissions Dialog) and reference the Web Application Connector.
Defining CSS Locally
Proceed as follows
-
Select the form element in the Designer or in the XML target:
-
In the form Designer in the Properties tab, fill the form element attributes with values.
CSS Alternatives
If you do not wish to use CSS classes in the Web Application Connector and if the desired attributes are not available in the Designer’s Properties tab, use one of the following options:
-
Add the
styleattribute to the form elementExample:
<Button label="next" event="submit(OK)" style="text-align: center; color: black; font-family: arial"/>This approach is suitable for supplementing attributes from the properties tab.
-
Add the
cssattribute to the form elementExample:
<Button label="next" event="submit(OK)" css="text-align: center; color: black; font-family: arial"/>With this approach, only styles are used that are defined via the
cssattribute. All attribute values from the properties tab are ignored.
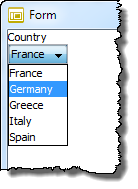
Creating Combo Boxes in the Task Generator
In combo boxes form users can select one value out of a given set of values or enter an arbitrary value, for example:
|
Entering arbitrary values is only available in forms that are displayed in the Tasklist tab of the INUBIT Workbench! |
Proceed as follows
-
Creating a combo box
-
In the Designer add a
ComboBoxelement. -
Add an
Itemelement for each value that is to be displayed in the list. -
To pass on an internal value, additionally to the value which is selected by the users, define the attribute
valuefor eachItemelement.
-
-
Allowing for individual input in the combo box
Only for forms that are displayed in the Tasklist tab of the INUBIT Workbench.
In the Designer, select the
ComboBoxelement and check the propertyeditable. If the property is not checked, then users can only choose one of the predefined values from the list. -
Defining a default value
To define a default value which is already selected when the list is displayed, select the
ComboBoxelement and enter the default value as value of the propertyselect, for example: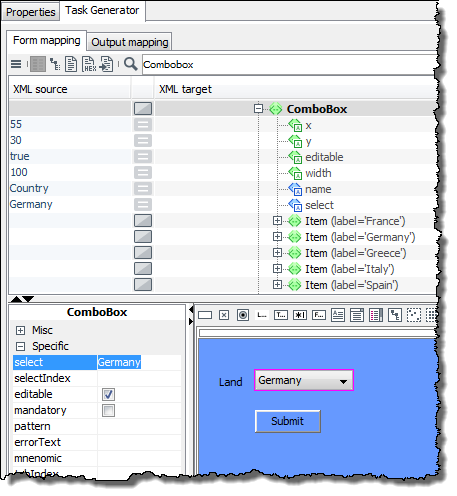
Alternatively, you can also set a default value using the following attributes:
-
selectIndex=‘[number]‘at theComboBoxelement, if the order of theItementries is known. -
selected=‘true‘at anItemelement, if theItem-entries are generated dynamically.
-
Creating Lists with Multiple Selection Dynamically
From a list with multiple selection option, form users can select one or more values out of a fixed set of values.
Prerequisites
Input message with a list of elements, in order to have the form list dynamically generated.
Proceed as follows
-
In the Designer insert a
groupelement with absolute layout. -
Into this group insert another group with vertical layout.
-
And finally, into the vertical group add as many
CheckBoxelements as needed by usingxsl:for-each, for example: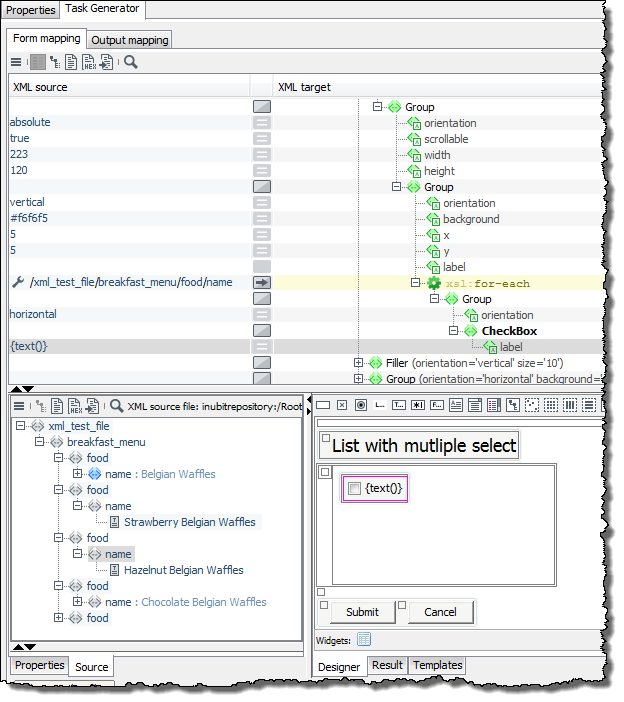
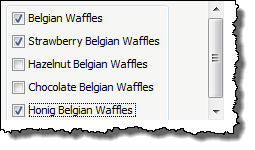
The result is a scrollable list in which any entry can be selected:
Changing the Unit for Indications of Size
As a default, in forms the unit pt (point) is used for all indications of size. You can change this unit.
Proceed as follows
-
In the Designer, add the
metricattribute to theFormelement. -
As value, enter the desired unit, for example px.
Displaying Form Elements Dependent upon User Rights - Web Applications only
In forms for Web applications (Form sequence (Web application page) task type), you can specify which user rights are needed to display and/or edit form elements, such as buttons, input fields or lists.
These rights are assigned to portal roles in the BPC Portal; portal roles are assigned to portal users. This gives you strict control over which users have rights to display and edit form elements.
Prerequisites
-
The Task Generator module that generates the form must be part of a Technical Workflow deployed as a module instance via a Web Application Connector to the BPC Portal.
-
You must have already created a form.
Proceed as follows
-
When configuring the Web Application Connector, define all necessary application rights.
-
Publish the Web Application Connector.
-
Open the Task Generator module for editing, and specify from which Web Application Connector you want to copy the application rights.
-
Display the form in the Form Designer.
-
Select a form element you want to make dependent on application rights. The attributes of the selected element can be viewed in the Properties tab.
-
Double-click the attribute
visibleto specify that the element should be visible only to users with particular rights. A dialog opens listing the available rights. -
Select all rights that will qualify users to view the element.
-
To specify that an element may only be modified by users with selected rights, double-click the attribute
enabledand select the rights.
All form elements that have been assigned rights will have a green border.
Generating Form Parts from XML Schemas or WSDL Files with the Client Generator
The Task Generator offers you the option to quickly and easily create form parts from XML schemas or WSDL files. XML type definitions are mapped to form elements as follows:
| XML element/attribute | Form elements |
|---|---|
complexType |
Generates an OuterGroup element, a Label element and an InnerGroup element for each element contained. |
complexType with one sequence |
A group element with a number of fields whose order is determined by their occurrence in the sequence element |
simpleType |
Generates a group element containing a label and a form element (matching the element); in the generated form, the element name is used as an identifier for the element (as a label). |
simpleType, enumeration type |
Dropdown list |
simpleType, boolean type |
Check box |
minOccurs/maxOccurs |
Specifies the element’s cardinality, and thus also specifies how often an element may or must occur in the form.
A |
Prerequisites
-
XML Schema:
-
The XML Schema is valid.
-
The XML Schema is stored in the Repository.
-
-
WSDL file:
The WSDL file must contain a
Typessection with completely specified definitions.
Proceed as follows
-
Create a Task Generator module.
-
Display the Form Editor.
-
Insert one of the following elements:
-
Group - Horizontal Layout
-
Group - Vertical Layout
-
-
Select the element so that the border is highlighted in pink.
-
Open the context menu, and select Open Client Generator. The Client Generator opens in a separate window.
-
In the Client Generator, click Open. The Repository browser opens.
-
Navigate to your XML schema or WSDL file to load the file. The file is displayed.
-
Click to select the start element for your form. The element is highlighted in grey.
The start element must be unique; its cardinality must therefore be 1…1.
-
Select the Start element option.

This completes the minimum information required to create the form.
-
You have the following options for displaying the form:
-
Click Test. A preview of the form is displayed in a separate Java window. Not all the form’s functions are available in this window.
-
To test all functions, display the form in your standard Web browser:
-
Click OK. The properties are saved, and the Client Generator closes. In the Form Editor, the form elements you have generated are displayed within the group to which the schema/WSDL file was loaded. The group also has a yellow border.
-
In the INUBIT Workbench menu bar, click
.
The browser opens and displays the form fields you have created.
-
-
|
Do not change the generated fields in the group element manually. Any manual changes will be overwritten when the schema or WSDL file is reloaded. |
|
To add elements, such as buttons for submitting or canceling the form, drag and drop the desired elements. Refer to Creating the Form Mapping 1: Inserting Labels for Input Fields |
Refer to Client Generator User Interface.
Accessing Resources of the Process Engine from Portal
Usage
For loading files from the Repository of the INUBIT Process Engine and for accessing a secured HTTP Input Listener Connector or REST Input Listener Connector from a web browser in case the Process Engine and the Portal are installed on different distributed systems.
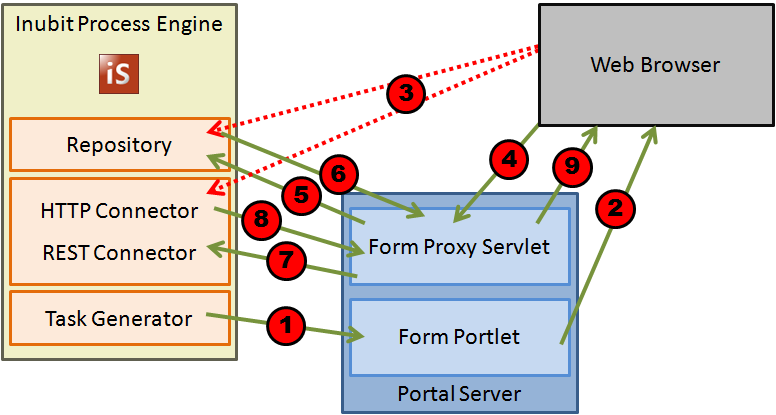
The following steps are executed when accessing the Process Engine from a web browser by using the Form Proxy portlet of the Portal:
-
Sending the form to the portal.
-
Displaying the form in the web browser.
-
Reloading Repository files or calling up an HTTP Connector directly from within the INUBIT software is not allowed.
Therefore, requests using the Form Proxy Servlet must be addressed to the Process Engine.
-
Redirecting requests to the Form Proxy Servlet
-
Reloading Repository data
-
The Form Proxy Servlet accesses the Repository.
-
The Repository provides the requested file to the Form Proxy Servlet.
-
-
Accessing an HTTP/REST Connector
-
The Form Proxy Servlet accesses an HTTP Connector or a REST Connector.
-
The Repository provides the output data from the HTTP Connector or from the REST Connector to the HTTP Connector Form Proxy Servlet.
-
-
-
The Form Proxy Servlet sends the data from the Repository, from the HTTP Connector or from the REST Connector to the web browser, which displays them.
Prerequisites
-
You have created a workflow containing at least one Web Application Connector and a succeeding Task Generator.
-
The workflow and the contained Web Application Connector are activated.
-
The Repository files to be loaded are anonymously readable.
Refer to Properties of a Repository File
Call up
The url property of a form element (e.g. Button) is responsible for accessing the Repository or an HTTP Connector.
Accessing the Repository of the Process Engine
Proceed as follows
-
In the Module Editor, open the respective Task Generator for editing.
-
Add the
urlattribute to the desired element. -
Set the value for the
urlattribute, for example:
https://<hostname>:<port>/o/isp/FormProxyServlet?url=inubitrepository:///Root/jh/iS61/logo.png-
hostnameHost name or IP address of the portal server
-
portPort number for accessing the portal server
-
/isp/FormProxyServletContext path (Domain name, Default:
isp) and name of the Form Proxy Servlet that is freely selectable during deployment -
url=inubitrepository:///<Path>/<File_name>Path and name of the Repository file
You can find this information in the Repository on the Details tab in the Internal repository URL parameter.
Refer to Properties of a Repository File
-
-
Publish the workflow.
-
Deploy the portlet.
Accessing an HTTP Input Listener Connector
Usage
-
To start a workflow from within a portlet
-
To return the results of the workflow to the portlet
Prerequisites
You have created a workflow containing an HTTP Input Listener Connector as workflow starter, and you have published it.
Proceed as follows
-
In the Module Editor, open the respective Task Generator for editing.
-
Add the
urlattribute to the desired element. -
Set the value for the
urlattribute, for example:
https://<server>:<port>/o/isp/FormProxyServlet?url=https://<inubit_hostname>:<inubit_Port>/ibis/servlet/IBISHTTPUploadServlet/<HTTP Connector>As the
urlattribute is deprecated and will be discontinued for BPC in a future release of INUBIT, you can use theconnectorattribute containing the unique name of the connector instead of theurlattribute.For a BPC portal, the
connectorattribute is recommended to call an HTTP Connector.https://<hostname>:<port>/o/isp/FormProxyServlet?connector=<HTTP Connector>-
hostnameHostname or IP address of the portal server
-
portPort number for accessing the portal server
-
/isp/FormProxyServletContext path (Domain name) and name of the Form Proxy Servlet that is freely selectable during deployment
-
url(alternatively forconnector)-
inubit serverHostname or IP address of the Process Engine
-
inubit portPort number for accessing the Process Engine
-
/ibis/servlet/IBISHTTPUploadServlet/<HTTP Connector>Path and name of the HTTP Input Listener Connector
-
-
connector=<HTTP Connector>(as an alternative tourl, recommended for BPC)Name of the HTTP Input Listener Connector
You find the URL in the ServerName property of the HTTP Connector or in the wizard on the HTTP Connector Properties tab in the field Server URL in the Base Configuration area.
-
-
Publish the workflow.
-
Deploy the portlet.
Accessing a REST Input Listener Connector
Usage
-
To start a workflow out of the portlet
-
To return workflow results to the portlet
Prerequisites
You have created and published a workflow containing a REST Input Listener Connector.
|
Optionally, you can use a Process Engine user or the INUBITISPortalUser@@@intern user instead of a real user in the REST Connector.
All HTTP methods ( |
Proceed as follows
-
Open the desired Task Generator for editing in the module editor.
-
Add the
urlattribute to the desired element. -
Specify the value for the
urlattribute, for example:
https://<server>:<port>/o/isp/FormProxyServlet?url=https://<inubit_hostname>:<inubit_port>/ibis/rest/rc/<REST Connector>As the
urlattribute is deprecated and will be discontinued for BPC in a future release of INUBIT, you can use theconnectorattribute containing the unique name of the connector instead of theurlattribute.For a BPC portal, the
connectorattribute is recommended to call an REST Connector.https://<hostname>:<port>/o/isp/FormProxyServlet?connector=<REST Connector>&type=rest-
hostnameHostname or IP address of the portal server
-
portPort number to access to the portal server
-
/isp/FormProxyServletFreely selectable context path (domain name) and name of the Form Proxy Servlet
-
url(instead ofconnector)By default, the URL is constructed according to the following pattern:
http(s)://[server_name]:[port]/ibis/rest/rc/[name_of_Input_Listener]If necessary, adjust the last URL element as desired.You find the URL in the URL field in the Provided resource section on the Resource Configuration tab in the REST Connector Wizard.
-
inubit_hostnameHostname or IP address of the Process Engine
-
inubit_PortPort number to access the Process Engine
-
/ibis/rest/rc/<REST Connector>Path and name of the REST Input Listener Connector
-
-
connector=<REST Connector>(instead ofurl, recommended for BPC)Name of the REST Input Listener Connector
-
type=restConnector type Possible values:
-
httpHTTP Connector (default value, can be omitted)
-
restREST Connector
-
-
-
Publish the workflow.
-
Deploy the portlet.
Accessing a Secured HTTP Input Listener Connector
In order to call up a secured HTTP Input Listener Connector, you must set the password of the Process Engine in portal settings. By default, this password is a generated string. You must change this password so that you can use it for the HTTP Input Listener Connector.
Proceed as follows
-
On the tab Administration > General Settings, select the attribute Portal > Server configuration > Password for portal server.
-
Enter a new password.
-
Save the new password.
-
Open the respective HTTP Input Listener Connector for editing.
-
Switch to the HTTP Connector Properties tab.
-
Activate the option Authentication required.
-
In the User name field, enter
inubit. -
In the Password field, enter in step 2.
-
Click Finish.
-
Publish the workflow.
|
If you want to use another user, you must enter it by using the |
https://<server>:<port>/o/isp/FormProxyServlet?login=<Username>&connector=<HTTP Connector>Accessing a Secured REST Input Listener Connector
The REST Connector can be accessed similarly to the method described for the HTTP Connector.
Optionally, you can use the internal Process Engine user.
Proceed as follows
-
Open the desired REST Connector for editing in the module editor.
-
Switch to the Resource Configuration tab.
-
Activate the checkbox Authentication required.
-
Activate the option Use Process Engine user (password from the server configuration).
-
Click Finish to save the changes.
-
Publish the REST Connector.
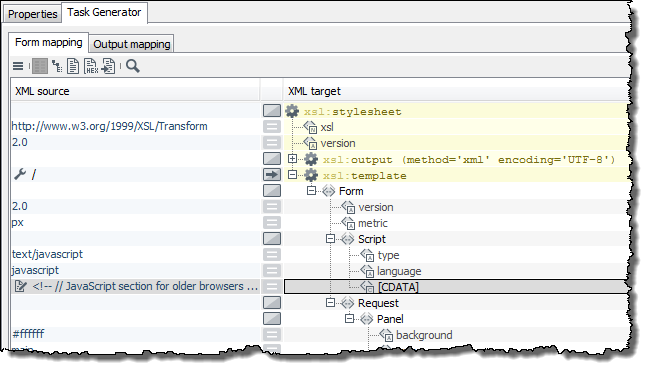
Using JavaScript in Forms
How you utilize JavaScript in forms depends on how forms and the JavaScript code are used.
|
When creating a custom form using Ext JS, you are responsible for managing the lifecycle of this form. |
You find the documentation of the INUBIT JavaScript framework in the directory <SUITE-INSTALL-DIR>/inubit/documentation/jsdoc/index.html, if you have installed the INUBIT documentation.
Alternatively, call the documentation directly.
Using portlet namespace in JavaScript
If you want to use multiple portlets on the same web page, these portlets must be clearly distinguishable from each other by their namespaces.
By using an <ns/> tag (lower case is mandatory) anywhere within a JavaScript tag, you can access the namespace of the portlet.
The <ns/> tag is replaced by the namespace text during execution.
Using the following script, you can write the namespace into the portletNS variable that you can use within all JavaScript blocks of this portlet.
<Script language="javascript" type="text/javascript">
    <![CDATA[var portletNS = ']]><ns/><![CDATA[';
        if (console != null) console.log("portletNS is "+ portletNS );
        //Enter your JavaScript here.
    ]]>
</Script>
JavaScript in form tasks/Web applications
In forms used for tasks and web applications, you can enter JavaScript code directly or reference to it as external file:
-
Entering directly Enter the JavaScript code in the Designer in one of the following elements:
-
WebelementRefer to Form Elements in the Toolbar
-
Scriptelement,Example:
-
-
Reference as external file
-
Save the
*.jsfile containing the JavaScript code in a directory in repository. -
External files should be loaded explicitly from the repository from the front-end.
External JavaScript code is not executed when displaying the form preview in the browser!
-
JavaScript in Web applications
Only when using a form as part of a web application you also can enter the JavaScript code centrally in the Web Application Connector in the dialog Dialog Internal Resources in the Web Application Connector.
Advantages: The JavaScript code
-
can be modified without needing to modify the XSLT style sheet,
-
can be reused in and accessed from all forms of the Technical Workflow.
Javascript event handlers
You add JavaScript event handlers directly as attribute of the concerned element, for example:

The TextArea element defines an input field.
If a cursor is placed into the input field, the event handler onfocus becomes active and prompts users to enter information into the input field.
For information about the various JavaScript event handlers, refer to https://www.w3schools.com/tags/ref_eventattributes.asp.
Using JavaScript to Submit a Form in the BPC Portal
Usage
For both BPC WebApp and BPC interaction, XCRF tokens have to be appended for each request.
|
When creating a custom form using Ext JS, you are responsible for managing the lifecycle of this form. |
Prerequisites
You have configured BPC as portal.
Proceed as follows
-
Open the workflow containing the desired Task Generator.
-
Open the context menu of the Task Generator and choose the Edit properties menu item.
-
Open the Module Editor dialog.
-
Open the Text View of the Form Mapping by clicking the text view icon .
-
Add one of the following methods below the line with the
submitfunction.-
To submit the INUBIT form (created in tasklist) and to open the next page
inubitwebapp.services.Script.checkForExtForSubmit(<event>,<namespace>,<url>);-
event:submitevent from button ornull -
namespace: namespace used in form or''(empty) -
url: URL for submission
-
-
To submit any form (e.g. custom forms created in Ext JS or HTML) without any validations and without response handling
After having received the response, you have to update the page containing the form, and you have to open the next page.
Configure the response by adding the following method below the line with the
submitfunction.inubitwebapp.Support.submitViaExtJs(<method>,<url>,<formData>)-
method:"POST" -
url: URL for submission -
formData:FormData(document.getElementById("formId"))
-
-
-
Adjust the method to your requirements if necessary.
-
Click Finish to save the changes.
-
Publish and test the module.
Submission of forms in a BPC Webapp
Use the following function to submit a form in a BPC webapp:
Ext.getComponent(bpcComponentId).submit(event, namespace, url, progressMsg, successMsg, errorMsg);-
event: submit event from button or null -
namespace: namespace used in form or''(empty) -
url: url for submission
Optional parameters for customizing notification during submit
-
progressMsg: customized message for form submission in progress (on button click) -
successMsg: customized message for successful form submission (on button click) -
errorMsg: customized message for error in form submission (on button click)
Use the following function to submit a form in a BPC webapp manually:
inubitwebapp.services.Script.checkForExtForSubmit(event, namespace, url, moduleId, progressMsg, successMsg, errorMsg);-
event: submit event from button or null -
namespace: namespace used in form or''(empty) -
url: url for submission -
moduleId: Module id used in form
Fetching dataIS object
To fetch a dataIS object, use:
Ext.getCmp(bpcComponentId).dataIS
The bpcComponentId can be fetched using var bpcComponentId = '<bpcComponentId/>'; in the script.
Example
<script language="javascript" _xulid="x48">
    var bpcComponentId = '<bpcComponentId/>';
    <!--To fetch dataIS -->
    Ext.getCmp(bpcComponentId).dataIS;
</script>
Updating Portlets and Form Sections using Ajax
You can use Ajax (Asynchronous JavaScript and XML) to exchange contents of a web page specifically without having to load the entire web page anew. The contents are loaded from the web server.
In the INUBIT software, you can use Ajax in web applications in order to specifically update a portlet and sections in a portlet form on a portal page.
Updating a Portlet with Ajax
Prerequisites
-
Ajax-based updating is only available in web applications that are deployed as portlets on a portal server.
-
The form in your web application must contain a button with a submit event because the Ajax-based update is always triggered manually by clicking such a button.
Proceed as follows
-
Display the form in the Designer.
-
Select the Submit button.
The Properties tab shows the properties of the button.
-
Activate the Ajax option:
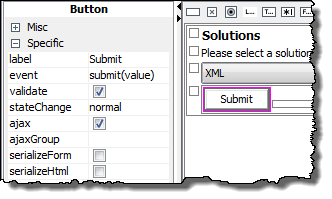
-
Save the change and publish the task generator.
When you click the Ajax submit button in the changed portlet, all form data is updated in the portlet. If additional portlets exist on the same portal page, the data in these portlets is not loaded anew.
Updating a Form Section with Ajax
You can use Ajax to change selected contents of a form on a web page without reloading the entire portlet.
For you as the workflow designer, this has the following advantages:
-
To restructure the page, you only have to map the changed data anew in the task generator, not the entire form.
-
You can respond flexibly to current user entries, for example, by showing additional form elements according to the last entry
-
You can design easier to read forms, e.g. by showing optional fields only when they are required.
This section explains how to configure the Ajax update by means of an example. Table data is sorted in the example.
Prerequisites
-
Ajax-based updating is only available in web applications that are deployed as portlets on a portal server.
-
The form in your web application must contain at least one button (possibly hidden) with a submit event because the Ajax-based update is always triggered by clicking such a button (possibly triggered by JavaScript).
-
The workflow that your web application implements contains a module that makes updated data available. This module is connected to the task generator via a path.
Example workflow
The mapped workflow generates a portlet with a table. You can sort the table data in ascending or descending order at the click of the mouse:
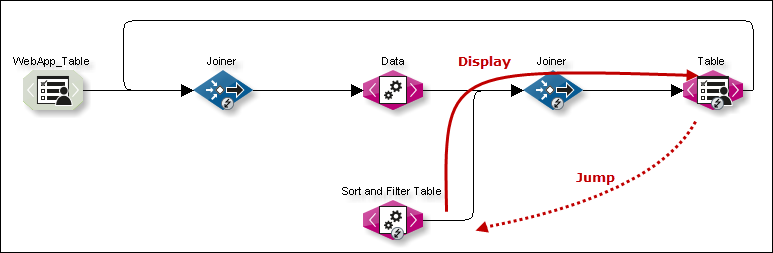
Sorting is implemented with Ajax: As soon as a user clicks a column header, the currently displayed data is sent from the Table task generator directly to the Sort and Filter converter for sorting. In the figure, the dotted Jump line visualizes this action.
The data consists of the response and the input message of the task generator, that is, of the data that the browser normally returns to the task generator when a user clicks the Submit button after making a form entry.
The XSLT Converter sorts the data and transfers it to the next module in the workflow. The workflow between the XSLT Converter and the task generator is signalized by the unbroken Display line in the figure.
The task generator receives the updated data and performs the form mapping. That is why the task generator expects the data in the same format as the original input message.
|
Make sure that the data is available in the same format as the input message! |
Instead of an individual module such as the XSLT Converter you can, of course, also configure a complex workflow for updating the data.
Button configuration
The column headers are implemented as Submit buttons. In addition, each Submit button is configured as follows:
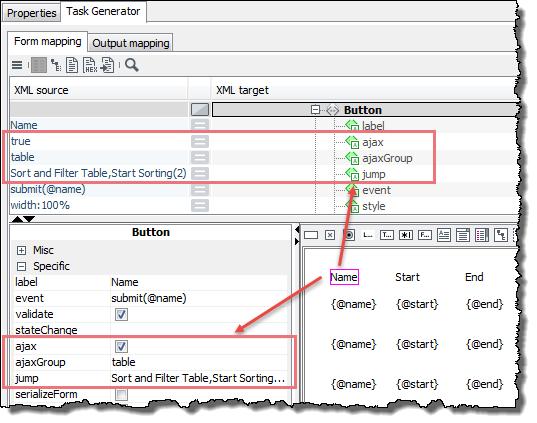
-
ajax: The option is active. -
ajaxGroup:This option is used to specify which data should be updated.
The value always refers to a named
groupelement, which must enclose the data to be updated. The name of thegroupelement is specified in thenameattribute of thegroupelement.In this example, all table data is to be sorted, hence the value is
table.Between the element
<xsl:template match="/">and the namedgroupelement, the following commands must not be used:call-templateandapply-template. Make sure that thegroupelement always exists! That means, amongst others, that thegroupelement must not be conditioned by, for example, anif-element. -
jump: This option is used to specify the module to which the data is sent for updating.