remote-connector.adoc= Remote Connector
Usage
A Remote Connector is an application on a remote computer executing one or more System Connectors. It is controlled by an INUBIT Process Engine.
|
Not all System Connectors can be configured as a Remote Connector. |
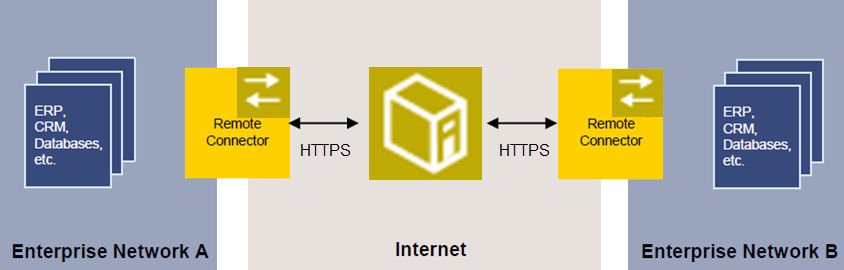
Deploying a Remote Connector is useful to connect an INUBIT system with applications which cannot be connected directly for security reasons. The Remote Connector is installed on the interface between the company network and the Internet:
|
In INUBIT version 8.1, the Process Engine is only compatible with Remote Connectors of the same version. To this end, a Remote Connector update is required. |
Runtime behavior
By default, a Remote Connector can process ten parallel accesses of System Connectors at most. All other accesses are queued.
Installing a Remote Connector
Prerequisites
The Remote Connector must be accessible via a URL because Remote Connector and INUBIT Process Engine communicate with each other via HTTP/HTTPS.
Proceed as follows
-
On the remote computer, start the INUBIT setup and select the installation type Remote Connector.
-
Configure the System Connector, which is to be executed by the Remote Connector.
Configuring System Connectors as Remote Connectors
Proceed as follows
-
Create a system connector.
-
When configuring it, in the dialog select the option Remote Connector and enter the URL of the Remote Connector.
Configuring a Secure Connection to the INUBIT Process Engine
Proceed as follows
-
Generate a keystore and truststore file.
-
Stop the Remote Connector.
-
Open the configuration file of the Remote Connector
<SUITE-INSTALL-DIR>/inubit/remoteConnector/conf/remote_conf.xml. -
Enter the paths and passwords of the keystore or truststore files in the respective name elements (
<TrustStorePassword>, <TrustStoreFile>, <KeyStoreFile>, <KeyStorePassword>). -
Additionally, it is possible to limit the address or address range the remote connector accepts queries from (
<AllowedIPs>,by default all queries are accepted). To limit access to certain IP’s or IP ranges, configure individual IP’s or IP ranges in CIDR notation comma separated. Example :<AllowedIPs>127.0.0.1,127.0.0.2,127.0.0.24,127.3.110.55/24</AllowedIPs> -
Restart the Remote Connector.
Activating HTTP/HTTPS Communication with Remote Computers via a Proxy Server
You can configure the Remote Connector in such a way that it uses a proxy server for accessing remote computers. Responses of the remote computers are also forwarded via the proxy server to the Remote Connector.
Proceed as follows
-
Stop the Remote Connector.
-
In a text editor, open one of the following files:
-
<SUITE-INSTALL-DIR>/inubit/remoteConnector/bin/start_rc.bat -
If the Remote Connector is installed as a service:
<SUITE-INSTALL-DIR>/inubit/remoteConnector/bin/rc_nt_service_install.cmd
-
-
Activate using the proxy servers and define its name and port number by including the following options into the environment variable
JAVA_OPTS, for example:-
HTTP
set JVM_PARAMS=%JVM_PARAMS% -Dhttp.proxySet=true -Dhttp.proxyHost=proxy.inubit.com -Dhttp.proxyPort=4711 -
HTTPS
set JVM_PARAMS=%JVM_PARAMS%
    -Dhttps.proxySet=true
    -Dhttps.proxyHost=proxy.inubit.com
    -Dhttps.proxyPort=4711
-
-
Restart the Remote Connector.
Updating Log Configuration in Remote Connector
You can configure the Remote Connector logging as required. The Remote Connector uses Log4j2 configuration in JSON format. For syntax refer to https://logging.apache.org/log4j/2.x/manual/configuration.html#main-configuration-elements.
These are the default settings:
-
rc.logfile will be created under<SUITE-INSTALL-DIR>/inubit/remoteConnector/logdirectory -
Debug level is set for
RollingFile, -
Info level is set for
Console.
Proceed as follows
-
Stop the Remote Connector.
-
Open the log configuration file of the Remote Connector
<SUITE-INSTALL-DIR>/inubit/remoteConnector/conf/log4j2.json. -
Update the log configuration as required. For syntax refer to https://logging.apache.org/log4j/2.x/manual/configuration.html#main-configuration-elements.
-
Restart the Remote Connector.
Starting a Remote Connector Manually
There is a start script for starting the Remote Connector included in the scope of delivery. It can be found (depending on the operating system used) in the following directory:
-
Windows:
<SUITE-INSTALL-DIR>/inubit/remoteConnector\bin\start_rc.bat -
Linux:
<SUITE-INSTALL-DIR>/inubit/remoteConnector/bin/start_rc.sh
Installing/Uninstalling the Remote Connector as Service
Windows
For installing/uninstalling, there are scripts included in the scope of the INUBIT software delivery.
The scripts can be found in the <SUITE-INSTALL-DIR>/inubit/remoteConnector\bin\ directory:
-
Installing
rc_nt_service_nssm_install.cmdInstallation is carried out in the same way as the installation of the INUBIT Process Engine as a service.
-
Starting
After a successful installation, you find under Start > Settings > System Control > Administration > Services the entry INUBIT Remote Connector.
-
Uninstalling
rc_nt_service_nssm_uninstall.cmd
Linux
The Linux script for installing the Remote Connector as a service consists of the runlevel script inubitrc and the configuration file inubitrc.conf.
The script can be found in the following directory:
<SUITE-INSTALL-DIR>/inubit/remoteConnector/bin
Installation is carried out in the same way as the installation of the INUBIT Process Engine as a service.
Remote Connector as Service Under Windows With Log Rotation
Usage
With the scripts described in this section, you can install/uninstall the INUBIT Remote Connector as Service under Windows with log rotation. Once the log file size has exceeded the configured maximum log file size or the service was (re)started, the current log file is renamed by adding the current date and time and a new log file is created.
Proceed as follows
-
Open the
<SUITE-INSTALL-DIR>/inubit/remoteConnector\bindirectory. -
Open the
rc_nt_service_nssm_install.cmdscript for editing. -
Configure the following parameters accordingly to your needs.
-
NSSM_ROTATE_FILE-
0: No log file rotation -
1: Log file rotation
-
-
NSSM_ROTATE_FILE_SIZEConfigure the maximum log file size in bytes. By default, the maximum log file size is set to 1 Mbyte:
NSSM_ROTATE_FILE_SIZE=1000000 -
NSSM_ROTATE_ONLINE-
0: The log files are rotating only if the maximum log file size configured using theNSSM_ROTATE_FILE_SIZEparameter has exceeded when the service is (re)started.If the service shall run for a long time without being restarted, this value should not be used.
-
1: The log files are rotating while the service is running.
-
-
-
Save the changes.
-
Execute the
rc_nt_service_nssm_install.cmdscript to install the INUBIT Remote Connector service.→ The INUBIT Remote Connector is installed as INUBIT IS Remote Connector service with the start type Automatic, and it can be started. Once the system is (re)started, the INUBIT IS Remote Connector service is started automatically.
-
Start the INUBIT IS Remote Connector service using the Services application or the following command:
net start "inubit IS Remote Connector"→ Depending on your configuration, in the
<SUITE-INSTALL-DIR>/inubit/remoteConnector\logdirectory, the following log files rotate/do not rotate.-
rc.out.log -
rc.err.log
-
-
To stop the INUBIT IS Remote Connector service, use the Services application or the following command:
net stop "inubit IS Remote Connector" -
To uninstall the INUBIT IS Remote Connector service, execute the
rc_nt_service_nssm_uninstall.cmdscript in the<SUITE-INSTALL-DIR>/inubit/remoteConnector\bindirectory.
Installing the INUBIT Remote Connector Under Linux as Service Using Systemd
Prerequisites
-
You must have
rootrights to install the INUBIT Remote Connector as service usingsystemd. -
This Feature will work on Ubuntu 18.04 and above.
-
Make sure that the
JAVA_HOMEenvironment variable in the<SUITE-INSTALL-DIR>/inubit/java_home_path_setter.shscript is set to the absolute path to the JDK installation used for INUBIT, e.g.:JAVA_HOME=/home/inubit74/_jvm
Proceed as follows
-
In the
/etc/systemd/systemdirectory, create a symbolic link to theINUBITrc.servicefile in the<SUITE-INSTALL-DIR>/inubit/remoteConnector/binfolder, e.g.:cd /etc/systemd/system sudo ln -s /home/user/inubit/remoteConnector/bin/inubitrc.service inubitrc.service -
Reload the
systemctl daemonconfiguration as follows:`sudo systemctl daemon-reload`
→ Now, you can use the following commands:
-
Starting the INUBIT Remote Connector
sudo systemctl start inubitrc -
Stopping the INUBIT Remote Connector
sudo systemctl stop inubitrc -
Restarting the INUBIT Remote Connector
sudo systemctl restart inubitrc
-
Checking the status of the INUBIT Remote Connector
sudo systemctl status inubitrc
|
When installing multiple Remote Connector services, note that the service names must be disjunct, using, e.g., a customer shortcut or similar.
You must use these names for creating the symbolic links to the services in Note that the port for the Remote Connector modules should be different.
You configure this in the files |
Example for installing the two services INUBITrc_ABC.service and INUBITrc_DEF.service:
cd /etc/systemd/system
sudo ln -s /home/user/inubit-RC-ABC/inubit/remoteConnector/bin/inubitrc_ABC.service inubitrc_ABC.service
sudo ln -s /home/user/inubit-RC-DEF/inubit/remoteConnector/bin/inubitrc_DEF.service inubitrc_DEF.service
Managing Remote Connectors
Adding Remote Connector in the Connection Manager
Usage
To add a Remote Connector in the Connection Manager in order to be accessed from another Process Engine
Prerequisites
You have installed both INUBIT and the Remote Connector on a remote system, refer to Installing a Remote Connector.
Proceed as follows
-
In the INUBIT Workbench, open the Connection Manager.
-
Open the context menu and choose the Add item.
→ The Add Connection dialog opens.
-
Enter the connection data.
-
URL of the remote system, e.g.:
https://<server>:<port>/rc -
Process Engine URL, e.g.:
https://<server>:<port>/ibis/servlet/IBISSoapServlet
-
-
Configure the Monitoring settings.
-
Time interval between pings
By default, the interval is set to 300 seconds/5 minutes.
-
Watchdog port
By default, the Watchdog port is set to
8686.
-
-
Click Finish to create the remote connection.
→ The new connection is displayed in the Connection Manager.
Monitoring Remote Connectors
You can monitor, update, start and stop Remote Connectors in the Connection Manager via Watchdogs.
Refer to
Configuring Log File, Debug Level and Parser
Since version 5.0
Proceed as follows
-
Stop the Remote Connector.
-
Open the configuration file of the Remote Connector in the directory
<SUITE-INSTALL-DIR>/inubit/remoteConnector/conf/remote_conf.xml. -
Change the information in the following elements:
-
Log File:
LogFileSize,LogFileName,LogFileBackupIndex -
Debug Level:
<DebugLevel>, for debugging, enter the valuedebug.
-
-
Restart the Remote Connector.
Versions < 5.0
Proceed as follows
-
Stop the Remote Connector.
-
Restart the Remote Connector using the appropriate parameters.
Expanding the Remote Connector
Usage
In order to expand the functions of the Remote Connector, you can add, for instance, JDBC drivers for other databases or for independently developed plug-ins.
Prerequisites
You have added the remote system to the Connection Manager using the Add context menu item, refer to Adding Remote Connector in the Connection Manager.
Proceed as follows
-
Stop the Remote Connector on the remote system.
-
In the Workbench, open the Connection Manager.
-
Open the context menu of the connection for which you want to upload a driver or a library.
-
Choose the Upload library menu item.
→ The Upload library dialog opens.
-
In this dialog, choose the library to be uploaded.
→ The library is being uploaded. In the Status column of the line with the connection, Updating indicates the continuing upload process. Once the upload has finished, the status changes to OK. The library is stored in the following directory on the remote system:
<SUITE-INSTALL-DIR>/inubit/remoteConnector/lib/new/ext -
Restart the Remote Connector.
Refer to Updating Monitored Components