Creating Log Entries with Functional Logging
The functional logging method is used to log business data.
It provides a predefined XML structure in the
BPC_Assign_hook module in the BPC_299_PM_Configuration workflow that defines the table structure for the logged data in the logging database and the settings for the Process Monitor in the portal.
The Workflow Connector BPC_PM_doFunctionalLogging `(in the `BPC_PM_LogDB_Administration workflow) uses the logging configuration from BPC_Assign_hook module for transferring logged data to the workflows of the INUBIT Process Monitor.
Basic principle
For functional logging, you always use the predefined database structure with the respective columns stored in the variables mapping of the BPC_Assign_hook module in the BPC_299_PM_Configuration workflow.
If you want to log more than the predefined information, you must add appropriate columns to the predefined database structure.
You define the columns in the variables mapping of the BPC_Assign_hook module in the
BPC_299_PM_Configuration workflow, which belongs to your Process Monitor grid.
The new table columns are generated when you start the BPC_PM_startWFHere module in the create log table frame in the
BPC_PM_LogDB_Administration workflow.
|
If you have changed the database structure, for example by deleting the column definitions in the template of XSLT variable in the |
Basic procedure
In functional logging, you write the information to be logged into a predefined XML structure.
With this XML structure, you fill the variable logEntry in the variable mapping in the Workflow Connector, which connects your workflow with the workflows of the INUBIT Process Monitor.
Based on the transferred logEntry variable, the INUBIT Process Monitor creates a log entry in the logging database.
In functional logging, you can modify the predefined XML structure in the XSLT variable of the BPC_Assign_hook module in the BPC_299_PM_Configuration workflow as desired.
For example, you cannot only have additional information written to the logging database and displayed in the Process Monitor grid; you can also have multiple child log entries generated for each execution of a workflow connector that writes a log entry.
Example logging
To create example log entries in order to view the preconfigured structure of the table columns in the portal, start the
BPC_PM_startWFHere module in the create test data frame in the BPC_PM_LogDB_Administration workflow.
The generated log entries are displayed in the grid in the Process Monitor on the BPC Portal.
Integrating functional logging
To log business data from your concrete application with the INUBIT Process Monitor, you must integrate functional logging in your system:
Proceed as follows
-
Insert the Workflow Connector
BPC_PM_doFunctionalLoggingat an appropriate place in your technical workflows. -
Ensure that your connected system returns an input message for the Workflow Connector that corresponds to the structure of the configured table columns.
-
If appropriate, add a XSLT variable at the Workflow Connector like the one at the
BPC_Assign_hookin theBPC_299_PM_Configurationworkflow.Make sure that the variable
databaseis defined in the inserted Workflow ConnectorBPC_PM_doFunctionalLoggingand set correctly. -
In the stylesheet, create a suitable
logEntrystructure with the required XML elements for the input message along the lines of the following: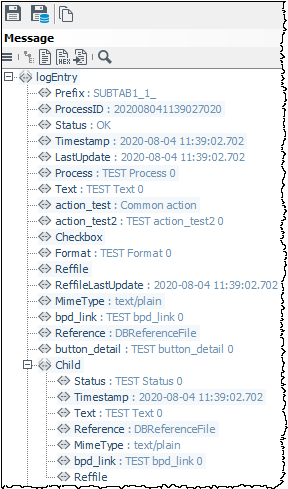
XML Elements for Functional Logging
All elements listed below are included in the default configuration of the predefined XML structure of the logging configuration In the XSLT Source variable of the BPC_Assign_hook module in the BPC_299_PM_Configuration workflow.
The table columns in the structure of the logging database and the columns in the grid of the Process Monitor are generated from the XML structure.
|
Do not change the names of the predefined elements! |
Elements for parent log entries
| Element | Explanation |
|---|---|
Status |
Current status of the process. You can change the display and names of the statuses. |
ProcessID |
Required entry! This XML element must be present as otherwise no log entry will be* generated. |
Timestamp |
Required entry! In the default configuration, this element must have a value as the time* stamp is the initial sorting criterion for the display of status values on the dashboard. Point in time at which the log entry was created (e.g. data of receipt) – is set during the first logging step. The time specification should be in the following format: You can always change the initial sort criterion. |
LastUpdate |
Additional date column besides Is only used for the “distributed logging” feature! Refer to Using Distributed Logging. |
Process |
Name of the business process. |
Text |
Any text. |
action_test |
Defines user-defined actions in a separate column that you can make available for a log entry, e.g. to restart a process. Refer to |
remoteFilterTest |
This button enables you to dynamically filter data in another Process Monitor grid. |
Checkbox |
Creates a checkbox. This is displayed in the Process Monitor grid with a checkmark if a value exists for it in the database table. Refer to Displaying Columns with Checkboxes. |
Format |
Format of the message that is processed in the process. |
Reffile |
File that is saved as a reference for the log entry. |
ReffileLastUpdate |
Date column filled with the value of the update time identical to that of the LastUpdate element. Is only used for the “distributed logging” feature! Refer to Using Distributed Logging. |
MimeType |
Mime type of the reference file. |
Reference |
Database ID |
Elements for child log entries
| Element | Explanation |
|---|---|
ProcessID |
ProcessID of the parent log entry. |
Status |
You can change the display and names of the statuses. |
ChildID |
Will be generated if empty. |
Timestamp |
Required entry! In the default configuration, this element must have a value as the time stamp is the initial sort criterion for the display of status values on the dashboard. Point in time at which the log entry was created. The time specification should be in the following format: Example: 2011-02-10 00:00:02 You can change the initial sort criterion. |
Text |
Any text. |
Reference |
Absolute path to the reference file or database ID. |
MimeType |
Mime type of the reference file. |
Reffile |
File that is saved as a reference for the log entry. |
Functions of the Supplied Technical Workflows
The following table explains the functions of the included technical workflows. Workflows displayed with a lock icon in the Workbench are encrypted and cannot be edited. In the table, these workflows are indicated as not editable.
| Editable | Workflow | Functions |
|---|---|---|
|
BPC_PM_Configuration |
In this workflow a Process Monitor grid is configured. |
|
BPC_PM_HTTP |
Provides an overview of all connectors that can be configured to operate multiple instances of the Process Monitor in parallel. |
|
BPC_PM_Insert_Log |
This workflow prepares the saving of log entries to the database by generating SQL statements from the |
|
BPC_PM_LogDB_Administration |
Generates the required database tables and test log entries. |
|
BPC_PM_LogMonitor_Action_AJAX |
In this workflow you configure the desired actions for the action buttons that can be created in the grid. Refer to Configuring Actions |
|
BPC_PM_Process Monitor_Init_Grid |
Used to initialize and configure the Process Monitor. It configures the web application displayed on the BPC Portal and calls the workflows |
|
BPC_PM_Query_LogDB |
Implements access to the database. The SQL statements are transferred to the Database Connector. This then fetches the required connection data from the system diagram and writes the data to the database. |
|
BPC_PM_Show_ Reference |
Loads messages for log entries. |


Using Distributed Logging
Besides the default logging mechanism, you can also use the optional distributed logging method.
Usage
You use distributed logging, if – for performance reasons – you execute logging steps in parallel and/or with asynchronously executed logging steps.
-
Parallel logging: One or several systems log independently of one another into the Process Monitor database
-
Asynchronous logging: Logging steps are executed asynchronously in order to ensure that a slow database connection will not delay message processing or stop it in case of an error.
In order to prevent older logging entries or database statements coming in from slow database connections from overwriting newer ones from faster connections, you must activate the distributed logging feature.
To use this mechanism, you must add the respective attribute to your logEntry structure as well as observe and apply specific rules for transferring logging steps.
Prerequisites
-
If you want to log from different systems into the same Process Monitor database, you must synchronize the clocks of the logging systems.
-
The process that is logging must be synchronous, which means that you have to make sure you do not execute logging from different asynchronous processes with the same ProcessID.
Activating Distributed Logging
In order to use the distributed logging mechanism, you must adapt your logEntry structure.
Proceed as follows
-
Make your
logEntrystructure available for editing and use an XSLT Converter, if necessary, to do so. -
In your existing structure, add a new
distributedLoggingattribute to thelogEntryroot element. -
Set the value of the new attribute to
true.If the
distributedLoggingattribute is either not set or set tofalse, the distributed logging mechanism is not active.
Applying and Observing Rules in the LogEntry
For correctly transferring logging steps, you must observer or apply specific rules in your logEntry structure to ensure
-
that, during logging of log entries, database statements are not overwritten.
-
that when logging child entries all of them are logged and stored to be further processed and output in the correct order.
-
that reference files to log entries (by using the
Reffileelement) are not unnecessarily included and carried along in the logging process.
The aim is to ensure that a new logEntry includes all necessary information of the previous one.
Proceed as follows
Adapt the logEntry structure in your relevant workflows to make sure they comply with the following rules:
-
LastUpdateelement Ensure that theLastUpdateelement (responsible for creating the date column that registers the current update time of the entry) is set in the XSLT variable of theBPC_Assign_hookmodule in theBPC_299_PM_Configurationworkflow. -
Log entry
-
In each logging step, include the
logEntryof the previous one. -
In each subsequent logging step, include new elements to the
logEntryor update relevant elements. Leave all other elements in thelogEntry. -
For each logging step, reset the timestamp of
LastUpdate. -
If you explicitly want to set the value of a column to zero, add the
deleteattribute with the value true to the respective element in thelogEntry.
-
-
Child log entry
In the subsequent logging step, set all values of the child log entries, especially the
Timestampelement, since it is required for the sorting order of child entries later in the display of the Process Monitor. -
Reffile element
Best Practice: If you include files in your log entries in the form of
Reffileelements, you must - for performance reasons - set them for each logging step and delete them afterwards.
Defining Settings for Logging Child Entries
Hiding Child ID for Display in the Grid
To make sure that child entries in the grid are only displayed according to their timestamp-based sorting order and not according to the database saving time (childid), you must hide the column displaying the child IDs.
Proceed as follows
-
Open the XSLT variable of the
BPC_Assign_hookmodule in theBPC_299_PM_Configurationworkflow for editing. -
Add the
hidden=trueattribute to thechildidelement that - in its display as column - is to be hidden in grid: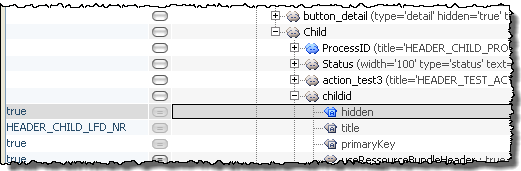
-
Save your changes and publish the workflow.
Defining Asynchronous Execution
In order to define the desired asynchronous execution, you must re-create and configure the Workflow Connector BPC_PM_doFunctionalLogging that implements the Process Monitor functionality and that you insert at an appropriate place in your technical workflows.
Parallel execution of the BPC_`PM_Insert_Log` workflow is set by default in delivery state.
Proceed as follows
-
Create a new Workflow Connector similar to
BPC_PM_doFunctionalLogging(in theBPC_PM_LogDB_Administrationworkflow). -
Name the Workflow Connector and use the wizard to guide you through the creation and configuration of the new connector. Make sure the following settings are active or selected:
-
Set the Communication mode to Asynchronous in order to make sure that the calling workflow is executed further immediately.
-
Select the option Execute workflow with new process ID in order to make sure that each new process that is created when calling the subworkflow is assigned a new process id.
-
Select
BPC_PM_Insert_Logas target workflow. -
Select the second Assign module
BPC_PM_Assignas target module and entry point for the logging.For detailed information about the Workflow Connector, refer to:
-
-
Click Finish to conclude the connector configuration.
-
Publish the Workflow Connector.