Activating Workflow Error E-mail Notifications
For alert activating events related to errors in workflows, the INUBIT software may send e-mails to the root user with the System Administrator role and the e-mail address defined in the configuration.
|
You can deselect the Notify root user option if you do not want the user |
Refer to
-
For Technical Workflow diagrams you can define individual e-mail recipients, refer to Execution Tab - TWF Only.
-
For a list of events that trigger an alert and may trigger an e-mail notification, refer to Events Triggering Alerts and Notification Paths
Define an e-mail recipient
-
In the INUBIT Workbench display the Administration > User Roles tab.
-
Expand the
System Administratoruser role folder and select the userroot. -
Open the context menu and select Edit user data. A dialog opens.
-
Enter a valid e-mail address.
-
Confirm by clicking OK. The dialog closes.
Activate e-mail notification
-
Display the Administration > General Settings tab.
-
Select the Monitoring > Workflow error E-Mail notification configuration category.
There are two types of e-mail notifications for workflow errors: Single e-mail notification and Aggregated e-mail notification.
Single e-mail notification
Follow the steps Activate e-mail notification and check the Notification activated checkbox to activate the feature.
When a workflow error occurs, the system immediately sends an e-mail for each error, resulting in multiple e-mails if multiple errors occur. This behavior occurs only if the Notification Activated option is enabled; otherwise, no e-mails are sent.
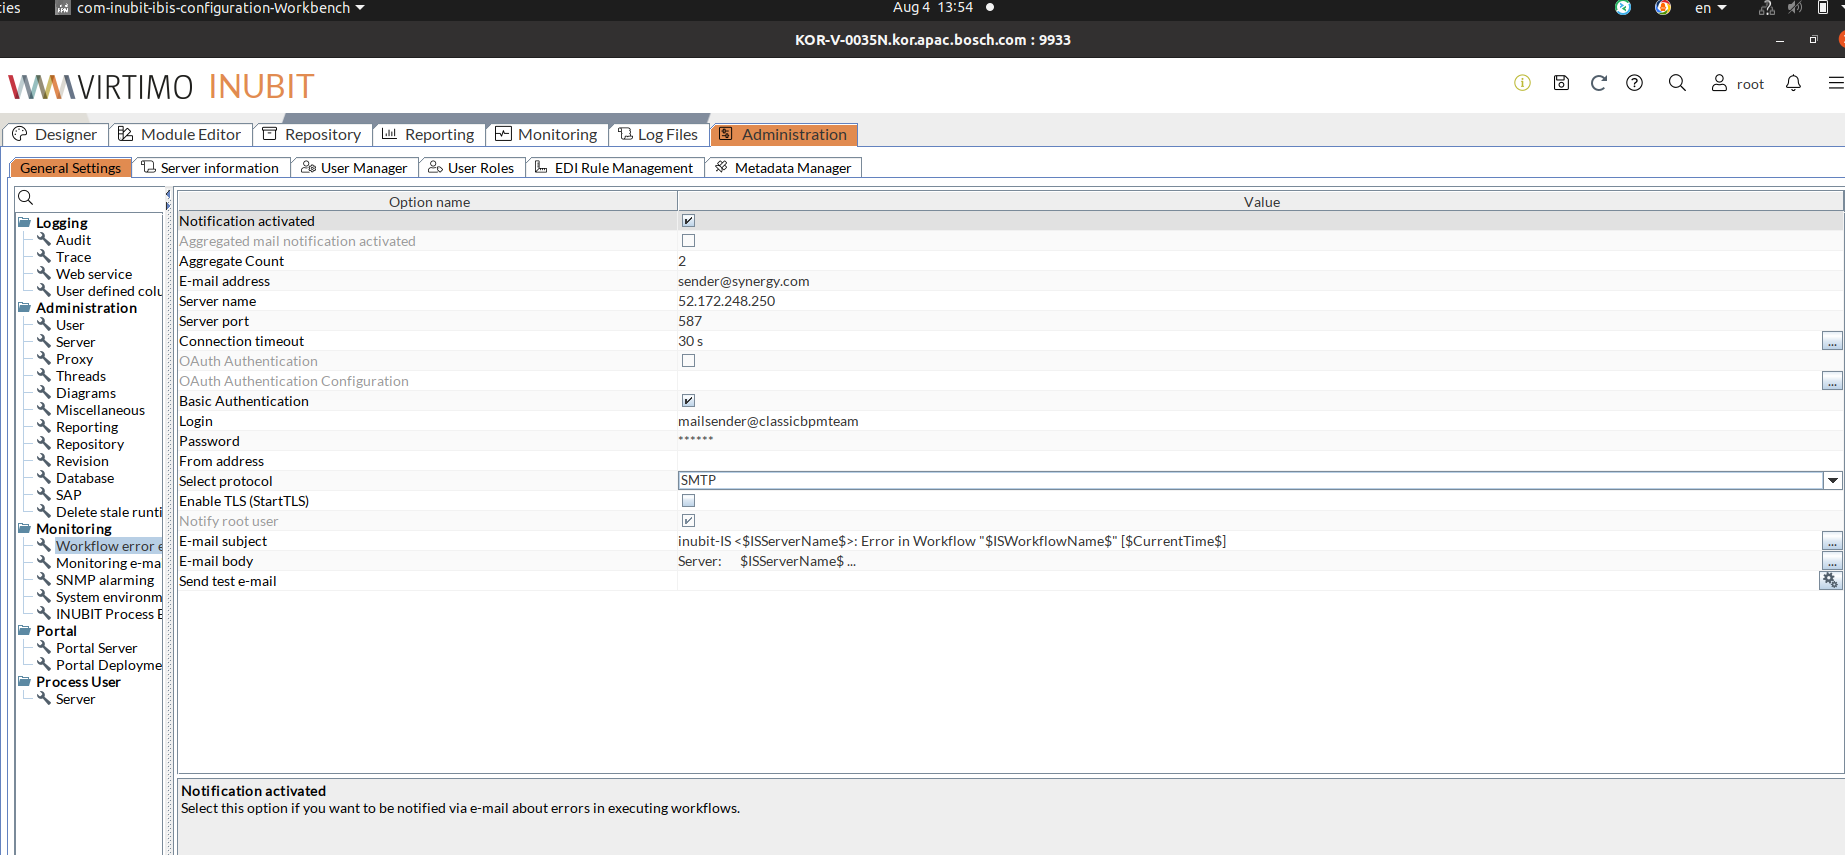
E-mail Subject and Body text
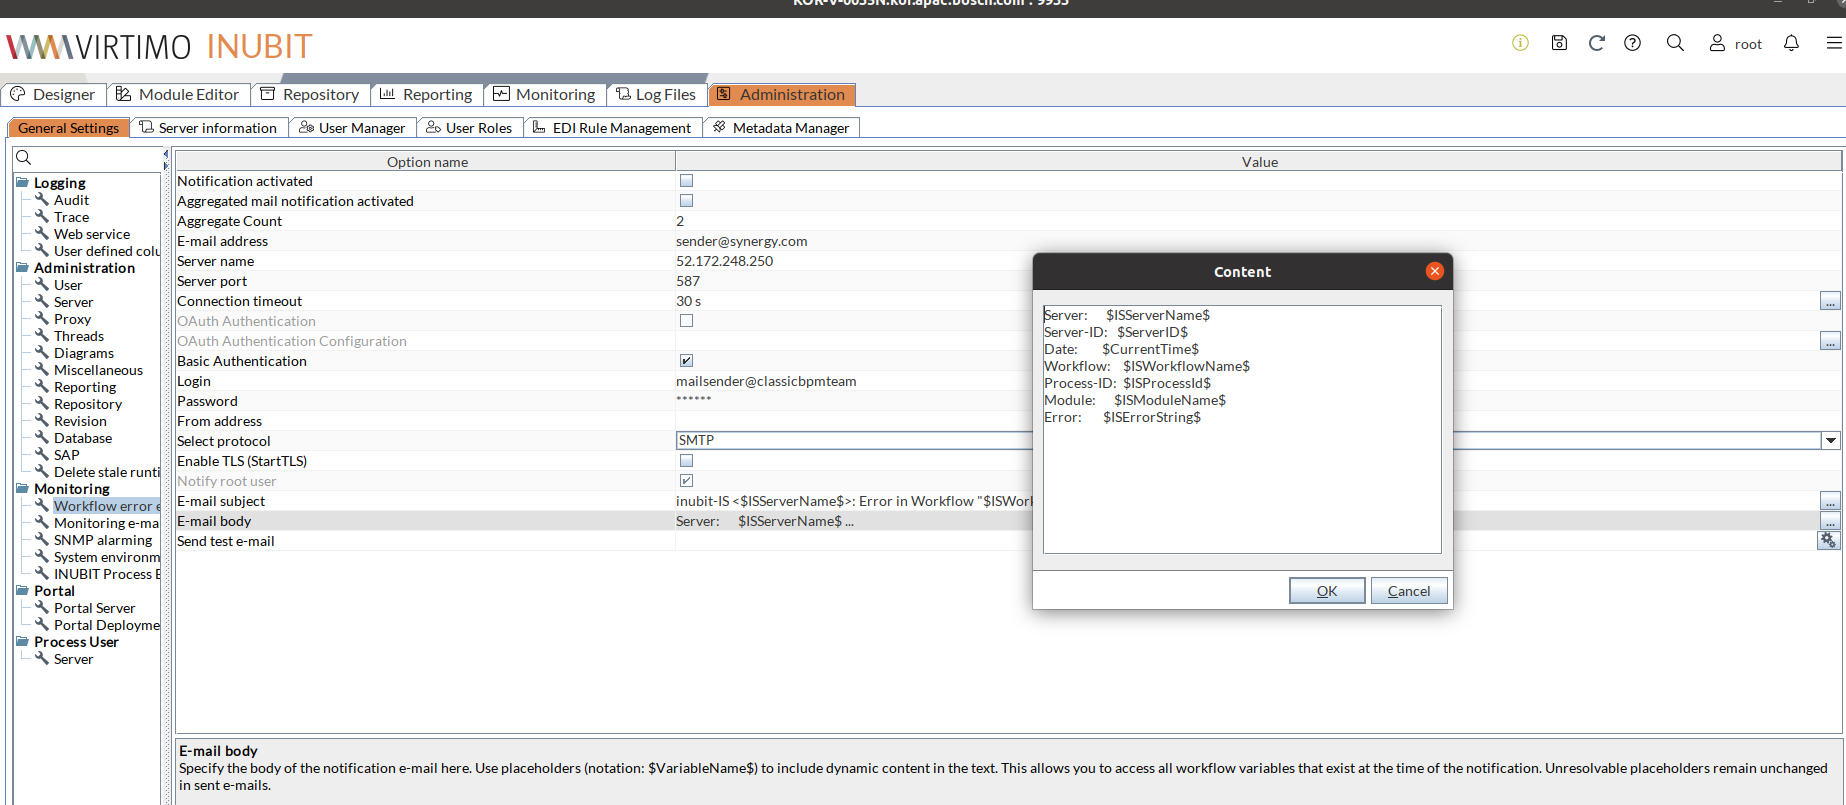
You can specify the subject line and the body text for the e-mail notification. To include dynamic content, use placeholders in the format (notation: $VariableName$). This allows you to access all workflow variables that exist at the time of the notification. Unresolvable placeholders remain unchanged in sent e-mails.
The e-mail body of a single e-mail notification includes the following details for each error:
-
Server,
-
Server ID,
-
Date,
-
Time,
-
Workflow name,
-
Module name,
-
ProcessId,
-
and error
The e-mail subject and body text content are preconfigured with default values. You can customize the content to suit your needs.
Aggregated e-mail notification
Instead of sending a separate e-mail for every error, related errors can be grouped and sent together in a single e-mail.
Follow the Activate e-mail notification steps and check the Aggregated Mail Notification checkbox to activate the feature. Uncheck the Aggregated Mail Notification checkbox to deactivate the feature.
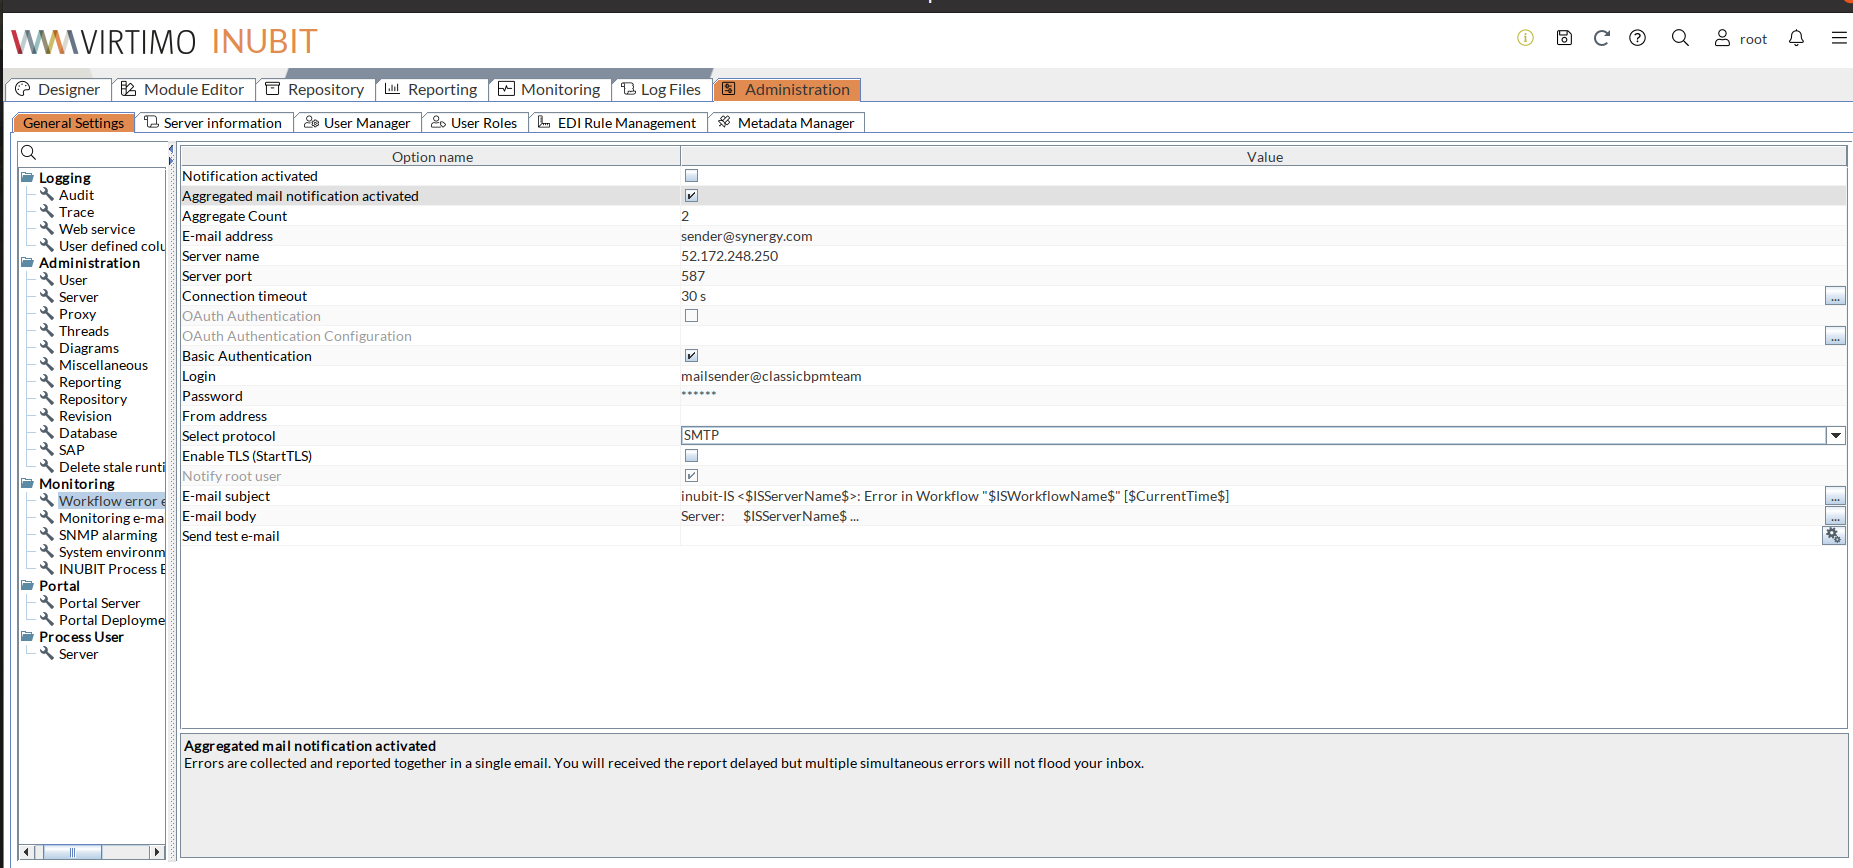
Instead of sending an email immediately for every single error, the system now collects all errors that occur until a configurable threshold is reached. During this period, the errors are logged and stored, but no email notifications are sent yet. This allows the system to bundle multiple errors into a single aggregated email, reducing the number of notifications and improving manageability.
|
Ensure that the Aggregated Mail Notification checkbox is enabled; otherwise, the system will continue to send individual e-mails for each error. |
Configurable Aggregate Count
Follow the Activate e-mail notification steps and enter the Aggregate Count.
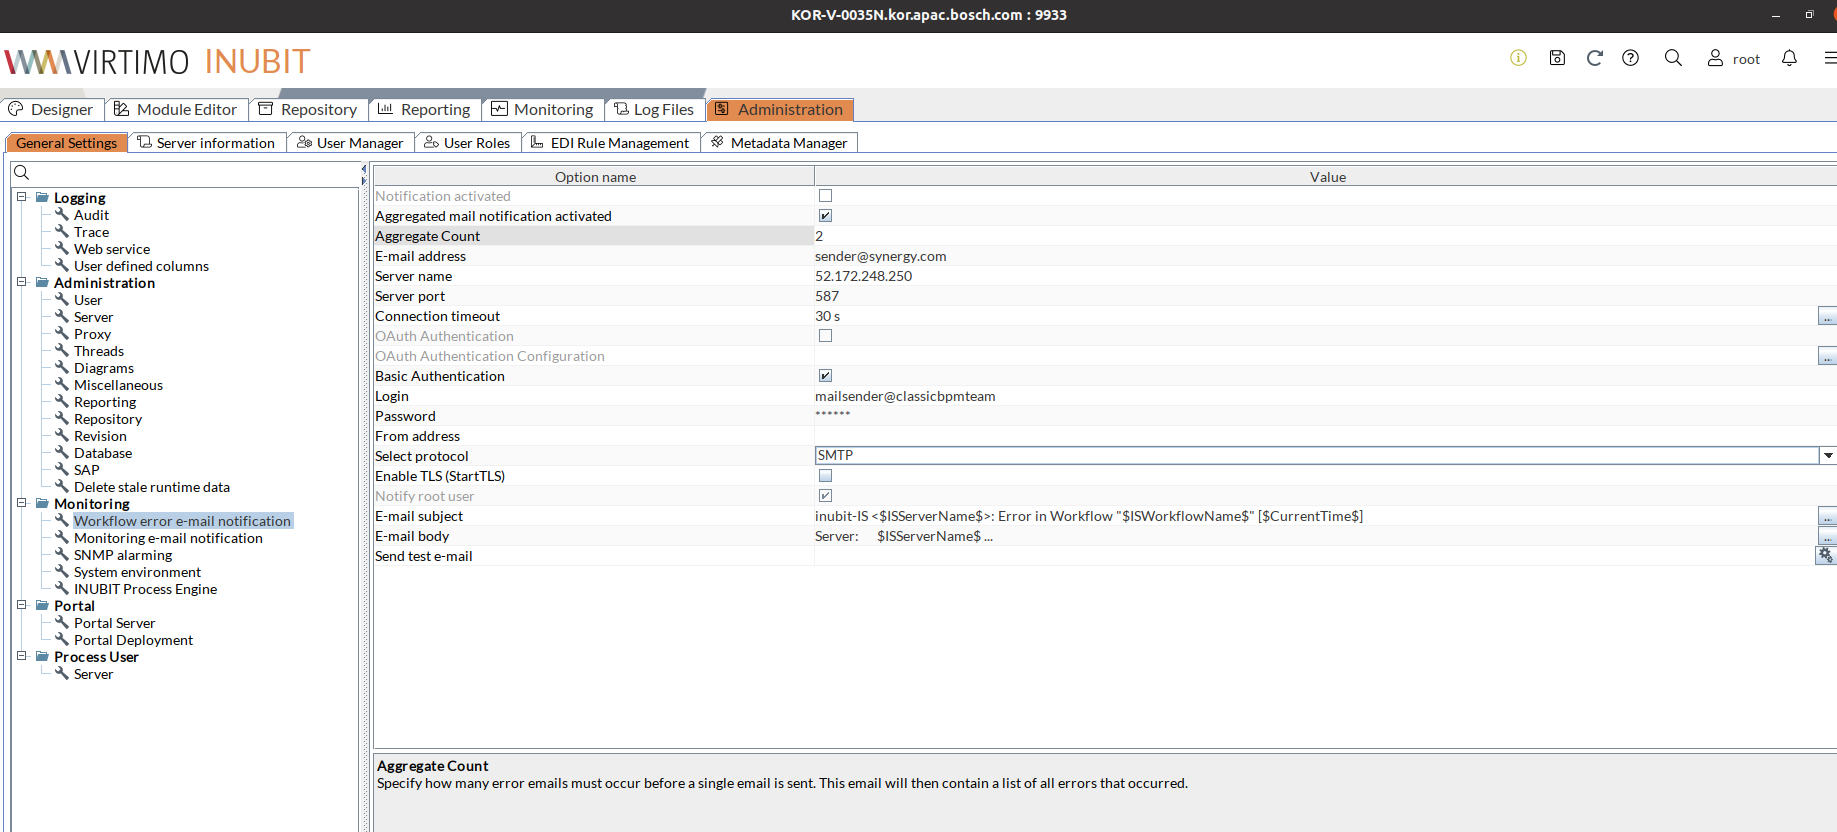
The customer can define a limit for the number of errors that must occur before a notification e-mail is triggered. This threshold is configurable and can be set to any value between 2 and 100.000. For example, if the limit is set to 100, the system will wait until 100 errors have been collected before sending a notification e-mail. This helps to reduce the frequency of e-mails by grouping multiple error events into a single notification.
Triggering the Aggregated E-mail
-
When the number of collected errors reaches or exceeds the configured limit, the system sends a single aggregated e-mail.
-
The e-mail includes all the errors that have been collected either since the last aggregated e-mail was sent, ensuring that multiple related errors are communicated together in a single, consolidated message.
E-mail Content and Format
The aggregated e-mail includes a subject line, body text, and an attachment.
-
Subject: Aggregated Workflow Error Report from
<server-id>. -
Body text: This e-mail notifies the recipient that the configured error threshold of
<configured-error-amount>has been reached. -
Attachment: A CSV file is attached, containing detailed information about all the aggregated errors.
The CSV file attached to the aggregated e-mail includes the following columns for each error: Server, Server-ID, Date, Time, Workflow Name, Module Name, ProcessId, ISErrorKey, ISErrorString, and Error Mail Content.
After the E-mail is sent
Once the aggregated e-mail is sent, the error count is reset. The system then starts collecting new errors for the next batch.
Configure the E-mail server
After enabling your preferred e-mail notification option, which can be either a single e-mail or an aggregated e-mail, follow the steps below:
-
In the Server name field, enter the IP address or name of your e-mail server.
-
Activate the Authentication option if the e-mail server expects a login.
-
Then enter the login name and password.
-
Save the information.
Using SMTP/SMTPs
E-mail notification can be sent via an unencrypted (SMTP) or an encrypted connection (SMTP with enabled TLS, SMTPs) between the INUBIT Process Engine and the mail server.
Activating Monitoring E-Mail Notifications
For alert activating events related to license expiry, low memory, and Process Engine crash, the INUBIT software may send e-mails to the root user with the System Administrator role and the e-mail address defined in the configuration.
|
You can deselect the Notify root user option if you do not want the user |
Refer to
-
For Technical Workflow diagrams you can define individual e-mail recipients, refer to After incorrect execution e-mail to.
-
For a list of events that trigger an alert and may trigger an e-mail notification, refer to Events Triggering Alerts and Notification Paths.
Proceed as follows
-
Define an e-mail recipient
-
In the INUBIT Workbench, display the Administration > User Roles tab.
-
Expand the
System Administratoruser role folder and select the userroot. -
Open the context menu and select Edit user data. A dialog opens.
-
Enter a valid e-mail address.
-
Confirm by clicking OK. The dialog closes.
-
-
Activate e-mail notifications
-
Display the Administration > General Settings tab.
-
Select the Monitoring > Monitoring E-Mail notification configuration category.
-
Activate the Notification activated option.
-
In the Server name field, enter the IP address or name of your e-mail server.
-
Activate the Authentication option if the mail server expects a login.
-
Then enter the login name and password.
-
Save the information.
-
Using SMTP/SMTPs
E-mail notification can be sent via an unencrypted (SMTP) or an encrypted connection (SMTP with enabled TLS, SMTPs) between the INUBIT Process Engine and the mail server.
When having chosen SMTP, you can choose the Enable TLS (StartTLS) option. This will encrypt the connection.