Repository: Managing Files Centrally
Overview
The INUBIT Repository is used to store and provide data centrally. These data can be used by all Process Engine users and process users as well as modules and applications that have been realized with the INUBIT software. Data visibility can be controlled on file level.
On delivery, the Repository is provided with mapping templates for use with various system connectors, with generation patterns for generating Workflows based on BPDs and with graphics for reporting and business modeling.
In the Repository you can e.g.
-
store BPM rules, unit tests, XML schemas, generation patterns and watchpoint files,
-
store graphics and scripts and make them available via URL.
Switching the Repository to a Database
When delivered the Repository of the INUBIT software stores its data into the file system. You must switch the Repository storage to a database before using the INUBIT software productively.
|
You must use the same connection configured for the cache database in the Refer to |
For switching the Repository to a database management system a repository.xml.<database>.<CLUSTER|SINGLE> configuration file for each database supported and the mode of operation is included in the distribution.
|
When switching to a MySQL/MariaDB database, ensure that the allowed file size fits at least the size of the largest file that is expected.
To do so, for example for MySQL, set the property After changing the value, you have to restart the MySQL/MariaDB server. |
Even after switching the Repository to a database, the index files are written into the file system. These files can be re- generated at anytime by restarting the INUBIT Process Engine so that losing these files is not critical.
Prerequisites
You have copied a JDBC 4.0 driver for your database to the directory <SUITE-INSTALL-DIR>/inubit/server/process_engine/lib.
|
For an Oracle database, Oracle JDBC driver 11.2.0.4 or higher is required. |
When installing the INUBIT software
Proceed as follows
-
Rename the file
<SUITE-INSTALL-DIR>/inubit/server/ibis_root/conf/repository.xml, for example torepository.xml.old. -
Rename the file
<SUITE-INSTALL-DIR>/inubit/server/ibis_root/conf/repository.xml.<database>.<CLUSTER|SINGLE>torepository.xml.
If the INUBIT installation already exists
Proceed as follows
-
Export the Repository files from the
Globalarea and from all own user directories. -
Stop the INUBIT Process Engine.
-
Delete the following directories:
<SUITE-INSTALL-DIR>/inubit/server/ibis_root/ibis_data/repository/repository
<SUITE-INSTALL-DIR>/inubit/server/ibis_root/ibis_data/repository/workspaces
You must not delete the directory
<SUITE-INSTALL-DIR>/inubit/server/ibis_root/ibis_data/repository/deploy. -
Adjust the configuration file
repository.xml, as described above in the section When installing the INUBIT software. -
Start the INUBIT Process Engine.
-
Import the Repository data again.
Depending on the index size, creating the index can take some time.
External Access to the Repository
For accessing Repository files there are the following options:
-
Accessing via URL
-
Importing or including style sheets in XSLT Converter style sheets.
-
Referencing XML schemas in Technical Workflows
-
Open graphics or any other files via HTTP/Web browser or WebDAV
-
-
Accessing via Web Service
You find information about the available operations on https://<server>:<port>/ibis/listServices.
For further information on how to access the web services and how to configure the password, refer to Listing Active Web Services.
On the web page, you will find the IBISInternalRepositoryService hyperlink to the WSDL of the Repository as well:
https://<server>:<port>/ibis/services/IBISInternalRepositoryService?wsdl
In the request for the following single repository objects, the user account and the password must be mentioned.
-
getObjects
-
getDirectory
-
getObjectVersions
-
existsChild
For all other objects, the request can be made anonymously.
Repository User Interface
Call up
INUBIT Workbench > Repository tab
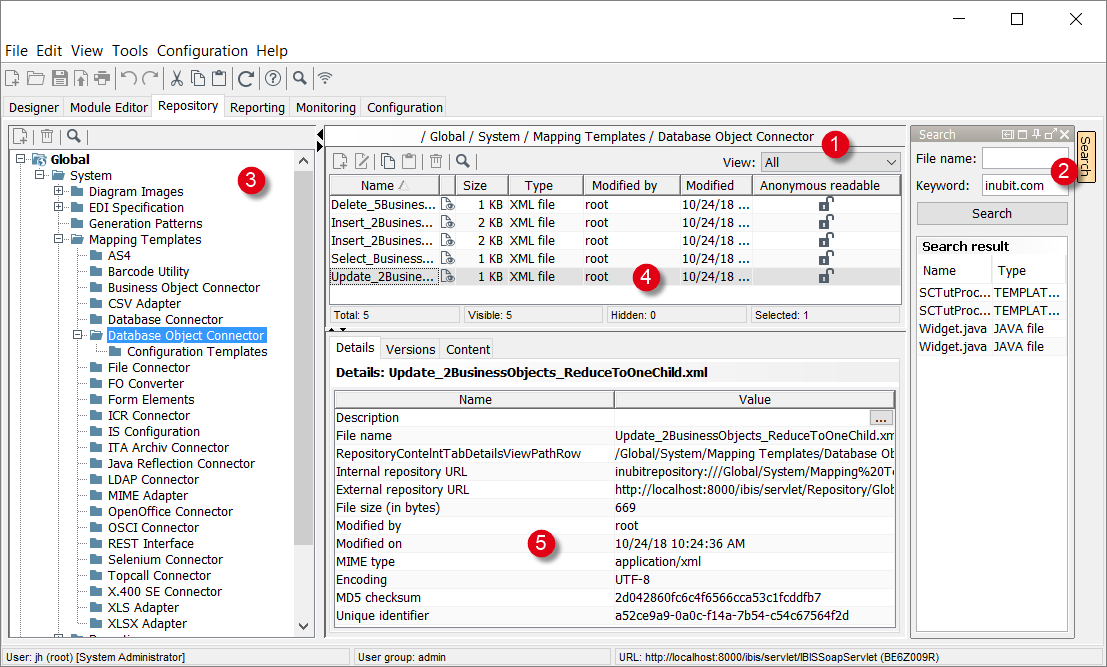
The Repository consists of the following areas:
-
For filtering files which are displayed in the Repository. You can select one of the following views:
-
All
Displays all data stored in the Repository. -
BPM Rules
Displays all existing rules and rule sets and allows for creating new rules and rule sets. Refer to Using BPM Rules. -
Schema files
Displays all XML schema files. -
Unit test files
Displays all test cases and test suites and allows for creating and starting test suites. Refer to Managing Test Cases in Test Suites. -
Watchpoint files
Displays all watchpoint files (*.wpffiles). Watchpoint files contain message and variables and can e.g. be stores during testing from all watchpoint dialogs or from the XPath assistant directly into the Repository.
-
-
Search Clicking the button in the sidebar opens the Search docking window. Refer to Searching in the Repository.
-
Directory tree The Repository files are grouped into two main directories:
Files stored in the
Globaldirectory can neither be tagged nor exported or deployed together with a special workflow tag. Furthermore, you cannot set access rights for these files. Do not store costumer- or workflow- specific data into theGlobaldirectory.Only the
rootuser is permitted to change or import files in or into the/Global/Systemdirectory tree. If another user tries to import files into this directory tree, these files are ignored without an error message. Exception: Each entitled user is allowed to change the files in the/Global/System/Diagram Imagesdirectory or import files into it.-
Global
This directory stores files that are required for proper functioning of the INUBIT Process Engine or for its modules, for example templates for input messages or graphics for the reporting.
At the first start-up of the Process Engine, these files and directories are created. Afterward, the root user only can change these files or overwrite them during an import.
For all other users the access is denied or files to be imported are ignored.
Refer to Updating a Directory in the Global Repository Hierarchy. -
Root
This directory stores individual files of users/user groups.
The structure of the directory corresponds to the structure of the Process Engine users and user groups: For all user groups and users, directories are automatically created.
As a linked user only the directories of the additional user group are displayed. The directories of your primary user group are not visible.
For information about linked users refer to Assigning Users to Additional User Groups and Editing the Assignment. The directories are automatically deleted as soon as users/a user group is deleted. -
File icons in the directory tree
-
 System file; only the
 rootuser can edit it. -
 Read-only file; the user logged in can only read it.
It is not possible to open this file for editing.
Read-only file; the user logged in can only read it.
It is not possible to open this file for editing. -
 Editable file; the user logged in can edit it.
-
-
-
Directory area: [Name of the directory] Displays all files of the directory that is selected in the directory tree. Refer to Editing Files in the Repository.
-
Details area If a file is selected, the following tabs are displayed, depending on the file type:
-
Details tab
Displays properties like e.g. file name, UID, and path for access via URL. Refer to Details of a Repository File. -
Versions tab
Displays versions of the file. For restoring, downloading, moving and deleting tags.-
Usage tab (only in the BPM rules view)* Shows in which Technical Workflows and Business Process Diagrams the selected BPM rule is used.
-
Content tab (only in the All view)
Displays the contents of the file (e.g. for XML schema files) or its ASCI representation.
-
-
Storing Files in the Repository
|
Files stored in the Only the |
Access rights for Repository files
For accessing files in the Repository from workflows the following rules apply:
-
Access from workflows belonging to a group:
Only Repository files can be accessed which are stored in the groups’ own area or in theglobalarea. Repository files stored in other groups’ areas cannot be accessed. -
Access from workflows belonging to a user:
Access is possible to Repository files of the user, her group or higher-level group provided that the role of the user permits a reading and/or writing access.
Refer to Properties of a Repository File
Adding Files and Folders from your File System
Prerequisites
In the Repository, you have selected the view All.
Proceed as follows
-
In the Repository, open the folder in which you want to save content.
-
In the directory area, open the context menu and choose Add file or directory. A wizard is displayed.
-
Click
 to select a file or directory.
-
If you select a directory, this is added to the Repository with all files and subdirectories. You can change the name of the directory.
-
If you select a file, you can change the file name and specify the MIME type and encoding.
-
-
Specify whether the files in the directory or the selected file are supposed to be readable anonymously
Refer to Anonymous readable in section Properties of a Repository File. -
Click Next.
-
The following action depends on whether you are saving a directory or a file:
-
Directory:
Enter a comment. The comment is saved together with the version created initially. Click OK to close the dialog and save the directory. -
File:
The editor opens for editing the file.
After editing, click Finish to close the dialog and save the file.
-
Creating and Adding a New File
Prerequisites
In the Repository, you have selected the view All.
Proceed as follows
-
In the Repository, open the folder in which you want to create and save the file.
-
In the directory area, open the context menu and choose Add file or directory….
→ A wizard is displayed and guides you through the next steps.
Creating and Adding a Text-Based File in the Repository
Prerequisites
In the Repository, you have selected the view All.
Proceed as follows
-
In the Repository, open the folder in which you want to save content.
-
In the directory area, open the context menu and choose Add file or directory. A dialog opens.
-
Enter a file name and specify the MIME type and encoding of the file.
-
Specify whether the file is supposed to be readable anonymously so that access to the file is possible via its URL.
Refer to Properties of a Repository File. -
Click Next. The editor opens.
-
Specify the content of the file. Refer to Using the Editor.
-
Click Finish. A dialog opens in which you can enter a comment for the initial version.
-
Click OK to save the file in the Repository.
Adding Messages and Variables from the Clipboard
You can copy content to the INUBIT clipboard and save it directly to the Repository.
Proceed as follows
-
Save the content that you want to store in the Repository in the INUBIT clipboard. This is possible e.g. in the following components:
-
XSLT Converter
-
Editor
-
Watch Point Dialog
-
-
Open the Repository and choose the view All.
-
Open the folder in which you want to save content.
-
In the directory area, open the context menu and choose Insert from clipboard:
Editing Files in the Repository
You can edit Repository files with text-based formats (XML schema, XML, TXT), BPD templates, BPM rules, unit tests and watch point files directly in the Repository.
Alternatively, you can replace Repository files with content from the clipboard or files from the file system.
A new version is created after each change.
Editing content
Proceed as follows
-
Select the directory that contains the file to be changed. The file is displayed in the area Directory: [name of directory].
-
Double-click the file. The file is opened in an editor.
-
After editing, click OK to enter a comment for your changes and to save the changes.
Replacing content
Proceed as follows
-
In the directory area, select the file that you want to overwrite.
-
In the context menu, choose Properties. The dialog opens. Refer to Properties of a Repository File.
-
Next to the Update content with field, click the
button.
A file explorer opens. -
Navigate to the file that you want to load and click Open.
→ A new version of the Repository file is generated with the content of the selected file.
Updating a Directory in the Global Repository Hierarchy
Usage
To synchronize files in directories in the local Global Repository Hierarchy with the files stored in the corresponding directories on the Process Engine. This function can be used, for example, if repository files in a Global directory are updated after having patched the INUBIT installation.
When updating a directory, files in the selected Global directory and its subdirectories are updated as new version, added, or deleted according to the content of the directories on the Process Engine.
|
This function is not available for other directories than Global directories. |
Prerequisites
You are logged in to the Workbench as INUBIT administrator root.
Proceed as follows
-
Open the Repository tab.
-
Navigate to the Global directory you want to update.
-
Right-click the directory you want to update.
-
Choose the Update directory menu item from the context menu.
→ The directory including its subdirectories is updated. No further message is displayed.
Restoring File Versions in the Repository
You can restore different versions of Repository files if you notice that you do not want to accept the changes made after all and want to go back to the previous version.
Proceed as follows
-
In the directory tree, navigate to the directory that contains the file with the version to be restored.
-
On the right in the directory tree, select the file of which you want to restore a version.
-
Select the Versions tab. All file versions are displayed here.
-
Select the version that you want to restore and open the context menu.
-
Choose Restore. A confirmation prompt opens.
-
Click OK to accept the content of the selected version into a new head version.
→ A new head version is created with the content of the selected version.
Deleting and Restoring Files from the Repository
Removing
You can delete files and directories by pressing the Delete button or choosing Delete from the context menu.
The deleted files are moved into an attic directory first. To delete files permanently, you must delete them from the attic directory.
Restoring
To restore files and directories, drag them from the attic directory back into the directory tree.
Deleting File Versions
Usage
To improve the performance of the Repository, you can delete old file versions.
Proceed as follows
-
In the Workbench, display the Repository tab.
-
Navigate to a folder below the Root folder you have access to.
-
Select one or more files or folders.
-
Open the context menu and choose Delete versions.
→ The Delete versions dialog is displayed and the files with versions of the selected folder(s) are listed in the Select the files section. -
Unselect all files whose older versions are not to be deleted.
-
In the Retain versions section, choose an option to specify which versions are not to be deleted.
-
Amount of latest versions
Enter a positive integer, for example10, to indicate how many of the youngest versions, for example 1`0`, shall be retained. -
All younger versions including version
Enter a version number, for example10. The version with the given number and all younger versions retain. -
All tagged versions
Only untagged versions are deleted. -
All younger versions including
Enter a date and a time. The version(s) created on the given date and time as well as all younger versions retain.
-
-
Click OK. → The dialog closes. All versions of the selected files being not specified in the Retain versions section are deleted and will no longer be displayed in the Repository.
Exporting Files from the Repository
You can export Repository files and directories as compressed (*.zip) XML files to exchange them between different INUBIT installations and INUBIT versions.
|
Files stored in the |
Proceed as follows
-
Select directory, node, or file
-
Select one or more directories or nodes in the directory tree.
When selecting a group or a user node, all the tags related to the group or the user are available for exporting. When selecting a directory node and selecting one or more files in this directory, all tags assigned to the file(s) is/are available for exporting. When selecting a directory node and not any file, only the HEAD tag is available for exporting.
-
Select one or more files in a directory.
When selecting one or more files inside a directory node, all the tags corresponding to the file(s) is/are available for exporting.
-
-
Open the context menu and choose Export.
→ The export wizard opens and guides you through the export.
Downloading Files from the Repository
You can download Repository files from the INUBIT Process Engine and save them locally. You can choose whether files are supposed to be saved in the original format or compressed as a *.zip file.
|
You cannot download BPM rules. Use the export function to copy these e.g. from another INUBIT Process Engine. |
Downloading a head version
Proceed as follows
-
Select one or more files in a directory.
-
Open the context menu and choose Download.
→ The download wizard opens and guides you through the process.
Downloading other versions
Proceed as follows
-
Select a file in the Directory area.
-
Open the Versions tab.
-
Open the context menu of the required version and choose Download. A file explorer opens.
-
Navigate to the requested storage location and choose Save.
Comparing Files in Repository Directories on Different Process Engines
Prerequisites
Both Process Engines are installed with an INUBIT version as of 8.0.
Proceed as follows
-
On the INUBIT Workbench, open the Repository tab.
-
Navigate to the Repository directory for which you want to compare the files containing in the directory and its subdirectories if any.
You cannot compare a single file within a directory.
-
Open the context menu and choose the item Compare with another Process Engine.
-
Choose the tag you want to compare and click Next.
-
For comparison, enter the connection details for the remote process engine. Only the IP address or the DNS name of the remote system on which the Process Engine is running must be specified as the Server name.
-
If you select HTTPS as protocol, all necessary security settings must be made by clicking on the SSL… button.
If you enter incorrect details, the wizard page will display a corresponding message. You should correct your settings until the message disappears.
-
When all the settings are correct, click Next.
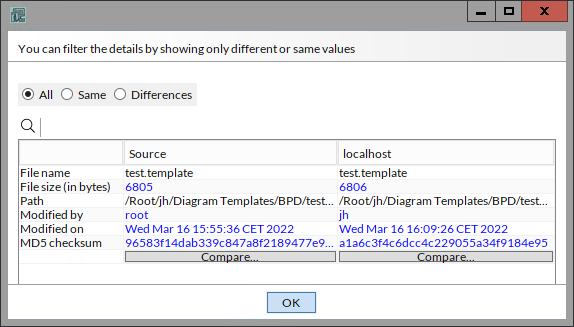
→ The Comparison results dialog is displayed.Differences between source files and target files are highlighted in color as follows:
-
Filename black: file is identical on both the source system and the target system.
If only the Modified on date and time differs, the filename is displayed in black -
Filename green: file is missing on the target system.
-
Filename red: file is missing on the source system.
-
Filename blue: file differs between source system and target system.
Additionally, you can filter the filenames as follows: -
All: depending on the Comparison result, all files are highlighted in color.
-
Same: only files that are identical on both systems are displayed.
-
Differences: only files that differ on both systems are displayed.
-
-
To display the details, double-click the filename in the list.
-
If the file content differs, click on the Compare button below to display the Document comparison.
Only the contents of XML files can be compared.
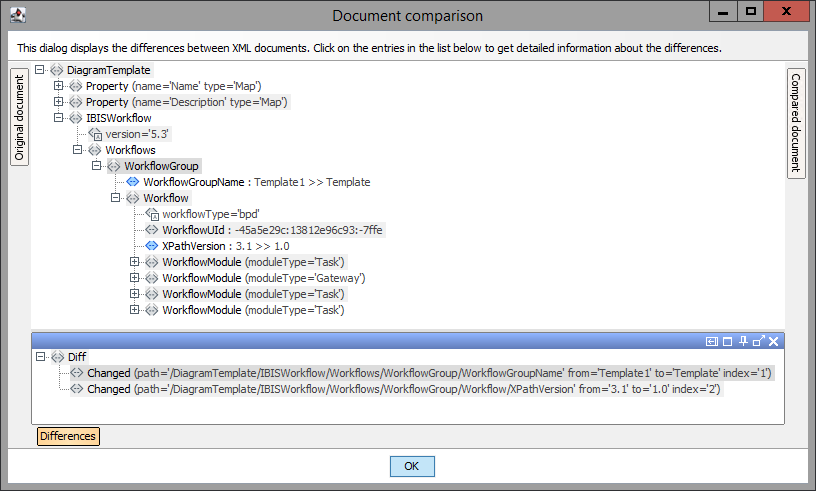
On the bottom, the Differences window is displayed by default. Here, the differing lines are displayed detailing the differences.
By clicking the Differences button, you can hide/display the Differences window.
To display the Original document and/or the Compared document, click the corresponding button on the top left and on the top right, respectively. -
Click OK to close the window.
Accessing Files in the Repository via URL or path
All files in the Repository can be accessed - either by reading or by writing - via a URL. In that way, you can, for example, use graphics from the Repository in forms and access Repository files for example, by HTTP, VFS and Web Services Connectors, via WebDAV or import/include commands in style sheets.
Prerequisites
-
Depending on the access type, the following prerequisites might be required:
-
The file must be readable anonymously.
-
When accessing, a log in with user name and password is required, for example, via BasicAuth or WS-Security UsernameToken.
-
HTTP access or WebDAV access to the Repository must be activated, refer to Configuring Access to the Repository.
Depending on the access type, the URL conforms one of the following schemas:
-
HTTP and REST Connector
Access read only (GET)Prerequisites
-
URL and file name are encoded.
http(s)://<ServerName>:<Port>/ibis/servlet/Repository/<repository path>Example
https://<server>:<port>/ibis/servlet/Repository/Global/System/Mapping%20Templates/ITA%20Archiv%20Connector/QueryInsert.xml
-
-
VFS Connector
Read and write access using the repository pathPrerequisites
-
You have to specify user data to get writing access.
-
-
WebDAV and REST Connector
Read (GET) and write access (PUT)Prerequisites
-
URL and file name are encoded and should look like this:
http(s)://<ServerName>:<Port>/ibis/servlet/RepositoryWebdav/<repository path>Example
https://localhost:8000/ibis/servlet/RepositoryWebdav/Global/System/Mapping%20Templates/ITA%20Archiv%20Connector/QueryInsert.xml
-
-
File import/include in XSLT converter style sheets; Referencing of XML schemas in Technical Workflows
inubitrepository://<repository path>Example
inubitrepository:///Global/System/Mapping Templates/ITA Archiv Connector/QueryInsert.xml -
Web Services Connector
Read and write access
All operations and parameters are possible, hence writing metadata (version comment, file description). The Anonymous readable flag can be set.
URL and file name are not needed to be encoded.
Refer to External Access to the Repository. -
XPath Function
Access read only and from the local instance only
Repository files can be used easily, for example, in XSLT stylesheets, XPath expressions of Demultiplexer conditions, or mapping of variables.
The files should be anonymously readable, URL and file name are not needed to be encoded.Call up
XPath in XPath context:
fn:doc("inubitrepository://<Repository_path>")XPath in XSLT context:xslt:document("inubitrepository://<Repository_path>")
Copying the repository path of a file
Proceed as follows
-
Display the Repository tab.
-
Double-click the file in the Repository. The Properties dialog opens.
Refer to Properties of a Repository File. -
Click
 next to the Path field.
The path is copied to the clipboard.
next to the Path field.
The path is copied to the clipboard. -
Press Ctrl+V to paste the contents of the clipboard into your form, for example.
Dialog Descriptions for the Repository
Properties of a Repository File
The Properties dialog shows the file properties. You can, for example, change file name and content, copy its path and the check sum as well as specify file access rights.
After each modification a new file version is created automatically.
-
File name
Displays the current file name. Changes in this field result in renaming the file while the versions remain. -
Update contents with (button)
This button opens a file explorer for selecting the file that is going to replace the content of the currently selected file. -
Description
Any text describing the use of the file. The description is displayed in the Details tab.
-
MIME type
The MIME type of a file is assigned automatically when adding it to the Repository. If the MIME type was not assigned correctly, you can change it in this field.
The MIME type mapping table is used for assigning the MIME type. If you upload files into the Repository with a file type yet unknown to the table, you can set the file type manually in the MIME type field.
Alternatively, you insert the MIME type and the corresponding file endings into the MIME type mapping table. Then, on the next file upload of such a file, the MIME type is assigned automatically.
Refer to MIME-Types Mapping Table.
-
Encoding
For changing the character encoding of the file. -
Path
Refer to Accessing Files in the Repository via URL or path. -
Size
File size. -
Modified on
Date and time of the last modification. -
Modified by
INUBIT user name of the person who last modified the file. -
MD5 checksum
Maps the file contents onto a sum; changing any character of the contents results in a different check sum. The check sum is used for-
ensuring the file integrity in any communication between the INUBIT Workbench and the INUBIT Process Engine.
-
verifying whether the local file is faultless after having downloaded it.
-
You can copy the check sum to the clipboard and, for example, assign it to a variable for ensuring that a specific file from the Repository is used in a workflow.
-
Anonymous readable
For modifying the file’s access rights. The file must be readable by anonymous users, so that it can be accessed via its URL.
Accessing non-anonymous readable files
Accessing a repository file using the FormProxyServlet via a Web Application session is dependent on where the Technical Workflow diagram with the Web Application Connector is located.
-
The Technical Workflow diagram with the Web Application Connector is located in a higher-level group directory.
A non-anonymously readable repository file can be read by the FormProxyServlet only if the file is stored in the corresponding higher-level group directory of the Repository. -
The Technical Workflow diagram with the Web Application Connector is located in a user directory.
All non-anonymously readable repository files can be read by the FormProxyServlet irrespective of the group directory where they are stored.
Details of a Repository File
The Details tab displays all details of the file properties, e.g. the internal and external URLs and paths. The properties are read-only and cannot be edited in the tab.
-
Description
Refer to Properties of a Repository File. -
File name
Refer to Properties of a Repository File. -
Path
Absolute path of the file in the Repository. -
Internal repository URL
Defines the URL that must be used to access a Repository file from within the INUBIT software. The URL can be used in modules (e.g. XSLT) or XML schemas. -
External repository URL
Defines the URL that must be used to access the Repository file from outside the INUBIT software, e.g. via browser.The access to Repository files from outside the INUBIT software is protected by the INUBIT authorization system. As a rule, a login is necessary to access a file.
You can avoid this by assigning the status anonymously readable to the file. Thus, no login is required.
-
File size (in bytes)
Refer to Properties of a Repository File. -
Modified by
Refer to Properties of a Repository File. -
Modified on
Refer to Properties of a Repository File. -
MIME type
Refer to Properties of a Repository File. -
Encoding
Refer to Properties of a Repository File. -
MD5 checksum
Refer to Properties of a Repository File. -
Unique Identifier
Refer to Properties of a Repository File.
Searching in the Repository
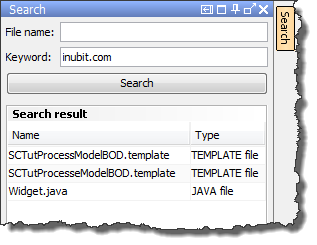
For searching files and file contents in the Repository.
-
File name
For entering the complete name of the searched file. -
Keyword
For entering the searched string or parts of it. Use the following wildcards:-
Asterisk (*): Replaces any number of characters before or after the file name or keyword.
-
Question mark (?): Replaces a single character before or after the file name or keyword.
Both wildcards can be used together before and after a key word.
-
-
Search (button)
Starts the search. -
Search result
Displays all file names which meet the given search criteria.