Starting the INUBIT Workbench and Logging In
Prerequisites
Either your locally available Process Engine is already started or a remotely running Process Engine is available via the network.
Proceed as follows
-
Start the Workbench:
-
Windows: Start > [All] Programs > INUBIT > Workbench
-
Linux/Windows
-
<SUITE-INSTALL-DIR>/inubit/client/bin/start_local.shor.bator ^*
<SUITE-INSTALL-DIR>/inubit/bin/start_workbench.sh `or `.bat
-
-
If an incompatible Java runtime version is detected:
A dialog is displayed showing the Java runtime version detected as well as pointing out that this version is not supported (refer to Software Requirements).
In this case, using the workbench may produce unexpected behavior.
Click one of the buttons:
-
Quit (recommended)
You cancel the start of the Workbench.
-
Continue
You continue the start of the Workbench at your own risk.
If a compatible Java runtime version is detected or if you have continued the start of the Workbench in case of an incompatible version, the following dialog is displayed:
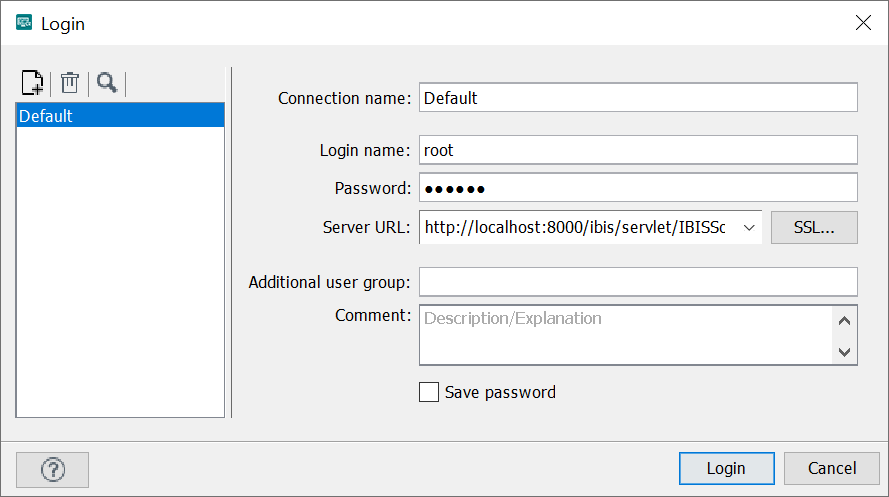
At the login, you can choose a direct user group or an additional user group in the User group field, refer to Assigning Users to Additional User Groups and Editing the Assignment. Both the username and the user group can be entered case-insensitive.
-
-
To connect the Workbench with a Process Engine, specify the URL as follows:
https://<server>:<port>/ibis/servlet/IBISSoapServlet-
LoadBalancer
Host name or IP address of the system on which the load balancer runs.
-
Port
Port through which the load balancer can be reached.
-
-
To login as system administrator, enter
rootas login name and lookup the randomrootpassword for the initial login provided inibis.xml:<Property name="initialRootUserPassword"><!-- Random 20 character string --></Property>After first login, you can remove the property for the initial
rootpassword inibis.xml.If the property entry for the initial
rootpassword is missing inibis.xmlduring the first login, the server start is being aborted.To use different credentials, you can create multiple login profiles. Therefore, refer to Creating and Deleting Login Profiles or call the appropriate help in the login window with
 .
. -
Click Login.
If the maintenance mode was activated for the Process Engine, a message is displayed. With the checkbox in this dialog, you can decide whether this warning should be displayed again. The same is true for the warning message that is displayed when the Workbench version is lower than the Process Engine version.
→ The INUBIT Workbench opens.
|
For security reasons, change the root password now. For this purpose, open user menu > Change password from the menu bar in the INUBIT Workbench. |
Managing Libraries
Using modules such as a Database Connectors may require installing additional programs such as database drivers on your INUBIT Process Engine.
The drivers will be copied into the cache database and will then be stored in the <SUITE-INSTALL-DIR>/inubit/server/lib/system directory.
|
Drivers — especially for the cache database — may only be stored in exact one version in exact one directory on the application server. Make sure that there are no other versions on your INUBIT installation before you install or update a driver. |
Prerequisites
You are logged in as a system administrator.
Proceed as follows
-
In the INUBIT Workbench, select Configuration > Library Manager. A dialog opens.
-
Click the Upload new library icon
 to upload a new library.
The Upload library dialog opens.
to upload a new library.
The Upload library dialog opens. -
To the right of the File field click the Browse file icon
 .
A file selection dialog opens.
.
A file selection dialog opens. -
Navigate to the driver, select it, and click Open. The file name is displayed in the File field.
-
In the Library Type section, select Driver library.
How to upload plug-ins, refer to Installing Plug-ins.
-
Click OK to upload the library.
→ The file is uploading.
If the upload was successful, a confirmation is displayed. Otherwise, an error message is displayed.
-
Click OK to close the dialog.
→ A dialog informs you about a necessary restart of the INUBIT Process Engines and the INUBIT Workbenches. Confirm the dialog.
-
Restart the INUBIT Process Engines and the INUBIT Workbenches. → After the restart, the driver is available, and you can use it in your workflows.
|
In the Available libraries section, you can choose which library type(s) (All, Drivers, Plugins) are to be displayed using the drop-down list. To remove a library, click the Remove library icon To download a previously uploaded library, select the library and click the Download To search for a library, click the Search icon |


Updating Libraries
Usage
To upload a new library version
|
You must not upload a new library version of an older library version before having removed the older one from the INUBIT Process Engine. |
Prerequisites
You are logged in as a system administrator.
Proceed as follows
-
In the INUBIT Workbench, select Configuration > Library Manager. The Library Manager dialog opens.
-
Choose Drivers from the Library type selection list.
-
Click the driver you want to update.
-
Click the Remove library icon
 to remove the existing library.
 -
Confirm deleting the driver in the Question dialog.
-
Restart all INUBIT Process Engines and INUBIT Workbenches.
-
Log in as a system administrator to the INUBIT Workbench.
-
In the INUBIT Workbench, select Configuration > Library Manager. The Library Manager dialog opens.
-
Click the Upload new library icon
to upload a new library.
The Upload library dialog opens. -
To the right of the File field click the Browse file icon
.
A file selection dialog opens. -
Navigate to the driver, select it, and click Open. The file name is displayed in the File field.
-
From the Type pull-down list in the Library type section, select Driver library.
-
Click OK.
→ A dialog informs you about a necessary restart of the INUBIT Process Engine and the INUBIT Workbench. Confirm the dialog.
→ The file is uploading. If the upload was successful, a confirmation is displayed. Otherwise, an error message is displayed.
-
Restart the INUBIT Process Engine and the INUBIT Workbench.
→ After the restart, the new driver is available and you can use it in your workflows.
Integrating Native Libraries
Proceed as follows
-
Download the corresponding libraries and decompress them.
-
Upload the
*.jarfiles to the INUBIT Workbench.Refer to Managing Libraries
-
Depending on your operating system, copy the `*.dll/so `files into one of the following directories:
-
Windows
-
When starting the INUBIT Process Engine via the Start menu:
<SUITE-INSTALL-DIR>/_jvm\bin -
When using the INUBIT Process Engine as a service under Tomcat:
SUITE-INSTALL-DIR\inubit\server\process_engine\bin
-
-
Linux 64-Bit
<SUITE-INSTALL-DIR>/_jvm/libYou must possibly add the directory to the environment variable PATH.
-
-
Restart the INUBIT Process Engine.
Updating the License via INUBIT Workbench
A new license may be loaded to the INUBIT Process Engine by means of the INUBIT Workbench.
When your license expires, the INUBIT Process Engine automatically goes into maintenance mode. Even in maintenance mode, you can update your license via Updating the INUBIT Workbench.
|
To display license information, click in the menu bar on Help > About a dialog opens. You find the license details in the License Information tab. |
Proceed as follows
-
Log in to the INUBIT Workbench as the System Administrator.
-
From the menu bar select Configuration > Update license file…. A file explorer opens.
-
Navigate to the directory where your license file is stored.
-
Select the license file and click Open.
The new license is saved in the directory <SUITE-INSTALL-DIR>/inubit/server/ibis_root/conf with the name license.xml.imported.
|
No licence file backup is created. |