Developing and Installing Plug-ins
Overview
With Java-based plug-ins you can extend the functionality of the INUBIT software. Thus, you can, for example, integrate enterprise applications with the INUBIT software for which there are not yet any system connectors provided. The number of plug-ins is not restricted.
|
You must license all self-developed plug-ins and let them register before you can use them. Refer to Adding Plug-ins to INUBIT Software |
Developing Plug-ins
Overview
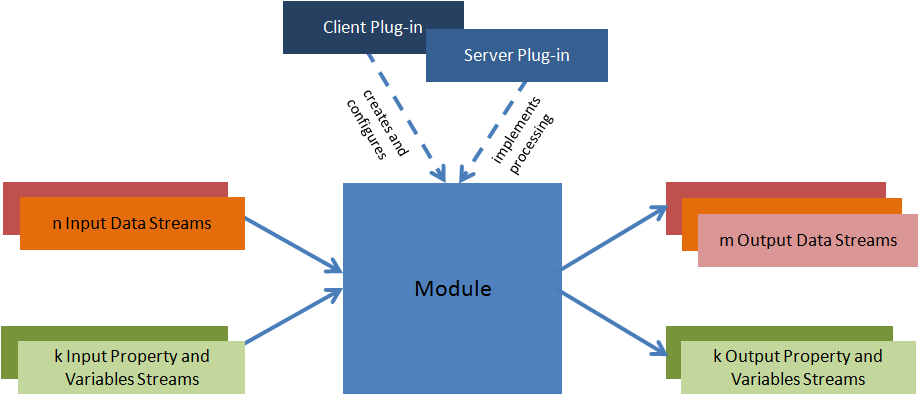
There are two plug-in types that work together: Server plug-ins and Client plug-ins. You can assign exactly one Client plugin to every Server plug-in.
-
Server plug-ins
A server plug-in processes the input message of a process step and makes the processing results available as an output message. It provides the technical implementation necessary for processing the input data into output data.
-
Client plug-ins
Client plus-ins are used in the INUBIT Workbench and provide a graphical user interface with dialogs to configure module instances and their parameters. The parameters stored in a module control and configure the way in which the module processing during workflow execution is carried out by the Process Engine.
Installing the Plug-in SDK
Proceed as follows
When installing the INUBIT software, select the option User-defined > Plug-in SDK.
→ The plug-in SDK is copied into the <SUITE-INSTALL-DIR>/inubit/pluginSDK directory.
For adding the plug-in SDK after the installation of the INUBIT software, refer to Post-installing Components of the INUBIT Software.
The SDK is structured as follows:
-
libibis.jarandibis_tools.jarfor compiling the plug-ins. -
src/com/inubit/ibis/plugins/examples/ExampleConnector-
example_connector.gifSample graphic for the connector symbol.
-
ExampleConnector.javaClient plug-in of the connector.
-
ExampleConnectorWizardPanel.javaFirst wizard panel of the connector.
-
ExampleConnectorSecondWizardPanel.javaSecond wizard panel of the connector.
-
ExampleConnectorPlugin.javaImplementation of the Server plug-in.
-
-
src/com/inubit/ibis/plugins/examples/ExampleModule/-
example_module.gifIcon for the module.
-
ExampleModule.javaClient plug-in for the module.
-
ExampleModulePlugin.javaImplementation of the server plug-ins.
-
ExampleWizardPanel.javaWizard panel for the client plug-in.
-
ExampleXulPlugin.javaSample class for wizard.
-
ExampleXulPlugin.xmlSample XML containing the description of a wizard.
-
-
templates/images/Templates for module actions used in Designer.
-
svgSVG module graphics for creating plug-ins.

-
-
build.xmlExample file for the Apache Ant build tool; requires the installation of Apache Ant. The source code can be compiled with
ant compile jar.
If you have installed the INUBIT documentation, you can find the interface description of the plug-in classes in the directory <SUITE-INSTALL-DIR>/inubit/documentation/apidoc/index.html.
Server Plug-ins
All interfaces and libraries for developing plug-ins are located in the files ibis.jar and ibis_tools.jar.
To create a server plug-in class, you need to implement one of the following interfaces:
-
For all plug-ins that are no system connectors:
I_IBISPluginInterface -
For system connector plug-ins:
I_IBIS_SC_PluginInterface
|
Self-developed plug-ins cannot be implemented as a listener connector. |
|
For an example of a system connector server plug-in, refer to the directory |
For developing plug-ins, you can use utility classes in the com.inubit.ibis.plugins.utils package.
Refer to Utility Classes
Accessing input messages
The input message is located as an InputStream object in inputMessages[0]:
InputStream dataStream = inputMessages[0];At the end of the module execution, the message has to be written into outputMessages[0].
For simply transferring the message, use:
IBISPluginStreamUtils.readStream(inputMessages[0], outputMessages[0]);Accessing variables
Variables set in the plug-in workflow must always first be moved from the first position of the input stream array (propertyMessages[1] to the first position of the output stream array (propertyOutputMessages[1]]).
In this way, the variables can be forwarded unchanged from the plug-in engine to the next module.
Example
public void execute(
        InputStream[] inputMessages,
        InputStream[] propertyMessages,
        OutputStream[] outputMessages,
        OutputStream[] propertyOutputMessages
      ) throws InubitException {

    IBISPluginPropertyHandler variables = new IBISPluginPropertyHandler(propertyMessages[1]);
    variables.setProperty("MyVariable", "12345");
    variables.save(propertyOutputMessages[1]);
}
Refer to I_IBISPluginInterface in <SUITE-INSTALL-DIR>/inubit/documentation/apidoc/index.html.
Producing errors
You have to throw an exception to produce an error:
throw new InubitException(valueForISErrorKey);
The parameter of this constructor is set as content of the ISErrorKey variable.
The variable is automatically filled with the appropriate language-dependent error text, provided that there is an available text for the given ISErrorKey.
To set an arbitrary value for the ISErrorString variable, you can use:
throw new InubitException.newInstanceWithUnlocalizedMsg(valueForISErrorKey, valueForISErrorString);If, in case of failure, you need to set the message to be transferred to the error or scope output, you have to set outputMessages[1] before throwing the exception:
IBISPluginStreamUtils.readStream(inputStreamOfErrorScopeMessage, outputMessages[1]);Java-based Client Plug-ins
To create a Java-based client plug-in class that will expand the INUBIT Workbench, it is necessary to implement abstract classes.
-
To all plug-ins the following applies
-
These plug-ins must implement the
I_ModulePlugininterface or derive it from` AbstractModulePlugin`. The derived class is listed in the Plug-in Manager as a Client Plug-In class. -
If a panel exists that will be used in the wizard, then the method
getFirstWizardPanel()must be implemented and an objectModuleEditorWizardBasePanelmust be returned. If no wizard panel exists thenzerowill be returned. -
In principle a wizard panel is derived from
ModuleEditorWizardBasePanel. Methods that will be superimposed must be overwritten and implemented in accordance with their intended use, as described in theWizardBasePaneltutorial.
-
-
For System Connector plug-ins the following also applies:
The plug-ins must implement the
I_ConnectorPlugininterface. HereI_ConnectorPluginis derived fromI_ModulePlugin. A simple table for the properties can most easily be derived from theAbstractConnectorPlugin.
|
You can find all classes and interfaces for the example modules including a wizard in the directory As a prerequisite you must have the Plug-in SDK installed, refer to Installing the Plug-in SDK. |
|
For an example of a system connector server plug-in refer to the directory |
Generating Wizards for Client Plugins
You can create wizards for client plugins by using the form designer in the Task Generator. This approach has the advantage of testing the wizard’s layout and scripts in the preview mode.
The Task Generator generates an XML structure containing the description of the wizard, which is handed over to the client plugin as an input message.
For an example of this XML structure, refer to Installing the Plug-in SDK (ExampleXulPlugin.xml).
Proceed as follows
-
Create a Task Generator.
When configuring it, select the following options:
-
Entry in a Task list > Form
-
Misc > Ignore input stream
-
-
Creating wizards with one or more dialogs
Each panel represents a single page of a wizard. To create a wizard with multiple page, add one panel for each page:
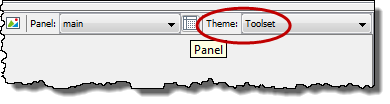
Make sure that the theme
Toolsetis selected! -
Dialog titles and descriptions
As a dialog title and description use the following attributes at the appropriate elements:
wizardTitle=Example title wizardDescription=Example description -
Errors and internationalization
Fields can be checked against specific criteria for different languages using the
pattern.<lang>command, e.g., whether periods have been used instead of commas in English numbers. Similarly, error messages and their translations can be specified as attributes, e.g.:errorText=Wer A wählt, muss auch B wählen! errorText.en=You must select... -
Dependencies
You can use one of the following languages to express dependencies between form controls: javascript, beanshell (java), jython, and groovy (if it exists in the classpath).
Refer to Panel 3 in the supplied sample file
ExampleXulPlugin.xml. -
Execute the XSLT style sheet in the
Form Mappingarea. The result is an XML structure that is displayed in theForm Mappingarea in the Result tab. -
Save this XML into a file in the same directory as the Java class of the client plugin.
-
Hand over the XML to your plugin as an input message, for example:
public class ExampleXulPlugin extends AbstractXulPlugin { public ExampleXulPlugin() { super(ExampleXulPlugin.class.getResourceAsStream("ExampleXulPlugin.xml")); } } -
Properties
You can read out the names and values of the form elements as properties and process them.
The properties, which are then handed over on the server side to the plug-in, result from the names of the form elements and their contents.
Example: A textField is named
streetand has the valueWiener Str. The corresponding property is then namedstreetand has the valueWiener Str.
Utility Classes
The following classes are available as utility classes in the package com.inubit.ibis.utils:
-
IBISTracerTo issue tracing information during runtime, the INUBIT software internally uses log4j2 for tracing. Tracing can be enabled or disabled for the running INUBIT Process Engine.
Refer to Activating and Configuring Server Traces.
The
IBISTracerclass can only be used for packages that are located in thecom.INUBITname space. To configure the trace level for independently developed plug-ins, theExampleConnectorPluginclass contains a sample implementation.For each Java class, the IBISTracer must be initialized once statically:
static IBISTracer Tracer = IBISTRacer.getTracer(MyPlugin.class.getName());Thereafter, traces may be generated using different levels in code, e.g.:
-
Tracer.log (’My first trace’);generates a trace entry with information level -
Tracer.debug (’My Debug Trace’);generates a trace with debug level -
Tracer.error (’My first error’, My exception);generates the respective trace with an error level.
-
-
inubitExceptionUsed for error handling. The module execution is canceled if a plug-in generates an InubitException and the corresponding error handling is initiated, (including transporting the workflow in failure condition, generating entries in Queue Manager and System Log, executing error branches or replacement connectors).
|
The stability is only guaranteed for the API of the classes described in Javadoc. Use of further classes is not recommended! |
Adding Plug-ins to INUBIT Software
Overview
Before using self-developed plug-ins with the INUBIT software, you must perform the following actions in the given order:
-
License the plug-in
Please contact the support of the Virtimo AG.
-
Install the plug-in
Refer to
-
Register the plug-in
Refer to
Installing Plug-ins
When installing a plug-in, the classes for the client plug-in are copied into the directories <SUITE-INSTALL-DIR>/inubit/client/lib/ext and <SUITE-INSTALL-DIR>/inubit/server/lib/ext of the computer, where the INUBIT Workbench is installed.
Prerequisites
If you want to let an icon display for a client plug-in, this icon must be contained in the installed *.jar file.
Proceed as follows
-
Login as system administrator to the INUBIT Workbench.
-
Display the Administration tab.
-
From the burger menu, select Configuration > Library Manager… A dialog opens.
-
Click the
 icon to upload a new library.
The Upload library dialog opens.
icon to upload a new library.
The Upload library dialog opens. -
To the right of the File field click
 .
A file explorer opens.
.
A file explorer opens. -
Navigate to the JAR file to be uploaded, select it, and click Open. The file name is displayed in the File field.
-
In the Library Type section, select the entry Plug-in jar library.
How to upload drivers, search libraries, and remove libraries, refer to Managing Libraries.
-
Click Finish.
→ The file is loaded.
If the upload was successful, a confirmation is displayed. Otherwise, an error message is displayed.
-
Restart both the Process Engine(s) and the Workbench(es).
For information how to upload plug-ins to Remote Connectors or remotely installed INUBIT Process Engines, refer to Updating Monitored Components.
Registering Plug-ins
Proceed as follows
-
Login as system administrator to the INUBIT Workbench.
-
Display the Configuration tab.
-
From the burger menu select Configuration > Plug-in Manager… A dialog opens.
-
Select a plug-in group into which the new plug-in will be inserted or create a new group.
-
Open the context menu of the group and select Register new plug-in…. A dialog opens.
-
Complete the fields:
-
Name: Select your plug-in’s name. The list contains all plug-in names contained in the License file that are not yet registered.
-
Group: Define in which group your plug-in should be displayed.
Fill in the following fields either in the Client area or in the Server area depending on whether your plug-in extends the INUBIT Process Engine or the INUBIT Workbench.
-
Class: Complete the class name of the plug-in.
-
Application: Your plug-in’s name.
-
Module icon (Client area only): Relative path including the icon’s name in the jar file.
The Plug-in groups installed by default cannot be renamed, edited, or deleted.
The Plug-ins within these groups cannot be renamed.
Their UI options cannot be edited.
-
-
Click OK to close the dialog.
-
Open the User Manager and assign the rights to use the new plug-in to roles.
Refer to Managing Users