Validating User Input in Forms
You have the following options for validating user input:
-
Client-side validation using regular expressions
Formula elements such as input fields are linked with regular expressions and error messages. The user input is validated in the browser before the form is submitted. Incorrect entries are highlighted, an error message is output, and the form will not be sent.
-
Server-side, context-sensitive validation with AJAX
XPath expressions and appropriate error messages are saved in the form elements from which the form fields are generated. Before the form is submitted, an Ajax call with the form fields and user input is sent to the server. The server validates the information using the XPath expressions. Any invalid field detected by Ajax is highlighted in the browser and a list of error messages are displayed.
Client-side User Input Validation with Patterns
To validate user input in forms in your browser before the form is submitted, you can define regular expressions for the input fields.
Fields containing incorrect entries are highlighted, the pertinent fields are highlighted, an error message is displayed, and the form will not be sent.
Prerequisites
The form must have at least one button element with a submit event.
At the button element, the attribute validate is selected.
Proceed as follows
-
Enter a
textFieldelement in the designer. -
Select the element, and display the Properties tab.
-
Define the restrictions of the possible user input as regular expression. Enter the regular expression as value of the
patternattribute.Regular expressions must be delimited by forward slashes (/).
Example:
/(\d\d)\.(\d\d)\.(\d\d\d\d)/The
patternattribute cannot be used in combination with themandatoryattribute! If the user input into a field is restricted bypatternand the field is to be a mandatory field at the same time, then you need to express this with a suitable regular expression.Refer to Regular Expressions
-
Enter the error message to be displayed if the user input does not match as value of the
errorTextattribute. -
If the form is not displayed in the BPC Portal, you must add the
<textArea name=‘errorViewer‘>element for displaying the error message. The element must be positioned hierarchically above the input field wherepatternis defined. As a default, the element is hidden. -
Publish the module.
Server-sided User Input Validation with AJAX
User input in forms can be validated context-sensitively by using own validation rules. Validations such as the following are possible:
-
Mandatory fields filled?
-
Data types and input values valid?
-
Date formats valid?
The user input is validated on the server side. For this validation the user input is sent to the server in the background. The validation is triggered by a Submit event. This means that the user input is validated as soon as the user clicks on a Submit or Send button in the form.
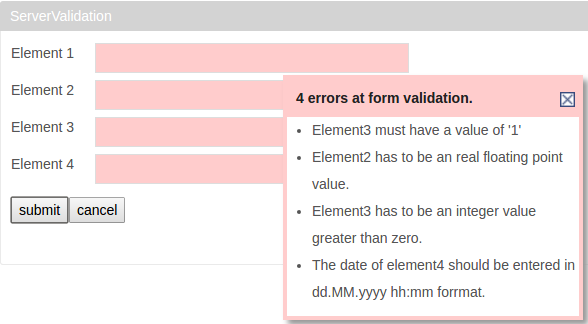
In the form, the validation results are displayed as a list in a tooltip. Clicking on an individual validation result highlights the input field in which the invalid value was entered:
Technical background
The validation rules are saved in the WS-Policy MessagePredicates standard, that is, in the form of XPath expressions. The entire XPath 3.1 syntax is supported.
All validation rules apply directly to the form structure and are reusable. You can map dependencies of any complexity between the form fields.
Example
A form requests the annuity rate, residence, and gender of retirees. In layman’s terms, the validation rule is as follows: The monthly annuity rate for a female resident of Berlin cannot exceed 1000 Euros.
As an XPath expression, the validation rule looks like this:
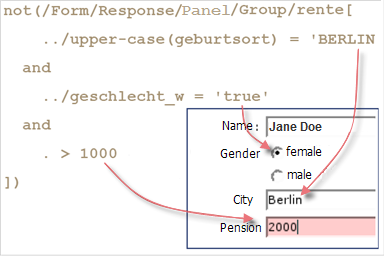
|
For the server-sided validation with AJAX, the XPath requires the |
Requirements
-
The form must have at least one button element with a Submit event.
-
At the button element, the attribute
validateis selected. -
You are familiar with XPath.
Proceed as follows
-
Display the form in the Form Designer.
-
Select Edit > Server-sided validation.
The editor opens and displays an XML document with sample validation rules.
-
Modify the samples to match your form structures or add new elements.
In order to highlight the corresponding input field when the validation result is clicked, the validation rules must be created in accordance with the following pattern:
not(invalidElement).Example: A rule is The InputElement input field must not be empty, in pseudocode this would be not(input field InputElement empty). The correct XPath expression is
not(/Form/Response/Group/InputElement[string-length(.)=0])By default, validation results can be displayed in German and English. To add other languages, insert the following for each language:
-
a
wsp:PolicyAttachmentattribute, such asINUBIT:heading.es='{errorCount} Error durante la validación del formulario'.
This information is used as a title for the result list.
-
HTML list element with an explanation, such as
inubit:responseHtml.es='<li>Elemento1 es un campo obligatorio.</li>'
-
-
Click OK to save your changes.
Your changes are saved, and the editor closes.