Administering Users, Server, Proxy, Threads, Languages etc.
Configuring INUBIT User Accounts
Call Up
INUBIT Workbench > Administration > General Settings> Administration > User
| Option | Explanation | ||
|---|---|---|---|
Maximum number of failed login attempts. If this number is exceeded, the user is locked for security reasons. Users having the role All successful logins and unsuccessful login attempts can be traced in the Audit Log. If SNMP messaging is activated, then, SNMP traps are sent, if user accounts have been locked after too many unsuccessful login attempts. Refer to Activating the SNMP Alert |
|||
If activated, users are locked who have not logged in since a specified number of days. |
|||
Lock after (in days) |
Specification after how many days users are locked. |
||
If checked, users who have not logged in since a specified number of days, are deleted. |
|||
Delete after (in days) |
Specification after how many days users are deleted. |
||
Use initial password |
If activated, the same initial password is always used when creating a new user. After logging in for the first time, the user is prompted to change the initial password. |
||
Initial Password |
Specification of the initial password. |
||
If activated, the validity of a password expires after a specified period of time. After this time has elapsed, users are prompted to change their password at the next login. |
|||
Validity (in days) |
After how many days passwords expire. |
||
Expanded password control |
If activated, a newly assigned password is only accepted if the user has not used it in the last 3 months and the password is different to the last 5 passwords used. |
||
Port filter for SOAP clients |
If activated, only clients have access via the port listed in the |
||
Ports allowed |
Comma-separated list of ports used for clients (e.g. INUBIT Workbenches) to connect to the INUBIT Process Engine. |
||
Allow users to store passwords |
When checked, users can let their passwords store when logging in on the INUBIT Workbench and do not need to re-enter them on their next log in. |
||
Use password limit |
Activates/deactivates the verification of a new password or one, which must be changed, against the setting in the property Password limit pattern. |
||
Password limit pattern |
Used to define a pattern for new passwords, as for example their minimum length or allowed characters. |
||
Invert password limit |
Inverts the meaning of the property value Password limit pattern. Unchecked: A password must comply with the criteria of the property Password limit pattern. All passwords are accepted, which are matching the pattern. All others are rejected. Checked: The password must not comply with the criteria of the property Password limit pattern. All passwords are accepted, which are not matching the pattern. All others are rejected. |
||
Extended display of user groups |
When selected, the user can see all user groups within a common hierarchy in Designer, Module Editor, Repository, and Reporting. Once this checkbox is selected, the user has to switch to an additional user group to view changes.
|
Activating the Maintenance Mode
You activate the Maintenance mode within
-
the INUBIT Workbench settings and
-
within the
<SUITE-INSTALL-DIR>/inubit/server/process_engine/bin/setenv.[sh/bat]file on startup only.
You deactivate the Maintenance mode within the INUBIT Workbench settings only.
Call up
INUBIT Workbench > Administration > General Settings > Administration > Server
| Option | Explanation | ||
|---|---|---|---|
Maintenance mode for whole Process Engine |
In Maintenance mode for whole Process Engine you can, for example, deploy patches or workflows. The modifications take effect, as soon as the maintenance mode is deactivated again. In maintenance mode, the INUBIT Process Engine acts as follows:
|
||
In maintenance mode also execute QUEUED processes |
By default, only processes in status PROCESSING will be executed. Enable this option to execute processes in status PROCESSING and in status QUEUED. Once all these processes finished execution, the Process Engine can be safely shutdown. |
||
Activate maintenance mode if maximum hard disk was exceeded |
If this option is checked, the maintenance mode is activated automatically, if the defined threshold value has exceeded. Afterwards, a corresponding message can be sent to the INUBIT administrator. The threshold value is defined in the option Max. hard disk usage in %.
Refer to Hard disk usage |
||
Stop system process if necessary |
If activated, INUBIT observes the shutdown phase of the Process Engine of the node and stops the system process if necessary. |
setenv.[sh/bat]
-
Set parameter
server.maintenance.modeto eithertrueorfalse. Default value isfalse. `server.maintenance.mode `parameter value is checked only during startup of the server.
|
If parameter |
|
Activating/Deactivating the Maintenance mode in the INUBIT Workbench settings is not changing the parameter value in |
|
Parameter value set in |
Defining Name and ID of the INUBIT Process Engine
Call up
INUBIT Workbench > Administration > General Settings > Administration > Server
| Option | Description |
|---|---|
Server id |
Arbitrary name. Is displayed in the title of the INUBIT Workbench and facilitates identifying the servers and their error mails when using several servers. The ID is initially filled with the server hostname. |
Server hostname |
Name of the server the INUBIT Process Engine is installed on.
The name is identified by a The server hostname is available as workflow variable |
Defining a Password for the Process Engine
Call up
INUBIT Workbench > Administration > General Settings > Administration > Server
| Option | Description |
|---|---|
Password for the Process Engine |
Password for the INUBIT Process Engine. Is required for the communication between the portal server or the REST Interface and INUBIT Process Engine. |
Defining Working Memory for Workflows
Call up
INUBIT Workbench > Administration > General Settings > Administration > Server
| Option | Description |
|---|---|
Available working memory in MB |
Available working memory in MB. |
Maximum working memory for workflows (in percent) |
Maximum available working memory for workflows where the memory utilization has not been specified manually. For information about how the memory load of a Technical Workflow can be specified manually, refer to Designer: Working with Diagrams, section memory restriction. |
Maximum number of files for temporary messages |
Set the amount of files for temporary messages (messages from the watch points of Technical Workflows), which will be stored in the global folder
|
Retrieving Status of the INUBIT Process Engine via HTTP
Call up
INUBIT Workbench > Administration > General Settings > Administration > Server
| Option | Description |
|---|---|
Status web page |
If activated, the status details as, for example, the JVM load, the system load and INUBIT Process Engine configuration settings are displayed at the URL |
The following information is displayed:
-
Maintenance is true or false (on or off)
-
Possible cause (if maintenance mode is true)
-
-
Memory usage of the JVM (total, used, and free memory)
-
Memory usage of the system (total, used, and free memory; total, used, and free swap)
-
CPU usage of each node
-
Workflow threads of the INUBIT Process Engine (maximum, running, and waiting workflows)
Configuring XML Schema Cache
Call up
INUBIT Workbench > Administration > General Settings > Administration > Server
| Option | Description |
|---|---|
Number of XML Schemas in cache |
Caching XML Schemas globally significantly improves the performance when using XML Schemas for example in validate modules or Technical Workflows. All XML Schemas are loaded into the cache when being used for the first time, get compiled and are then supplied in the cache for a while. There, they are available for the next accesses without the need of being compiled again. The number of cached XML Schemas depends on the totally available working storage and the complexity of your XML Schemas. You can increase the number, if the XML Schema access seems slow. Generally, the rule of thumb applies: If you are using many XML Schemas 100 KByte, increase the number; for XML Schemas > 1 MByte the number can be decreased. The recommended value is 300, the minimum number should not be below 150. |
Clear Schema Pool
Call up
INUBIT Workbench > Administration > General Settings > Administration > Server
| Option | Description |
|---|---|
Clear schema pool |
Clears the XML schemas in the cache. |
Setting Multitenancy for Tasks
Call up
INUBIT Workbench > Administration > General Settings > Administration > Server
| Option | Description |
|---|---|
Multitenancy for tasks |
Tasks are created for tenants. In the tenant group, the TWF is executed. |
Setting the Master Password
Call up
INUBIT Workbench > Administration > General Settings > Administration > Server
| Option | Description | ||
|---|---|---|---|
Master password |
Create a master Password for the Credentials Manager. Refer to
|
Ignoring Uninitialized XPath Variable Exception
Call up
INUBIT Workbench > Administration > General Settings > Administration > Server
| Option | Description |
|---|---|
Ignore uninitialized XPath variable exception |
If ticked, the exception will be ignored if an XPath variable is not defined/initialized. |
Allow Fallback to an Insecure Connection
If needed, you can configure a fallback to an insecure trust manager and/or a fallback to an insecure hostname verification.
|
These options are enabled by default for backwards compatibility only. They need to be disabled in a productive environment, or in an environment with internet access. |
-
Allow fallback to insecure trust manager
Applies to all connections using SSL/TLS. Custom trust manager accepts any connection without checking the content and, therefore, it marks any connection as secure.
-
When enabled: secure connections will fall back to an insecure trust manager if no trust store is provided within context. The server/client certificates are validated using the insecure trust manager in addition to JRE’s default TrustManagers for SSL/TLS connections. The insecure trust manager always trusts the certificates.
-
When disabled: JRE’s default TrustManagers are used. If no trust store is provided, secure connections will use trust managers from the JRE’s default factories, which employ the public certificates of root certificate authorities stored in the
<JRE_HOME>/lib/security/cacertsfile, as well as the security providers' validation implementation.This option is always enabled implicitly when used contextually to a Remote Connector.
-
-
Allow fallback to insecure hostname verification
Applies to HTTP and LDAP over TLS connections (refer to IETF RFC 2818 and RFC 2830). Custom hostname verifier accepts any hostname and, therefore, it marks any hostname as secure.
-
When enabled: HTTPS/LDAPS connections will employ an insecure hostname identification and verification mechanism.
This insecure verifier verifies any hostname as a valid hostname.
This option is always enabled implicitly when used contextually to the Remote Connector.
-
When disabled: HTTPS/LDAPS connections will leverage the JRE’s provided hostname identification and verification mechanism.
-
Allowed TLS versions in Mail Connector
Call up
INUBIT Workbench > Administration > General Settings > Administration > Server
| Parameter | Description |
|---|---|
Allowed TLS versions in Mail Connector |
Here, you can set the allowed TLS versions in Mail Connector, for instance, version 1 (TLSv1), version 1.1 (TLSv1.1), version 1.2 (TLSv1.2), version 1.3 (TLSv1.3), and so on. By default, versions TLSv1, TLSv1.1, TLSv1.2 are selected. If you choose no version, the default will be set internally. |
Configuring SFTP Cipher Algorithms
Call up
INUBIT Workbench > Administration > General Settings > Administration > Server
| Parameter | Description | ||
|---|---|---|---|
SFTP cipher algorithms |
When using SFTP connections you can adjust the used cipher algorithms globally within the Workbench. Based on the given entries the algorithms are chosen automatically for all SFTP connections. If a connection fails because of a missing or unknown algorithm, add the missing information in the Workbench. Click the
|
Adding new algorithm values to already existing keys
-
Identify the JSch key and value to add. Look at the description below: Identifying the JSch Key and value to update.
-
In the SFTP cipher algorithms row, click the
 button to open the Property table with all existing JSch keys and values.
 -
To adjust the values, click the
button in the key entry row to open the Value list panel.
Example algorithmName=”kex”. -
Add the
serverProposalalgorithms you have identified. Example:diffie-hellmann-group1-sha1anddiffie-hellmann-group14-sha1.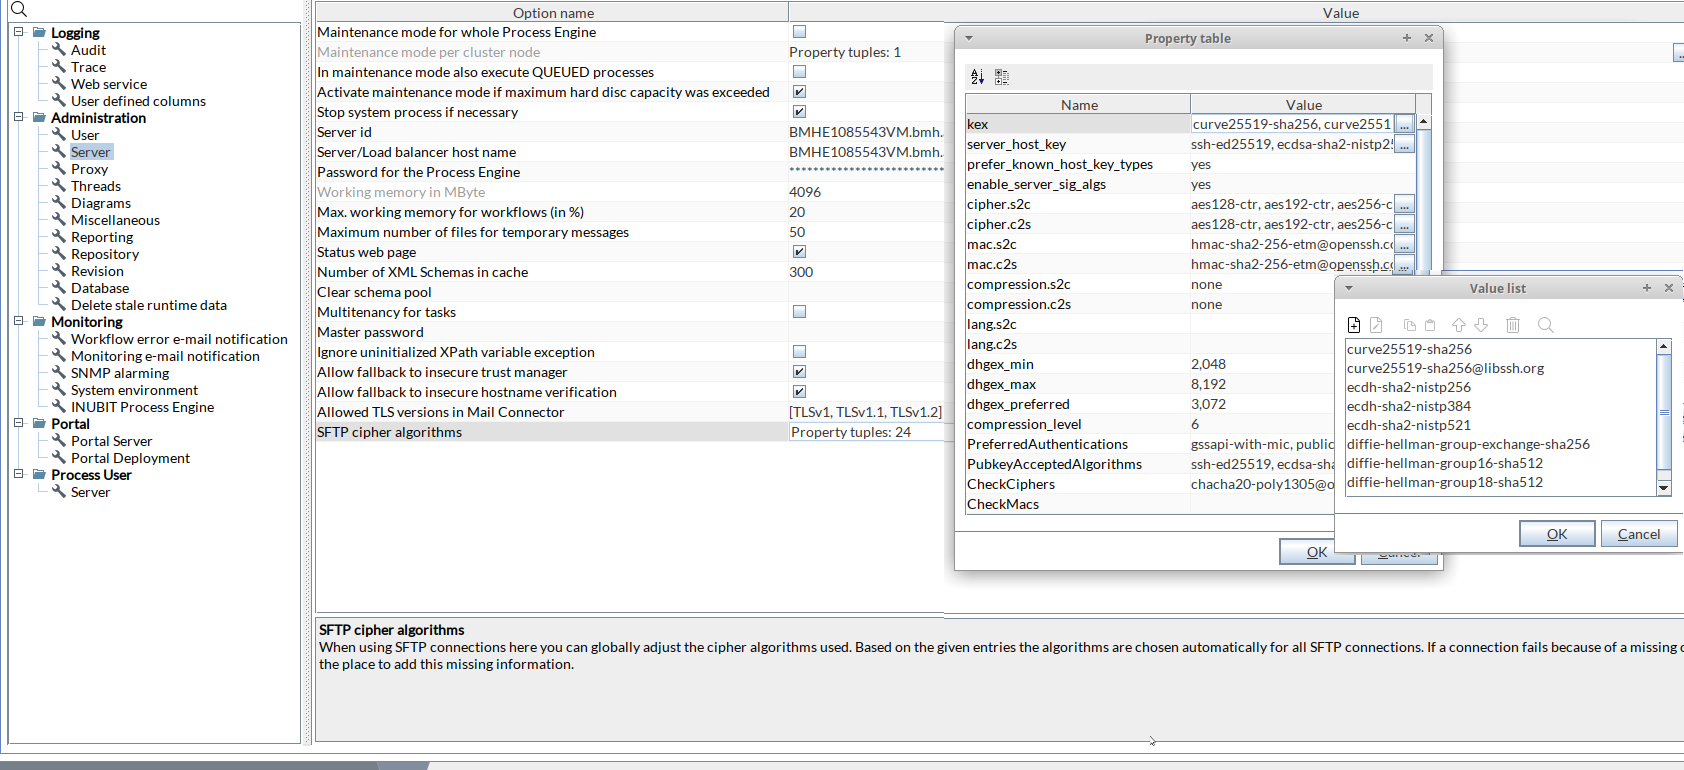
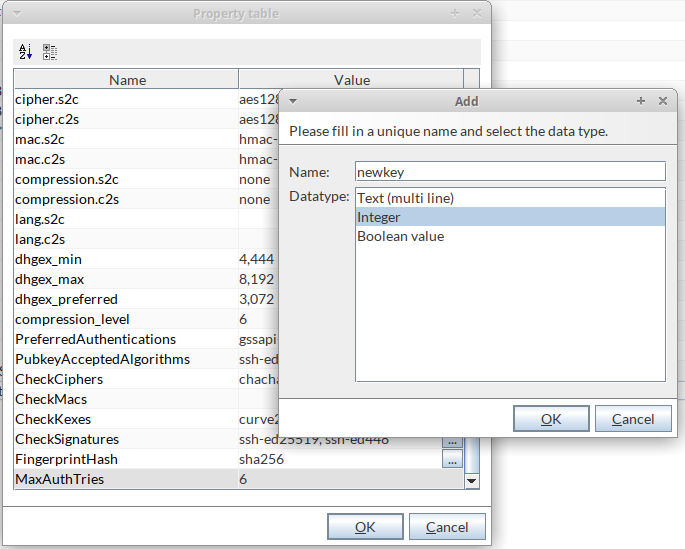
Adding new keys and algorithm values
Add new keys and values if any new property key/value comes up in latest JSch.jar which can be used for resolving SFTP connection issues.
-
In the SFTP cipher algorithms row, click the
button to open the Property table with all existing JSch keys and values. -
Open context menu and select Add.
-
Fill in a unique Name and select the Datatype for the new key and close the Add panel.
-
Click the
button in the new key row in the Property table to open the Value list panel. -
Add the algorithm values.
Identifying the JSch key and value to update in case of an SFTP connection error
-
Error pop up:
-
Check if you get an error pop up during Test connection or execution of FTP Connector in SFTP mode.
-
-
* Look at the
algorithmNameand theserverProposalalgorithms. Example: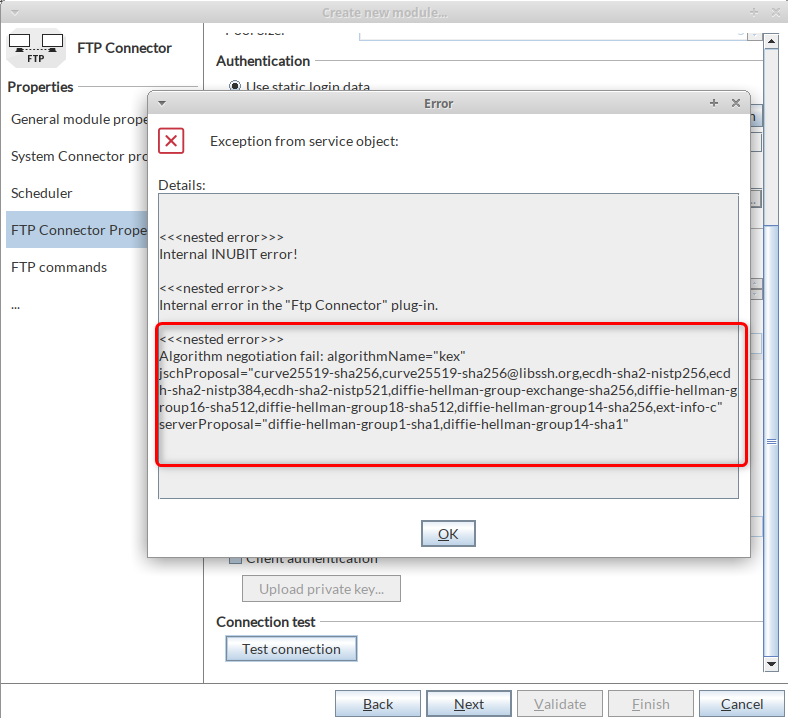
-
Additional SFTP logs in the
trace.logfile-
If
serverProposalis not displayed in the error pop up, open<SUITE-INSTALL-DIR>/inubit/server/ibis_root/log/trace.logfile. -
Look at the
algorithmNameand theserverProposalalgorithms entries. -
Example entry in
trace.log file:DEBUG 17.10.22 18:24:53,436 [IS-N1--IFH-7] FTPConnector DEBUG com.jcraft.jsch.JSchAlgoNegoFailException: Algorithm negotiation fail: algorithmName="kex" jschProposal="aes128-ctr,aes192-ctr,aes256-ctr,aes128- gcm@openssh.com,aes256-gcm@openssh.com" serverProposal="diffie-hellmann-group1- sha1,diffie-hellmann-group14-sha1"If already
-DJVM parameters configuration forJSchwas used insetenv.[bat|sh]file, it will be overridden by the configuration implemented within the Workbench.
-
Configuring Proxy
Call up
INUBIT Workbench > Administration > General Settings > Administration > Proxy
| Option | Description | ||
|---|---|---|---|
Use proxy configuration |
If activated, then the following HTTP/HTTPS proxy settings are configured in the Process Engine. Deactivate this option if you want to configure the HTTP/HTTPS proxy in the start script of the application server.
|
||
HTTP proxy server name |
Name of the central proxy server used for all HTTP requests of the INUBIT Process Engine. |
||
HTTP proxy port |
Port number of the HTTP proxy server. |
||
HTTPS proxy server name |
Name of the central proxy server used for all HTTPS requests of the INUBIT Process Engine. |
||
HTTPS proxy port |
Port number of the HTTPS proxy server. |
||
Exceptions |
Hosts which are connected directly instead of through HTTP/HTTPS proxy server. The value can be single hostname or a list of hostnames, multiple names are separated by "|". You can also use the wildcard "*", for example "*.example.com|localhost". |
||
Login name |
Username for authentication at the proxy server. |
||
Password |
Password for authentication at the proxy server. |
Configuring the Thread Pool for Workflows
Call up
INUBIT Workbench > Administration > General Settings > Administration > Threads
| Option | Description | ||||
|---|---|---|---|---|---|
Number of workflow threads |
Maximum number of threads executed in parallel by the INUBIT Process Engine. Per thread, exactly one process can be executed.
|
||||
Workflow thread priority |
To determine the operating system priority of the threads. |
||||
Privileged Workflow |
To select the format to specify the number of privileged workflows. Two formats are available:
|
||||
Reserved threads for privileged workflows in % |
Percentage of workflow threads that are reserved for privileged workflows.
|
||||
Number of reserved threads for privileged workflows |
Absolut number of workflow threads that are reserved for privileged workflows. |
||||
Number of GUI threads |
Maximum number of parallel GUI threads of the INUBIT Process Engine. GUI threads are used for communication between the INUBIT Workbench and the INUBIT Process Engine. |
||||
Priority of the GUI thread |
To determine the operating system priority of GUI threads. |
||||
Maximum number of TCP/IP Connector connections |
Maximum number of concurrent TCP/IP Connector connections. The value for the maximum number of TCP/IP Connector connections must be a positive integer, refer to TCP/IP Connector.
|
|
Restart the INUBIT Process Engine to activate your changes! |
Refer to Optimizing Performance
Configure diagrams
In this area you can specify, among other things, a check workflow, a notify workflow and a tag name workflow.
In addition, you can use the Lock diagrams and modules in progress for further editing checkbox to configure whether a diagram/module should be automatically locked when it has been opened for editing.
If this option is activated, diagrams and modules can only be edited by one user at a time. Other users cannot edit these diagrams or modules and an error message will appear.
If necessary, a user with the appropriate rights, e.g. a system administrator, can unlock locked diagrams or modules, see Locking and unlocking diagrams.
To do this, the right Unlock diagrams and modules in progress by user must be set for the relevant user role of which this user is a member via the Administration > User Roles > User Roles folder > [User Role] > User Role Rights > Designer tab.
A system administrator has this right by default.
Define test workflow
You can define a technical workflow that tests diagrams for compliance with certain conditions. In addition, the check workflow is always executed when technical workflows are deployed.
Call
INUBIT Workbench > Administration > General Settings > Administration > Diagrams
| Option | Explanation |
|---|---|
Checking workflow |
The |
Set Notify workflow
Call
INUBIT Workbench > Administration > General Settings > Administration > Diagrams
| Option | Explanation | ||
|---|---|---|---|
Notify workflow |
You can define a technical workflow with which events on all technical and functional diagrams as well as on modules in the INUBIT software are recorded and passed on to an external system as an XML message with the identified changes via a system connector. This allows you, for example, to synchronize data from the INUBIT Process Engine with external data sets. Before you define a technical workflow as a notify workflow, you must create and activate a technical workflow in the INUBIT software. The following events trigger the Notify workflow:
The |
Input message for the Notify workflow
The following XML structure is passed to the Notify workflow after deployment:
<?xml version="1.0" encoding="UTF-8"?>
<Notification operation="deploy" type="deploy">
    <User>root</User>
    <TargetISServerID>ber-pdl-2086.inubit.com</TargetISServerID>
    <TargetISServerName>ber-pdl-2086.inubit.com</TargetISServerName>
    <TargetISSOAPPortNr>8000</TargetISSOAPPortNr>
    <TargetUserName>miller</TargetUserName>
    <SourceISServerID>ber-pdl-2086.inubit.com</SourceISServerID>
    <SourceISServerName>ber-pdl-2086.inubit.com</SourceISServerName>
    <SourceISSOAPPortNr>8000</SourceISSOAPPortNr>
    <SourceUserName>brown</SourceUserName>
    <DeployProtocol>
        <Deploy>
            <Name>PM_ProcessMonitor_Grid-4-1</Name>
            <OldName>PM_ProcessMonitor_Grid-4</OldName>
            <Type>module</Type>
            <Info>renamed</Info>
            <Date>28.08.2012 13:23:51</Date>
            <UserOrUserGroup>user2</UserOrUserGroup>
            <SourceUserOrUserGroup>user1</SourceUserOrUserGroup>
            <ModuleType>Web Application Connector</ModuleType>
            <TargetVersion>1</TargetVersion>
        </Deploy>
        <Deploy>
            <Name>GroupScBod.xsd</Name>
            <Type>repository_object</Type>
            <Info>modified</Info>
            <Date>03.09.2012 15:27:05</Date>
            <UserOrUserGroup>odo</UserOrUserGroup>
            <Version>1.6</Version>
            <Path>/Root/odo/SolutionCenter/BODSchemas/GroupScBod.xsd</Path>
            <ContentType>application/x-xsd+xml</ContentType>
            <SourcePath>
                /Root/admin/SolutionCenter/BODSchemas/GroupScBod.xsd
            </SourcePath>
            <SourceUserOrUserGroup>admin</SourceUserOrUserGroup>
        </Deploy>
    </DeployProtocol>
</Notification>-
User
User executing deployment -
TargetISServerID
INUBIT server ID of target system -
TargetISServerName
INUBIT server name of target system -
TargetISSOAPPortNr
INUBIT server SOAP port number of target system -
TargetUserName
Name of the user on target system to deploy into -
SourceISServerID
INUBIT server ID of source system -
SourceISServerName
INUBIT server name of source system -
SourceISSOAPPortNr
INUBIT server SOAP port number of source system -
SourceUserName
Username on source system -
DeployProtocol
Start of the section with the deployment protocol -
Name
New name of module/diagram -
OldName
Old name of module/diagram -
Type-
module: Module -
diagram: Diagram -
repository_object: Repository object
-
-
Info
Deployment message -
Date
Execution date of deployment -
UserOrUserGroup
User or user group the deployment went into -
Version
Version of newly created object on target system containing automatically generated comment (deployt) -
Path
Path to the repository object on target system -
ContentType
File type (MIME-Type) -
SourcePath
Path to repository object on source system -
SourceUserOrUserGroup
User or user group on source system containing the module/diagram -
ModuleType/DiagramType
Module/Diagram type -
TargetVersion
Version on target system
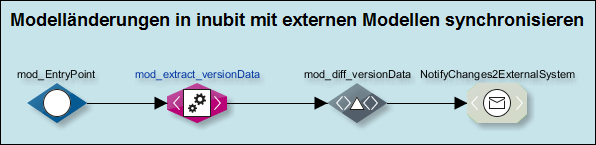
Example of Notify workflow
The Notify workflow routes information to an external system determined by a Technical Workflow called TestWorkflow:
-
The Notify workflow receives the input message via the
Emptyinput modulemod_EntryPointwith information that a new workflowTestWorkflowhas been created in the INUBIT Workbench. The information about the change event is always specified in theoperationattribute and in this example uses thecreateattribute to indicate a newly created workflow (information about modifications to workflows or deletion is provided via themodifyordeleteaddressed):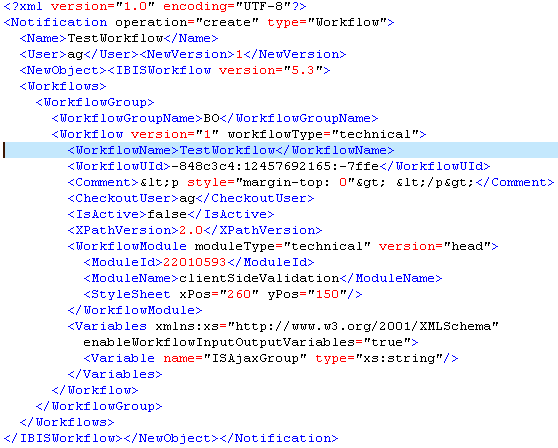
-
The XML input message is passed to an XSLT Converter, which reads the version data before and after the change and creates a structure that the subsequent XML Diff module can use to determine the change difference:
-
The XML Diff utility determines the difference in changes between the extracted data and creates an output XML message that contains all resulting changes for the
Create Workflowevent in the form ofDifferenceelements of typeinsert: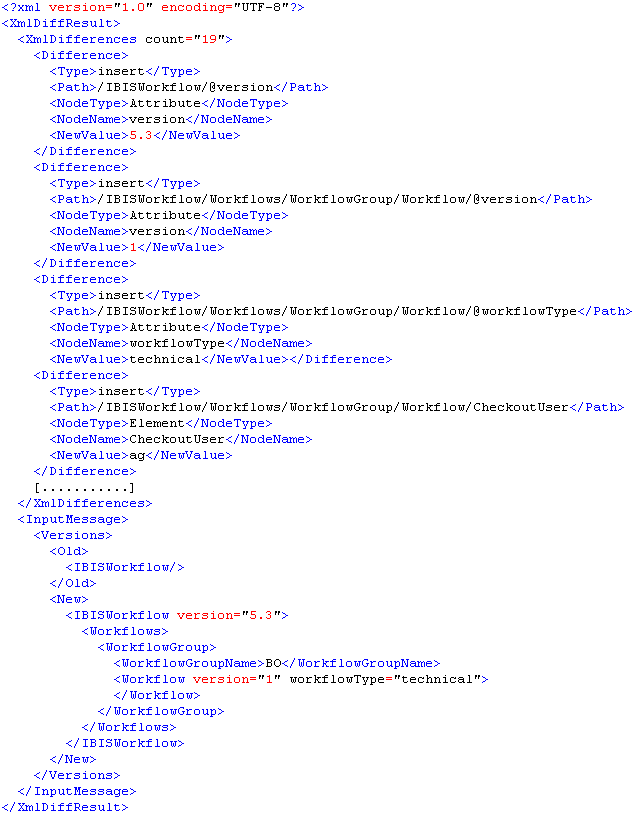
-
This output message is output to a system connector to forward the change information to an external system.
Set tagname workflow
Call
INUBIT Workbench > Administration > General Settings > Administration > Diagrams
| Option | Explanation |
|---|---|
Tagname workflow |
You can set up a technical workflow that automatically generates a suggested tag name. The suggestion is displayed when you open the 'Create tag' dialog. Before you define a technical workflow as a tagname workflow, you must create a corresponding technical workflow that returns a character string or an XML structure.
If the tag name workflow returns an XML structure, the entries in the 'Create Tag' dialog can only be selected; entering a different tag name is not possible.
The |
Prefixes for tag names cannot be edited |
If this option is enabled in addition to the Tagname Workflow option, then a tag name will be suggested with a prefix that users cannot change. Disable this option to allow users to change the suggested prefix. |
|
In the Module Editor and Repository tabs, only information related to users and user groups can be accessed in the prefix. |
|
Further details about workflows are available in the Designer tab. |
Example
The XML structure returned by the tag name workflow must be structured as shown in the following example:
<?xml version="1.0" encoding="UTF-8"?>
<tags xmlns:xsi="https://www.w3.org/2001/XMLSchema-instance">
  <tag description="Description of Tag A">Tag A</tag>
  <tag description="Description of Tag B" selected="true">Tag B</tag>
  <tag>Tag C</tag>
</tags>
You can use the selected="true" attribute to pre-populate the Tag and Description fields in the Create Tag dialog with the relevant tag.
Activate/deactivate change display
Call
INUBIT Workbench > Administration > General Settings > Administration > Diagrams
| Option | Explanation |
|---|---|
Visualization of diagram changes on link between BPD and TWF |
If this option is activated, a construction site symbol will be displayed on the link between linked business process diagrams and technical workflows as soon as the diagrams have been changed. If email notification is enabled, diagram owners will also be notified of the nature of the changes via email. For minor changes, the display of the construction site symbol and email notifications can be suppressed directly in the diagram properties. Please refer |
Lock diagrams and modules
Options
INUBIT Workbench > Administration > General Settings > Administration > Diagrams
| Option | Explanation |
|---|---|
Lock diagrams and modules in progress for further editing |
If activated, each diagram and module can only be edited by a single user. For any additional users, editing this diagram or module will fail with an error message. |
Configuring Miscellaneous
Allow Saving Deployment Artifacts
Call up
INUBIT Workbench > Administration > General Settings > Administration > Miscellaneous
| Option | Description |
|---|---|
Save deployment artifacts |
If you activate this option, you can save the result of a deployment, e.g. to archive the deployed states in an external version control system. |
Internationalization: Defining Languages for Diagrams
Call up
INUBIT Workbench > Administration > General Settings > Administration > Miscellaneous
| Option | Description |
|---|---|
Default language |
Defines the default language for element names, diagram and element comments as well as for reports. |
Additional languages |
The If more languages are selected, you can enter and display texts for diagrams and elements in the selected languages. |
MIME-Types Mapping Table
Call up
INUBIT Workbench > Administration > General Settings > Administration > Miscellaneous > MIME types mapping table
| Option | Description |
|---|---|
MIME types mapping tables |
The When adding a file, its MIME type is set automatically based on these mappings. You can create more mappings so that other, until now unknown file types are recognized automatically. This way, you avoid having to change MIME types manually after adding a file to the repository. Refer to MIME type. |
Java System Properties
Call up
INUBIT Workbench > Administration > General Settings > Administration > Miscellaneous > Java System Properties
| Option | Description |
|---|---|
Java System Properties |
The
|
Setting a Defragmentation Interval for Oracle Database Tablespace
Call up
INUBIT Workbench > Administration > General Settings > Administration > Miscellaneous
| Option | Description |
|---|---|
Interval in which to defragment the Oracle database tablespace |
Specifies the number of "remove" operations after which a "shrink" command is triggered on the database tablespace. Only relevant if an Oracle database is used. |
Setting a Midnight Task Start Time
Call up
INUBIT Workbench > Administration > General Settings > Administration > Miscellaneous
| Option | Description |
|---|---|
Midnight task start time |
Change the start time for the midnight task and set a start date for the new start time to take effect. Once it is set, server restart is necessary. The start time must be a time in the future. After server restart, if the start date and start time are not in the future anymore, the midnight task will be carried out for the first time on the next day at the scheduled time. The midnight task can also be triggered using the CLI. |
Reporting
Call up
INUBIT Workbench > Administration > General Settings > Administration > Reporting
| Option | Description | ||
|---|---|---|---|
System statistic log |
If activated, then statistical data is written via the system to the database of the INUBIT Process Engine.
The data may be displayed via the |
||
Log interval |
Time interval during which the statistical data is to be collected. The minimum value for the time interval is 1 minute.
|
Configuring Access to the Repository
Call up
INUBIT Workbench > Administration > General Settings > Administration > Repository
| Option | Description |
|---|---|
WebDAV access to repository |
For activating the WebDAV interface of the Repository at |
HTTP access to repository |
Activates the HTTP interface of the Repository and thus enables accessing files in the Repository via a Web browser. |
Activate directory listing |
Enables navigating through the Repository’s global area with a Web browser. |
Garbage Collection Start * |
First start of the garbage collection of the repository, by default at 11:00 PM on the server’s start-up day. G |
arbage Collection Interval * |
Interval for the garbage collection of the repository after first start, by default 1 day. |
Unit Test file storage directory |
Directory name to store Unit Test files under the workflowgroup name directory |
*All items that have been removed from the repository and attic are unused items. The repository garbage collector scans these unused items and cleans up the repository. It is recommended to execute the scan while the INUBIT Process Engine is idle. |
|
Configuring the Revision
Call up
INUBIT Workbench > Administration > General Settings > Administration > Revision
| Option | Description |
|---|---|
Activate |
When activated, only workflows and modules can be deployed, which were checked and released by the revision department. |
Revision workflow (optional) |
The given workflow is always started when a tag release is requested. When the workflow terminates without an error, the release request is forwarded to the revision department. Create this workflow manually and configure it, for example, in such a way that it checks the syntax of module names automatically. |
Notify revision department |
Notify revision department about tag release requests. |
E-mail address of the revision department |
When a tag release is requested, a notification is sent to the given e‑mail address. |
Notify requester |
Specify here if the requester will be notified about tags released/rejected. |
Database
DB Metadata Cache
Call up
INUBIT Workbench > Administration > General Settings> Administration > Database
| Option | Description |
|---|---|
Clear databases metadata caches |
Clear databases' metadata caches when structure of database table(s) has changed. |
Case Sensitivity in Database Queries
Call up
INUBIT Workbench > Administration > General Settings> Administration > Database
| Option | Description |
|---|---|
Consider case sensitivity in database queries |
If enabled, case sensitivity will be considered in XML queries used with a Database Connector and other, database related modules like Database Object Connector, Lookup Table, Complex Lookup Table, and Process Data Logger. |
Deleting Stale Runtime Data
Call up
INUBIT Workbench > Administration > General Settings > Administration > Delete stale runtime data
| Option | Description | ||
|---|---|---|---|
Delete stale runtime data, if it is older than the configured number of days |
All stale runtime data is deleted from the IBIS_RT_OTHER_DATA_PERSIST table, if the data is older than the configured number of days. If the Queue Manager is empty, the entire data from the IBIS_RT_OTHER_DATA_PERSIST table is deleted irrespective of the configured number of days. Save the changes in order for the changes to take effect.
|
||
Delete stale runtime data from IBIS_RT_OTHER_DATA_PERSIST table |
Remaining stale runtime data are deleted from the IBIS_RT_OTHER_DATA_PERSIST table if there is no corresponding entry in the Queue Manager. |
||
Use midnight task to delete stale data automatically |
If the checkbox is selected, the midnight task performs the deletion of stale data. By default, the checkbox is not selected. |
Monitoring
Configuring Workflow Error E-mail Notification
Call up
INUBIT Workbench > Administration > General Settings > Monitoring > Workflow error E-mail notification
| Option | Description |
|---|---|
Notification activated |
Select this option if you want to be notified via E-mail about errors in executing workflows. |
E-mail address |
Enter the e-mail address to which the error message has to be sent.
The e-mail will also be sent to the |
Server name |
Fill in the name of the mail server, which is used to send e-mails about workflow errors. You can fill in the name or IP address. |
Server port |
Fill in the port number of the mail server, which is used to send e-mails about workflow errors. |
Connection timeout |
Fill in the time that is used at most to establish a connection to the mail server. The try to establish a connection is terminated after that time. |
Authentication |
Select this option in case the mail server for sending workflow error e-mails needs an authentication. |
Login |
Fill in the login data. |
Password |
Fill in the password. |
From address |
Enter the e-mail address of the sender. |
Select protocol |
Select the protocol type to proceed with the request. |
Enable TLS |
For SMTP protocol only: Select the checkbox to enable TLS. |
Notify root user |
Deselect this option if you do not want the user |
Send test E-mail |
Please send a test e-mail only in case you provided a valid e-mail address here or for the user |
For more information on Alerting and events triggering e-mails, refer to Events Triggering Alerts and Notification Paths.
Configuring Monitoring E-Mail Notification
Call up
INUBIT Workbench > Administration > General Settings > Monitoring > Monitoring e-mail notification
| Option | Description |
|---|---|
Notification activated |
Select this option if you want to be notified via e-mail about process monitoring events. |
E-mail address |
Enter the e-mail address to which the process monitoring message has to be sent.
The e-mail will also be sent to the |
Server name |
Fill in the name of the mail server, which is used to send e-mails about process monitoring events. You can fill in the name or IP address. |
Server port |
Fill in the port number of the mail server, which is used to send e-mails about process monitoring events. |
Connection timeout |
Fill in the time that is used at most to establish a connection to the mail server. The try to establish a connection is terminated after that time. |
Authentication |
Select this option in case the mail server to send e-mails about process monitoring events needs an authentication. |
Login |
Fill in the login data. |
Password |
Fill in the password. |
From address |
Enter the e-mail address of the sender. |
Select protocol |
Select the protocol type to proceed with the request. |
Enable TLS |
For SMTP protocol only: Select the checkbox to enable the TLS. |
Notify root user |
Deselect this option if you do not want the user |
Send test E-mail |
Please send a test e-mail only in case you provided a valid e-mail address here or for the user |
For more information on Alerting and events triggering e-mails, refer to Events Triggering Alerts and Notification Paths.
Configuring SNMP Alarming
Call up
INUBIT Workbench > Administration > General Settings > Monitoring > SNMP alarming
| Option | Description |
|---|---|
Activate |
This option activates sending of SNMP traps when alarms were set off. |
SNMP version |
Fill in the SNMP version. |
Server name |
Fill in the name of the SNMP server (name or IP). |
Server port |
Fill in the port number of the SNMP server. |
Community |
Fill in the name that is used by the INUBIT Workbench to identify at the SNMP server. The default is "public". |
Configuring the System Environment
Call up
INUBIT Workbench > Administration > General Settings > Monitoring > System environment
| Option | Description | ||
|---|---|---|---|
Time interval for the system environment check |
Select a time interval for the check of the system environment.
|
||
Hard disk usage |
Activates or deactivates the monitoring of the hard disk partition, where the INUBIT Process Engine is installed. Choose the desired option and save the changes by pressing Ctrl-S or clicking the save icon Possible options
|
||
Max. hard disk usage in % |
Configure the upper limit of the hard disk usage in %.
|
||
Max. hard disk usage in bytes |
Configure the upper limit of the hard disk usage in bytes.
Click on the icon
|
||
JVM memory |
This option activates the internal memory load monitoring of the JVM. |
||
Max. JVM memory usage in % |
The upper limit of the JVM memory usage is configured here. Reaching the limit sets off an alarm. |

Controlling Workflow Queues
Call up
INUBIT Workbench > Administration > General Settings > Monitoring > INUBIT Process Engine
Control workflow queue
| Option | Description |
|---|---|
Control workflow queue |
This option activates monitoring the queue of workflows to be executed. |
Max. number of entries |
The maximum number workflows in the queue is configured here. Reaching the limit sets off an alarm. |
Controlled time interval |
Fill in the time interval wherein the size of the workflow queue are measured. |
Control faulty workflows
| Option | Description |
|---|---|
Control faulty workflows |
This option activates monitoring of faulty workflow executions. |
Max. number |
Fill in the maximum number of faulty workflow executions that are allowed within the time interval. Reaching the limit sets off an alarm. |
Controlled time interval |
Fill in the time interval wherein the maximum number of faulty workflow executions is measured. |
Control workflows
| Option | Description |
|---|---|
Control workflows |
This option activates the monitoring of workflow executions. |
Max. number |
Fill in the maximum number of workflow executions that will be measured in the given time interval. Reaching the limit sets off an alarm. |
Controlled time interval |
Fill in the time interval wherein the workflow executions are measured. |