Flat Adapter
Usage
Flat files contain records without explicit information about the record structure. A Flat Adapter is used to convert flat files to XML files, and to convert XML files to flat files.
The conversion uses XML-based rules. For each message type, a specific rule must be created, which can then be used for conversions in both directions. The rule specifies how flat file elements are mapped to flat XML elements.
Refer to EDI Adapter
|
Note that if you try to convert incoming flat-file messages containing the character Before converting, use a Data Stream Modifier to replace the Refer to Data Stream Modifier |
Functional Principle of the Flat Adapter
A flat file has a non-hierarchic structure consisting of several segments, each containing one or more elements. Implicit segment and element properties, such as the frequency of an element within a segment, are either
-
notated explicitly as an attribute value of the respective XML elements in XML, such as loop=3,
-
or they are configured as an adapter property when the adapter is created, such as a delimiter signaling the end of a segment.
The following table shows how segments and elements are mapped to XML elements.
| Hierarchy level | Structure within the flat file | Structure within the flat XML |
|---|---|---|
1 |
no root element |
root element Name cannot be changed! |
2 |
segments |
XML element |
properties |
attributes |
|
no segment name |
ID and xml tag Possible values:
|
|
one or more segments frequency of occurrence specified |
loop=n | [number] |
|
mandatory or optional segment |
required=C(onditional)|M(andatory) |
|
each segment can contain one or more elements |
can be specified using an XML schema for the template |
|
elements are separated by delimiters, or successive without interruption |
specified during adapter configuration |
|
3 |
elements |
XML element <Element> |
properties |
properties analogous to segment |
|
no element name |
ID and xml tag Possible values:
|
|
specified length |
length specified via start and end positions |
|
specified position Example: The statement {n 15-23} means that this is about a numeric value beginning at position 15 and ending at position 23. |
e.g. posStart=1, posEnd=14 |
|
unavailable characters |
||
specified data type |
|
|
mandatory or optional element |
required=C(onditional)| M(andatory) |
Example
The following image shows a flat file (in the background) and the flat XML message created from the flat file (foreground):
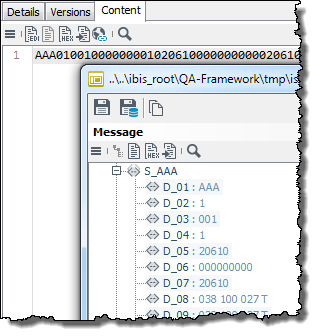
The flat file (in the background) consists of several segments separated by a line break (not visible).
In the flat XML message, a <Flatfile> root element was added.
One XML element was created for each flat file element, and each XML element was named in accordance with the convention D_n+1 (D_01, D_02…).
Leading zeros were removed from the element values: the second element’s value 01 in the flat file becomes element D_02 with the value of 1 in the flat XML file.
The following image shows a section from a rule used to convert the files shown above:
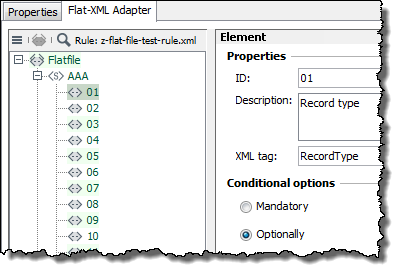
This section shows that
-
the
<Flatfile>root element was a mandatory addition -
the first segment must exist (M in the tree structure)
-
it can occur any number of times ([1…n] in the tree structure)
-
it consists of a series of elements, including element 01, which is also mandatory (M), has an alphanumeric data type, begins at position 1 and ends at position 3 ({an 1-3} in the tree structure).
Rule Editor - User Interface
The Flat Rule Editor helps you create rules.
The editor consists of the following areas:
-
Support rule area
Initially not visible. To display this area, select
 > Support rule tree.
In this area, you can load an additional rule and use it as a template for your new rule. You can create a new rule by dragging and dropping elements and segments from the support rule to the rule area.
-
Rule area
Use this area to establish a new rule.
You can use the tree’s context menu to add, move and delete segments and elements. To change the presentation of the tree, select > Rule view.
-
Properties area
Shows the properties of the element/segment selected in the rule.
Menu bar
The Editor menu bar includes the following commands:
-
 : Opens a text field for a string search within the rule tree.
 -
: Opens a menu with the following commands:
-
New: Creates a new rule file with the root element
<Flatfile>. -
Open: Displays a rule saved in the file system.
-
Save: Saves the rule currently displayed.
-
Print
Opens a print dialog enabling you to send the currently displayed rule to your default printer.
-
Validate rule structure
Starts validating the rule against an internal XML Schema file.
-
Generate mapping template
Opens the wizard that creates a flat-XML template containing all of the structural information of the currently displayed rule. The template can be loaded as a target file in the XSLT Converter.
Alternatively, the rule file explorer in the XSLT converter can be used to create, save, and load the rule.
-
Generate XML Schema
Creates an XML out of the rule. You can use the XML Schema for validating incoming messages, for example. For the validation you can use an XML Validator or activate the Schema check at the EDI Adapter.
Refer to XML Validator
-
Generate Excel report
Opens a wizard in which you can specify in detail which data should be exported from the rule to the Excel report. In addition to selecting xls as export format, you can select an option to specify csv as export format for rule files.
-
-
Rule view
-
id attribute: ID, corresponds to the ID field entry in the properties area.
-
xmlTag attribute: XML element name, corresponds to the XML tag field entry in the properties area.
-
Element type: The standard name of the rule node, e.g. segment.
-
Description
Shows a description of each element next to the element in the tree. This entry corresponds to the value in the Description field in the properties area.
-
Conditional option
Indicates in the tree whether an element is conditional © or mandatory (M).
-
Repetition
Shows the number of occurrences of elements in the tree, e.g. [0…n].
-
Length (or element position)
Shows the type and length or the position of elements in the tree, e.g. {an 1-7}.
-
-
Support rule tree
Displays an additional area that can be used to load an additional rule as a template for the new rule.
Validating the Rule File for Publishing
Edit menu
If activated, each rule is verified against an internal XML schema describing the rule structure before publishing. The module will not be published unless all rule files correspond to this structure. If the XML validation option is selected, then all rule files must comply to this structure. Otherwise, the module cannot be published.
Refer to Syntax and Validation Dialog
Creating a New Rule
|
To create a conversion rule, you will need detailed information about the structure of the messages you want to process with the adapter. |
Proceed as follows
-
Load the support rule (if necessary)
Support rules are normal rules you created previously or rules that are available to you. The INUBIT software does not include rules.
-
In the rule area click
and select Support rule view.
The support rule area is displayed on the left side of the rule area. -
In the empty area, click
, and select Open.
A file explorer is displayed. -
Navigate to the rule you would like to display as a support rule, and select the rule. The rule is displayed.
-
-
Generating a new rule
In the rule area, click
, and select Open > New.
A new rule with root element Flatfileis displayed. -
Editing a new rule
The following options are available:
-
Add segments and elements using the context menu in the rule area
-
Drag and drop segments and elements from the support rule
-
The rule is automatically saved with the adapter.
Dialog Descriptions: Flat-XML-/XML-Flat Adapter Properties
XML element names
-
Use attribute id
When selected, the output message contains XML elements with abbreviated identifiers (
X_<ID>orD_<ID>). -
Use attribute xmlTag
When selected, the message is output with meaningful element names based on the value for XML tag in the conversion rule. Though meaningful element names improve the message’s readability, they also increase the file size and thus have an impact on the performance.
Flat message formatting
-
Segment delimiter (input)
Select a value from the list in order to define how segments are separated from each other in the input messages.
-
Decimal separator (input)
Define which character (dot or comma) separates decimals with decimal places.
-
Decimal separator (output)
The decimal separator can be replaced during the conversion. Define which character is be used (dot or comma).
-
Character encoding
Character encoding for incoming messages. This setting ensures that the incoming message is correctly converted to XML and that German umlauts, for instance, are correctly displayed.
By default, the ISO-8859-1 character set is used. It contains all characters of the common Western European languages, including their special characters. You can also select any other character set.
XML message formatting
(Flat-XML Adapter only)
-
Remove leading zeros which were added to fill numeric fields
This option is self-explanatory.
-
Skip empty elements
When this option is selected, XML elements will not be created for flat file elements containing only blank spaces. This reduces the size of the output messages, and XSLT stylesheets for any subsequent processing are easier to maintain.
White Spaces
-
XML output remains untouched
This option is self-explanatory.
-
Remove leading and trailing white spaces
This option is self-explanatory.
-
Trim all white spaces
Removes all white spaces.
Analysis
-
Cache rule file
When selected, the rule file will remain cached during the entire workflow execution.
This setting is useful when a number of consecutive messages need to be converted, because the conversion can be completed more quickly if the rule file does not need to be reloaded for each message. Caching is useful for messages larger than 300 KB.
|
When dimensioning your memory, you should remember that caching uses additional memory. |
-
Ignore syntax errors occurring in input message
When selected, the conversion will not be cancelled in case of an error. Instead, sections containing errors will be skipped.
When the option is disabled, an error message is displayed and processing is stopped if an error is found. Disable this option to test a rule and find possible errors.
-
Attach error info to XML output message (Flat-XML Adapter only)
Adds the original segment and element data to flat-XML output messages.
-
Validation
-
XML validation
If active, the XML output messages (Flat-XML Adapter) or input messages (XML-Flat Adapter) are validated against an XML Schema generated by the conversion rule. In this process, the element type and the qualifier list are checked, in contrast what happens during the normally carried out automatic syntax check.
After changing the rule file, you must activate this option! Otherwise, messages are validated against an outdated rule file.
Using this option will impact performance when processing a large number of input messages.
-
Use error branch as output for the schema validation error
When selected, this option will cancel the workflow execution if the schema validation fails. The message will be directed to error output.