TCP/IP Connector
Usage
The TCP/IP Connector establishes a socket connection between the INUBIT software and other programs, to send or receive messages via the TCP/IP protocol.
|
The value for the maximum number of TCP/IP Connector connections must be a positive integer. The minimum number of TCP/IP Connector connections is 1. Make sure that not more connections to INUBIT are opened as configured. Otherwise, this data will get lost, refer to Configuring the Thread Pool for Workflows. |
|
Because the TCP/IP Connector can be used universally, you should use it with deep expert knowledge. When having configured the TCP/IP Connector as a Remote Connector, the maximum number of TCP/ IP Connector connections is set to |
TCP/IP Connector Types
A TCP/IP Connector can be used in the following configurations:
-
Input Listener Connector
The connector provides server functionality within a workflow and establishes a service on the given IP address and port that waits for a client messages.
Once the module or workflow is activated, the socket will be opened.
As soon as a message arrives the subsequent workflow modules are processed.
-
Start/Stop sequence is configured
-
Searching for the message and analyzing start/stop bytes.
-
Removing the start/stop bytes if the (first) message is completely received.
Using the start/stop byte sequence an arbitrary number of future messages can be received.
Therefore, a sequential request response connection is enabled.
-
For each message the workflow is executed once.
-
At the end of the workflow, data are returned to the calling client.
-
-
Start/Stop sequence is not configured
-
Message contains all incoming bytes. Closing the connection by the client marks the end of the message.
-
The message is passed to the subsequent workflow modules to be further processed. Deactivating the workflow will close the socket.
-
-
-
Medium Connector
Connector establishes a connection using the hostname and port configured.
-
Start/Stop sequence is configured
-
The connector sends the message of the previous module in the workflow with start/stop bytes to the host and port configured.
-
Searching for the message in the host’s response and analyzing start/stop bytes
-
The start/stop bytes are removed from the incoming message.
-
The pay load contained in the message is passed to the subsequent workflow modules and the execution of the workflow is continued.
-
The socket is closed.
-
-
Start/Stop sequence is not configured
-
The connector sends the message of the previous module in the workflow (client) to the host and port configured without start/stop bytes.
-
The client closes the connection.
-
The server sends the message without start/stop bytes and it also closes the connection.
-
The client recognizes as end of the message if the server has closed the connection.
-
The message is passed to the subsequent workflow modules and the execution of the workflow is continued.
-
The socket is closed.
-
-
-
Output Connector
The connector establishes a connection to the hostname and port configured.
-
Start/Stop sequence is configured
-
The connector sends the message of the previous module in the workflow (client) with start/stop bytes to the host and port configured.
-
The socket is closed.
-
-
Start/Stop sequence is not configured
-
The connector sends the message of the previous module in the workflow (client) without start/stop bytes to the hots and port configured.
-
The socket is closed.
-
-
Processing IP Messages Using Start and Stop Bytes
For generic use, the Connector can process IP messages marked uniquely using start and stop bytes. The following graphic depicts such a message structure:
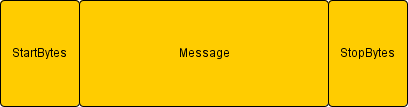
Start and stop bytes are not part of the message but part of the lower layer communication protocol.
You can define any byte sequences. Check the Test start and stopbytes checkbox to configure the values in the configuration dialog of the connector.
Refer to Dialog TCP/IP Connector Properties.
Proceed as follows
-
Open the desired TCP/IP Connector for editing.
-
Open the TCP/IP Connector Properties dialog.
-
Check the Test start and stopbytes checkbox in the Configuration section.
-
Enter the byte sequence that indicates the beginning of the desired IP message, e.g.
0x0bas the HL7 start byte sequence. -
Enter the byte sequence that indicates the end of the desired IP message, e.g.
0x1c0x0das the HL7 end byte sequence. -
Click Finish to close the dialog.
-
Publish the connector to save the settings.
Receive HL7 messages
You can use the TCP/IP Connector to receive HL7 messages by checking the Test start and stopbytes checkbox.
|
To process HL7 messages you can use an EDI Format Adapter as the subsequent module after the TCP/ IP Connector in the workflow. |
Refer to EDI Adapter - Format Adapter.
An HL7 message consists of a header (MSH) and data segments. Start and stop bytes delimit the HL7 bit stream that is necessary because the end of file does not necessarily mark the end of the message.
To separate HL7 messages the following default start and stop bytes are used:
-
Start:
0x0b -
Stop:
0x1c0x0d
Dialog TCP/IP Connector Properties
This dialog offers the following options:
Configuration
-
Server name
-
Input Listener Connector
IP address of the network interface at which the TCP/IP Connector should listen.
-
Medium/Output Connector
IP address of the INUBIT Process Engine to which the message should be sent.
-
-
Port
Number of the port over which the messages are to be exchanged; by default this is port 60000. Port numbers larger than 65536 must not be used.
To revert to the default port setting, click the Default button.
Ensure both that no other application accesses the specified port and that the port is not blocked by a firewall.
-
Test start and stop bytes
Check this option to process IP messages using start and stop byte sequences. Refer to Processing IP Messages Using Start and Stop Bytes.
-
Start byte sequence
Enter the byte sequence that marks the beginning of the IP message.
-
Stop byte sequence
Enter the byte sequence that marks the end of the IP message.
-
Connection test
-
Test connection
For testing whether the connection can be successfully established using your configuration.