REST Connector
Usage
The REST Connector provides an interface for transferring data via HTTP without an additional transport layer such as SOAP. The REST Connector is used to call or provide REST-compatible Web services via a URL.
Connector types
The REST Connector functions depend on the actual configuration:
-
Input Listener Connector
Provides a resource under a specified URL, which can be requested by a client by means of a request. The provided resource is the result of a workflow execution.
All parameters and headers that were transferred with the request are available as module variables during workflow execution.
-
Medium/Output Connector
Sends an HTTP request to an HTTP server as a client and the Medium Connector forwards the returned response (if available) to the workflow.
Module Variables
When a REST Connector is executed, the following variables are set depending on the connector type and are available downstream in the workflow.
Input Listener Connector
The following variables are set for the data of the received request:
-
restConnector.requestMethodContains the name of the HTTP method of the request.
-
restConnector.requestHeadersContains the header data of the request message.
-
restConnector.requestQueryParamsContains the values of the query parameters from the request URL. These are converted into an XML structure and every parameter is converted into an XML element.
-
restConnector.requestResourcePathContains the path of the requested resource. For example, for the request URL
https://<server>:<port>/ibis/rest/rc/orders/123, the variable contains the value/orders/123. -
restConnector.requestURITemplateParam.xContain the contents of dynamic path components of the request URL.
xalways stands for the name of the path component in curly brackets within the resource URL configured on the Connector. For the resource URLusers/{userName}/orders/{orderNo}, for example, the variablesrestConnector.requestURITemplateParam.userNameandrestConnector.requestURITemplateParam.orderNoare set with the actual values from the request URL. -
restConnector.clientAddressContains the IP address of the calling client.
-
restConnector.requestAuthUserContains the name of the authenticated user, if Use portal user data was selected under authentication options.
The status and header data of the response to be sent is written to the following variables:
-
restConnector.responseStatusCodeContains the response code for the result of the sent response.
-
restConnector.responseStatusDescriptionContains the description of the response code.
-
restConnector.responseHeadersContains the header data of the send response message.
The content of the variables corresponds to the default values configured in the connector. The variables are designed to be overwritten dynamically in the workflow. The value of the variable that is available at the end of the workflow is used for sending the response.
Medium/Output Connector
The status and header data of the response to be received is written to the following variables:
-
restConnector.responseStatusCodeProvides the response code that specifies the result of the query.
-
restConnector.responseStatusDescriptionProvides the description of the response code, e.g.
Internal Server Error. -
restConnector.responseHeadersContains the header data of the response message.
Refer to Workflow Variables and Mappings
REST Functional Principle
HTTP resource URLs
REST (Representational State Transfer) is an architectural concept for Web services that describes how web standards can be used in a way that is appropriate for the web. REST-based Web services use the HTTP protocol and HTTP methods such as GET or POST.
A basic principle of this model is that the functionality of a Web service is not mapped in its properties but in the resources of the service. The individual functions of a service are split into resources that can be individually addressed using URLs.
REST thus makes it possible to address applications, for example an online shop, via a URL. In doing so, every individual object of the application, such as article or customer, represents a resource that is addressed using its own URL.
Every REST resource has a generic interface via the different HTTP methods.
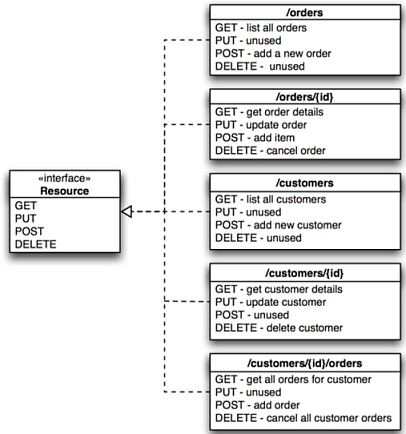
For the example of an online shop as a REST service, order management has, for example, a URL for the quantities of the purchase orders from every customer and a URL for every purchase order.
Communication takes place only when necessary and on request. The client or connector becomes active and requests a representation of a resource from the server or modifies a resource.
Resources
In the example of the online shop, this shop represents a collection of resources to which HTTP messages can be sent, for example to call up a customer for a purchase order in a shopping cart. The resource is not manipulated directly because access takes place indirectly, using the URL assigned to the resource.
Examples of resources
-
Online shop as a Web service:
https://<server>:<port>/ibis/rest/sqlshop -
List of all orders:
https://<server>:<port>/ibis/rest/sqlshop/orders -
Order number 1234:
https://<server>:<port>/ibis/rest/sqlshop/orders/1234
Representations
Every resource can have different representations, that is, the customer can be represented, for example, by an XML structure with customer master data or by a business card in vcard format. The client and server must have a common understanding of the meaning of the representation through the use of XML.
Representations can refer to other resources, which in turn provide representations that can also refer to resources. If a client follows a link in a representation, this takes it to another resource.
Examples of representations
Representation of a customer through the customer’s master data:
<CUSTOMER>
    <ID>4</ID>
    <FIRSTNAME>John</FIRSTNAME>
    <LASTNAME>Smith</LASTNAME>
    <STREET>Elisabeth St. 13</STREET>
    <CITY>Sample city</CITY>
</CUSTOMER>
Representation of a customer list with links to the individual customers as additional resources:
<CUSTOMERList>
    <CUSTOMER xlink:href="https://www.inubit.com/sqlrest/CUSTOMER/1/">1</CUSTOMER>
    <CUSTOMER xlink:href="https://www.inubit.com/sqlrest/CUSTOMER/2/">2</CUSTOMER>
    <CUSTOMER xlink:href="https://www.inubit.com/sqlrest/CUSTOMER/3/">3</CUSTOMER>
    <CUSTOMER xlink:href="https://www.inubit.com/sqlrest/CUSTOMER/4/">4</CUSTOMER>
    <CUSTOMER xlink:href="https://www.inubit.com/sqlrest/CUSTOMER/29/">29</CUSTOMER>
</CUSTOMERList>
Methods
According to the REST principle, resources are to be accessed using the standard HTTP methods GET, POST, PUT and DELETE. Hence, no protocol conventions have to be known in order for client and server to be able to communicate. A request, for example for a certain purchase order always consists of a URL and an HTTP method. The HTTP methods map the basic actions on the resources.
Using HTTP Methods in the REST Connector
The HTTP methods that can be configured in the REST connectors cover the use cases of REST applications.
| HTTP method | Meaning |
|---|---|
|
GET queries the representation of a resource. GET requests can be sent any number of times. |
|
POST can be used to add something to a resource. For example, a material can be added to a shopping cart. |
|
New resources can be generated using PUT or the content of existing resources can be replaced using PUT. |
|
Single attributes of existing resources can be replaced using PATCH. PATCH saves bandwidth by allowing partial updates. In addition, PATCH (as opposed to PUT) allows more precise control over which attributes of a resource may be changed and which may not. |
|
Resources can be deleted using DELETE. |
|
Returns a list of methods supported by the server. |
|
In the same way as for GET, a resource is queried. However, no content (body) is transferred in the reply but merely the response header. This enables you to, for example, query the file size before a GET request. |
To apply different methods to a resource, the same URL is always used because the URL is independent of the executed action.
Offering a Resource
Principle
You can implement a Web service in the form of a REST resource through a Technical Workflow with a REST Input Listener Connector. The REST Connector then offers a resource (e.g. an order or article list) to the outside in form of a URL. Individual resources are always offered via a single REST Input Connector.
The resources are individual objects of an application that must be reachable via a URL and can be represented with a document, ideally in XML.
Proceed as follows
-
Configure a resource
-
Create a REST Input Listener Connector.
-
In the list, under Use specifications for, choose which type of resource this connector is supposed to offer.
Refer to Dialog Resource Configuration.
-
Define a URL under which the resource can be accessed.
You can use curly brackets for dynamic path components, e.g.
https://<server>:<port>/ibisrest/orders/{orderID}. Here, the value oforderIDis made available as a workflow variable in the workflow and can be used to determine the data of the desired order, refer to Module Variables. Enter*at the end of the path to support paths ending with characters of any type. -
Protect your Rest service against unauthorized access by activating the Authentication required option.
-
Define the desired method of authentication and specify the access data required for a request.
-
Define which operations can be executed on your resource.
Not all HTTP methods are permissible for every resource type. By default, those HTTP methods that make sense for the selected resource are preselected, refer to Dialog Resource Configuration.
-
Specify the encoding for data that is received as a request in format
multipart/form-data.
-
-
Configure a response
For each permissible HTTP method with which the resource can be requested, you define the response returned by the resource.
-
Configure the response data for the available request types.
The values configured here can be changed dynamically in the workflow by changing corresponding variables.
Refer to Module Variables.
-
|
For resources with several supported methods, variable |
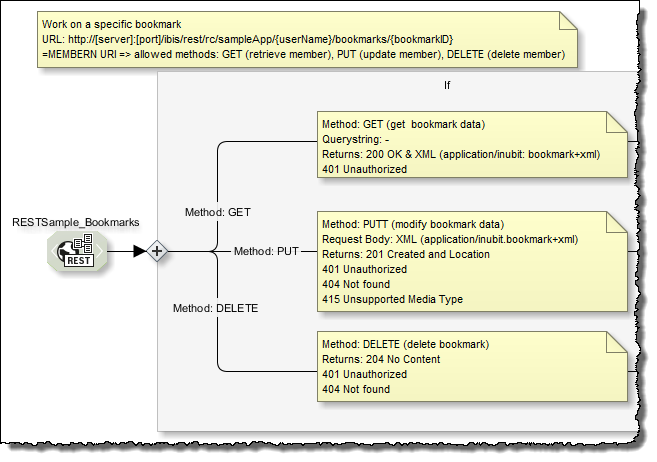
Example of a collective resource
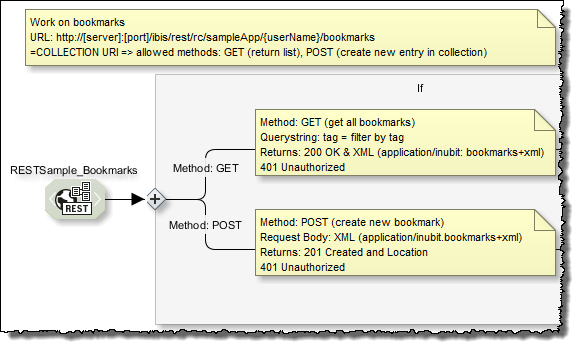
Example of a single resource from a collection
|
For incoming requests with HTML form data and content type |
Displaying Available Input Connectors Using a REST Connector
You can display a list of the available (active and inactive) REST Input Connectors.
Proceed as follows
-
Choose a REST Input Listener Connector and open it for editing.
-
In the dialog in the Provided resources group, click the
 button next to the URL.
Refer to Dialog HTTP Connector Properties
-
Choose the List all REST Input Connectors option.
A dialog appears showing a list of all created Input Connectors. The list provides the name of the connector, the corresponding workflow, the path for the resource and the HTTP methods available for the connector.
Additionally, you can display a list of all available REST services in the web browser:
https://<server>:<port>/ibis/rest/rc?method=OPTIONS
Displaying Published Resources Using a REST Connector
You can display a list with all published and activated resources.
Proceed as follows
-
Choose a REST Input Listener Connector and open it for editing.
-
In the dialog in the Provided resources group, click the
button next to the URL.Refer to Dialog Resource Configuration
-
Choose the option Display published resources. In the browser, a page opens showing the formatted list with all activated resources.
|
Resources implemented with a REST Input Listener Connector are only displayed as published and activated once the corresponding Technical Workflows have been activated. |
Calling Resources Using a REST Connector
Principle
You can use the REST Connector to call a resource that is available via a certain URL. You can request, for example, an article list. To do so, you first have to create and configure a REST Output or Medium Connector for sending the request and receiving the response.
-
Medium Connector
Use the Medium Connector if the called resource returns a response that is to be processed further in the workflow.
-
Output Connector
Use the Output Connector if the request to a resource is a call without output.
Prerequisites
-
The URL of the resource is available
-
Authentication data is available if the server requires authentication for the resource
Proceed as follows
-
Create a new REST Medium or Output Connector.
-
Enter the URL of the resource to be called.
-
Enter the required authentication data if necessary.
Refer to Dialog Request Configuration.
-
Choose the required HTTP method depending on the type of request.
-
If you have set PUT or POST as the method, choose the respective option from the list of MIME types and the encoding.
Refer to Dialog Request Configuration.
You thus specify the definition of the data that is sent. The values of the request data are copied into the content type header.
-
You can optionally make adjustments in the request header, for example if you want to specify the desired representation of the requested resource for resources that support several representations. To do so, use the
Acceptheader:-
Click the Edit header button.
A dialog opens. By default, / is used to query an arbitrary representation of a resource.
-
Double-click the
Acceptheader.Another dialog opens:
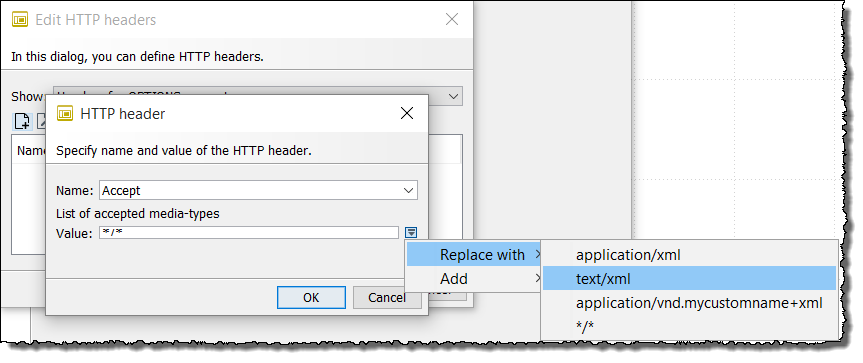
-
Choose a MIME type. You can also choose several types and a sorted list of the desired representations is returned.
-
Close the dialog for editing the HTTP header by choosing OK.
-
-
Click Finish.
-
Publish the REST Connector.
To query a resource with GET you do not need an output message because the resource is only requested and no change is made to the data. To access a resource with POST or PUT, you need an output message. If you want to, for example, add data to an article list, you can use an XSLT Converter in the workflow before the REST Connector to create an XML message and send this, e.g.
<article>
  <description>Rooibos tea</description>
  <price>2.80</price>
  <unit>100g</unit>
</article>
All input messages into the REST Output/Medium Connector are sent with the request.
|
You can dynamically adjust the URL of the resource by overwriting the module property |
Setting and Overwriting Headers Dynamically
Usage
By using the variables mapping, you can dynamically overwrite headers and set new headers, refer to Workflow Variables and Mappings.
Proceed as follows
-
To overwrite the response headers in a workflow with a REST Input Listener Connector set the
restConnector.ResponseHeader.[headerName]workflow variables somewhere in the workflow, but before the output is returned as the response.The following response headers are set by the REST Connector itself and cannot be overwritten by the user, e.g., via variable mapping).
Allow Connection Content-Length Content-Encoding Content-Type Content-MD5 Content-Range Proxy-Authenticate Server Via WWW-Authenticate -
To overwrite the request headers for an REST Medium or Output Connector request set the
Request.Header.[headerName]module properties of the REST Connector.The following request headers are set by the REST Connector itself and cannot be overwritten by the user, e.g., via variable mapping.
Accept
Accept-Charset
Accept-Encoding
Accept-Language
Cookie
Expect
From
Host
If-Match
If-Modified-Since
If-None-Match
If-Range
If-Unmodified-Since
Max-Forwards
Proxy-Authorization
Range
Referer
User-Agent
Dialog Descriptions
Dialog Resource Configuration
(Input Listener Connector)
In this dialog, you specify the path of the resource offered by the connector, the authentication, and the HTTP methods.
Provided resource
-
Use defaults for
Choose which type of resource the connector is supposed to offer. The choice of resource type also defines the preselection of the HTTP method(s) supported by default.
-
Single resource (read-only)
Choose this option if you only want read access to a single resource, e.g. Display order. HTTP method
GETis preselected automatically. -
Collection resource
Choose this option if the resource is to contain, for example, a list of orders (
/orders) and this list is to be retrieved or new entries are to be added to the list. By default, only the GET and POST methods are allowed. -
Member of a collection resource
Choose this option if you, for example, want to offer an individual order from an order list or an article number as a resource. These methods are supported here: GET (retrieve data), PUT (change data), and DELETE (delete data).
-
-
URL
URL of the Input Listener at which the listener is waiting for requests and providing its resource. By default, the URL is constructed according to the following pattern:
http(s)://[ServerName]:[Port]/ibis/rest/rc/[NameOfInputListener]If necessary, adjust the part of the URL after
rcas desired. You can use curly brackets for dynamic path components, e.g./users/{userName}/orders/{orderNo}.Enter
*at the end of the path to support paths ending with characters of any type.
Authentication required
Select this option if authentication is supposed to be required for accessing the resource.
-
Use static login data
Define a scheme to be used here and the authentication data required for access.
-
Scheme
-
Basic: Username and password are required and transferred unencrypted.
To be used only if the connection between client and server can be regarded as secure!
-
Digest: Also requires username and password. The password is transferred in encrypted form. Used for encrypting several parameters, including randomly generated values.
-
-
User name: Username for authentication
-
Password: Password for authentication
-
-
Select from Credentials Manager
For authentication, you can also use credentials managed by the Credentials Manager. Refer to Using the Credentials Manager for Authentication.
-
Use process user
This option is only available if a portal is installed.
If this option is activated, access to the resource is possible only if valid portal user data is transferred.
Basic is used as the authentication scheme.
The portal username used in a call is available in the variable
restConnector.requestAuthUserduring workflow execution.Refer to Module Variables.
-
Use Process Engine user (password from the portal configuration)
Using the internal user (INUBITISPortalUser@@@intern) and the password for the Process Engine, to be found in the configuration area Administration > Server > Password for the Process Engine.
For further information about using the internal user via FormProxyServlet, refer to Accessing a REST Input Listener Connector and refer to Accessing a Secured HTTP Input Listener Connector.
-
Use Keycloak Authorization for REST Connector
-
REST Listener
When selected authentication against the Keycloak resource server in the REST Connector listener is enabled. Thus, the registered client with the users associated with the client can authenticate against the Keycloak OIDC server.
For adding the necessary information for Keycloak authorization, click Select Config File… to open the Select JSON configuration dialog. Assumed you have provided this information in a
keycloak.jsonfile stored in the INUBIT Repository, you can load this JSON file from the INUBIT repository by clicking the appropriate button close to the Select file from repository entry field.Alternatively, you can directly copy the contents of the
keycloak.jsonfile and paste it in the Keycloak JSON content text area.Once the REST Connector listener is executed, it uses the URL of the authentication server and authenticates it to the resource server. The text field is provided for the Well known URL (https://<hostname>:<port>/auth/realms/<keycloak realm name>/.well-known/openid-configuration), which is used for generating the token and authenticating against it. It is required for authentication with credentials and token.
-
REST Caller
Using the REST Connector, one can call the REST Listener or REST resources that are authorized with the Keycloak. To perform this activity, there are two options.
-
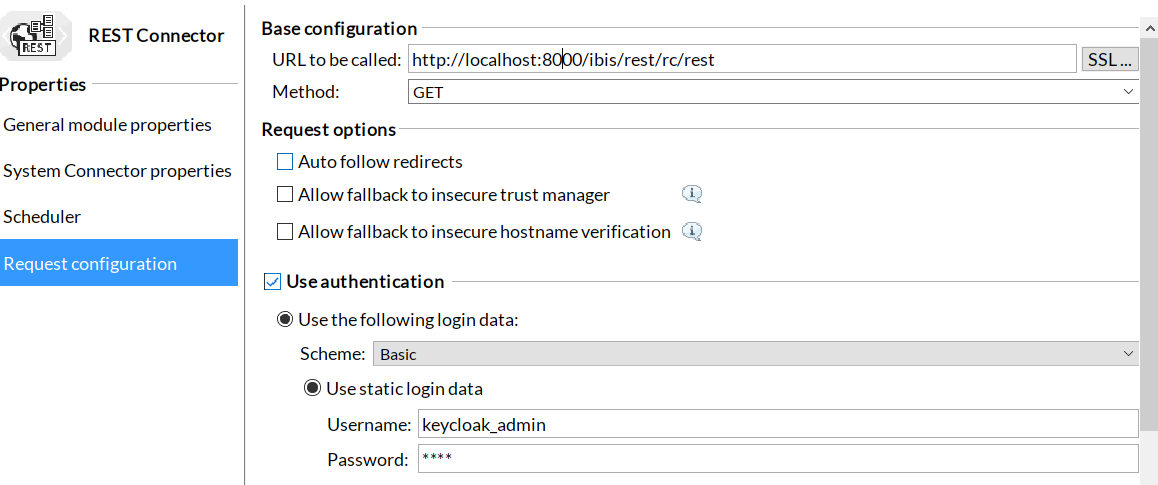
Using username and password: To access the REST Connector listener, use the "Listener URL", “Basic” scheme authentication, and the username and password of Keycloak in the Request configuration page. For example, in Keycloak server, the user and credential for the user would be created as "Keycloak_admin" and "test" respectively. We need to provide the same credentials here (refer below image).
-
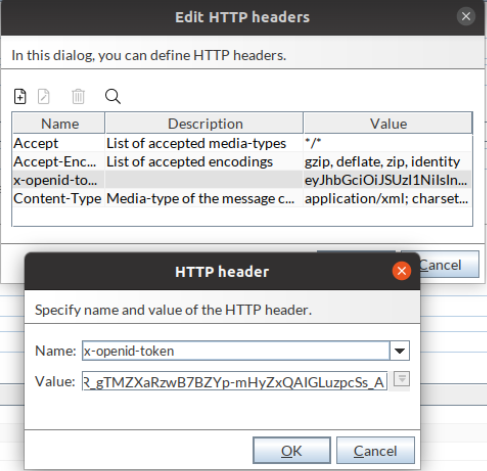
Using authorization token: To access the REST Connector listener via “Bearer Token,” edit the HTTP headers on the "Request configuration" page. In the HTTP headers, include the name "x-openid-token" and the value of the access token (refer below image).
Use this CURL command to generate a bearer token in Keycloak:
curl --request POST --url https://<keycloak-server>/auth/realms/<realm name>/protocol/openid-connect/token --header 'Content-Type: application/x-www-form-urlencoded' --data 'grant_type=password&client_id=<client-id>&client_secret=<client_secret>&username=<username>&password=<password>'Copy the access token from output into the value of the "x-openid-token" header parameter.
Username and password are not required to access the REST Connector-Listener using authorization token.
-
-
Supported HTTP methods
This is where you specify that the connector responds only to certain HTTP operations.
By defining the resource type, you have already automatically preset the suitable HTTP methods for the respective resource type.
-
GET (retrieve resource data)
-
POST (create new resource)
-
PUT (update resource)
-
PATCH (modify resource)
-
DELETE (delete resource)
Refer to Using HTTP Methods in the REST Connector.
Processing of received data
-
Specify the encoding for data that is received as a request in format
multipart/form-data. -
Use CORS
Select this option if you want to use the CORS properties. To configure the properties, click Settings… In the CORS settings dialog that opens, you can configure the following settings:
-
Allowed origins
Specify either a single origin or multiple origins. This tells browsers that these origins are allowed to access the resources. Multiple origins must be separated by commas without spaces. To allow all origins, specify "*".
-
Allowed methods
Select or deselect the methods allowed when accessing the resource.
-
Allowed headers
Specify which HTTP headers can be used when making the actual request.
-
Allow credentials
Select this option to specify that the current request can be made with credentials.
-
MaxAge
Specify how long the results of a preflight request can be cached.
-
Dialog Response Configuration in the REST Connector
(Input Listener Connector)
In the dialog for defining the resource, you specify the settings for the previously select HTTP methods supported by your connector that are to be used for a response.
Options for GET requests
This is where you define the representation of the response data for GET requests. Useful default settings have already been chosen and can be left unchanged.
-
MIME type
Choose the desired MIME type. For information about MIME types, refer to:
-
https://developer.mozilla.org/en-US/docs/Web/HTTP/Guides/MIME_types
-
Encoding
Choose the encoding of the response data.
Options for POST and PUT requests
-
Start workflow asynchronously
Activate this option if the Input Listener is supposed to return the HTTP status message to the client directly after it receives the request. In this case, the response is sent before the workflow starts. The result of the workflow is not returned. If this option is not activated, the workflow starts synchronously and the response is only sent to the client once the last module of the workflow has been executed.
-
Response status code
Choose what is to be received as the response status code.
If you want the response to show that an error occurred because of incorrect request data, you can set the variable
restConnector.responseStatusCodefor the response status code to HTTP status code 400 (for Bad Request).
General options
-
Automatically encode response data
Activate this option if the response data is to be encoded automatically using a method that is known to the server and supported by the client.
-
Edit HTTP header
The Edit HTTP header button opens the dialog for editing the header definition for available HTTP methods.
Refer to Dialog Request Configuration.
Dialog Request Configuration
(Medium/Output Connector)
In the dialog for configuring the resource to be requested, you define the URL to be called, the HTTP method and, if applicable, an authentication.
Base configuration
-
URL to be called
Enter the URL of the resource to which the Connector sends its request, for example, the address of an HTTP Input Listener.
-
SSL
Used for configuring the server or client authentication.
Refer to Dialog SSL Configuration
-
-
Method
Enter the desired HTTP method that is used to define the action applied to the resource.
Refer to Using HTTP Methods in the REST Connector.
-
Auto follow redirects (for GET method only)
-
If checkbox is checked, the REST Connector will follow a redirection URL provided by the requested application if an HTTP status code 302 is received in response to a GET request.
The redirect URL will be called as long as the HTTP status code 302 is received in response to a GET request.
-
If checkbox is unchecked (default), the GET request fails when receiving the HTTP status code 302.
-
Use Authentication
Select this option if the server requires an authentication.
-
Use the following login data
-
Scheme
-
Basic: Username and password are required and transmitted unencrypted.
Use only if the connection between client and server can be classified as secure!
-
Digest: Also requires username and password. The password is transmitted in encrypted form. Used for encrypting several parameters, including randomly generated values.
-
-
Use static login data
Enter the account that the connector is supposed to use for authentication.
-
Username: Username for authentication.
-
Password: Password for authentication.
-
-
Select from Credentials Manager
For authentication, you can also use credentials managed by the Credentials Manager. Refer to Using the Credentials Manager for Authentication.
-
-
Use authentication for accessing the Process Engine
Using the internal user (
INUBITISPortalUser@@@intern) and the password for the Process Engine, to be found in the configuration area Administration > Server > Password for the Process Engine.
Authorization
-
Use OAuth2 Authorization
Activate this option to use the OAuth2 authorization.
If the Use OAuth2 Authorization option is selected, OAuth2 authorization will have priority over the settings in the Use Authentication section.
-
Grant Type
-
Client Credentials: Recommended for INUBIT because no user interaction is required.
-
Password Credentials
-
Custom: Select this option to configure any other grant type (e.g. refresh token flow, implicit flow)
-
-
Access Token URL
Insert the URL of the OAuth server. In addition, you can specify whether HTTP request should be sent via GET or POST.
-
Parameters
Add the parameters the selected grant type requires. You can find out which of these are in the documentation of the OAuth server you are using.
The parameter table can hold any number of entries.
All parameters configured in the module wizard are available as module properties with the prefix
OAUTH_PROPERTYfor use in the variable mapping.Variable mapping can only be used to overwrite properties that were previously set in the wizard. If further parameters are to be set via variable mapping, they must first be entered in the table via the module wizard (with empty or placeholder value).
Request data
This is where you define the desired representation of the request data.
-
Send inbound data stream as HTTP payload
Activate this checkbox to send input message as HTTP payload This functionality can optionally be used to specify whether to pass or not the input message as REST caller payload for HTTP methods like
GETandDELETE. -
MIME type
Select a content type from the MIME type list or enter the content type manually and select an encoding from the Encoding list.
For the HTTP methods POST, PUT, and PATCH the inbound data stream is sent as HTTP payload by default.
For the HTTP methods GET, DELETE, OPTIONS, and HEAD you must select the Send inbound data stream as HTTP payload option.
If you specify a user-defined boundary value, for example
myownboundaryvalue, this value is taken into account when the REST request is called instead of the automatically generated value. To do this, use the MIME typemultipart/form-data; boundary=myownboundaryvalue. -
Encoding
Choose the encoding used in the file.
-
Send message as single multipart/form-data
Activate this checkbox to send an input message as MIME data and upload it. If this checkbox is deactivated, the input message needs to be valid MIME data.
-
Parameter name for file content (mandatory for
multipart/form-dataMIME type only)Enter the parameter name for file content.
This parameter is used to specify the
nameparameter’s value in theContent-Dispositionheader.The
Content-Dispositionheader is part of themultipart/form-databody. TheContent-Dispositionheader is used to provide information for each subpart of the form. The first directive is alwaysform-data, and the header must also include anameparameter to be identified/mapped to the relevant field on the REST provider. This mandatory field must be specified by the user.Example template
-----------------------------9051914041544843365972754266
Content-Disposition: form-data; name="file1"; filename="a.txt"
Content-Type: text/plain
Content of a.txt.
-----------------------------9051914041544843365972754266
Cases
There are two cases to specify the value for Parameter name for file content field depending on whether you are consuming INUBIT REST Connector listener or external REST endpoint by INUBIT REST caller. A respective description is given below how to specify the Parameter name for file content field in an INUBIT REST caller.
-
When you consume a REST listener, you can give your own value to the
nameparameter in the Parameter name for file content field in the REST caller. -
In case of consuming external REST endpoint by REST caller, it is different since those endpoints are incorporated by specifying the name parameter to which this
Content-Dispositionbody value should be mapped. Therefore, you must give the same value for Parameter name for file content field as what has been provided in the externalREST endpoint provider. As this is as generic standard of
Content-Dispositionheader, this field is mandatory to specify the value.
-
-
Use input message (for
multipart/form-dataMIME type only, if Parameter name for file content is set correctly)Choose this option to use a file from the input message at the REST Connector as file. Specify the file name with the correct extension.
-
Use file URL (for
multipart/form-dataMIME type only, if Parameter name for file content is set correctly)Choose this option to enter a URL to a file on your server file system in order to be uploaded.
HTTP headers
The information in the request header informs the server, for example, about the type and configuration of the client and the document formats that the client expects or supports. Here you define, for example, the form of the representation in which you want to receive a list with requested orders.
The Edit header… button opens a dialog. In the dialog, you can define the request header by double-clicking the individual rows of the header list.
The permissible headers are defined in the HTTP specification, refer to https://www.w3.org/Protocols/rfc2616/rfc2616-sec5.html#sec5.3.
Extended
-
Throw exception if error response is received
By default, the option Throw exception if error response is received is activated. Therefore, an error response from the REST Connector always results in a workflow error (HTTP status code
4xxor5xx).Deactivate the option to continue the workflow as normal. The response data will be displayed in the input message or in the REST Connector-specific variables.
-
Return actual error message as ISErrorString variable
Activate this option to return the actual error message as
ISErrorStringvariable instead of INUBIT’s own error message.
Test
You use the Test sending of request button to test whether the connection can be established successfully with the entries made. It opens a dialog in which the configured connection can be tested, and a response is displayed with status code, HTTP header, and data.