Configuring Secure Connections
For information about the SSL configuration of the Remote Connector, refer to Configuring a Secure Connection to the INUBIT Process Engine.
Configuring SSL Connections and Server Authentication
You can secure the communication between the INUBIT Process Engine and clients such as the INUBIT Workbench by using the HTTPS protocol, which is secured by SSL/TLS.
When using HTTPS, the INUBIT Process Engine and the BPC Portal or the INUBIT Process Engine and a web service consumer communicate via encrypted data. Additionally, clients (e.g. INUBIT Workbench, web browsers) can verify the certificate of the server (e.g. INUBIT Process Engine, BPC Portal) to authenticate the connection.
As operator of the INUBIT Process Engine, you create the keystore. A keystore contains certificates with the corresponding public keys and the private key belonging to the certificate. The public key is part of the certificate that the client uses to authenticate the server.
Configure the HTTPS connection and deposit the keystore in the INUBIT Process Engine.
|
Based on the domain, the keystore is searched for a certificate with the corresponding alias. Name your keystore by the DNS name so that it can be found. |
The server certificate is deposited in the so-called trust store at the client (e.g. INUBIT Workbench) and, there, you also configure the HTTPS connection. In contrast to the keystore, the trust store contains certificates only.
In this way, the INUBIT Process Engine can access the private key and the INUBIT Workbench can access the certificate, by means of a public key.
|
Normally, the SSL connection between client and server is already terminated at the LoadBalancer. This can be sufficient if the connection between the LoadBalancer and the instance behind it is established in a secure network. In addition, the configuration between the LoadBalancer and the instance can be secured via SSL. Information on the SSL configuration of the LoadBalancer used can be found in its manual. |
Proceed as follows
-
Create a keystore and a self-signed certificate. To do so, call up the
keytoolvia the command line in the directory<SUITE-INSTALL-DIR>/_jvm/bin/keytool.exe.The following parameters generate a keystore
ibis_demo_keystorewith a self-signed certificate with a public key. When generating, assign one password for the keystore and one the certificate. Adjust the parameter values to your own IT environment (except-alias):keytool -genkey -alias tomcat -dname "CN=server.domain.com, O=Example Inc, C=DE" -keystore ./keys/inubit_demo_keystore.jks -keyalg RSA -
Extract the certificate:
keytool -export -alias tomcat -storepass PasswordKeystore -keystore ./keys/inubit_demo_keystore.jks -file ./keys/inubit_demo_certificate.crt -
Configure the INUBIT Process Engine. To do this, open the following configuration file:
<SUITE-INSTALL-DIR>/inubit/server/process_engine/conf/server.xml
and navigate to the default connector path.<Connector port="8443" protocol="org.apache.coyote.http11.Http11Nio2Protocol" maxThreads="150" SSLEnabled="true"> <SSLHostConfig> <Certificate certificateKeystoreFile="conf/localhost-rsa.jks" certificateKeystorePassword="change it" type="RSA" /> </SSLHostConfig> </Connector>The type of certificate must be compatible. It must be one of UNDEFINED, RSA, DSA or EC.
If only one Certificate is nested within a SSLHostConfig then type attribute is not required and will default to UNDEFINED. If multiple Certificates are nested within a SSLHostConfig then type attribute is required and each Certificate must have a unique type.
-
Edit the following parameters:
-
certificateKeystoreFileEnter the full path to the RSA keystore file of the certificate.
-
certificateKeystorePasswordEnter the password for the RSA keystore file of the certificate.
-
-
Restart the INUBIT Process Engine.
-
Add the certificate to the client’s truststore.
The server authentication is only done when it is selected in the Workbench and the added certificate contains a private key.
With the following command you copy the certificate to the client computer and import it to the truststore:
keytool -import -alias tomcat -file ./keys/inubit_demo_certificate.crt -keystore ./keys/inubit_demo_truststore.jks -
Confirm the call back Trust this certificate?
-
If you use a self-signed certificate, you need to declare the truststore for Java, because the Java framework checks the server certificate’s reliability. If the truststore is not declared, the communication with the INUBIT Process Engine via HTTPS fails, for example when loading documents from the INUBIT Process Engine via the XSLT function
document()or when loading a URL in the XML Editor.The truststore must be declared in the start script of the INUBIT Process Engine and the INUBIT Workbench:
-
Open the start script of the INUBIT Process Engine:
<SUITE-INSTALL-DIR>/inubit/server/process_engine/bin/setenv.[bat|sh] -
Open the INUBIT Workbench start script in
<SUITE-INSTALL-DIR>/inubit/client/bin/start_local.[bat|sh]. -
Add the following and adjust the path to your truststore:
-
Windows
set JVM_PARAMS=%JVM_PARAMS% -Djavax.net.ssl.trustStore=<path-to-truststore>\inubit_demo_truststore.jks -
Linux
JVM_PARAMS="$JVM_PARAMS -Djavax.net.ssl.trustStore=<path-to-truststore>/inubit_demo_truststore.jks"
-
-
-
To view the content of the truststore, use the following command:
keytool -keystore ./keys/inubit_demo_truststore.jks -list -v -
Restart the INUBIT Workbench.
-
For the SSL configuration create a new login profile based on an HTTPS connection, for example
https://<server>:<port>/ibis/servlet/IBISSoapServlet, and enter the path of the truststore file.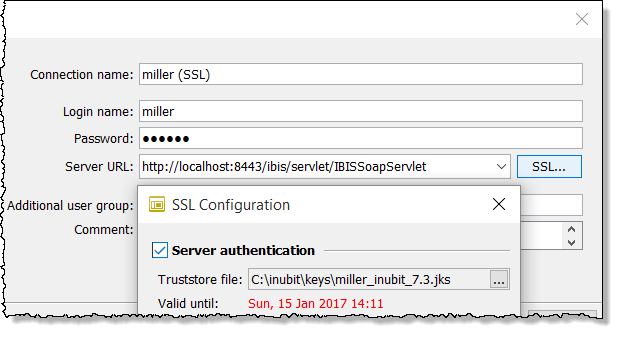
Refer to Creating and Deleting Login Profiles
Configuring INUBIT Process Engine using NIO Implementation
|
Recommended structure by Apache Tomcat. |
Prerequisites
-
You have implemented steps 1 and 2, refer to Configuring SSL Connections and Server Authentication
-
You have opened the configuration file
<SUITE-INSTALL-DIR>/inubit/server/process_engine/conf/server.xml
Proceed as follows
-
Remove the annotation marks of the NIO structure example:
<Connector port="8443" protocol="org.apache.coyote.http11.Http11Nio2Protocol" maxThreads="150" SSLEnabled="true"> <SSLHostConfig> <Certificate certificateKeystoreFile="conf/localhost-rsa.jks" certificateKeystorePassword="change it" type="RSA" /> </SSLHostConfig> </Connector> -
Edit the following parameters:
-
certificateKeystoreFileEnter the full path to the RSA keystore file of the certificate.
-
certificateKeystorePasswordEnter the password for the RSA keystore file.
-
-
Continue with step 4, refer to Configuring SSL Connections and Server Authentication
Configuring INUBIT Process Engine using APR/Native Implementation
Prerequisites
-
You have implemented steps 1 and 2, refer to Configuring SSL Connections and Server Authentication
-
You have opened the configuration file
<SUITE-INSTALL-DIR>/inubit/server/process_engine/conf/server.xml
Proceed as follows
-
Remove the annotation marks of the APR/native structure example:
<Connector port="8443" protocol="org.apache.coyote.http11.Http11AprProtocol" maxThreads="150" SSLEnabled="true"> <UpgradeProtocol className="org.apache.coyote.http2.Http2Protocol" /> <SSLHostConfig> <Certificate certificateKeyFile="conf/localhost-rsa-key.pem" certificateFile="conf/localhost-rsa-cert.pem" certificateChainFile="conf/localhost-rsa-chain.pem" type="RSA" /> </SSLHostConfig> </Connector> -
Edit the following parameters:
-
certificateKeystoreFileEnter the full path to the RSA keystore file of the certificate.
-
certificateFileEnter the full path to the RSA certificate file.
-
certificateChainFileEnter the full path to the RSA certificate chain file.
-
-
Continue with step 4, refer to Configuring SSL Connections and Server Authentication
Configuring INUBIT Process Engine using old style
Prerequisites
-
You have implemented steps 1 and 2, refer to Configuring SSL Connections and Server Authentication
-
You have opened the configuration file
<SUITE-INSTALL-DIR>/inubit/server/process_engine/conf/server.xml
Proceed as follows
-
Use this example:
<Connector port="8443" protocol="HTTP/1.1" URIEncoding="UTF-8" connectionTimeout="20000" maxThreads="150" minSpareThreads="25" maxSpareThreads="75" enableLookups="false" acceptCount="100" compression="on" compressionMinSize="2048" compressableMimeType="text/html,text/xml,text/javascript" server="Apache" emptySessionPath="true" SSLEnabled="true" scheme="https" secure="true" clientAuth="false" sslProtocol="TLS" keystoreFile="/absolute/path/to/keystore.jks" keystorePass="changeit" keyAlias="chageit" ciphers="TLS_RSA_WITH_AES_128_CBC_SHA256,TLS_RSA_WITH_AES_128_CBC_SHA,TLS_RSA_WITH_AES_ 256_CBC_SHA,TLS_RSA_WITH_AES_256_CBC_SHA256,TLS_RSA_WITH_AES_128_GCM_SHA256,TLS_RSA_WIT H_AES_256_GCM_SHA384"> ... </Connector> -
Add the list of cipher names each separated by comma.
-
Edit the following parameters:
-
keystoreFileEnter the full path to the keystore file (private key and certificate).
-
keystorePassEnter the password for the keystore file.
-
keyAliasAlias name of the keystore entry. If this entry is missing,
tomcator the first entry in the keystore is used.
-
-
Continue with step 4, refer to Configuring SSL Connections and Server Authentication
Activating Traces for HTTPS Connections
In order to obtain meaningful traces for HTTPS connections between INUBIT Workbench and INUBIT Process Engine, the start scripts of the two components can be adjusted.
Proceed as follows
-
Close the INUBIT Workbench and stop the INUBIT Process Engine.
-
Open the following start scripts:
-
INUBIT Workbench
<SUITE-INSTALL-DIR>/inubit/client/bin/start_local.[bat|sh] -
INUBIT Process Engine
<SUITE-INSTALL-DIR>/inubit/server/process_engine/bin/setenv.sh
-
-
Insert the following lines:
-
INUBIT Workbench:
set JAVA_PARAMS=%JAVA_PARAMS% -Djavax.net.debug= ssl,handshake,data,trustmanager -
INUBIT Process Engine:
set JAVA_PARAMS=%JAVA_PARAMS% -Djavax.net.debug=ssl,handshake,data,trustmanager
-
-
Restart the INUBIT Process Engine and the INUBIT Workbench.
Configuring a HTTP/HTTPS Proxy Server for INUBIT Workbench and/or INUBIT Process Engine
Proxy-Servers can be used for the HTTP(S) communication between
-
the INUBIT Workbench and the INUBIT Process Engine,
-
the INUBIT Process Engine and remote computers,
-
Remote Connectors and other remote computers.
|
External files (WSDLs, URLs etc.) don’t need to be reachable from the INUBIT Workbench because they are always loaded via the INUBIT Process Engine. |
A proxy server can be used for aims like
-
Increasing security
Computers on the local network should not have direct Internet access; a proxy server may be used as an interface between the two networks.
-
Bandwidth control
The proxy server may allocate different resources to different user groups dependent upon utilization.
Configuring a Proxy Server between INUBIT Workbench and INUBIT Process Engine
Proceed as follows
-
Stop the INUBIT Workbench.
-
Open the start script
<SUITE-INSTALL-DIR>/inubit/client/bin/start_local.[bat|sh]. -
Insert the lines matching to your protocol and adjust the values:
-
HTTP
set JAVA_PARAMS=%JAVA_PARAMS% -Dhttp.proxyHost=Proxy_IP_or_URL set JAVA_PARAMS=%JAVA_PARAMS% -Dhttp.proxyPort=8080 set JAVA_PARAMS=%JAVA_PARAMS% -Dhttp.proxyUserName=username set JAVA_PARAMS=%JAVA_PARAMS% -Dhttp.proxyPassword=password set JAVA_PARAMS=%JAVA_PARAMS% -Dhttp.nonProxyHosts=*.yourcompany.com -
HTTPS
set JAVA_PARAMS=%JAVA_PARAMS% -Dhttps.proxyHost=Proxy_IP_or_URL
set JAVA_PARAMS=%JAVA_PARAMS% -Dhttps.proxyPort=8080
set JAVA_PARAMS=%JAVA_PARAMS% -Dhttps.proxyUserName=username
set JAVA_PARAMS=%JAVA_PARAMS% -Dhttps.proxyPassword=password
set JAVA_PARAMS=%JAVA_PARAMS% -Dhttps.nonProxyHosts=*.yourcompany.com
-
-
Restart the INUBIT Workbench.
Configuring Proxy Server between INUBIT Process Engine and Remote Computers
In some networks HTTP and HTTPS accesses are possible only via a proxy server. You configure this proxy server centrally at the INUBIT Process Engine.
Additionally, you can make exceptions, that means, define remote computers that are connected to directly and not via the proxy server.
|
Use a proxy server if there are errors when publishing and deploying Web Service Input Listeners Medium Connectors with external access to XML Schemas. |
Proceed as follows
-
In the INUBIT Workbench open the tab Administration > General Settings > Administration > Proxy configuration category.
-
Check the Use proxy configuration option to activate the proxy settings to activate the following options. If you deactivate the Use proxy configuration after having configured proxy settings, your proxy configuration is preserved, but is not used anymore.
The values in this configuration overwrite the values set in the start script. If you leave the value for
Serverblank and activate the Use proxy configuration option, no proxy is used. You find the start scripts under<SUITE-INSTALL-DIR>/inubit/server/process_engine/bin/setenv.[bat|sh]. -
Define your proxy settings. Click an option to display its explanation.
-
Save your changes.
Changing HTTP/HTTPS Ports
If necessary, you may change the HTTP(S) port of your INUBIT Process Engine. The following port numbers are given by default for the INUBIT Process Engine:
-
HTTP: 8000
-
HTTPS: 8443
Proceed as follows
-
Open the configuration file corresponding to your operating system:
<SUITE-INSTALL-DIR>/inubit/server/process_engine/conf/server.xml -
Change the ports.
-
Save your changes.
-
Restart the INUBIT Process Engine.
|
When having changed the port(s) in the
For this purpose, change the following line: When using another protocol as |