AS4 Connector
An AS4 Connector sends and receives business messages and receipts in accordance with Applicability Statement 4 (AS4).
AS4 allows B2B (business to business) Web-Services-Messaging based on the ebMS 3.0 specification.
AS4 describes how to exchange business messages securely in a peer-to-peer network using the HTTP protocol. AS4 defines how to establish the connection and how to validate, send, and acknowledge the business message.
To trust the initiator, business messages are signed and to ensure data security, messages are encrypted. Based on the AS4 communication standard, the initiator receives a digital receipt (Message Disposition Notification, MDN) to be evidence of delivery on time.
Before sending, for each message a SOAP envelope is created.
Business messages can be sent in the XML format, EDI format (e.g. ASC X12, HL7 or UN/EDIFACT) or in any other structured format.
Refer to AS4 Specification.
Introduction
The AS4 Connector can be used as Input, Medium, or Output Connector. Thus, two INUBIT Process Engines are able to communicate with each other via AS4, for example:
-
AS4 Output Connector to send AS4 messages
-
AS4 Input Connector to receive AS4 messages
Communication modes
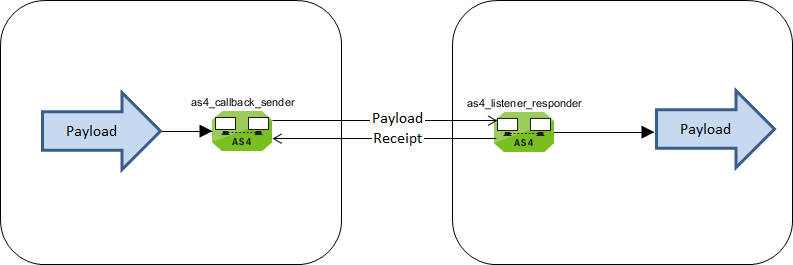
The AS4 Connector supports both synchronous and asynchronous communication with an AS4 partner.
-
Synchronous mode: The initiator waits for the receipt.
-
Asynchronous mode: The initiator does not wait for the receipt, which is received by another AS4 Listener Connector (callback listener).
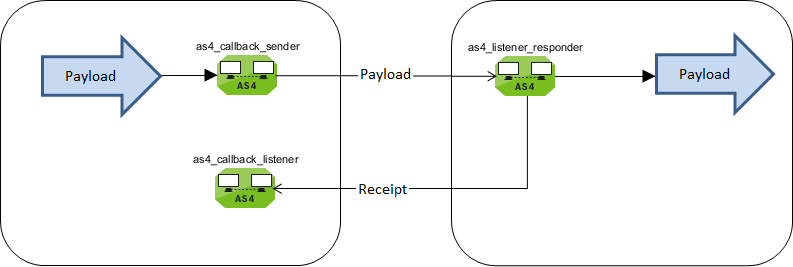
The communication is controlled via Collaboration Protocol Agreements (CPA). In INUBIT, these CPA files must be stored in XML format in the INUBIT Repository.
Refer to
AS4 Gateway
The AS4 Gateway enables communication with an AS4 Gateway of another AS4 partner.
The INUBIT AS4 Gateway is based on the Jentrata Open Source B2B Gateway.
The AS4 Gateway is installed during the INUBIT installation and is started together with the Process Engine.
Refer to Installing INUBIT Software.
Configuring AS4 Gateway
The AS4 Gateway is configured in the <inubit-installdir>/inubit/server/ibis_root/conf/as4/as4-gateway.xml
file, which is delivered with INUBIT.
The AS4 Gateway logging is configured in the <inubit-installdir>/inubit/server/ibis_root/conf/as4/log4j2.properties file, which is delivered with INUBIT.
|
|
|
For productive use, it is recommended to use a database that is different to the H2 database installed by default as AS4 message store. |
Copy the corresponding database JDBC driver to the <inubit-installdir>/inubit/server/process_engine/webapps/as4-gateway/WEB-INF/lib directory.
<?xml version="1.0" encoding="UTF-8"?>
<!DOCTYPE properties SYSTEM "http://java.sun.com/dtd/properties.dtd">
<properties>
    <!-- The ActiveMQ server (broker) that is needed for
          communication between Process Engine and AS4 gateway
          binds locally on this port. May be changed to any other valid port number -->
    <entry key="broker.port">61620</entry>
    <entry key="broker.url">failover:(tcp://localhost:${broker.port})?initialReconnectDelay=2000&timeout=60000</entry>
    <!-- Proxy settings -->
    <entry key="http.proxyHost"></entry>
    <entry key="http.proxyPort"></entry>
    <entry key="http.proxyScheme">http4</entry>
    <entry key="http.httpClientOverride"></entry>
    <!-- AtiveMQ memory limit configuration -->
    <entry key="activemq.memoryLimit">5mb</entry>
    <!-- SQL script file name. This script is run during AS4 gateway start up -->
        <entry key="sql.script.filename">sql-script.sql</entry>
    <!-- JDBC Message Store Database Properties -->
    <!-- Select exactly ONE section from the following sections to support your database -->
    <!-- H2 -->
    <entry key="messagestore.type">H2</entry>
    <entry key="messagestore.jdbc.driverClass">org.h2.Driver</entry>
    <entry key="messagestore.jdbc.url">jdbc:h2:../../ibis_root/ibis_data/as4/message-store;AUTO_SERVER=TRUE</entry>
    <entry key="messagestore.jdbc.username">jentrata</entry>
    <entry key="messagestore.jdbc.password">jentrata</entry>
    <entry key="messagestore.jdbc.validationQuery">select 1</entry>
    <entry key="messagestore.jdbc.connectionProperties">h2.socketConnectTimeout=180000</entry>
    <!-- Oracle -->
    ...

    <!-- MySQL -->
    ...
    <!-- SQL Server -->
    ...
    <!-- PostgreSQL -->
    ...
</properties>
Parameters
| Parameter | Description | ||
|---|---|---|---|
|
To specify which port the AS4 Gateway shall use to communicate with the Process Engine. Changing the port number is only necessary, if port 61620 is used for other purposes. |
||
|
URL of the broker the client shall connect to |
||
|
Defining the maximum size of a message. If the size of a message exceeds this value, the message is rejected. By default, `activemq.memoryLimit `is set to 5 MB.
|
||
|
Optionally names an SQL script that is executed when the AS4 Gateway is started. The script must be located in the same folder as the AS4 Gateway configuration file:
The content of SQL script is provided by the user. In case of a SQL exception while executing any statement, the previous executions are rolled back. The rollback extent depends on the AS4 database type. After execution the script is renamed as backup file with the current timestamp. |
||
|
Database type (ORACLE, MYSQL, POSTGRES, H2) |
||
|
Database JDBC driver class |
||
|
JDBC URL of the database
|
||
|
Database username |
||
|
Database password |
||
|
Query to validate connections from the pool before returning them to the caller . |
||
|
Connection properties that will be sent to your JDBC driver when establishing new connections. |
The AS4 MessageStore contains the following two tables:
-
Status table
IBIS_AS4_MSG_STATUSThis table contains the status of the messages. The following status are distinguished:
Status Description RECEIVED
inbound message received
DELIVER
outbound message to be sent
DELIVERED
outbound message sent
FAILED
inbound message not accepted, outbound message not sent
DONE
sent and receipt received
IGNORED
wrong inbound message
ERROR SOAP
fault, AS4 error\
-
Content table
IBIS_AS4_MSG_CONTENTThis table contains the contents of the messages.
There is no automatic purging of AS4 MessageStore database tables. You have to plan and execute the cleanup, based on your business needs, by yourself.
Configuring an AS4 Gateway proxy
If the AS4 Gateway shall communicate via a proxy with the AS4 partner(s), you have to configure a proxy accordingly.
The AS4 Gateway proxy is configured in the as4-gateway.xml file in the path <inubit-installdir>/inubit/server/ibis_root/conf/as4.
Parameters
| Parameter | Description |
|---|---|
|
Proxy hostname |
|
Proxy port number |
|
Proxy scheme |
|
Client override |
If you apply more than one protocol for the communication with the proxy and with the partner, you have to use the last parameter (proxyScheme) to explicitly set the scheme for the proxy.
In case of a local proxy addressed per HTTP the parameter must be set to the fixed value http4.
The value corresponds to the end point scheme of the Apache Camel HTTP4 component in the AS4 Gateway.
Configuring AS4 Communication
In order to configure communication between two AS4 partners, you use XML files that contain Collaboration Protocol Agreements (CPAs) definitions. These XML files are stored in the INUBIT Repository. An example file is included in the scope of delivery and can be found using the following Repository path:
Global/System/Mapping Templates/AS4/as4-cpa-repository.xml
Copy this file to your own Repository folder and adjust it accordingly. Thus, you ensure that only authorized users can access sensitive data.
You can use the Partner Management to configure the CPA ID (module property cpaId) and the CPA file name (module property AS4CPAFilePath).
You can configure the security settings in the following section in the partnermanagement_config.xml configuration file using the INUBIT Workbench menu Configuration > Partner management:
-
Incoming messages
Section
<Protocol name="AS4" plugin="AS4 Connector" inbound="true"> -
Outgoing messages
Section
<Protocol name="AS4" plugin="AS4 Connector" outbound="true">
Refer to
You can create any number of CPA files.
|
The CPA ID of each partner agreement must be unique over all CPA files of your INUBIT installation. |
On the CPA Configuration tab of the AS4 Connector, select the CPA file and - depending on the connector type - one or more of the containing CPA IDs that configure the communication parameters of two communication partners.
|
When selecting multiple CPAs for a listener connector, ensure that all the selected CPAs refer to the same signing/private key alias ( |
|
Once you have changed the partner agreement configuration, you have to deactivate and re-activate each AS4 Connector that uses this partner agreement in order for the changes to take effect. |
The given CPA file is validated automatically using an AS4 schema file.
You can find a copy of the AS4 schema file in the Repository (as4-cpa-repository.xsd) in the following directory:
/Global/System/Mapping Templates/AS4
The sections of two partners must be identical, except for the element address.
The address element contains the partner address with the following syntax for an INUBIT AS4 Connector:
https://<server>:<port>/ibis/as4/{sync|async}
Examples
You can find an example xml with example messages in the Repository (as4-cpa-repository.xml) in the following directory:
/Global/System/Mapping Templates/AS4
Security Settings Using the Partner Management
Usage
To configure CPA ID, CPA file, key store, trust store, and the corresponding passwords using the INUBIT Partner Management
Prerequisites
-
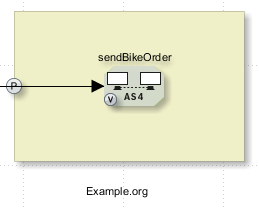
You have created a workflow containing an AS4 Connector that is located within a Partner Management frame.
Example of a medium/output connector
-
You have configured the Partner Management frame properly.
-
You have published the workflow containing the AS4 Connector within the Partner Management frame.
-
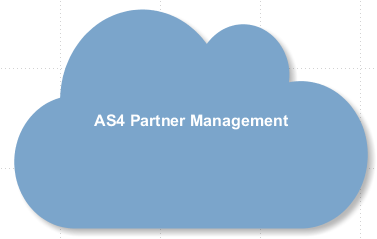
You have created a System Diagram with at least a Communication cloud element.
-
In the Partner Management settings dialog (Edit partner management settings context menu of the Communication cloud), you have configured the following settings:
-
You have added the Partner Management frame containing the AS4 Connector in the Referencable workflow panel as a new reference.
-
In the Partner section, you have added at least one partner.
-
In the Referenced workflows section, you have added at least the workflow with the AS4 Connector added in the Referencable workflows panel.
Refer to
-
Proceed as follows
-
Open the System Diagram with the Communication cloud to be connected to the AS4 Connector for editing.
-
Open the Partner Management settings dialog using the Edit partner management settings context menu of the Communication cloud.
→ The following dialog appears:
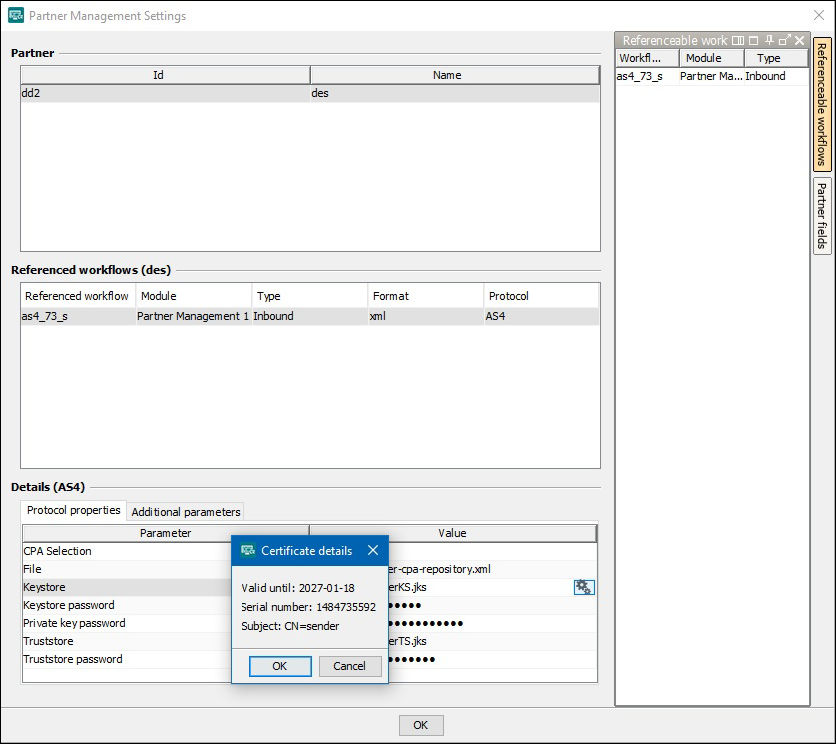
-
In the Details (AS4) section, configure the parameters accordingly to the security settings for the corresponding partner.
To display the details valid until, serial number, and subject click the
 icon in the row with the file name of the keystore or of the truststore.
 -
Click OK to save the changes.
-
Publish the System diagram.
CPA Element Namespace
The CPA file contains the XML namespace for the AS4 Connector:
<cpaRepository xmlns="https://www.virtimo.de/inubit/as4">Section partnerAgreement
This section contains all properties how to exchange messages with one or more partners.
-
General partner agreement properties
Refer to General Partner Agreement Properties
-
Sub-section
initiatorTo specify the properties of the message sender, refer to CPA Sub-Sections Initiator and Responder.
-
Sub-section
responderTo specify the properties of the message responder, refer to CPA Sub-Sections Initiator and Responder.
-
Sub-section
businessInfoSub-section to specify the
businessInfoproperties, refer to CPA Sub-Section BusinessInfo. -
Sub-section
protocolTo specify a message exchange protocol, refer to CPA Sub-Section Protocol.
-
Sub-section
securityOptional: Sub-section to specify the security settings, refer to CPA Sub-Section Security.
-
Sub-section
receptionAwarenessOptional: Sub-section to specify retry parameters and whether duplicates are to be detected, refer to CPA Sub-Section receptionAwareness.
General Partner Agreement Properties
-
idUnique ID to identify a configuration for a communication partner within an INUBIT installation.
If two different CPAs define the same ID, the CPA published most recently to the gateway will overwrite any other CPA using the same ID published to the gateway before.
-
agreementA unique URI used to configure the communication between two partners.
-
mepTo specify the URI of a message exchange pattern:
http://docs.oasis-open.org/ebxml-msg/ebms/v3.0/ns/core/200704/oneWay -
mepBindingTo specify the URI of a message exchange pattern binding:
http://docs.oasis-open.org/ebxml-msg/ebms/v3.0/ns/core/200704/push
CPA Sub-Section Protocol
In this section, you configure the SOAP endpoint address and – optionally – the SOAP version of the remote system, that is, the receiver message handler, for example, for Jentrata.
-
addresshttps://<server>:<port>/jentrata/ebms/inboundTo send messages to an INUBIT AS4 Connector, the address element must look like this:
-
Synchronous mode
https://<server>:<port>/ibis/as4/sync -
Asynchronous mode
https://<server>:<port>/ibis/as4/async
-
-
soapVersionOptional: SOAP version running on the remote system.
|
Only SOAP 1.2 compliant messages are generated. |
CPA Sub-Sections Initiator and Responder
The initiator and responder sections contain the same elements for the sender resp. the addressee of the message.
-
partyUnique ID of the initiator or responder of the message. It must be a valid URI if the `type `attribute is not set.
-
typeThe optional
typeattribute classifies the semantic of the used ID, for example, a catalog with customer numbers.The
typeattribute must not be used with ENTSOG.
-
-
roleThe initiator or responder role, e.g. Buyer or Seller.
Sub-section authorization (must not be used with ENTSOG)
Username and password of the initiator or responder to authenticate at the resp. partner system.
-
usernameInitiator or responder name
-
passwordInitiator or responder password
-
digestIndicates whether the password must be Base64 encoded or can be plain text. Possible values:
-
trueThe password must be Base64 encoded.
-
falseThe password can be plain text.
-
-
createdThe Boolean value of this parameter indicates whether the
WSS UsernameTokenelement should have aCreatedtimestamp element.Possible values:
-
trueThe
WSS UsernameToken `element should have a `Createdtimestamp element. -
falseThe
WSS UsernameToken `element must not have a `Createdtimestamp element.
-
CPA Sub-Section BusinessInfo
The service and action elements contain values to specify how to handle the message sent with this CAP ID.
|
Each service/action combination may only be used for a single CPA ID system-wide. |
-
serviceUnique service ID
Using the
AS4Servicemodule property, you can set this element via variables mapping. When having configured theAS4Servicemodule property, this value takes precedence over the settings in the CPA repository file, and it is used by the AS4 Gateway. Otherwise, the value set in the CPA repository file is used. -
actionUnique action ID
|
Using the |
CPA Sub-Section Security
The security section defines the settings for sending a receipt as well as for signing and encrypting the message.
-
Sub-section
sendReceiptto specify how receipts are to be handledRefer to Sub-Section sendReceipt
-
Sub-section
x509to configure encrypting and the signing of messagesRefer to Sub-Section x509
Sub-Section sendReceipt
-
replyPatternTo specify whether the receipt should be sent as a callback or as a response in the same communication channel of the message.
Possible values:
-
ResponseSynchronous response receipts are sent (default).
-
CallbackAsynchronous callback receipts are sent.
-
-
nonRepudiationTo define whether a signed non-repudiation receipt should be sent. Possible values:
-
trueNon-Repudiation receipts are sent (default).
-
falseNon-Repudiation receipts are not sent.
Sub-Section x509
The security section contains attributes required for signing and encrypting the message.
Sub-section encryption
-
certificateTo identify the alias of the public certificate of the communication partner to be used for encryption. The public certificate must be available within the specified truststore (at the AS4 Connector) under the given alias.
-
algorithmURI to specify the encryption algorithm, by default:
https://www.w3.org/2009/xmlenc11#aes128-gcm -
keyEncryptionAlgorithmTo optionally configure the encryption method algorithm if you want to use the settings recommended by ENTSOG. If
keyEncryptionAlgorithmis not set,https://www.w3.org/2001/04/xmlenc#rsa-oaep-mgf1pis used. Recommended by ENTSOG:https://www.w3.org/2009/xmlenc11#rsa-oaep -
maskGenerationFunctionTo optionally configure the mask generation function if you want to use the settings recommended by ENTSOG. If
maskGenerationFunctionis not set,https://www.w3.org/2009/xmlenc11#mgf1sha1is used. Recommended by ENTSOG:https://www.w3.org/2009/xmlenc11#mgf1sha256 -
digestGenerationFunctionTo optionally configure the digest generation function if you want to use the settings recommended by ENTSOG. If
digestGenerationFunctionis not set,https://www.w3.org/2000/09/xmldsig#sha1is used. Recommended by ENTSOG:https://www.w3.org/2001/04/xmlenc#sha256
Sub-section encrypt
-
elementSpecifies the element to be encrypted.
-
namespaceattributeURL of the namespace that must be used for signing
-
encryptionModifierattributePossible values:
Content: Encrypt the element’s content onlyElement(default): Encrypt the element’s content and the element tag itself, too.If the
encryptionModifierattribute is not set or if it is set to any other value but notElementorContent, the following setting is used:encryptionModifier="Element"
-
-
includeAttachmentsSpecifies whether attachments are to be encrypted, too.
Possible values:
-
trueAttachments are encrypted (default).
-
falseAttachments are not encrypted.
-
-
useBinarySecurityTokenTo set the authentication mechanism Possible values:
-
trueThe resulting SOAP message will use the
BinarySecurityTokenmechanism for authentication. -
false(default)The resulting SOAP message will use the default
IssuerSerialmechanism for authentication.
Sub-section sign
-
elementSpecifies the elements to be signed, default.
<element namespace="http://docs.oasis-open.org/ebxml-msg/ebms/v3.0/ns/core/200704/">Messaging</element> <element namespace="http://www.w3.org/2003/05/soap-envelope">Body</element>-
namespaceattributeSpecifies the namespace URL to be used for signing.
-
encryptionModifierattributePossible values:
-
Content: Encrypt the element’s content onlyWhen using ENTSOG, the
encryptionModifierattribute must be set toContentfor theBodyelement. -
Element(default): Encrypt the element’s content and the element tag itself, too. If theencryptionModifierattribute is not set or if it is set to any other value but notElementorContent, the following setting is used:encryptionModifier="Element"
-
-
-
includeAttachmentsSpecifies whether attachments are to be encrypted, too. Possible values:
-
trueAttachments are encrypted (default).
-
falseAttachments are not encrypted.
-
Sub-section signature
-
signingKeyAliasTo specify the private key alias to be used when signing messages. The private key must be available within the specified truststore (at the AS4 Connector) under the given alias.
-
hashFunctionTo specify the algorithm that is used to compute the digest of the message being signed, by default:
https://www.w3.org/2001/04/xmlenc#sha256 -
algorithmTo specify the algorithm that is used to compute the value of the digital signature, by default:
https://www.w3.org/2001/04/xmldsig-more#rsa-sha256 -
requireSignedElementsOptional section to define elements of an incoming user message to be checked for a valid signature references in the security header of the SOAP message. If no reference is found, an exception is thrown. To disable signature validation, remove the
requireSignedElementssection from the CPA file used in the AS4 Connector. -
MessagingOptional element to validate the signature of the messaging.
-
BodyOptional element to validate the signature of the message body.
-
includeAttachmentsOptional element defining whether the signature of the attachments are to be validated.
-
trueAttachments are validated.
-
falseAttachments are not validated.
-
-
useBinarySecurityTokenTo set the authentication mechanism Possible values:
-
trueThe resulting SOAP message will use the
BinarySecurityTokenmechanism for authentication. -
false(default)The resulting SOAP message will use the default
IssuerSerialmechanism for authentication.
-
-
signatureValidationCertificateThe specified certificate must be available in the truststore used for the AS4 connector. If no
signatureValidationCertificateis specified, the signature will be considered valid as long as a certificate within the truststore matches the private key used to sign the message.
CPA Sub-Section receptionAwareness
In this optional section, you can configure, among other things, whether the message shall be resent if an error occurred when sending a message. Furthermore, you can configure whether message duplicates are to be detected.
-
retryTo specify whether the message shall be resent if an error occurred. Possible values:
-
trueThe message will be resent (default).
-
falseThe message will not be resent.
-
-
Sub-section
retryParametersTo specify the retry parameters.
-
Sub-section
entryTo specify none, one, or more key value pairs to configure retry parameters.
-
keyTo specify the parameter name.
-
valueTo specify the parameter value.
The following parameters are supported using the following default values if they are not set:
-
maxretriesMaximum number of retries, by default 5.
-
periodTime in milliseconds between the occurrence of an error when sending a message and the next retry, by default
30000. -
sockettimeoutTimeout in milliseconds for the socket connection, by default
60000. -
connectiontimeoutTimeout in milliseconds for the connection, by default
60000.Example
...
<as4:retryParameters>
  <as4:entry>
    <as4:key>maxretries</as4:key>
    <as4:value>5</as4:value>
  </as4:entry>
  <as4:entry>
    <as4:key>period</as4:key>
    <as4:value>30000</as4:value>
  </as4:entry>
  <as4:entry>
    <as4:key>sockettimeout</as4:key>
    <as4:value>60000</as4:value>
  </as4:entry>
  <as4:entry>
    <as4:key>connectiontimeout</as4:key>
    <as4:value>60000</as4:value>
  </as4:entry>
</as4:retryParameters>
...
-
-
-
duplicateDetectionFor receivers only: To specify whether message duplicates are to be detected. Possible values:
-
trueDuplicates will be detected (default).
-
falseDuplicates will not be detected.
-
AS4 Keystore/Truststore
Store the Java keystore file, required for secured communication, to your Repository folder and select it during the AS4 Connector configuration.
Refer to Dialog AS4 Security Configuration.
Refer to
Using MessageProperties as Workflow Variables
Usage
To transmit user-specific data in addition to the payload of an AS4 message, you can add MessageProperties to the header of the message. This could be a customer ID or a reference number. Applications or workflows can use these values to build efficient message dispatching or correlation without the need of parsing the complete payload.
If a message sent f[#read_message_properties]rom your communication partner contains a section MessageProperties, the AS4 Connector sets a variable for each property.
If your communication partner expects custom-specific properties in messages sent from you, you can write them to the input message using the variable mapping.
Reading MessageProperties from an Input Message
Usage
To read MessageProperties of an incoming message and set workflow variables to process the MessageProperties.
The AS4 Connector analyzes the input message.
For each property in the MessageProperties section, the AS4 Connector automatically sets a variable.
The AS4 Connector expects a XML structure like this:
<eb:UserMessage>
  ...
  <eb:MessageProperties>
    <eb:Property name="CustomerID">123</eb:Property>
    ...
  </eb:MessageProperties >
  ...
</eb:UserMessage>
The variables are named as follows: as4.input.messageproperty.<propertyName>, e.g.:
as4.input.messageproperty.CustomerID.
In the workflow, the subsequent modules can access these variables.
Writing MessageProperties to an Output Message
Usage
To add the value of workflow variables as properties to the output message to meet the requirements of your communication partner.
Proceed as follows
-
Open the workflow containing the AS4 Output Connector for editing.
-
Add a predecessor module and connect it with the AS4 Connector if necessary.
-
At the predecessor module of the AS4 Connector, define a workflow variable mapping as follows:
-
SourceStatic value, e.g.:
123 -
TargetVariable:
as4.output.messageproperty.<propertyName>, e.g.:as4.output.messageproperty.CustomerID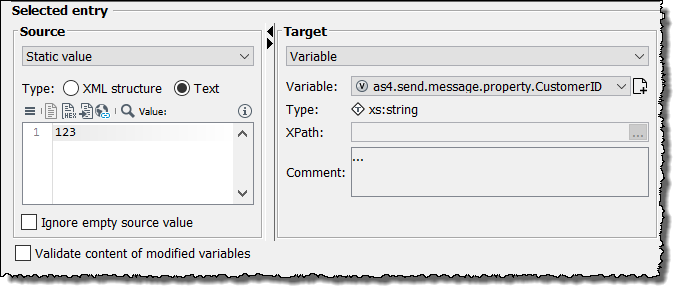
→ The following AS4 Connector will add a structure like this to the output message:
<eb:UserMessage>
  ...
  <eb:MessageProperties>
    <eb:Property name="CustomerID">123</eb:Property>
    ...
  </eb:MessageProperties >
  ...
</eb:UserMessage>
-
-
Publish the workflow including the modules.
Using PartProperties as Workflow Variables
Usage
To simplify the processing of messages, you can use PartProperties to specify the payload content.
This can be a customer ID or a reference number.
Applications or workflows can use these values to build efficient message dispatching or correlation part-by-part without the need of parsing the complete payload.
-
If a message sent from the communication partner contains a section
PartProperties, the AS4 Connector sets a variable for each property. -
If the communication partner expects custom-specific properties in messages, you can write them to the output message using variables mapping.
Reading PartProperties from an Input Message
Usage
To read PartProperties of an incoming message and set workflow variables to process the PartProperties of the message.
The AS4 Connector analyzes the input message.
For each property in the PartProperties section, the AS4 Connector automatically sets a variable.
The AS4 Connector expects AS4 messages with a structure like this:
<eb:UserMessage>
  <eb:PaylodInfo>
    <eb:PartInfo>
      <eb:PartProperties>
        <eb:Property name="MimeType">application/xml</eb:Property>
        <eb:Property name="CustomerID">123</eb:Property>
      </eb:PartProperties>
    </eb:PartInfo>
  </eb:PaylodInfo>
</eb:UserMessage>
The variables are named according to the following pattern:` as4.input.partproperty.any_name`, e.g:
as4.input.partproperty.CustomerID
In the workflow, the subsequent modules can access these variables.
Writing PartProperties to an Output Message
Usage
To add the value of workflow variables as properties to the output message to meet the requirements of the communication partner.
The default PartProperties CompressionType, MimeType, and CharacterSet can only be set as a module property of the AS4 Connector.
|
When sending a ENTSOG compliant messages, the For this purpose, you need to create a variables mapping to set the value of the top-level type element to the |
Proceed as follows
-
Open the workflow containing the AS4 Output Connector for editing.
-
If the AS4 Connector has no predecessor module, add one, e.g. an Assign module, and connect it with the AS4 Connector.
-
At the predecessor module of the AS4 Connector, define a workflow variables mapping as follows:
-
SourceStatic value, e.g.:
123 -
Target -
Variable:
as4.output.partproperty.<propertyName>, e.g.:as4.output.partproperty.CustomerID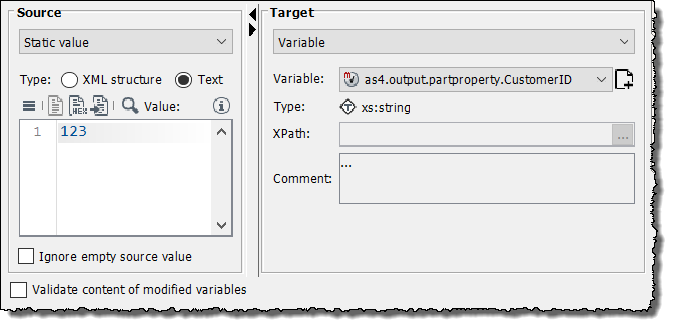
→ The following AS4 Connector will add a structure like the following one to the output message:
<eb:UserMessage>
  <eb:PaylodInfo>
    <eb:PartInfo>
      <eb:PartProperties>
        <eb:Property name="CustomerID">123</eb:Property>
      </eb:PartProperties>
    </eb:PartInfo>
  </eb:PaylodInfo>
</eb:UserMessage>
-
-
Publish the workflow including the modules.
Selecting the Partner Agreement Dynamically
Usage
For Output Connectors only: To select the partner agreement depending on the communication partner set for a message to be sent
Prerequisites
-
You have created a CPA file containing multiple partner agreements.
-
The CPA file is stored in the INUBIT Repository and can be accessed from the AS4 Connector.
-
A module previous to the AS4 Connector provides the partner name, its CPA ID, and the name of the CPA file where the partner agreement is stored.
-
You have set a workflow input variable that contains the CPA ID determined dynamically depending on the receiver.
-
You have set a workflow input variable that contains the path to the CPA file with the partner agreement for the desired partner.
Proceed as follows
-
In the Designer, open the workflow with the AS4 Connector for editing.
-
Open the variables mapping for editing.
-
Create a variables mapping for the module properties the
cpaIdand theAS4CPAFilePath:-
To set the
cpaIdmodule property, create a variables mapping to assign the workflow input variable containing the CPA ID to thecpaIdworkflow property. -
To set the
AS4CPAFilePathmodule property, create a variables mapping to assign the workflow input variable containing the path to the CPA file to theAS4CPAFilePathworkflow property. -
Click OK to save the changes.
→ The variables mapping is assigned to the AS4 Connector.
-
-
Publish the workflow.
Receiving Timestamps of Incoming Messages
Usage
-
To provide the date and time of receipt of an incoming message in the
as4.message.receive.timestampworkflow variable -
To allow analyzing the timestamp in order to decide how to deal with the message in the following modules in the workflow.
Prerequisites
-
You have created a workflow containing an AS4 Input Connector configured to receive incoming messages
-
The workflow has been started in order to receive an incoming message.
→ In the result file, the date and time of receipt is displayed in the
as4.message.receive.timestampvariable when clicking the watch point icon next to the AS4 Connector.
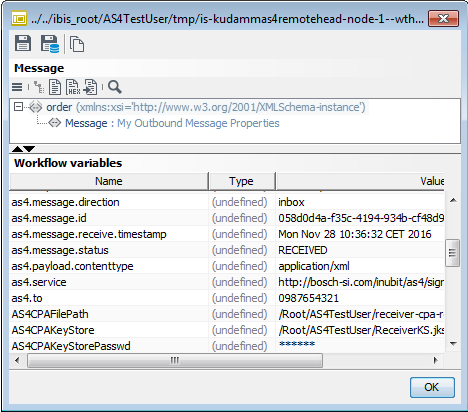
AS4 Connector Dialog Description
Dialog AS4 Configuration
AS4 Output/Medium Connector
CPA Selection
-
File
To select the file containing the Collaboration Protocol Agreement(s) (CPA) with the communication parameters for one or more partners.
-
CPA ID
To select the Collaboration Protocol Agreement (CPA) for a partner system, use one of the CPA IDs configured in the given file.
-
Refresh CPA list
Click this button to re-read the CPA IDs stored in the given Repository file.
AS4 Message Format
-
MIME type
Select the MIME type of the data to be transferred from the pull-down menu or enter another one. You can transfer data, for example, in several EDI formats, in XML, GZIP, and in octet-stream format.
-
Character set encoding
Select the character set encoding of the data to be transferred from the pull-down menu or enter another one. You can transfer data, for example, in UTF-8, UTF-16, or ISO_8859_1.
-
Compression type
Select the compression type of the data to be transferred from the pull-down menu. You can transfer data in GZIP or select none.
These message formats have to be supported by the receiver.
AS4 Input Connector
Usage
You can use the AS4 Input Connector to receive both, AS4 messages and asynchronous receipts, send from your partner.
CPA Selection
-
File
To select the file containing the Collaboration Protocol Agreement(s) (CPA) for one or more partners.
-
CPA ID Selection
To select the Collaboration Protocol Agreement (CPA) for a partner system, activate the checkbox next to the CPA ID with the service–action combination that suites your needs. The CPAs must be configured in an XML file located in the user’s Repository folder.
-
Refresh CPA list
Click this button to re-read the CPA-IDs stored in the given CPA file from the user’s Repository folder.
AS4 Call Back Listener Connector
This connector is configured in the same way as the AS4 Input Connector. However, but it must be created on the sending system to receive the asynchronous receipt.
Refer to AS4 Input Connector.
Dialog AS4 Security Configuration
Truststore
-
File
To select the truststore file that matches the CPA-ID from the Repository
-
Truststore password
Password of the truststore file
-
Valid until
Truststore is valid until the displayed date.
-
Serial number
Serial number of the truststore is displayed.
-
Subject
The subject (CN tag) of the truststore is displayed.
To retrieve the certificate details, the alias for the truststore is taken from the
certificateelement of the CPA file.
Keystore
-
File
To select the keystore file that matches the CPA-ID from the Repository
-
Keystore password
To enter the password of the keystore file
-
Private key alias
Displays the alias of the private key defined as
signingKeyAliasin the selected CPA file. This alias is used to retrieve the certificate details. -
Private key password
To enter the password of the private key
-
Valid until
Keystore is valid until the displayed date.
-
Serial number
Serial number of the keystore is displayed.
-
Subject
The subject (CN tag) of the keystore is displayed.
SSL Configuration
-
Server URL of the receiver
Server URL of the receiver (read-only, read from the chosen CPA file)
Refer to
-
SSL (button)
(Medium and output connector only)
For securing the communication with SSL, refer to Dialog SSL Configuration.
Refer to
