Installation
Preparations
Before installing the BPC, you should review the System Requirements and complete the following preparations.
License
You need a license file for your installation. You can obtain this from Support or your sales contact.
System User
It is recommended that you create a dedicated user on the system for installation and operation. This is intended to prevent negative interactions with other applications on the server.
The system user should have a home directory.
If this is not the case, at the end of the installation, org.ops4j.pax.url.mvn.localRepository must be set to a valid path in KARAF/etc/org.ops4j.pax.url.cfg.
Otherwise, errors will occur if additional features are installed in Karaf.
|
The application should never run under a user with unrestricted administrative privileges (such as root). |
Installation Procedure
There are several ways to install the BPC. The following sections describe the options for using a pre-built bundle (recommended) or compiling all components individually.
Alternatively, you can install the BPC as part of an INUBIT installation using its installer. A description of this process can be found in the INUBIT documentation.
Installation Using the Bundle File
Installing via the bundle file is a simple way to install the BPC, since in this case all required files (except for License) are already included.
-
First, download the bundle file appropriate for your operating system.
-
Unzip the bundle file into the
INSTALLATIONSVERZEICHNISdirectory. -
If you’re using Windows, you should also create the following links:
cd INSTALLATIONSVERZEICHNIS
mklink /J opensearch\config\virtimo\ssl ssl
mklink /J opensearch-2.19.4 opensearch
mklink /J karaf-4.1.X karaf
mklink /J jdk-17.X _jvm
This isn’t strictly necessary, but it makes things easier when installing future updates. This ensures that the paths to the system components remain consistent.
-
Place your license file in the directory
INSTALLATIONSVERZEICHNIS/karaf/deploy. -
If you want to set up the BPC as an operating system Service, you can follow the instructions at Services.
Alternatively, you can start and stop the BPC directly.
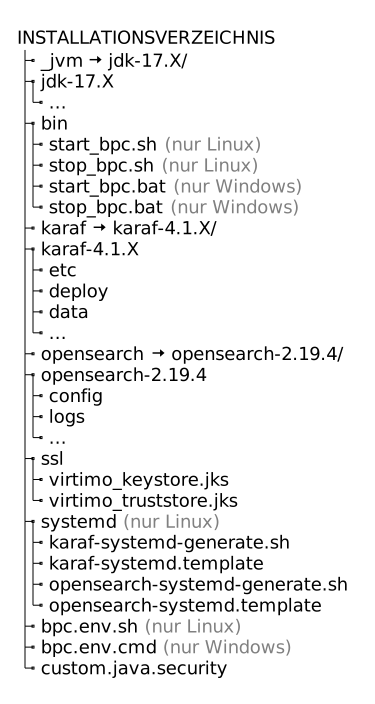
When finished, the contents of INSTALLATIONSVERZEICHNIS should look like this.
Installing the Individual Components
The following describes how to install the BPC system components individually.
Setting Up Central Configuration Files
We recommend using the Central configuration file. This allows you to store important configurations separately from the system components. This simplifies updating the individual components, as the configuration is preserved.
-
Download the central configuration files.
-
Place the files directly under
INSTALLATIONSVERZEICHNIS.
For more information, see Central configuration file.
Install Java
The two system components, OpenSearch and Karaf, require a compatible runtime environment (Java 17). If you already have a compatible runtime environment on your system, you can skip the first two steps.
-
Unzip the Java runtime environment archive appropriate for your operating system (
jdk_*) into theINSTALLATIONSVERZEICHNISdirectory. -
Create a link named
_jvmthat points to the runtime environment directory:-
Linux
-
Windows
ln -s jdk-17.X _jvmmklink /J jdk-17.X _jvm -
-
You must set the environment variable
JAVA_HOMEto the path of the runtime environment (e.g.,INSTALLATIONSVERZEICHNIS/_jvm) for the user running the BPC.To set
JAVA_HOME, we recommend using the Central configuration file
Install OpenSearch
-
Extract the OpenSearch archive appropriate for your operating system into the
INSTALLATIONSVERZEICHNIS. -
Create a link named
opensearchthat points to the new directory:-
Linux
-
Windows
ln -s opensearch-2.19.4/ opensearchmklink /J opensearch opensearch-2.19.4 -
Install Karaf
-
Extract the Karaf archive appropriate for your operating system into the
INSTALLATIONSVERZEICHNISdirectory. -
Create a link named
karafthat points to the new directory:-
Linux
-
Windows
ln -s karaf-4.1/ karafmklink /J karaf karaf-4.1.X -
Install the license
Place your license file in the directory INSTALLATIONSVERZEICHNIS/karaf/deploy.
BPC Modules
Now you can install the BPC modules.
To do this, download all required BPC modules and copy them to the directory INSTALLATIONSVERZEICHNIS/karaf/deploy.
A basic installation typically includes the following modules:
Central Java Trust and Keystores
It is recommended to use central trust/keystores. These are necessary to set up encrypted network connections. The system components already come with sample stores that enable an encrypted connection. However, you should replace these and customize them to suit your needs.
-
Create a Java trust store and keystore that contain all the necessary keys and certificates.
-
If you do not need your own trust and keystores—for example, for simple testing—you can use the sample trust and keystores.
-
-
Copy these to the directory
INSTALLATIONSVERZEICHNIS/ssl. -
Configure them according to the instructions for using the central trust/keystores.
Start and Stop Scripts
If you want to start and stop the BPC with a single script, you can set it up as follows.
-
Download the start and stop scripts appropriate for your operating system.
-
Copy them to the directory
INSTALLATIONSVERZEICHNIS/bin.
For more information on using the scripts, see Starting and Stopping BPC.
Setting Up as an Operating System Service
If you want to set up the BPC as an operating system service, you can follow the instructions at Services.
Initial Login
The BPC is accessible in your browser at http://localhost:8181/ once OpenSearch and Karaf have been started.
See also Starting and Stopping BPC.
To log in to the BPC for the first time, Karaf is set as the identity provider by default.
There are three default users:
| Username | Note |
|---|---|
|
Admin user with the bpcadmin role. |
|
Admin user with the bpcadmin role. |
|
Only for accessing the Karaf console. |
|
Passwords for standard users are assigned randomly and must be set manually (see Karaf as an Identity Provider)! |
Other identity providers can also be used for the BPC. For detailed configuration instructions, see Creating, Configuring, and Using an Identity Provider.
