Administrator documentation
This section is aimed at system and application administrators.
IGUASU installation directory
"bin" directory
All the scripts required to start and stop IGUASU and to install it as Windows and Linux are located in this directory.
Directory "data"
All data and repositories that are generated during the execution of IGUASU at runtime are stored here.
To adjust the storage location, you must adjust the files ui/conf/iguasu-ui.properties and in nifi/conf/nifi.properties.
Directory "ui"
Contains the IGUASU UI installation
Directory "nifi"
Contains the NiFi installation
| File | Parameters |
|---|---|
iguasu-ui.properties |
ui.data-directory |
nifi.properties |
nifi.flow.configuration.file |
Configuration
General
Conditions
IGUASU requires an existing Java Runtime in version 17.
This must be made available via the environment variable JAVA_HOME.
If JAVA_HOME cannot be made available system-wide or several different runtimes are installed on the system, JAVA_HOME can be configured explicitly for IGUASU in the file ./bin/iguasu-env.sh.
Configuration NiFi
Linux system configuration
To prepare the system, read the section Best Practices in the NiFi documentation.
| The settings linked here in the Best Practices can strongly influence the performance of IGUASU or lead to problems if the values are too low! |
Sizing
NiFi is basically designed to use all available resources of the node. Processors, RAM, network and hard disk.
The biggest bottleneck is typically disk I/O. If this occurs, it makes sense to assign a dedicated disk to each repository (Content, FlowFile, Provenance). A repository (e.g. Content) can also be distributed over several disks or directories. SSDs are better than hard disks.
NiFi can process FlowFiles of any size and does not keep them completely in memory. This means that 8 GB to 16 GB Java Heap is typically sufficient. However, it should be borne in mind that individual Processors can also require more memory and can, for example, load a complete XML as a DOM into memory if they are implemented in this way (the typical record-based Processors do not do this, however).
Recommendations:
-
At least 4 cores per NiFi node (more is better and 8 cores usually provides the best starting point for the most common use cases)
-
At least 6 disks per NiFi node to ensure dedicated disks for repositories
-
At least 4GB of RAM for the NiFi heap
Content Archiving
The content of the FlowFiles is normally deleted from the content repository as soon as a FlowFile leaves NiFi - e.g. the flow ends at a Processor. However, there is Content Archiving, which can be configured.
Archiving is used to view the content at the Processors via the provenance of the FlowFiles (i.e. the path they have taken through the flows). This can also be used to replay the data at the respective point. The properties to control this are:
nifi.content.repository.archive.max.retention.period=12 hours
nifi.content.repository.archive.max.usage.percentage=50%
nifi.content.repository.archive.enabled=true
If archiving is activated in this way, "content claims" (the content in NiFi pieces) in the content repository are moved to archive subfolders and not deleted. As only one move takes place here, this should be very fast and not generate any load.
The retention.period and usage.percentage specify when the data should ultimately be deleted. Both are soft criteria - if a checkpoint detects that they have been exceeded, the oldest files are deleted until the criterion is met.
It is very important that there is either enough space on the hard disk so that the nifi.content.repository.archive.max.usage.percentage (here 50%) does not occur constantly or that nifi.content.repository.archive.enabled is set to false. If archiving is activated but there is generally less free disk space than the limit set here, the system will be very slow and potentially unstable.
|
Configuration IGUASU UI
IGUASU UI can be configured via the file iguasu-ui.properties in the directory iguasu-x.x.x/ui/conf.
The most important parameters are explained below:
Web server configuration
| Parameters | Meaning |
|---|---|
server.port |
The Port on which the IGUASU UI interface runs |
server.ssl.key-store |
The location of the Java keystore. This is required if you want to access the interface via HTTPS. |
server.ssl.key-store-password |
The password for the keystore |
server.ssl.key-alias |
The alias for the SSL certificate |
server.ssl.key-password |
The password for the SSL certificate |
Logging
| Parameters | Meaning |
|---|---|
logging.file.name |
The location where IGUASU UI saves the log files |
logging.level.* |
Various logging filters. Default is INFO. To obtain debugging information, set the level to DEBUG |
OpenID Connect configuration
registration-id and provider-id can be freely selected, but must be unique
An example can be found at (OIDC LINK).
| Parameter | Meaning |
|---|---|
spring.security.oauth2.client.registration.<registration-id>.client-name |
Name of the OIDC provider, e.g. Virtimo Keycloak |
spring.security.oauth2.client.registration.<registration-id>.client-id |
The ClientId under which the IGUASU is registered in the provider |
spring.security.oauth2.client.registration.<registration-id>.client-secret |
the client secret |
spring.security.oauth2.client.provider.<provider-id>.user-name-attribute |
the mapping for the user name, e.g. username or email spring.E.g. username or email |
spring.security.oauth2.client.provider.<provider-id>.issuer-uri |
the url under which IGUASU searches for the OpenID Provider configuration |
IGUASU UI
| Parameter | Meaning |
|---|---|
ui.security-enabled |
activates the security of the web application and requires the configuration of the OpenID Connect Provider |
ui.production-mode |
activates the Production Mode |
ui.allow-test-in-production-mode |
activates test runs of Processors in production mode |
ui.data-directory |
the location where IGUASU UI stores runtime data |
ui.nifi.directory |
the location where IGUASU UI searches for the local NiFi installation |
ui.nifi.url |
the URL under which NiFi runs |
ui.nifi.security.keystore |
the keystore in which the certificate for communication with NiFi is stored |
ui.nifi.security.keystorePassword |
the keystore password |
ui.nifi.security.keyAlias |
the alias of the certificate |
ui.nifi.security.keyPassword |
the certificate password |
ui.nifi.security.truststore |
the truststore in which the certificate for communication with NiFi is stored |
ui.nifi.security.truststorePassword |
the certificate password |
Production Mode vs Development Mode
If Production Mode is activated, there are a number of changes in the use of Flow:
-
IGUASU must be called up in the browser via HTTPS. Otherwise the IGUASU UI will not start. The following error message is displayed in the log:
If you run the application with productionmode=true you need to configure authentication and tls for IGUASU
Please follow the Admin Guide or check the README about how to secure IGUASU.
-
Changing/deleting Connections requires an explicit stop of the targets/sources of the Connection
-
When switching between entities, the changes are not saved automatically, but you are prompted to save or discard the changes.
-
allow-test-in-production-mode:
if activated, then a warning is issued before a test run of a Processor,
if deactivated, then no test runs of Processors can be started
Teamwork
Teamwork can be configured via the file ui/conf/iguasu-ui.properties:
| Parameters | Value |
|---|---|
ui.teamwork.diagram |
true | false |
ui.teamwork.header |
true | false |
ui.teamwork.pictures |
true | false |
ui.teamwork.users.not |
user1@example.com, user2@example.com |
ui.teamwork.users.only |
user1@example.com, user2@example.com |
To activate the profile pictures when using Keycloak, the 'picture' attribute must be set in Keycloak via a mapper. For the connection via Google Account this means:
-
Add a
pictureattribute underRealm settings/User Profile -
Add a mapper with the name
pictureunderIdentity Providers/Google/Mappers -
ID,NameandSocial Profile JSON Field Pathset topicture; if in doubt, setSync mode overridetoForce; theMapper typeis aAttribute Importer
Security
Setup Single User Authentication
If no OIDC provider is configured, NiFi starts in single user mode. The user name and password are automatically generated at the first start and can be viewed in the log file nifi-app.log.
To change the user name and password, enter the following command before starting IGUASU:
./nifi/bin/nifi.sh set-single-user-credentials <username> <password>
Setting up OpenId Connect
| Please note: After successfully setting up OpenId Connect, it is necessary to log in to the system with an administrator account for the first time. The system will perform an automatic configuration with this account and thus complete the initial setup. |
An identity provider is required to set up OpenId Connect. Keycloak or another identity provider such as Google OAuth 2.0 can be used for this.
Setting up Google
-
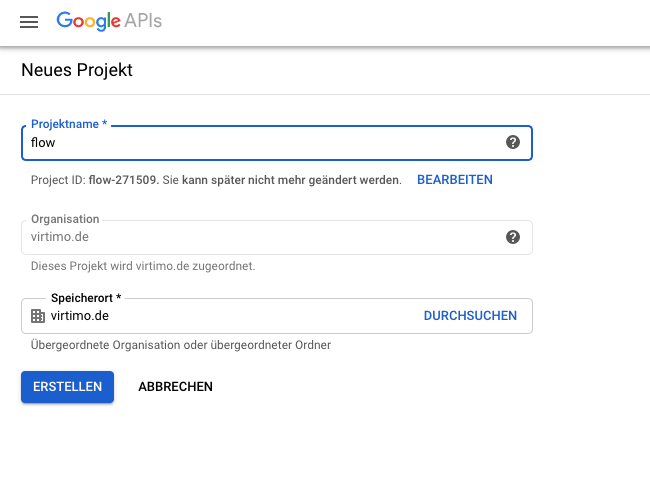
Create a new project at https://console.developers.google.com/ or select an existing project.
-
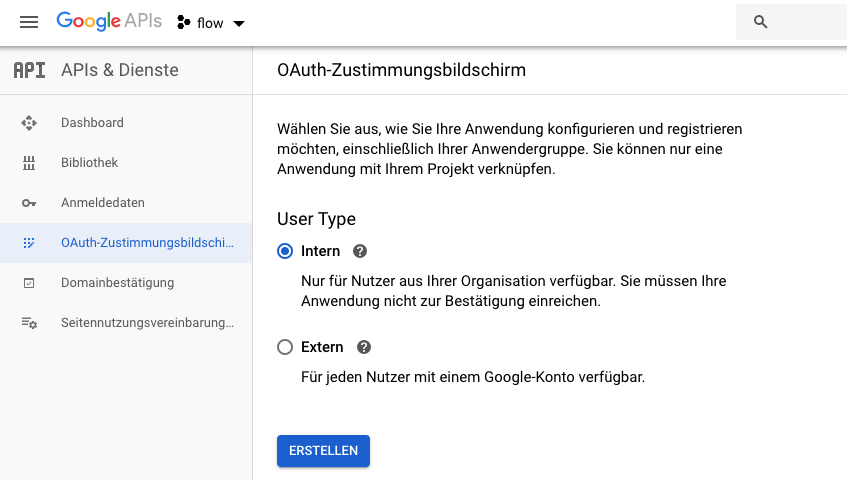
Select under OAuth consent screen internal
-
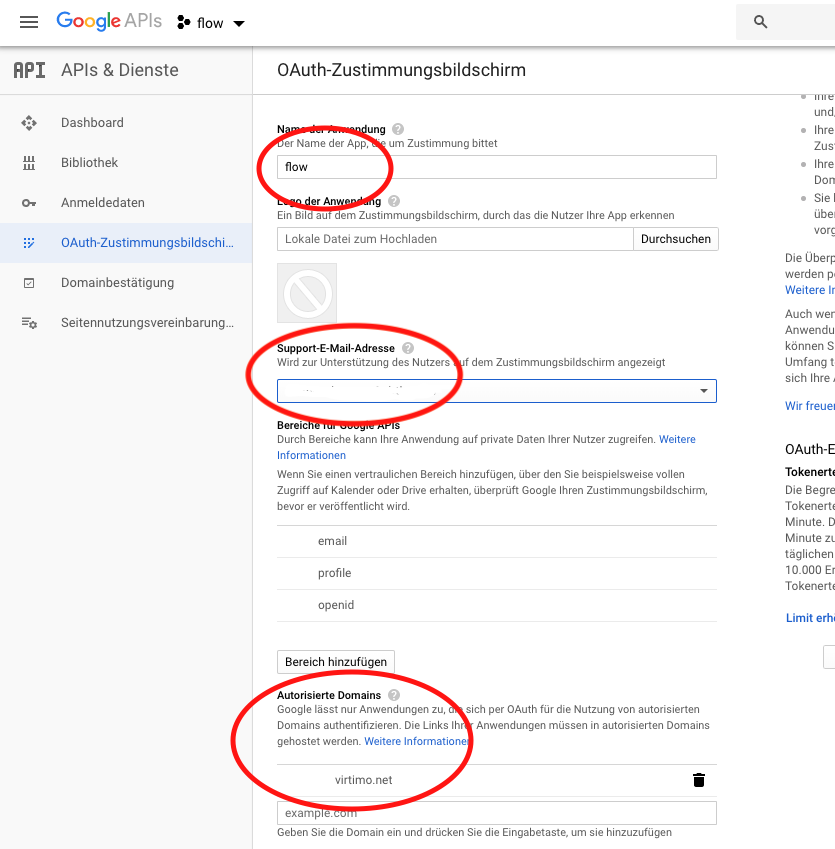
Once the consent screen has been created, it must be configured. Assign a name for the application, select a support e-mail address and enter the authorized domains.
-
Then navigate to Credentials, click on Create credentials and select OAuth client ID.
-
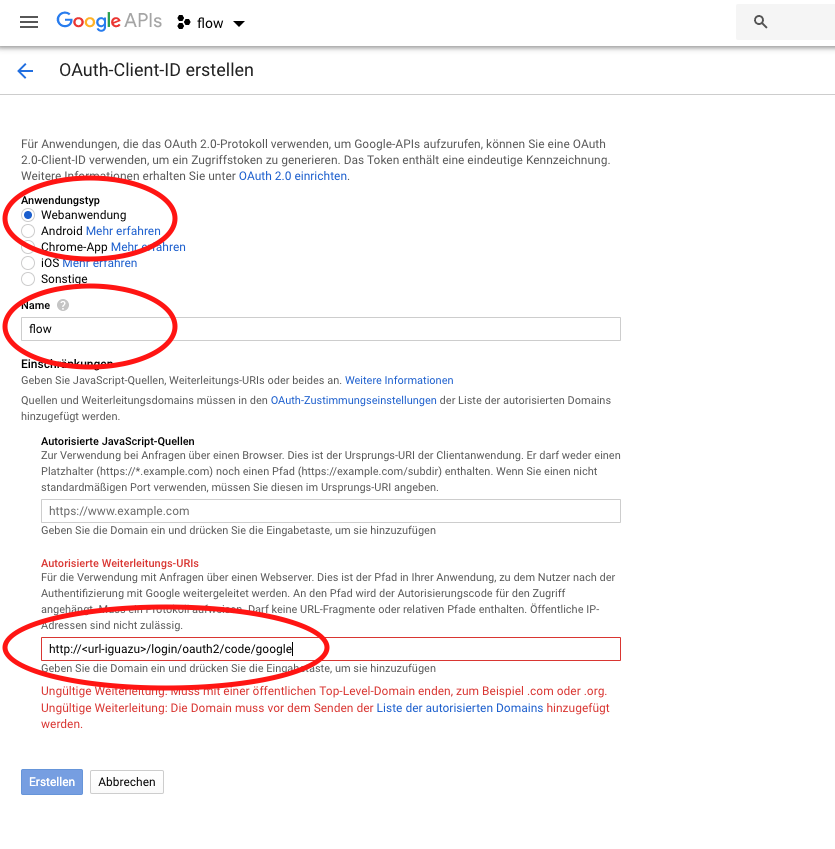
Select Web application, assign a name and enter the URL address of the IGUASU UI server and the NiFi server as the authorized forwarding URL in the following format:
-
(https://)<url-iguasu-ui>/login/oauth2/code/google -
(https://)<url-nifi>/nifi-api/access/oidc/callback
-
-
A pop-up window then appears with the client ID and the client secret.
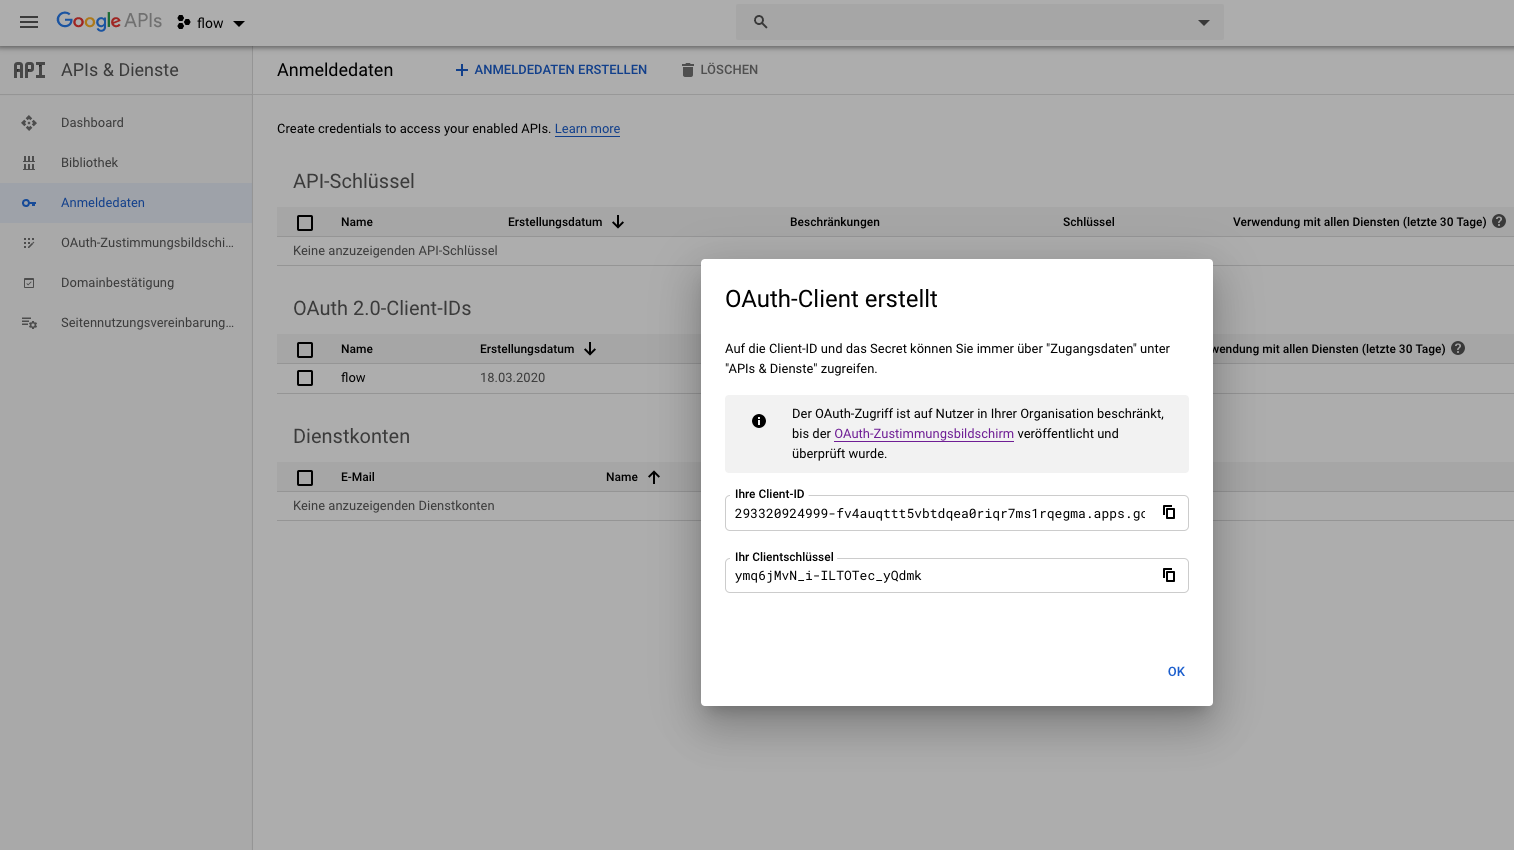
This information is required for the subsequent configuration of NiFi and the IGUASU UI.
Setup Keycloak
-
Create a new realm and select it.
-
IGUASU uses groups to manage the authorizations of users. Create
flow_adminandflow_dev.
-
Create a service user for IGUASU so that users and roles can be queried in Keycloak. This user must receive the role
view_usersin the "Role Mappings" under "Client Roles: realm-management". The name and password will be requested later in the IGUASU Toolkit under NiFi Keycloak service account.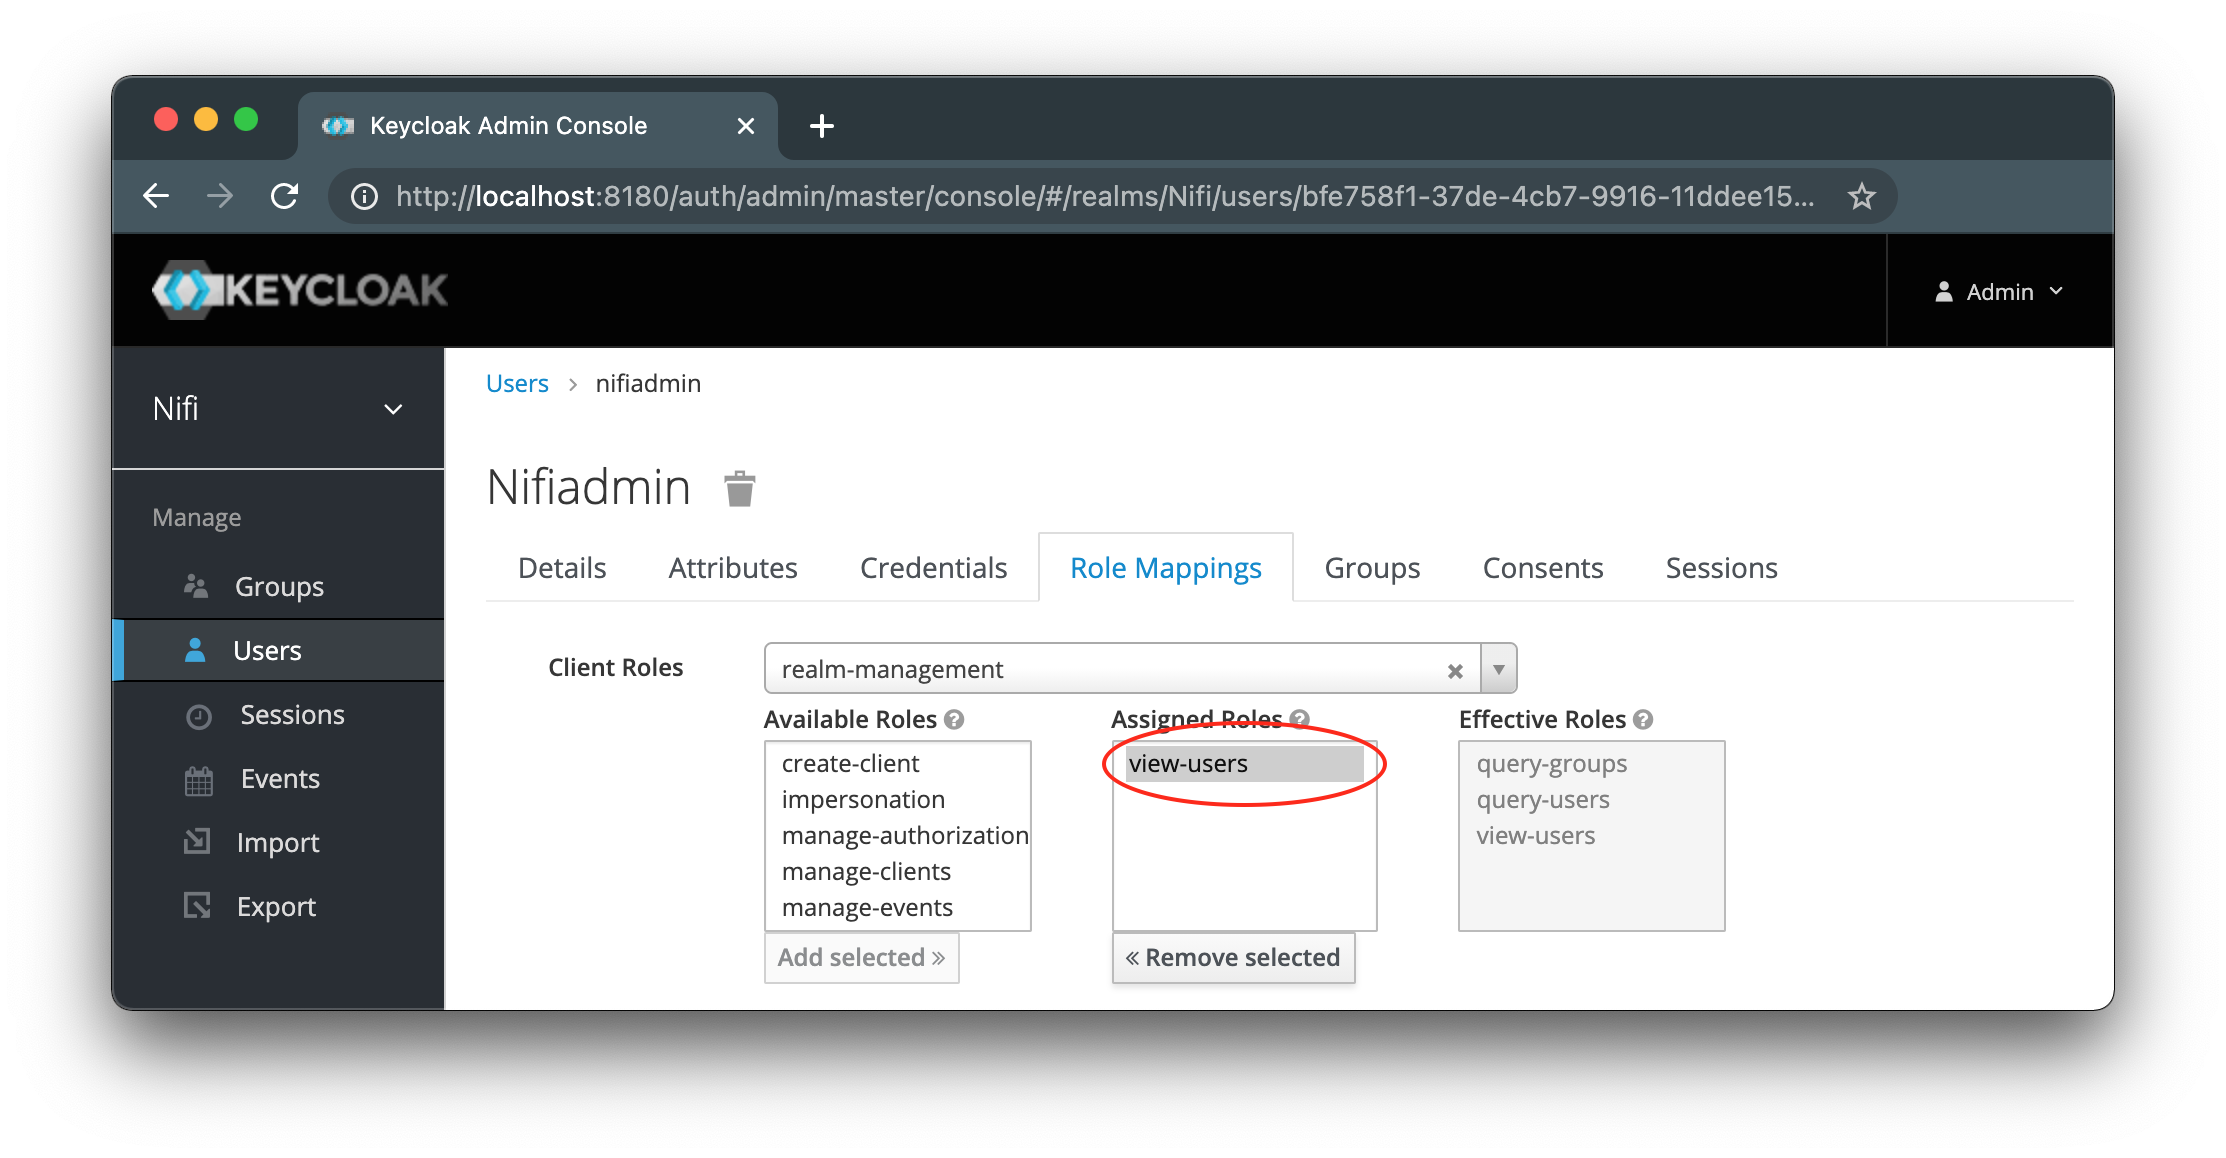
-
For the first start, IGUASU requires an administrator account that must be added to the "flow_admin" group. The user name will be requested later in the IGUASU Toolkit under NiFi initial user identity or NiFi initial admin identity.
-
Keycloak contains a client called "admin-cli" in the standard configuration. The role
view_usersmust be added to this. IGUASU uses this client to query roles and users from Keycloak.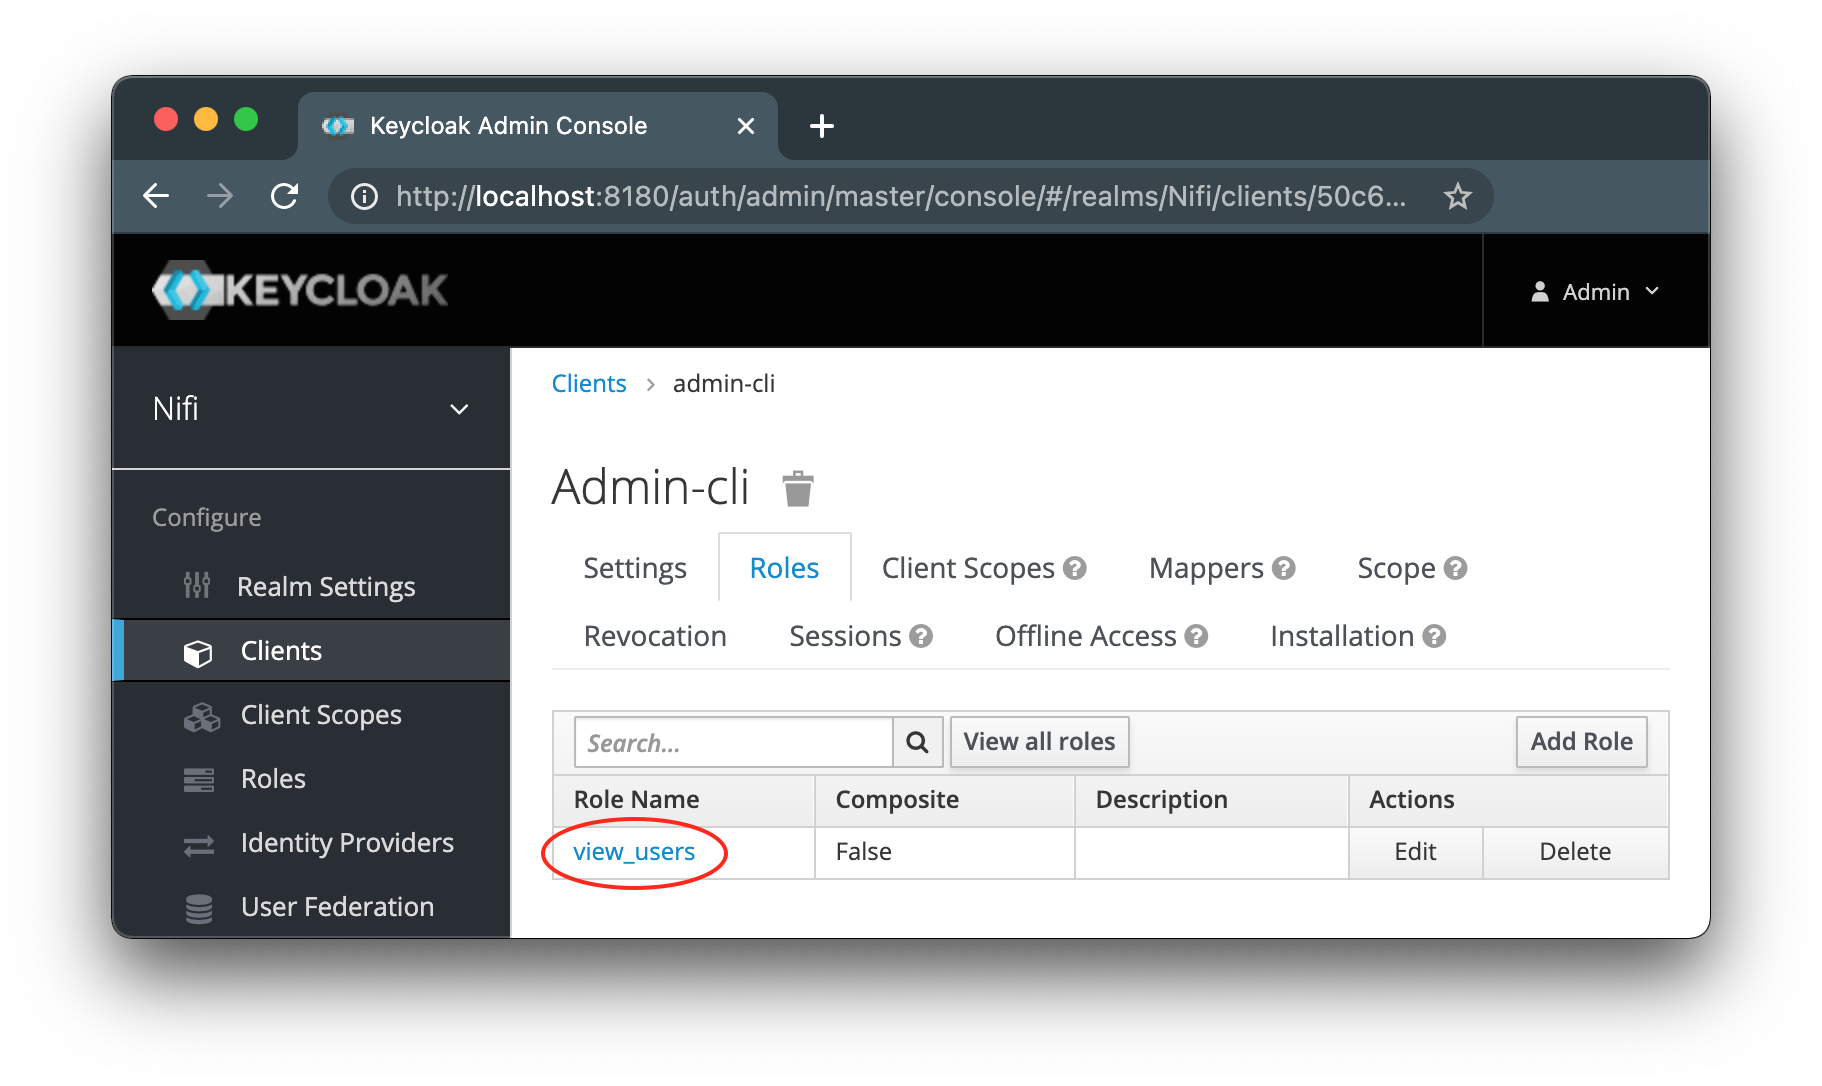
-
Create a new client with the client.
-
Set Client Protocol to openid-connect.
-
Set Access Type to
confidential. -
Add valid redirect URIs for IGUASU UI and NiFi.
https://iguasu.example.com:iguasu-ui-port/+* and \https://iguasu.exmple.com:nifi-port/+*
-
After you have saved the changes, you can view the keycloak configuration in JSON format in the tab Installation. Important information is: realm (the realm name), resource (the client ID), secret (the client secret), auth-server-url (the keycloak URL).
Execute IGUASU Toolkit
The IGUASU Toolkit should be located in the IGUASU directory for execution.
iguasu-x.x.x
├── bin
├── iguasu-toolkit-x.x.x
├── ui
└── nifi
Start the IGUASU Toolkit by executing the file run.sh (Linux/Mac) / run.bat (Windows) in the iguasu-toolkit-x.x.x/bin directory.
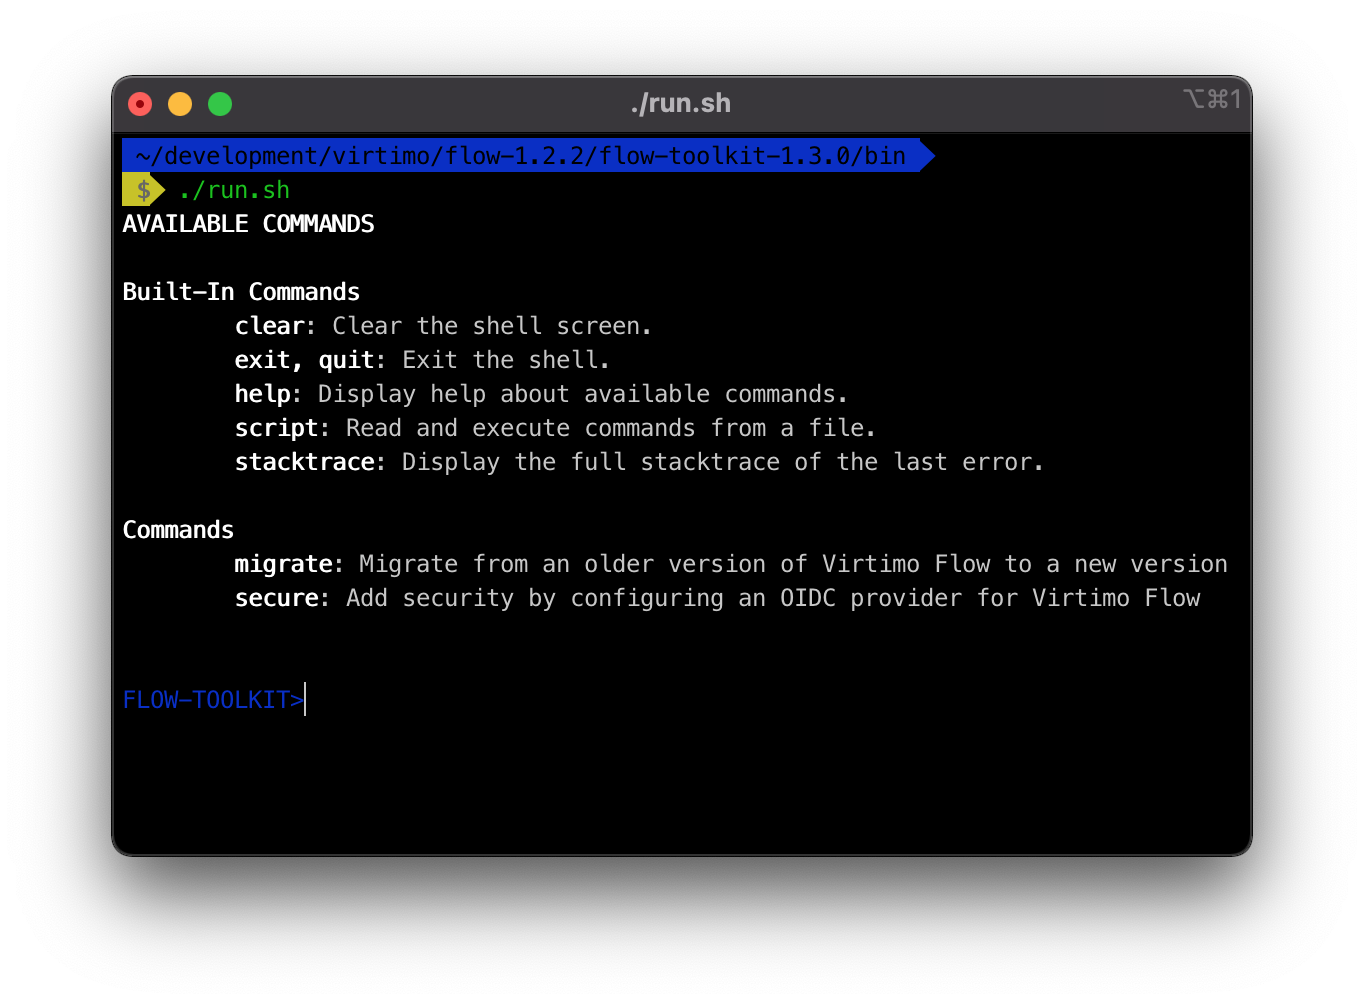
After execution, the available commands should be listed as shown in the screenshot. To start the configuration with Keycloak as OIDC provider, enter the following command:
IGUASU-TOOLKIT>secure -p keycloak
For all other identity providers, use:
IGUASU-TOOLKIT>secure
or
IGUASU-TOOLKIT>secure -p other
-
IGUASU server domain name - the domain name of the IGUASU server.
-
IGUASU server host name - the host name of the IGUASU server.
-
Common OIDC URL - the URL of the keycloak server
-
Common OIDC Realm - the keycloak realm name.
-
Common OIDC Client ID - the client ID.
-
Common OIDC Client Secret - the client secret
-
Common OIDC Username mapping email/preferred_username - mapping of users in IGUASU based on email/username
-
NiFi HTTPS port - Port of the Nifi Services
-
NiFi truststore password - Truststore password. A blank entry automatically generates a new truststore with a random password.
| Truststores and keystores are used for secure communication between the IGUASU UI and NiFi. The IGUASU Toolkit can automatically generate the necessary keys including the trust and keystores. In the square brackets, the random password is displayed which is generated for the trust/keystore if no own password is used. |
-
NiFi keystore password - Keystore password. Blank input automatically generates a new keystore with a random password.
-
NiFi Keycloak service account username - Username of the IGUASU service account
-
NiFi Keycloak service account password - Password of the IGUASU service account
-
NiFi initial user identity - Username of the IGUASU administrator account
-
NiFi initial admin identity - Username of the IGUASU administrator account
| Please note that the username is generated according to the already queried settings of the "email/preferred_username" mapping. For example, if*"email"* has been selected, the user’s email must be entered here. |
-
IGUASU UI keystore password (minimum 6 characters) - Keystore password for IGUASU UI. Blank input automatically generates a new keystore with a random password.
-
IGUASU UI truststore password (minimum 6 characters) - Truststore password for IGUASU UI. Blank input automatically generates a new truststore with a random password.
-
IGUASU UI secret key password (minimum 6 characters) - Secret key for IGUASU UI. Blank input automatically generates a new random secret key.
-
Do you want to enable HTTPS for IGUASU UI? - Switches IGUASU UI to the use of TLS.
-
IGUASU UI Port - Port of the IGUASU UI Services
Backup
Important directories to be backed up are:
iguasu-x.x.x/nifi/conf/
iguasu-x.x.x/ui/conf/
iguasu-x.x.x/data/nifi/conf/
If it is necessary for runtime data to be available after a restore, the following directory is also required:
iguasu-x.x.x/data/nifi/work/
| this directory may take up considerable disk space |
Migration
-
Uninstalling the old systemd IGUASU Services (also stops a possibly running IGUASU instance).
./bin/iguasu.sh uninstall -
Copy the configuration and data to the new installation
-
The following directories are required for a complete copy:
./nifi/conf/ ./ui/conf/ ./data/ -
Für eine minmale Migration ohne Verlaufsdaten müssen die beiden Dateien
 ./nifi/conf/flow.json.gz
 ./nifi/conf/flow.xml.gz
in die neue Installation kopiert werden.
Falls in
 ./data/keystores und
 ./data/driver
Dateiein vorhanden sind, sollten diese ebenfalls kopiert werden.
Wichtig ist hierbei, dass folgende Properties aus der Datei ./nifi/conf/nifi.properties ebenfalls übernommen werden.
 nifi.sensitive.props.key=
 nifi.sensitive.props.key.protected=
 nifi.sensitive.props.algorithm=
 nifi.sensitive.props.additional.keys=
Je nach Authentifizierungskonfiguration müssen die Schritte im Abschnitt Security erneut ausgeführt werden.
-
-
Any adjustments from
./bin/iguasu-env.shsollten ebenfalls übernommen werden
-
Installation of the new systemd IGUASU Services (the new IGUASU instance is started automatically).
./bin/iguasu.sh install
|
Under certain circumstances, it may be useful to manually transfer the configuration from an existing iguasu-x.x.x/nifi/conf/nifi.properties and iguasu-x.x.x/ui/conf/iguasu.properties file to the new configuration files. The following command can be used to get a quick overview of the changed lines: |
