List of version-dependent patch steps
To upgrade to the desired version, you must perform all applicable patch steps from the following list whose patch level is higher than the current patch level and lower than or equal to the target version.
For example, if you want to upgrade to the target version 7.4.0.79 and your current version is 7.4.0.3, you must complete all steps from patch version 7.4.0.4 up to and including patch version 7.4.0.79.
|
In case a patch step occurs several times, you must execute it once only (e.g., Tomcat updates). |
List structure
-
Patch level
Patch level requiring a manual patch action. Patching is necessary if you patch from a minor version to the indicated or to a higher version.
-
Component
Components involved in the patch step.
-
Action
Action(s) that must be performed.
7.4.0.12
|
Manual step BEFORE patch installation required. |
Process Engine - Updating Tomcat to 9.0.20
Proceed as follows
-
Shut down the INUBIT Process Engine.
-
From the directory
<inubit-installdir>/server/Tomcat, save all files that have been customized or that are especially adjusted to the system environment (for example,setenv.sh,server.xml,portal-ext.properties). -
Backup and delete the Tomcat directory of your INUBIT installation
<inubit-installdir>/server/Tomcat. -
Install the Process Engine 7.4.0.79 to a temporary directory.
-
Copy the Tomcat directory from that temporary installation folder
../server/Tomcatto the<INUBIT-installdir>/serverdirectory of your INUBIT installation. -
In the Tomcat directory of your INUBIT installation
<inubit-installdir>/server/Tomcat, adjust all the files adjusted in the previous Tomcat installation based on the files saved in step 2. -
Execute the patch installer of INUBIT 7.4.0.79.
-
In cluster mode: Execute steps 1 to 7 for all the other nodes in your cluster.
7.4.0.13
Workbench - Adjust the config.xml file
Proceed as follows
-
On the system where the Workbench is installed, go to the following directory:
-
Linux:
/home/<Linux username>/.inubit/Toolset/<inubit version>/work/<IP address>_<port>/ <inubit username>/ -
Windows:
C:\Users\<Windows username>\AppData\Roaming\inubit\Toolset\<inubit version>\work\<IP
address>_<port>\<inubit username>\
-
-
Open the
config.xmlfile for editing. -
Search for all lines that contain
WF.Deployas the last part of a property name. -
Delete all the lines that contain
WF.Deploy, e.g.:Last.IS.WF.Deploy,Last.RS.WF.Deploy -
Save the changes.
-
Restart the INUBIT Workbench.
-
If you have installed the Workbench on multiple systems, execute the steps above on all systems where a Workbench is installed.
7.4.0.14
Liferay Portal 7.x/DXP: Redeploying Liferay Plug-ins
Proceed as follows
-
Open
<inubit-installdir>/server/portal/inubitPlugins/<liferay_version>/directory. -
Extract the
liferay-inubit-bootstrap-1.0.0.jararchive. -
Copy the
grid3-hrow.giffile from theliferay-INUBIT-bootstrap-1.0.0/ROOT/html/js/extjs/resources/images/default/grid/directory to the clipboard. -
Paste the
grid3-hrow.giffile from the clipboard to the<liferay_installdir>/Tomcat-dir/webapps/ROOT/html/js/extjs/resources/images/default/grid/directory.If the
../ROOT/html/js/extjs/recources/images/default/griddirectory does not exist, create it. -
Shutdown and restart Liferay for the changes to take effect.
-
Continue with the steps in section Patching Liferay 7.x/DXP
7.4.0.18
Installer - Updating ibis.xml and logsDBConfig.xml
Action
Updating the configuration files ibis.xml and logsDBConfig.xml with entries for the new properties noOfRetries and retryInterval.
This action is compulsory.
Proceed as follows
-
Open the existing files
ibis.xmlandlogsDBConfig.xmlfor editing. -
Open the template files
ibis.xml.<db-type>andlogsDBConfig.xml.<db-type>appropriate to the database type you use.Example: If you use a MySQL database, open
ibis.xml.MySQLandlogsDBConfig.xml.MySQL. -
Copy the relevant properties
noOfRetriesandretryIntervalfrom the template fileibis.xml.<db-type>andlogsDBConfig.xml.<db-type>respectively into the respective lines of the XML structure of the existing filesibis.xmlandlogsDBConfig.xmlrespectively. -
Save the files
ibis.xmlandlogsDBConfig.xml. -
Close the template files
ibis.xml.<db-type>andlogsDBConfig.xml.<db-type>. -
Restart the Process Engine.
In cluster mode, you can do the update node by node to avoid downtime.
Installer - Updating .bat or .sh Scripts Setting JAVA_HOME
Action
Updating all .bat or .sh scripts setting the JAVA_HOME environment variable in order that the scripts make use of the central file <INUBIT-installdir>\java_home_path_setter.cmd or <INUBIT-installdir>/java_home_path_setter.sh.
Prerequisites
The file <INUBIT-installdir>\java_home_path_setter.cmd or <INUBIT-installdir>/java_home_path_setter.sh. contains the correct path to the JDK used by INUBIT.
Proceed as follows
Windows
-
Navigate to the directory
<INUBIT-installdir>server\Tomcat\binand execute the following steps with all.batfiles in this directory:-
Open the
.batfile for editing. -
Add the following lines before the first code line:
rem # set JAVA_HOME by calling central java_home path setter
set JAVA_HOME_PATH_SETTER="..\..\..\java_home_path_setter.cmd"
if EXIST "%JAVA_HOME_PATH_SETTER%" (call "%JAVA_HOME_PATH_SETTER%")
-
-
Execute the following steps with all
.batfiles being in the following directories:<inubit-installdir>/client/bin <inubit-installdir>/remoteconnector/bin <inubit-installdir>/server/migration <inubit-installdir>/server/restore <inubit-installdir>/server/benchmark-
Open the
.batfile for editing. -
Add the following lines before the first code line:
rem # set JAVA_HOME by calling central java_home path setter
set JAVA_HOME_PATH_SETTER="..\..\java_home_path_setter.cmd"
if EXIST "%JAVA_HOME_PATH_SETTER%" (call "%JAVA_HOME_PATH_SETTER%")
-
Linux
-
Navigate to the directory
<INUBIT-installdir>server/Tomcat/binand execute the following steps with all.shfiles in this directory:-
Open the
.shfile for editing. -
Add the following lines before the first code line:
# set JAVA_HOME by calling central java_home path setter
JAVA_HOME_PATH_SETTER="../../../java_home_path_setter.sh"
if [ -f "$JAVA_HOME_PATH_SETTER" ]
then
    "$JAVA_HOME_PATH_SETTER"
fi
-
-
Execute the following steps with all
.shfiles being in the following directories:<inubit-installdir>/client/bin <inubit-installdir>/remoteconnector/bin <inubit-installdir>/server/migration <inubit-installdir>/server/restore <inubit-installdir>/server/benchmark-
Open the
.shfile for editing. -
Add the following lines before the first code line:
# set JAVA_HOME by calling central java_home path setter
JAVA_HOME_PATH_SETTER="../../java_home_path_setter.sh"
if [ -f "$JAVA_HOME_PATH_SETTER" ]
then
    "$JAVA_HOME_PATH_SETTER"
fi
-
7.4.0.19
Patching Liferay Portal 7.x/DXP
Proceed as follows
Refer to Patching Liferay 7.x/DXP
7.4.0.22
EDI Adapter - Adapt the EDI-XML to Consider Name and def Attributes in rule_hwed.xsd
Proceed as follows
-
Start the INUBIT Workbench and login as user root.
-
Click the Repository tab and select the view All.
-
Open the repository folder Global > System > Schemas > EDI.
-
In the file area, open the context menu and choose Add file or directory.
→ A wizard is displayed.
-
Click the
 icon to open the operating system’s file picker.
 -
Navigate to the folder
<inubit-installdir>/server/ibis_root/ibis_data/repository/deploy/Global/System/Schemas/EDIand select the filerule_hwed.xsd. -
Specify that the files is supposed to be readable anonymously.
-
Click Next.
-
Click Finish to close the dialog and save the file.
Patching Liferay Portal 7.x/DXP
Proceed as follows
-
Remove the following files from the
./lib/extdirectory of the Java installation used by your Liferay installation.-
bcprov-jdk15on-1.60.jar -
ibis-system-7.0.0.jar
-
-
Remove the
endorseddirectory below the<Liferay-installdir>/<Tomcat-dir>directory of your Liferay installation. -
Refer to Patching Liferay 7.x/DXP
7.4.0.23
Installer - Updating logsDBConfig.xml
Action
Updating the configuration file logsDBConfig.xml with entries for the new audit logs limit properties maximumLimitDaysAuditLog , minimumLimitAuditLog, and maximumLimitAuditLog.
|
This action is compulsory. |
Proceed as follows
-
Open the existing file
logsDBConfig.xmlfor editing. -
Copy the following property block into the
<LogsDatabaseConfig>tag of the open filelogsDBConfig.xml:<dataEntriesLimitAuditLog> <maximumLimitDaysAuditLog>0</maximumLimitDaysAuditLog> <minimumLimitAuditLog>40000</minimumLimitAuditLog> <maximumLimitAuditLog>50000</maximumLimitAuditLog> </dataEntriesLimitAuditLog> -
Save the file
logsDBConfig.xml. -
Restart the Process Engine.
|
In cluster mode, you can do the update node by node to avoid downtime. |
7.4.0.27
Updating Plug-ins and User Profiles for EDI Signature Utility
Action
To use the EDI Signature Utility, add the EDI Signature Utility as a new plug-in and add it to the following user profiles:
-
System Administrator
-
EAI Developer
-
Project Lead
Proceed as follows
-
Create an
edi_sign.xmlfile in a temporary directory<local_temp_dir>, for example/tmporc:\tmp, with the following content:<?xml version="1.0" encoding="UTF-8"?> <Plugin> <Name>EDI Signature Utility</Name> <PluginGroup>Utilities</PluginGroup> <ClientJavaClass>com.inubit.ibis.plugins.edisign.EDISignatureClient</ClientJavaClass> <ClientComment>EDI Signature Utility Plugin, Toolset Version 6.0</ClientComment> <ServerJavaClass>com.inubit.ibis.plugins.edisign.EDISignatureGenerator</ServerJavaClass> <ServerComment>Server Version 6.0</ServerComment> <Image>icons/60x40/colored/edi_signature.svg</Image> <LastUpdateUser>root</LastUpdateUser> <LastUpdateTime>12.09.2019 11:45:00</LastUpdateTime> </Plugin> -
Start the INUBIT CLI as user
rootin a shell or the command prompt.startcli -u root [<URL>] -
Switch to cache mode:
CLI|root@{hostname}> cachemode CLI|root@{hostname}> -
Upload the plug-in data stored in the
<local_temp_dir>\edi_sign.xmlfile.CACHE|root@{hostname}> put PLUGIN_DATA "EDI Signature Utility" <local_temp_dir>/ edi_sign.xml -
Download the System Administrator user profile to the
<local_temp_dir>/SystemAdmin.xmlfile.CACHE|root@{hostname}> get USER_PROFILES "System Administrator" <local_temp_dir>/ SystemAdmin.xml -
Download the EAI Developer user profile to the
<local_temp_dir>/SystemAdmin.xmlfile.CACHE|root@{hostname}> get USER_PROFILES "EAI Developer" <local_temp_dir>/ EAIDeveloper.xml -
Download the Project Lead user profile to the
<local_temp_dir>/SystemAdmin.xmlfile.CACHE|root@{hostname}> get USER_PROFILES "Project Lead" <local_temp_dir>/ ProjectLead.xml -
Open the following files downloaded before and add the line
<Use>EDI Signature Utility</Use>above the</Profile>tag and save the changes afterwards:-
<local_temp_dir>/SystemAdmin.xml -
<local_temp_dir>/EAIDeveloper.xml -
<local_temp_dir>/ProjectLead.xml
-
-
Upload the changed files using the following commands:
CACHE|root@{hostname}> put USER_PROFILES "System Administrator" <local_temp_dir>/ SystemAdmin.xml CACHE|root@{hostname}> put USER_PROFILES "EAI Developer" <local_temp_dir>/ EAIDeveloper.xml CACHE|root@{hostname}> put USER_PROFILES "Project Lead" <local_temp_dir>/ ProjectLead.xml -
Exit the cache mode and the INUBIT CLI using the
exitcommand. -
Restart the Process Engine or all the Process Engines of the cluster.
Process Engine - Updating BouncyCastle library
Proceed as follows
-
Download the
bcprov-jdk15on-1.64.jarfile from Maven Central Repository and replacebcprov-jdk15on-1.60.jarin the folders below the INUBIT installation folder:./client/lib ./server/Tomcat/webapps/ibis/WEB-INF/libAs of patch level 7.4.0.28, this step is no longer needed because the BouncyCastle library is updated automatically.
-
Change
bcprov-jdk15on-1.60.jartobcprov-jdk15on-1.64.jarin the following scripts in the following folders below the INUBIT installation folder.-
./server/benchmark/Update all
.shfiles for Linux and.batfor Windows. -
./client/bin/Update the
check_is_status.sh/check_is_status.batfile. -
./server/Tomcat/bin/Update the following scripts:
-
check_is_status.sh/check_is_status.bat -
startcli.sh/startcli.bat -
ibis_nt_service_install.cmd
-
-
./remoteConnector/binUpdate the
rc_nt_service_install.cmdscript.
-
7.4.0.28
Liferay Portal 7.x/DXP - Replacing the Company Logo
Proceed as follows
-
Go to the
<inubit-installdir>/server/portal/inubitPlugins/<Liferay_version>/directory. -
Extract the
liferay-inubit-bootstrap-1.0.0.jararchive to a temporary directory. -
Go to the
ROOT/WEB-INF/classes/logo/directory below the temporary directory created in step 2. -
Copy the
logo_virtimo.pngfile to the clipboard. -
Paste the
logo_virtimo.pngfrom the clipboard to the<Liferay_installdir>/Tomcat-dir/webapps/ROOT/WEB-INF/classes/logo/directory. -
Go to the
<Liferay_installdir>/directory. -
Open the
portal-ext.propertiesfile for editing. -
Search for the line containing the string:
image.default.company.logo -
Change the line as follows:
image.default.company.logo=logo/logo_virtimo.png -
Restart Liferay for the changes to take effect.
Process Engine, Cache - Update EDIFACT-ORDERS-D-96A.xml File
Prerequisites
-
You have successfully executed the patch installer.
-
The new
EDIFACT-ORDERS-D-96A.xmlfile is available in the<INUBIT-installdir>/server/ibis_root/conf/edidirectory.
Proceed as follows
-
Updating
EDIFACT-ORDERS-D-96A.xmlfile in the cache-
Start the INUBIT CLI.
-
Enter the cache mode using the
cachemodecommand. -
Execute the following command:
put EDI_RULES EDIFACT-ORDERS-D-96A.xml <inubit-installdir>/server/ibis_root/conf/edi/ EDIFACT-ORDERS-D-96A.xml -
Exit the cache mode.
-
-
Updating
EDIFACT-ORDERS-D-96A.xmlback-up file in the Process Engine-
Go to the
<inubit-installdir>/server/ibis_root/conf/edidirectory. -
Delete the existing
EDIFACT-ORDERS-D-96A.xml.bakfile. -
Rename the
EDIFACT-ORDERS-D-96A.xmlfile toEDIFACT-ORDERS-D-96A.xml.bak.
-
7.4.0.29
|
Manual step BEFORE patch installation required. |
Process Engine - Updating Tomcat to 9.0.31
Proceed as follows
-
Shut down the INUBIT Process Engine.
-
From the directory
<inubit-installdir>/server/Tomcat, save all files that have been customized or that are especially adjusted to the system environment (for example,setenv.sh,server.xml,portal-ext.properties). -
Backup and delete the Tomcat directory of your INUBIT installation
<inubit-installdir>/server/Tomcat. -
Install the Process Engine 7.4.0.79 to a temporary directory.
-
Copy the Tomcat directory from that temporary installation folder
../server/Tomcatto the<INUBIT-installdir>/serverdirectory of your INUBIT installation. -
In the Tomcat directory of your INUBIT installation
<inubit-installdir>/server/Tomcat, adjust all the files adjusted in the previous Tomcat installation based on the files saved in step 2. -
Execute the patch installer of INUBIT 7.4.0.79.
-
In cluster mode: Execute steps 1 to 7 for all the other nodes in your cluster.
7.4.0.30
Repository - Updating the EDIFACT Folder
Proceed as follows
-
Log on to the Workbench as INUBIT administrator.
-
Open the Repository tab.
-
Open the Global > System > EDI Specification > EDIFACT folder.
-
Delete the existing
content.xmlfile. -
Open the context menu and choose the Add file or directory item.
-
Open the
<inubit-installdir>/server/ibis_root/ibis_data/repository/deploy/Global/System/EDISpecification/EDIFACT/content.xmlfile. -
Click on Next and Finish to add the
content.xmlfile to the INUBIT Repository.
7.4.0.32
All Components – Update JDK/Java to Version 11.0.7
Action
Update the JDK/Java installation used by your INUBIT installation(s) for all INUBIT components to Version 11.0.7 as described in the Updating JDK section.
Process Engine - Updating the BouncyCastle Library to Version 1.65
Proceed as follows
Replace the file name bcprov-jdk15on-1.64.jar with bcprov-jdk15on-1.65.jar in the following scripts in the following folders below the INUBIT installation folder.
-
./server/benchmark/Update all
.shscripts for Linux and.batscripts for Windows. -
./client/bin/Update the
check_is_status.sh/check_is_status.batscript. -
./server/Tomcat/bin/Update the following scripts:
-
check_is_status.sh/check_is_status.bat -
startcli.sh/startcli.bat -
ibis_nt_service_install.cmd
-
-
./remoteConnector/binUpdate the
rc_nt_service_install.cmdscript.
INUBIT Liferay Plug-in Deployment Script - Updating the BouncyCastle Library to Version 1.65
Windows INUBIT Start Scripts - Updating Title, Service Name, and Service Description
Action
Windows only: Update title, service name, and service description in the INUBIT start scripts for Windows
Proceed as follows
-
Go to the
<inubit-installdir>/server/Tomcat/bin/folder. -
Open the
ibis_nt_service_install.cmdscript for editing. -
Search for the
SERVICE_NAMEvariable. -
Replace the value
INUBIT IS Tomcatwith the stringINUBIT 7.4 Service. -
Add a new line below the line where you have set the
SERVICE_NAMEvariable. -
Copy the following command in the newly added line:
set SERVICE_DESCRIPTION=INUBIT 7.4 Process Engine available as a service -
Search for the string
%JAVA_SERVICE_EXE%" -install. -
Add a new line below the line with the string
%JAVA_SERVICE_EXE%" -install. -
Copy the following command in the newly added line:
sc description "%SERVICE_NAME%" "%SERVICE_DESCRIPTION%" -
Save your changes.
-
Open the
ibis_nt_service_uninstall.cmdscript for editing. -
Search for the
SERVICE_NAMEvariable. -
Replace the value
INUBIT IS Tomcatwith the stringINUBIT 7.4 Service. -
Save your changes.
-
Open the
setenv.batscript for editing. -
Search for the
TITLEvariable. -
Replace the value
INUBITwith the stringINUBIT 7.4 Service. -
Save your changes.
Patching Liferay Portal 7.x/DXP
Proceed as follows
Refer to Patching Liferay 7.x/DXP
7.4.0.34
|
Manual step BEFORE patch installation required. |
Process Engine – Updating Tomcat to 9.0.35
Proceed as follows
-
Shut down the INUBIT Process Engine.
-
From the directory
<inubit-installdir>/server/Tomcat, save all files that have been customized or that are especially adjusted to the system environment (for example,setenv.sh,server.xml,portal-ext.properties). -
Backup and delete the Tomcat directory of your INUBIT installation
<inubit-installdir>/server/Tomcat. -
Install the Process Engine 7.4.0.79 to a temporary directory.
-
Copy the Tomcat directory from that temporary installation folder
../server/Tomcatto the<INUBIT-installdir>/serverdirectory of your INUBIT installation. -
In the Tomcat directory of your INUBIT installation
<inubit-installdir>/server/Tomcat, adjust all the files adjusted in the previous Tomcat installation based on the files saved in step 2. -
As of INUBIT 7.4.0.33, the
<INUBIT-installdir>placeholder contains the additionallyINUBITsub-directory.When patching from INUBIT for Linux below version 7.4.0.33, you have to adjust the following scripts and configuration files, or you have to replace them with the corresponding files from the backup directory. Proceed with one of the following steps for the files listed below.
-
inubitis-
Replace the
<inubit-installdir>/server/Tomcat/bin/inubitisscript with the corresponding script from the backup directory. -
Adjust the
CONFIG_FILEvariable with the correct path to the<INUBIT-installdir>/server/Tomcat/bin/inubitis.conffile.
-
-
inubitis.conf-
Replace the
<inubit-installdir>/server/Tomcat/bin/inubitis.conffile with the corresponding file from the backup directory. -
Adjust the
IS_DIRvariable with the correct path to the<INUBIT-installdir>directory.
-
-
inubitSystemd-
Replace the
<inubit-installdir>/server/Tomcat/bin/inubitSystemdscript with the corresponding script from the backup directory. -
Adjust the
CONFIG_FILEvariable with the correct path to the<INUBIT-installdir>/server/Tomcat/bin/inubitis.conffile.
-
-
inubitrc-
Replace the
<inubit-installdir>/remoteConnector/bin/inubitrcscript with the corresponding script from the backup directory. -
Adjust the
CONFIG_FILEvariable with the correct path to the<INUBIT-installdir>/remoteConnector/bin/inubitrc.conffile.
-
-
inubitrc.conf-
Replace the
<inubit-installdir>/remoteConnector/bin/inubitrc.conffile with the corresponding file from backup directory. -
Adjust the
RC_DIRvariable with the correct path to the<INUBIT-installdir>directory.
-
-
inubitrcSystemd-
Replace the
<inubit-installdir>/remoteConnector/bin/inubitrcSystemdscript with the corresponding script from backup directory. -
Adjust the
CONFIG_FILEvariable with the correct path to the<INUBIT-installdir>/remoteConnector/bin/inubitrc.conffile
-
-
-
Execute the INUBIT patch installer.
-
In cluster mode: Execute steps 1 to 8 for all the other nodes in your cluster.
Liferay 7.0 – Unchecking the Expose Global Option to use the Updated Fusion Charts Library
Certain Scripts can be Used with Relative Paths – Renaming New Scripts and Adjusting them if necessary
Scripts to Install/Uninstall the Process Engine as a Service under Windows – Adjusting the Scripts
Action
Windows only: To ascertain the Java version correctly, the install/uninstall scripts to start the Process Engine as a Service under Windows need to be adjusted
Proceed as follows
-
If the Process Engine is installed as a service stop the Process Engine service.
-
Uninstall the Process Engine service.
-
Navigate to the
<inubit-installdir>\server\Tomcat\bindirectory. -
Open the
ibis_nt_service_install.cmdscript for editing. -
Replace two lines as follows:
Lines to be replaced:
for /f "tokens=3" %%g in ('%JAVA_HOME%\bin\java -version 2^>^&1 ^| findstr /i
"version"') do set JAVA_VERSION=%%g
for /f tokens^=2-5^ delims^=.-_^" %%i in ('%JAVA_HOME%\bin\java -fullversion 2^>^&1')
do set "jver=%%i"
New lines to replace:
for /f "tokens=3" %%g in ('""%JAVA_HOME%\bin\java" -version 2>&1 | findstr /i version"') do set JAVA_VERSION=%%g for /f tokens^=2-5^ delims^=.-_^" %%i in ('""%JAVA_HOME%\bin\java" -fullversion 2>&1"') do set "jver=%%i" -
Save the changes in order for the changes to take effect.
-
Open the
ibis_nt_service_uninstall.cmdscript for editing. -
Replace two lines as follows:
Lines to be replaced:
for /f "tokens=3" %%g in ('%JAVA_HOME%\bin\java -version 2^>^&1 ^| findstr /i
"version"') do set JAVA_VERSION=%%g
for /f tokens^=2-5^ delims^=.-_^" %%i in ('%JAVA_HOME%\bin\java -fullversion 2^>^&1')
do set "jver=%%i"
New lines to replace:
for /f "tokens=3" %%g in ('""%JAVA_HOME%\bin\java" -version 2>&1 | findstr /i version"') do set JAVA_VERSION=%%g for /f tokens^=2-5^ delims^=.-_^" %%i in ('""%JAVA_HOME%\bin\java" -fullversion 2>&1"') do set "jver=%%i" -
Save the changes in order for the changes to take effect.
-
Now, you can install and start the Process Engine as a Service.
INUBIT Repository – Updating AS4 Mapping Templates and CPA Files
Action
Update the AS4 Mapping templates in the Global Repository and the CPA files used for AS4 Connectors.
Proceed as follows
-
Log in to the INUBIT Workbench as administrator.
-
Open the Repository tab.
-
Open the Global > System > Mapping Templates directory.
-
Right-click the AS4 directory.
-
Choose the Update Directory menu item.
→ The files
as4-cpa-repository.xmlandas4-cpa-repository.xsdare updated to the new version. -
In order to update all CPA xml files used for your AS4 Connector modules, replace
bosch-si.comwithvirtimo.dein all these CPA xml files.
7.4.0.37
Installer under Linux – Updating java_home_path_setter.sh
Action
Linux only: Updating the java_home_path_setter.sh file in case of a Linux installation and the JAVA_HOME path contain spaces.
|
This action is compulsory. |
Proceed as follows
-
Open the
<inubit-installdir>/java_home_path_setter.shfile. -
Check if
JAVA_HOMEis set and has a space in the path.If so, enclose the path in double quotes, for example:
JAVA_HOME="/home/inubit/jdk 11" -
Save the file.
|
In cluster mode, you can do the update node by node to avoid downtime. |
7.4.0.38
Liferay 7.x/DXP – Patching Liferay Portal 7.x/DXP
Proceed as follows
-
Open the
<inubit-installdir>/server/portal/inubitPlugins/<Liferay_version>/directory. -
Extract the
liferay-inubit-bootstrap-1.0.0.jararchive to a temporary directory. -
Open root directory below the temporary directory created in step 2.
-
Open the
portal-ext.propertiesfile for editing. -
Copy the property
module.framework.properties.org.osgi.framework.bootdelegationwith the provided value to the clipboard. -
Open the
<Liferay_installdir>/directory. -
Open the
portal-ext.propertiesfile for editing. -
Paste the copied property value from clipboard, which was copied in step 5, to the end of the
portal-ext.propertiesfile. -
Restart Liferay for the changes to take effect.
7.4.0.39
|
Manual step BEFORE patch installation required. |
Process Engine – Updating Tomcat to 9.0.37
Proceed as follows
-
Shut down the INUBIT Process Engine.
-
From the directory
<inubit-installdir>/server/Tomcat, save all files that have been customized or that are especially adjusted to the system environment (for example,setenv.sh,server.xml,portal-ext.properties). -
Backup and delete the Tomcat directory of your INUBIT installation
<inubit-installdir>/server/Tomcat. -
Install the Process Engine 7.4.0.79 to a temporary directory.
-
Copy the Tomcat directory from that temporary installation folder
../server/Tomcatto the<INUBIT-installdir>/serverdirectory of your INUBIT installation. -
For Linux only: If INUBIT or Remote Connector was installed as a service, the following steps are necessary.
As of INUBIT 7.4.0.36, the
<inubit-installdir>placeholder contains the additional INUBIT sub-directory. When patching from INUBIT for Linux below version 7.4.0.36, you have to adjust the following scripts and configuration files or you have to replace them with the corresponding files from the backup directory.-
If INUBIT was installed as a service using
Systemd, proceed as follows:-
Stop the
inubit systemdservice if already running. -
Remove the symbolic link named
INUBIT.servicein the/etc/systemd/systemdirectory. -
Proceed with the following steps for the files listed below.
inubitis.confReplace the
<inubit-installdir>/server/Tomcat/bin/inubitis.conffile with the corresponding file from the backup directory. Adjust theIS_DIRvariable with the correct path to the<INUBIT-installdir>directory.inubitSystemdReplace the
<inubit-installdir>/server/Tomcat/bin/inubitSystemdscript with the corresponding script from the backup directory. Adjust theCONFIG_FILEvariable with the correct path to the<INUBIT-installdir>/server/Tomcat/bin/inubitis.conffile.inubit.serviceReplace the
<inubit-installdir>/server/Tomcat/bin/inubit.servicefile with the corresponding file from the backup directory. Adjust thePIDFilevariable with the correct path to the<INUBIT-installdir>/server/Tomcat/bin/catalina.pidfile. Adjust theCATALINA_HOMEenvironment variable with the correct path:CATALINA_HOME=<INUBIT-installdir>/server/TomcatAdjust theWorkingDirectoryvariable with the correct path to:<INUBIT-installdir>/server/Tomcat/binAdjust theExecStartvariable with the correct path to:<INUBIT-installdir>/server/Tomcat/bin/inubitSystemd startAdjust theExecStopvariable with the correct path to:<INUBIT-installdir>/server/Tomcat/bin/inubitSystemd stopCreate the symbolic link forinubit.serviceas mentioned in inubit documentation (refer to section Installing the INUBIT Process Engine Under Linux as Service Using Systemd).
-
-
If INUBIT was installed as a service using
SysVinit, proceed as follows:-
Stop the
SysVinitservice if already running -
Proceed with one of the following steps for the files listed below.
inubitisReplace the /etc/init.d/INUBITis script with the corresponding script from the backup directory. Adjust the CONFIG_FILE variable with the correct path to the <INUBIT-installdir>/server/Tomcat/bin/INUBITis.conf file.
inubitis.confReplace the
/etc/inubitis.conffile with the corresponding file from the backup directory. Adjust theIS_DIRvariable with the correct path to the<INUBIT-installdir>directory.
-
-
If Remote Connector was installed as a service using
Systemd, proceed as follows:-
Stop the
rc systemdservice if already running. -
Remove the symbolic link named
rc.servicein the/etc/systemd/systemdirectory. -
Proceed with one of the following steps for the files listed below.
inubitrc.confReplace the
<inubit-installdir>/remoteConnector/bin/inubitrc.conffile with the corresponding file from backup directory. Adjust theRC_DIRvariable with the correct path to the<INUBIT-installdir>directory.inubitrcSystemdReplace the
<inubit-installdir>/remoteConnector/bin/inubitrcSystemdscript with the corresponding script from backup directory. Adjust theCONFIG_FILEvariable with the correct path to:<INUBIT-installdir>/remoteConnector/bin/inubitrc.confinubitrc.serviceReplace the
<inubit-installdir>/remoteConnector/bin/inubitrc.servicefile with the corresponding file from backup directory. Adjust theWorkingDirectoryvariable with the correct path to the<INUBIT-installdir>/remoteConnector/bindirectory. Adjust theExecStartvariable with the correct path to:<INUBIT-installdir>/remoteConnector/bin/inubitrcSystemd startAdjust theExecStopvariable with the correct path to:<INUBIT-installdir>/remoteConnector/bin/inubitrcSystemd stopCreate the symbolic link forrc.serviceas mentioned in INUBIT documentation (refer to section Installing the INUBIT Remote Connector Under Ubuntu as Service Using Systemd)
-
-
If Remote Connector was installed as a service using
SysVinit, proceed as follows:inubitrcReplace the
/etc/init.d/inubitrcscript with the corresponding script from the backup directory. Adjust theCONFIG_FILEvariable with the correct path to the<INUBIT-installdir>/remoteConnector/bin/inubitrc.conffile.inubitrc.confReplace the
/etc/inubitrc.conffile with the corresponding file from backup directory. Adjust theRC_DIRvariable with the correct path to the<INUBIT-installdir>directory.
-
-
For all files being not adjusted in step 6 but being adjusted in the previous Tomcat installation in the Tomcat directory
<inubit-installdir>/server/Tomcatof your INUBIT installation: Adjust all the remaining files based on the files saved in step 2. -
Execute the INUBIT patch installer.
-
In cluster mode: Execute steps 1 to 8 for all the other nodes in your cluster.
7.4.0.40
All Components – Update JDK/Java to Version 11.0.8
Action
Update the JDK/Java installation used by your INUBIT installation(s) for all INUBIT components to version 11.0.8 as described in the Updating JDK section.
Process Engine as a Service under Windows – Using Log File Rotation
Action
Optionally: To provide log file rotation when operating the INUBIT Process Engine as a service, use the newly provided scripts.
The following scripts to install/uninstall INUBIT 7.4 Service are available in the <inubit-installdir>\server\Tomcat\bin\ directory after having patched your INUBIT installation:
-
ibis_nt_service_nssm_install_patch.cmd -
ibis_nt_service_nssm_uninstall_patch.cmd
Proceed as follows
-
When you have already installed the INUBIT Process Engine as a service:
-
Stop the INUBIT Process Engine service.
-
Uninstall the INUBIT Process Engine service.
Refer to the section Installing/Uninstalling the INUBIT Process Engine as Service Under Windows.
-
-
Open the
<inubit-installdir>\server\Tomcat\bin\directory. -
Open the
ibis_nt_service_nssm_install_patch.cmdscript for editing. -
Configure the following parameters accordingly to your needs:
-
NSSM_ROTATE_FILE-
0: No log file rotation -
1: Log file rotation
-
-
NSSM_ROTATE_FILE_SIZEConfigure the maximum log file size in bytes. By default, the maximum log file size is set to 10 Mbyte:
NSSM_ROTATE_FILE_SIZE=10000000 -
NSSM_ROTATE_ONLINE-
0: The log files are rotating only if the maximum log file size configured using theNSSM_ROTATE_FILE_SIZEparameter has exceeded when the service is (re)started.If the service shall run for a long time without being restarted, this value should not be used.
-
1: The log files are rotating while the service is running.
-
-
-
Save the changes.
-
Execute the
ibis_nt_service_nssm_install.cmdscript to install the INUBIT Process Engine service.→ The INUBIT Process Engine is installed as INUBIT 7.4 Service with the start type Automatic, and it can be started. Once the system is (re)started, the INUBIT 7.4 Service is started automatically.
-
Start the INUBIT 7.4 Service using the Services application or the following command:
net start "inubit BPM 7.4 Service"→ Depending on your configuration, in the
<inubit-installdir>\server\Tomcat\logsdirectory, the following log files rotate/do not rotate.stderr.log stdout.log -
To stop the INUBIT 7.4 Service, use the Services application or the following command:
net stop "inubit BPM 7.4 Service" -
To uninstall the INUBIT 7.4 Service, execute the
ibis_nt_service_nssm_uninstall_patch.cmdscript in the<inubit-installdir>\server\Tomcat\bin\directory.
Remote Connector as a Service under Windows – Using Log File Rotation
Action
Optionally: To provide log file rotation when operating the Remote Connector as a service, use the newly provided scripts.
The following scripts are available to install/uninstall the inubit IS Remote Connector service in the <inubit-installdir>\remoteConnector\bin\ directory after having patched your INUBIT installation:
-
rc_nt_service_nssm_install_patch.cmd -
rc_nt_service_nssm_uninstall_patch.cmd
Proceed as follows
-
When you have already installed the Remote Connector as a service:
-
Stop the Remote Connector service.
-
Uninstall the Remote Connector service.
Refer to the section Installing/Uninstalling the Remote Connector as Service
-
-
Open the
<inubit-installdir>\remoteConnector\bin\directory. -
Open the
rc_nt_service_nssm_install_patch.cmdscript for editing. -
Configure the following parameters accordingly to your needs.
-
NSSM_ROTATE_FILE-
0: No log file rotation -
1: Log file rotation
-
-
NSSM_ROTATE_FILE_SIZEConfigure the maximum log file size in bytes. By default, the maximum log file size is set to 1 Mbyte:
NSSM_ROTATE_FILE_SIZE=1000000 -
NSSM_ROTATE_ONLINE-
0: The log files are rotating only if the maximum log file size configured using theNSSM_ROTATE_FILE_SIZEparameter has exceeded when the service is (re)started.If the service shall run for a long time without being restarted, this value should not be used.
-
1: The log files are rotating while the service is running.
-
-
-
Save the changes.
-
Execute the
rc_nt_service_nssm_install_patch.cmdscript to install the INUBIT Remote Connector service.→ The INUBIT Remote Connector is installed as INUBIT IS Remote Connector service with the start type Automatic and it can be started. Once the system is (re)started, the INUBIT IS Remote Connector service is started automatically.
-
Start the INUBIT IS Remote Connector service using the Services application or the following command:
net start "inubit IS Remote Connector"→ Depending on your configuration, in the
<inubit-installdir>\remoteConnector\logdirectory, the following log files rotate/do not rotate.rc.out.log rc.err.log -
To stop the INUBIT IS Remote Connector service, use the Services application or the following command:
net stop"inubit IS Remote Connector" -
To uninstall the INUBIT IS Remote Connector service, execute the
rc_nt_service_nssm_uninstall_patch.cmdscript in the<inubit-installdir>\remoteConnector\bin\directory.
7.4.0.41
Repository – Update the iSConfiguration Template File
Action
Update the IS Configuration template file to be able to use the getWorkflowList operation with the UserName element in order to retrieve a username.
Proceed as follows
-
Log in to the Workbench as
rootadministrator. -
Open the Repository tab.
-
Open the
/Global/System/Mapping Templates/IS Configuration/Repository path. -
Right-click the
IS Configurationfolder and choose the Update Directory context menu item.→ The
configuration.xmlfile stored in this folder will be replaced with the file provided by the patch installer.
BPC Portal – Preparatory Work for the purpose of Configuring Documentation Modules
Action
Preparing your patched your INUBIT installation in order to configure and deploy documentation modules for the BPC portal.
Proceed as follows*
-
Open the Configuration > General Settings > Portal > Portal Deployment tab.
After having patched, the value of the Documentation modules in BPC option is 0/0.
-
To load the DocumentationModule configuration file click the
 icon at the Documentation modules in BPC option.
 -
The configuration file is loaded and can be configured, refer to the Configuring documentation modules for BPC section in the INUBIT Administration Guide.
→ The Documentation modules in BPC option has a value greater than 0/0, depending on how many documentation modules you have configured.
7.4.0.43
Liferay Portal – Updating the jQuery Library
Action
When using a Liferay portal 7.x/DXP: Patch Liferay Portal 7.x/DXP to update the jQuery library
Proceed as follows
-
Stop Liferay.
-
Navigate to the
<inubit-installDir>/server/portal/inubitPlugins/<Liferay-version>directory. -
Extract the
jquery-3.5.1.jsandjquery-3.5.1.min.jsfiles from theROOT/html/js/jquery/directory of theliferay-inubit-bootstrap-1.0.0.jararchive. -
Navigate to the
<Liferay-installdir>/<Tomcat-dir>/webapps/ROOT/html/js/jquery/directory. -
Remove the existing
jquery*.jsfiles, for examplejquery-1.9.1.jsandjquery-1.9.1.min.js. -
Copy the extracted files
jquery-3.5.1.jsandjquery-3.5.1.min.jsto the<Liferay-installdir>/<Tomcat-dir>/webapps/ROOT/html/js/jquery/directory. -
Navigate to the
<Liferay-installdir>/<Tomcat-dir>/webapps/ROOT/html/common/themes/directory. -
Open the
top_js-ext.jspffile for editing. -
Replace the string
/html/js/jquery/jquery-1.9.1.min.jsin line 7 with the following string:/html/js/jquery/jquery-3.5.1.min.js -
Start Liferay for the changes to take effect.
Process Engine – Optional: Removing unnecessary Tomcat directories
Action
Optional: To increase the security of your INUBIT installation, remove unnecessary Tomcat directories
Proceed as follows
-
Stop the INUBIT Process Engine.
-
Navigate to the
<inubit-installdir>/server/Tomcat/webapps/directory. -
Remove the following directories:
-
docs -
examples -
manager -
host-manager
-
-
Start the INUBIT Process Engine.
Process Engine – Updating the SAP JCo and IDoC libraries to version 3.1
Prerequisites
-
For downloading the installation files, you need a username and a password for the SAP Marketplace.
-
The SAP installation instructions state that a JDK 1.3 or higher is required.
Action
When using SAP Connectors with SAP JCo 3.0 libraries: Update the SAP JCo and IDoC libraries to version 3.1.
Proceed as follows
-
In a browser, open the URL https://support.sap.com/en/product/connectors/jco.html.
-
Download the 3.1 version of the following libraries and decompress them:
-
SAP IDOC Class Library, for example
sapidoc3_3.1.x.zipContains
sapidoc3.jar -
SAP Java Connector (suitable for your operating system), for example
sapjco3-NTintel-3.1.x.zipContains
-
sapjco3.jar -
depending on your choice for example
sapjco3.dll(Windows) orlibsapjco3.so(Linux)
-
-
-
Copy the files
sapidoc3.jarandsapjco3.jarto the directory<INUBIT-installdir>/server/Tomcat/webapps/ibis/WEB-INF/lib.If you get an error message referring to the missing middleware layer, read the SAP note 684106 (which you find in the SAP Marketplace) and apply the solution suggested there.
-
Depending on your operating system, copy the `.dll/.so `files to one of the following directories:
-
Windows
-
When starting the INUBIT Process Engine via the Start menu:
<java-installdir>\bin -
When using the inubit Process Engine as a service under tomcat:
<inubit-installdir>\server\Tomcat\bin
-
-
Linux
<java-installdir>/libYou may also need to add the directory to the
PATHenvironment variable.
-
-
Restart the INUBIT Process Engine.
INUBIT Repository – Updating AS4 Mapping Templates
Proceed as follows
-
Log in to the INUBIT Workbench as administrator.
-
Open the Repository tab.
-
Open the Global > System > Mapping Templates directory.
-
Right-click the AS4 directory.
-
Choose the Update Directory menu item.
→ The files
as4-cpa-repository.xmlandas4-cpa-repository.xsdare updated to the new version.
7.4.0.44
INUBIT Repository – Updating AS4 Mapping Templates and CPA Files
Action
-
Update the AS4 mapping templates in the Global Repository regarding the new
connectiontimeoutproperty. -
Update the CPA XML files used for your existing AS4 Connector modules to use the new
connectiontimeoutproperty.
Proceed as follows
-
Log in to the INUBIT Workbench as administrator.
-
Open the Repository tab.
-
Open the Global > System > Mapping Templates directory.
-
Right-click the AS4 directory.
-
Choose the Update Directory menu item.
→ The files
as4-cpa-repository.xmlandas4-cpa-repository.xsdare updated to the new version. -
To use the
connectiontimeoutproperty in the CPA XML files used for your existing AS4 Connector modules, add it to the CPA XML files as in the templates and adjust the default value (60 seconds) if necessary.
7.4.0.47
Process Engine - Updating Tomcat to 9.0.43
Action
As Tomcat has been updated automatically to version 9.0.43 during patch installation, check whether manual steps are necessary.
Proceed as follows
Refer to Updating Tomcat
Repository – Updating the IS Configuration Template File
Action
Update the IS Configuration template file in order that the user root can use the cacheOperation operation with the get or the put element to retrieve or write data from or to the cache database.
Proceed as follows
-
Log in to the Workbench as
rootadministrator. -
Open the Repository tab.
-
Open the
/Global/System/Mapping Templates/IS Configuration/repository path. -
Right-click the
IS Configurationfolder and choose the Update Directory context menu item.→ The
configuration.xmlfile stored in this folder will be replaced with the file provided by the patch installer.
INUBIT Repository - Updating TextExample.xml File for MIME Adapter
Repository – Updating the PDF Toolbox directory
Action
Update the PDF Toolbox Repository path in order to import the schema files Embed.xsd and Merge.xsd provided by the patch installer.
These schema files can be used to validate the input message, refer to the PDF Toolbox.
Proceed as follows
-
Log in to the Workbench as
rootadministrator. -
Open the Repository tab.
-
Open the
/Global/System/Mapping Templates/PDF Toolbox/Repository path. -
Right-click the
PDF Toolboxfolder and choose the Update Directory context menu item.→ Both files
Embed.xsdandMerge.xsdare stored in this folder.
All Components - Updating Scripts Due to the BouncyCastle Library Update
Action
Update the listed scripts regarding the BouncyCastle library update to version bcprov-jdk15on-1.68.jar
Proceed as follows
Replace the file name bcprov-jdk15on-1.*.jar with bcprov-jdk15on-1.68.jar in the following scripts.
-
<inubit-installdir>/server/benchmark/Update all
.shscripts for Linux and.batscripts for Windows. -
<inubit-installdir>/client/bin/Update the
check_is_status.sh/check_is_status.batscript. -
<inubit-installdir>/remoteConnector/binUpdate the
rc_nt_service_install.cmdscript. -
<inubit-installdir>/server/portal/liferayInstallScripting/Update the
installInubitLiferayDXPExtensions.plscript.
When having manually adjusted the following former scripts now located in the <inubit-installdir>/server/Tomcat_backup/bin directory, adjust the new scripts in the <INUBIT-installdir>/server/Tomcat/bin directory in the same way.
When having copied the scripts from the <inubit-installdir>/server/Tomcat_backup/bin directory to the <INUBIT-installdir>/server/Tomcat/bin directory, make sure that the bcprov-jdk15on-1.68.jar file name is set in the following scripts.
-
check_is_status.sh/check_is_status.bat -
startcli.sh/startcli.bat -
ibis_nt_service_install.cmd
Process Engine as a Service under Windows - Re-installing the Service
Proceed as follows
-
Stop the INUBIT Process Engine service.
-
Uninstall the INUBIT Process Engine service using one of the scripts
ibis_nt_service_uninstall.cmdoribis_nt_service_nssm_uninstall.cmdfrom the backup directory:<inubit-installdir>\server\Tomcat_backup\binWhen having manually adjusted the former
ibis_nt_service*install.cmdscripts now located in the<inubit-installdir>\server\Tomcat_backup\bindirectory, adjust the newibis_nt_service*install.cmdscripts in the<INUBIT-installdir>\server\Tomcat\bindirectory in the same way.When having copied the
ibis_nt_service_uninstall.cmdscripts from the<INUBIT-installdir>\server\Tomcat_backup\bindirectory to the<INUBIT-installdir>\server\Tomcat\bindirectory, make sure that thebcprov-jdk15on-1.68.jarfile name is set. -
Install the INUBIT Process Engine service using one of the scripts
ibis_nt_service_install.cmdoribis_nt_service_nssm_install.cmdin the following directory:<inubit-installdir>\server\Tomcat\bin -
Start the INUBIT Process Engine service.
7.4.0.49
Linux - Adjust User To Run INUBIT Process Engine as Service Using systemd
To install the INUBIT Process Engine as a service using systemd, by default, the username is used who has installed INUBIT.
If this user differs from the user is running the INUBIT Process Engine as a service using systemd, you have to adjust the username.
Proceed as follows
-
Navigate to the
<inubit-installdir>/server/Tomcat/bin/directory. -
Open the
inubit.servicefile for editing. -
In the line starting with
User=, replace the existing username with the user who shall run the INUBIT Process Engine as a service usingsystemd. -
Save the changes.
→ The user configured in the
INUBIT.servicefile can run the INUBIT Process Engine as a service usingsystemd.
Liferay Portal - Patching Liferay Portal 7.3/DXP
Proceed as follows
-
Go to the
<inubit-installdir>/server/portal/inubitPlugins/7.3.10/directory. -
Extract the
liferay-inubit-bootstrap-1.0.0.jararchive to a temporary directory. -
Go to temporary directory created in step 2.
-
Open the
portal-ext.propertiesfile. -
Copy the property
module.framework.properties.org.osgi.framework.bootdelegationwith the provided value to the clipboard. -
Go to the
<Liferay-installdir>/directory. -
Open the
portal-ext.propertiesfile for editing. -
Replace the
module.framework.properties.org.osgi.framework.bootdelegationproperty and its value in theportal-ext.propertiesfile from the property and its value copied in step 5 to the clipboard. -
Restart Liferay for the changes to take effect.
-
Navigate to the
<inubit-installdir>/server/portal/inubitPlugins/7.3.10directory. -
Copy the
com.INUBIT.ibis.portal.liferay.api-1.0.0.jarfile to the<Liferay-installdir>/deploydirectory. -
Wait for the message that
com.inubit.ibis.portal.liferay.api-1.0.0.jaris started to appear in file<Liferay-installdir>/<Tomcat-dir>/logs/catalina.outor in the startup Command Prompt window (Windows only). -
Copy the
com.INUBIT.ibis.portal.liferay.service-1.0.0.jarfile to the<Liferay-installdir>/deploydirectory. -
Wait for the message that
com.inubit.ibis.portal.liferay.service-1.0.0.jaris started to appear in file<Liferay-installdir>/<Tomcat-dir>/logs/catalina.outor in the startup Command Prompt window (Windows only). -
Copy the
com.INUBIT.ibis.portal.liferay.service-wsdd-1.0.0.jarfile to the<Liferay-installdir>/deploydirectory. -
Wait for the message that
com.inubit.ibis.portal.liferay.service-wsdd-1.0.0.jaris started to appear in the<Liferay-installdir>/<Tomcat-dir>/logs/catalina.outfile or in the startup Command Prompt window (Windows only). -
Clear the cache by deleting the
<Liferay-installdir>/<Tomcat-dir>/work/Catalina/localhostdirectory.
INUBIT Repository - Updating the Widget Directory
Action
Update the files in the Global Repository.
When having adjusted the existing Widget.xsl files in the directories ExtFormPanel and/or Grid, update the files manually as follows:
Replace the line Ext.state.Manager.setProvider(new Ext.state.CookieProvider()); by the following lines:
if (typeof BpcCommon == 'undefined') {
   Ext.state.Manager.setProvider(new Ext.state.LocalStorageProvider());
}
Proceed as follows
|
You must not execute the following steps if the existing |
-
Log in to the INUBIT Workbench as
root. -
Open the Repository tab.
-
Open the Global > System > Widgets directory.
-
Right-click the ExtFormPanel directory.
-
Select the Update Directory menu item.
-
Right-click the Grid directory.
-
Select the Update Directory menu item.
→ The
Widget.xslfiles in both directories are updated to the new version. -
Redeploy the tasklist instances.
7.4.0.50
Liferay Portal - Patching Liferay Portal 7.3/DXP
Proceed as follows
-
Go to the
<inubit-installdir>/server/portal/inubitPlugins/7.3.10/directory. -
Copy the
com.INUBIT.ibis.portal.liferay.api-1.0.0.jarfile to the<liferay-installdir>/deploydirectory. -
Wait for the message that
com.inubit.ibis.portal.liferay.api-1.0.0.jaris started to appear in file<Liferay-installdir>/<Tomcat-dir>/logs/catalina.outor in the startup Command Prompt window (Windows only). -
Copy the
com.INUBIT.ibis.portal.liferay.service-1.0.0.jarfile to the<liferay-installdir>/deploydirectory. -
Wait for the message that
com.inubit.ibis.portal.liferay.service-1.0.0.jaris started to appear in file<Liferay-installdir>/<Tomcat-dir>/logs/catalina.outor in the startup Command Prompt window (Windows only). -
Copy the
com.inubit.ibis.portal.liferay.service-wsdd-1.0.0.jarfile to the <liferayinstalldir>/deploy directory. -
Wait for the message that
com.inubit.ibis.portal.liferay.service-wsdd-1.0.0.jaris started to appear in file<Liferay-installdir>/<Tomcat-dir>/logs/catalina.outor in the startup Command Prompt window (Windows only). -
Clear the cache by deleting the
<Liferay-installdir>/<Tomcat-dir>/work/Catalina/localhostdirectory.
7.4.0.52
BPC Portal - Updating BPC Modules
Prerequisites
-
You have installed the BPC portal for INUBIT.
-
You have configured BPC as portal server for INUBIT.
-
You have successfully executed the 7.4.0.52 patch installer for INUBIT or BPC.
Proceed as follows
INUBIT patch installation
-
Navigate to the
<inubit-installdir>/portal/bpc_modulesdirectory. -
Copy the updated modules (frontend and backend) to the
<bpc-installdir>/bpc/<Karaf-dir>/deploydirectory.
BPC patch installation
-
Navigate to the
<bpc installdir>/bpc_modulesdirectory. -
Copy the updated modules (frontend and backend) to the
<bpc-installdir>/bpc/<Karaf-dir>/deploydirectory.
Liferay Portal - Redeploying Tasklists
Prerequisites
-
You have configured Liferay as portal server for INUBIT.
-
You have successfully executed the 7.4.0.52 patch installer for INUBIT.
Proceed as follows
-
In the INUBIT Workbench, display the Configuration > General Settings tab.
-
Open the configuration area Portal > Portal Deployment.
-
At the option Portlet-Archive click Open
 . A dialog opens.
 -
In the area Archives on portal server in the column Action click the Redeploy archive icon
 for the archive containing the tasklists.
 -
Confirm the next dialog.
-
The deployment starts. A dialog with a progress bar is displayed.
-
After the deployment has been finished successfully, this dialog is closed automatically.
-
Close the dialog.
7.4.0.53
Remote Connector - Updating Service-related script files
Proceed as follows
-
Go to folder
<inubit-installdir>/inubit/remoteConnector/bin.cd <inubit-installdir>/inubit/remoteConnector/bin -
Rename the file
INUBITrcSystemdtoINUBITrcSystemd_original.mv inubitrcSystemd inubitrcSystemd_original -
Rename the file
INUBITrcSystemd_patchtoINUBITrcSystemd.mv inubitrcSystemd_patch inubitrcSystemd -
Rename the file
start_rc.shtostart_rc_original.sh.mv start_rc.sh start_rc_original.sh -
Rename the file
start_rc_patch.shtostart_rc.sh.mv start_rc_patch.sh start_rc.sh -
Adjust the script files if any custom changes were made in
inubitrcSystemd_originalandstart_rc_original.sh. -
If not already done, create the
systemdservice and start or restart the Remote Connectorsystemdservice.
Workbench - Replacing Start Script
Action
To update the Workbench in background, there are new Workbench start scripts to make sure that former versions of the existing files (ibis.jar and ibis_tools.jar) are backed up automatically:
Linux: start_local_patch.sh
Windows: start_local_patch.bat
|
When not using the |
Proceed as follows
-
Navigate to the
<inubit-installdir>/inubit/client/bindirectory. -
Rename the existing
start_local.[sh|bat]script tostart_local_old.[sh|bat]. -
Rename the
start_local_patch.[sh|bat]script tostart_local.[sh|bat]. -
When having manually adjusted the former
start_local.[sh|bat]script, adjust the newstart_local.[sh|bat]script in the same way.
BPC Portal - Updating BPC Modules
Prerequisites
-
You have installed the BPC portal for INUBIT.
-
You have configured BPC as portal server for INUBIT.
-
You have successfully executed the 7.4.0.53 patch installer for INUBIT or BPC.
Proceed as follows
INUBIT patch installation
-
Navigate to the
<inubit-installdir>/portal/bpc_modulesdirectory. -
Copy the updated modules (frontend and backend) to the
<bpc-installdir>/bpc/<Karaf-dir>/deploydirectory.
BPC patch installation
-
Navigate to the
<bpc installdir>/bpc_modulesdirectory. -
Copy the updated modules (frontend and backend) to the
<bpc-installdir>/bpc/<Karaf-dir>/deploydirectory.
Liferay Portal - Redeploying Tasklists
Prerequisites
-
You have configured Liferay as portal server for INUBIT.
-
You have successfully executed the 7.4.0.53 patch installer for INUBIT.
Proceed as follows
-
In the INUBIT Workbench, display the Configuration > General Settings tab.
-
Open the configuration area Portal > Portal Deployment.
-
At the option Portlet-Archive click Open
 .
A dialog opens.
.
A dialog opens. -
In the area Archives on portal server in the column Action click the Redeploy archive icon
 for the archive containing the tasklists.
 -
Confirm the next dialog.
-
The deployment starts.
A dialog with a progress bar is displayed.
-
After the deployment has been finished successfully, this dialog is closed automatically.
-
Close the dialog.
INUBIT Repository - Updating the Widget.xsl file
Proceed as follows
-
Log in to the INUBIT Workbench as
root. -
Open the Repository tab.
-
Open the Global > System > Widgets > ExtFormPanel directory.
-
When having adjusted the
Widget.xslfile manually, add theformat: 'json'line as follows:var bundle = Ext.create(bundlePackage,{ bundle : 'Application', path: path, lang : '<xsl:value-of select="lang"/>', noCache: true, format: 'json' }); -
Otherwise, right-click the ExtFormPanel directory and select the Update Directory menu item.
→ The
Widget.xslfile in the ExtFormPanel directory is updated to the new version.
-
-
Redeploying or adjusting Web Application Connector modules
-
Liferay portal: Redeploy the Web Application Connector modules as described in the Deploying modified portlets section of the Workbench User Guide.
-
BPC portal: When using a custom form panel for a Web Application Connector module, modify it similar to the updated
Widget.xslfile in the ExtFormPanel repository folder in step 3 and in the form submission handler function.
-
7.4.0.54
BPC Portal - Updating BPC Modules
Prerequisites
-
You have installed the BPC portal for INUBIT.
-
You have configured BPC as portal server for INUBIT.
-
You have successfully executed the 7.4.0.54 patch installer for INUBIT or BPC.
Proceed as follows
INUBIT patch installation
-
Navigate to the
<inubit-installdir>/portal/bpc_modulesdirectory. -
Copy the updated modules (frontend and backend) to the
<bpc-installdir>/bpc/<Karaf-dir>/deploydirectory.
BPC patch installation
-
Navigate to the
<bpc installdir>/bpc_modulesdirectory. -
Copy the updated modules (frontend and backend) to the
<bpc-installdir>/bpc/<Karaf-dir>/deploydirectory.
7.4.0.55
BPC Portal - Updating BPC Modules
Prerequisites
-
You have installed the BPC portal for INUBIT.
-
You have configured BPC as portal server for INUBIT.
-
You have successfully executed the 7.4.0.55 patch installer for INUBIT or BPC.
Proceed as follows
INUBIT patch installation
-
Navigate to the
<inubit-installdir>/portal/bpc_modulesdirectory. -
Copy the updated modules (frontend and backend) to the
<bpc-installdir>/bpc/<Karaf-dir>/deploydirectory.
BPC patch installation
-
Navigate to the
<bpc installdir>/bpc_modulesdirectory. -
Copy the updated modules (frontend and backend) to the
<bpc-installdir>/bpc/<Karaf-dir>/deploydirectory.
INUBIT Repository - Updating the Widgets Directory
Proceed as follows
-
Log in to the INUBIT Workbench as
root. -
Open the Repository tab.
-
Open the Global > System > Widgets directory.
-
When having adjusted the current
Widget.xslfile in theExtFormPaneldirectory manually, backup the currentWidget.xslfile, for example, to the file system. -
Right-click the following directories successively and select the Update Directory menu item.
-
ExtComboBox -
ExtDateField -
ExtFormPanel -
ExtNumberField -
ExtTextField -
Grid→ The files in the Widgets directories are updated to the new version.
-
-
When having backed up the
Widget.xslfile in step 4, adjust the updated Widg`et.xsl` file as theWidget.xslfile you have backed up before.
Isode Code - Updating to Version 18v07
Prerequisites
-
You are using the X.400 connector.
-
You have received the required Isode library files from Virtimo AG.
Installing Isode for Windows
Proceed as follows
-
Install the Isode client and select the setup Typical.
-
To add the path of the Isode clients’
bindirectory to the globalPathvariable, select Start > Settings > Control panel. The window Control panel is displayed. -
Double-click the entry System. The dialog System properties opens up.
-
Display the Advanced tab.
-
Click the Environment variables button. A dialog with the same name opens up.
-
In the System variable area select the
Pathvariable. -
Click the Edit button.
-
At the end of the existing entries, add a semicolon sand the path to the
bindirectory of the Isode client.
7.4.0.56
All Components – Update Java/JDK to Version 11.0.12
Action
Update the Java/JDK installation used by your INUBIT installation(s) for all INUBIT components to version 11.0.12 as described in the Updating JDK section.
Prerequisites
-
You have installed the BPC portal for INUBIT.
-
You have configured BPC as portal server for INUBIT.
-
You have successfully executed the 7.4.0.56 patch installer for INUBIT or BPC.
Proceed as follows
INUBIT patch installation
-
Navigate to the
<inubit-installdir>/portal/bpc_modulesdirectory. -
Copy the updated modules (frontend and backend) to the
<bpc-installdir>/bpc/<Karaf-dir>/deploydirectory.
BPC patch installation
-
Navigate to the
<bpc installdir>/bpc_modulesdirectory. -
Copy the updated modules (frontend and backend) to the
<bpc-installdir>/bpc/<Karaf-dir>/deploydirectory.
Liferay Portal - Redeploying Process Viewer Portlets
Prerequisites
-
You have configured Liferay as portal server for INUBIT.
-
You have successfully executed the 7.4.0.56 patch installer for INUBIT.
Proceed as follows
-
In the INUBIT Workbench, display the Configuration > General Settings tab.
-
Open the configuration area Portal > Portal Deployment.
-
At the option Portlet-Archive click Open
 .
A dialog opens.
.
A dialog opens. -
In the area Archives on portal server in the column Action click the Redeploy archive
 icon for the archive containing the Process Viewer portlet.
 -
Confirm the next dialog.
-
The deployment starts. A dialog with a progress bar is displayed.
-
After the deployment has been finished successfully, this dialog is closed automatically.
-
Close the dialog.
7.4.0.57
Liferay Portal - Patching Liferay Portal 7.x/DXP
Proceed as follows
-
Stop your Liferay.
-
Navigate to the
<Liferay-installdir>/Tomcat/webapps/ROOT/html/common/themes/directory. -
Open the
top_js-ext.jspffile for editing. -
Replace the string
/group/control_panelwith the string/control_panel. -
Delete the
<Liferay-installdir>/Tomcat/Work/Catalina/localhostdirectory. -
Start your Liferay for the changes to take effect.
Liferay Portal - Patching or Redeploying Tasklist
Proceed as follows
-
Log in to the INUBIT Workbench as administrator.
-
Open the Configuration > General Settings > Portal Deployment > Task Lists on the portal menu.
-
When using the default Tasklist Ext, redeploy the Tasklist Ext.
-
When using a custom copy of Tasklist Ext
-
Add the
remoteFilter: true,statement as follows:... var <xsl:value-of select="$wid"/>storeExtJsIS = Ext.create('Ext.data.Store', { storeId: 'taskliststore', autoLoad : false, pageSize: <xsl:value-of select="$pageRows"/>, remoteSort: true, remoteFilter: true, remoteGroup : true, ... -
Save the changes.
-
Re-deploy the custom copy of Tasklist Ext.
-
-
BPC Portal - Updating BPC Modules
Prerequisites
-
You have installed the BPC portal for INUBIT.
-
You have configured BPC as portal server for INUBIT.
-
You have successfully executed the 7.4.0.57 patch installer for INUBIT or BPC.
Proceed as follows
INUBIT patch installation
-
Navigate to the
<inubit-installdir>/portal/bpc_modulesdirectory. -
Copy the updated modules (frontend and backend) to the
<bpc-installdir>/bpc/<Karaf-dir>/deploydirectory.
BPC patch installation
-
Navigate to the
<bpc-installdir>/bpc_modulesdirectory. -
Copy the updated modules (frontend and backend) to the
<bpc-installdir>/bpc/<Karaf-dir>/deploydirectory.
INUBIT Repository - Updating the PDF Toolbox Repository Directory
Proceed as follows
-
Log in to the INUBIT Workbench as
root. -
Open the Repository tab.
-
Open the Global > System > Mapping Templates > PDF Toolbox directory.
-
When having adjusted the current files in the PDF Toolbox directory manually, backup the current files, for example, to the file system.
-
Right-click the PDF Toolbox directory and select the Update Directory menu item.
→ The files in the PDF Toolbox directory are updated to the new version.
-
When having backed up the files in step 4, adjust the updated files as the files you have backed up before.
7.4.0.58
INUBIT Repository - Updating the ExtFormPanel Directory
Proceed as follows
-
Log in to the INUBIT Workbench as
root. -
Open the Repository tab.
-
Open the Global > System > Widgets directory.
-
When having adjusted files in the ExtFormPanel directory manually, backup the current files, for example, to the file system.
-
Right-click the ExtFormPanel directory and select the Update Directory menu item.
→ The files in the ExtFormPanel directory are updated to the new version.
-
When having backed up files in step 4, adjust the updated files as the files you have backed up before.
BPC Portal - Updating BPC Modules
Prerequisites
-
You have installed the BPC portal for INUBIT.
-
You have configured BPC as portal server for INUBIT.
-
You have successfully executed the 7.4.0.58 patch installer for INUBIT or BPC.
Proceed as follows
INUBIT patch installation
-
Navigate to the
<inubit-installdir>/portal/bpc_modulesdirectory. -
Copy the updated modules (frontend and backend) to the
<bpc-installdir>/bpc/<Karaf-dir>/deploydirectory.
BPC patch installation
-
Navigate to the
<bpc-installdir>/bpc_modulesdirectory. -
Copy the updated modules (frontend and backend) to the
<bpc-installdir>/bpc/<Karaf-dir>/deploydirectory.
7.4.0.59
INUBIT Repository - Updating the ExtFormPanel Directory
Proceed as follows
-
Log in to the INUBIT Workbench as
root. -
Open the Repository tab.
-
Open the Global > System > Widgets directory.
-
When having adjusted files in the ExtFormPanel directory manually, backup the current files, for example, to the file system.
-
Right-click the ExtFormPanel directory and select the Update Directory menu item.
→ The files in the ExtFormPanel directory are updated to the new version.
-
When having backed up files in step 4, adjust the updated files as the files you have backed up before.
BPC Portal - Updating BPC Modules
Prerequisites
-
You have installed the BPC portal for INUBIT.
-
You have configured BPC as portal server for INUBIT.
-
You have successfully executed the 7.4.0.59 patch installer for INUBIT or BPC.
Proceed as follows
INUBIT patch installation
-
Navigate to the
<inubit-installdir>/portal/bpc_modulesdirectory. -
Copy the updated modules (frontend and backend) to the
<bpc-installdir>/bpc/<Karaf-dir>/deploydirectory.
BPC patch installation
-
Navigate to the
<bpc-installdir>/bpc_modulesdirectory. -
Copy the updated modules (frontend and backend) to the
<bpc-installdir>/bpc/<Karaf-dir>/deploydirectory.
Liferay Portal - Patching or Redeploying Tasklist
Proceed as follows
-
Log in to the INUBIT Workbench as administrator.
-
Open the Configuration > General Settings > Portal Deployment > Task Lists on the portal menu.
-
When using the default Tasklist Ext, redeploy the Tasklist Ext.
-
When using a custom copy of Tasklist Ext, proceed as follows:
-
Add the following statement three times below the
if(columnName == 'creation'statements.if (dateInMilli === undefined) { dateInMilli = item[k].getValue().valueOf(); }Afterwards, the three new statements must look like this:
... if (columnName == 'creation' || columnName == 'expiration') { var dateInMilli = item[k].dateValue; if (dateInMilli === undefined) { dateInMilli = item[k].getValue().valueOf(); } var operator = item[k].config.operator; var filterUrl = '&filterField='columnName'&filterValue='dateInMilli'&filterComparison='+operator; newfilterUrl = newfilterUrl.concat(filterUrl); } ... -
Save the changes.
-
Re-deploy the custom copy of Tasklist Ext.
-
-
INUBIT Repository - Updating the IS Configuration Directory
Action
Update the configuration.xml file of the IS Configuration utility module in the Global repository in order to use the VersionCheckInComment attribute for the modifyModuleProperties operation.
With this attribute, you can add a version check-in comment for modules during modification using the IS Configuration utility.
Proceed as follows
-
Log in to the INUBIT Workbench as
root. -
Open the Repository tab.
-
Open the Global > System > Mapping Templates directory.
-
Right-click the IS Configuration directory and select the Update Directory menu item.
→ The files in the IS Configuration directory are updated to the new version. Afterwards, the
Modify_Module_Properties_Typesection looks like this: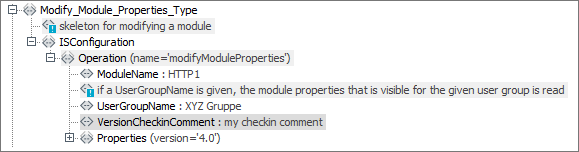
Process Engine - Updating Tomcat to 9.0.54
Action
As Tomcat has been updated automatically to version 9.0.54 during patch installation, check whether manual steps are necessary.
Proceed as follows
Refer to Updating Tomcat
7.4.0.60
BPC Portal - Updating BPC Modules to Version 3.4.1
Prerequisites
-
You have installed the BPC portal for INUBIT.
-
You have configured BPC as portal server for INUBIT.
-
You have successfully executed the 7.4.0.60 patch installer for INUBIT or BPC.
Proceed as follows
INUBIT patch installation
-
Navigate to the
<inubit-installdir>/portal/bpc_modulesdirectory. -
Copy the updated modules (frontend and backend) to the
<bpc-installdir>/bpc/<Karaf-dir>/deploydirectory.
BPC patch installation
-
Navigate to the
<bpc-installdir>/bpc_modulesdirectory. -
Copy the updated modules (frontend and backend) to the
<bpc-installdir>/bpc/<Karaf-dir>/deploydirectory.
All Components - Updating Scripts Due to the Log4j2 Critical Security Vulnerability
Usage
To prevent Log4j2 from critical security vulnerability.
For the latest information even when using BPC, Elesticsearch, and Karaf, refer to Virtimo’s INUBIT news ticker.
After having patched all your INUBIT components to the 7.4.0.60 version, there are new script versions named *_patch.[sh|bat|cmd].
You can use these scripts by removing the _patch part of the file name.
When having adjusted an existing script manually before, you can use the corresponding new scripts to add the log4j2.formatMsgNoLookups=true parameter to your existing scripts correctly.
Proceed as follows
-
Make sure that the
JVM_PARAMS="$JVM_PARAMS -Dlog4j2.formatMsgNoLookups=true"parameter is set in the following scripts:-
setenv.sh(when using Liferay even Liferay’ssetenv.sh) -
start_rc.sh
-
-
Make sure that the
set JVM_PARAMS=%JVM_PARAMS% -Dlog4j2.formatMsgNoLookups=trueparameter is set in the following scripts:-
setenv.bat(when using Liferay even Liferay’ssetenv.bat) -
ibis_nt_service_install.cmd(when using the Process Engine as a service) -
start_rc.bat(when using the Remote Connector) -
rc_nt_service_install.cmd(when using the Remote Connector as a service)
-
-
Make sure that the
"%JAVA_HOME%\bin\java" -Dlog4j2.formatMsgNoLookups=trueis set in the following scripts:-
backup.bat -
restore.bat
-
-
Make sure that the
"$JAVA_HOME/bin/java" -Dlog4j2.formatMsgNoLookups=trueis set in the following scripts:-
backup.sh -
restore.sh
-
-
Make sure that the
"$JAVA_HOME/bin/java" -Dlog4j2.formatMsgNoLookups=trueparameter is set in each line containing"$JAVA_HOME/bin/java"in themigration.shscript. -
Make sure that the
"%JAVA_HOME%\bin\java" -Dlog4j2.formatMsgNoLookups=trueparameter is set in each line containing"%JAVA_HOME%\bin\java"in themigration.batscript.
7.4.0.61
7.4.0.63
BPC Portal - Updating BPC Modules to Version 3.4.5
Prerequisites
-
You have installed BPC or Liferay as portal for INUBIT.
-
You have configured BPC or Liferay as portal server for INUBIT.
-
You have successfully executed the 7.4.0.63 patch installer for INUBIT or BPC.
Proceed as follows
INUBIT patch installation
-
Navigate to the
<inubit-installdir>/portal/bpc_modulesdirectory. -
Copy the updated modules (frontend and backend) to the
<bpc-installdir>/bpc/<Karaf-dir>/deploydirectory.
BPC patch installation
-
Navigate to the
<bpc-installdir>/bpc_modulesdirectory. -
Copy the updated modules (frontend and backend) to the
<bpc-installdir>/bpc/<Karaf-dir>/deploydirectory.
INUBIT Repository - Updating the Widgets Directory
Proceed as follows
For a BPC portal using BPC INUBIT webapp module and/or Process Interaction module
-
Log in to the INUBIT Workbench as
root. -
Open the Repository tab.
-
Open the Global > System directory.
-
When having adjusted files in the Widgets directory manually, backup the current files, for example, to the file system.
-
Right-click the Widgets directory and select the Update Directory menu item.
→ The files in the Widgets directory are updated to the new version.
-
When having backed up files in step 4, adjust the updated files as the files you have backed up before.
For a Liferay portal when using a webapp and/or a tasklist if any corresponding diagram was edited
|
For diagrams being not edited, the following steps are not necessary. |
-
Log in to the INUBIT Workbench as
root. -
Open the Global > System directory.
-
When having adjusted files in the Widgets directory manually, backup the current files, for example, to the file system.
-
Right-click the Widgets directory and select the Update Directory menu item.
→ The files in the Widgets directory are updated to the new version.
-
When having backed up files in step 4, adjust the updated files as the files you have backed up before.
-
Redeploy the portlets.
7.4.0.64
Process Engine - Updating Tomcat to 9.0.58
Action
As Tomcat has been updated automatically to version 9.0.58 during patch installation, check whether manual steps are necessary.
Proceed as follows
Refer to Updating Tomcat
Process Engine - Removing MVCC attribute From the JDBC URL For an H2 Database
Proceed as follows
-
Navigate to
<inubit-installdir>/server/ibis_root/confdirectory. -
Open
ibis.xmlfile for editing. -
Search for the
jdbcUrlproperty. -
Remove the
MVCC=TRUE; attribute from the JDBC URL. -
Save the changes.
-
Open
logsDBConfig.xmlfile for editing. -
Search for the `<url> `tag.
-
Remove the
MVCC=TRUE; attribute from the JDBC URL. -
Save the changes.
-
The Process Engine needs to be restarted in order for the changes to take effect.
BPC Portal - Updating BPC Modules to Version 3.5
Prerequisites
-
You have installed BPC or Liferay as portal for INUBIT.
-
You have configured BPC or Liferay as portal server for INUBIT.
-
You have successfully executed the 7.4.0.64 patch installer for INUBIT or BPC.
Proceed as follows
INUBIT patch installation
-
Navigate to the
<inubit-installdir>/portal/bpc_modulesdirectory. -
Copy the updated modules (frontend and backend) to the
<bpc-installdir>/bpc/<Karaf-dir>/deploydirectory.
BPC patch installation
-
Navigate to the
<bpc-installdir>/bpc_modulesdirectory. -
Copy the updated modules (frontend and backend) to the
<bpc-installdir>/bpc/<Karaf-dir>/deploydirectory.
INUBIT Repository - Updating the Widgets Directory
Proceed as follows
For a BPC portal using BPC INUBIT webapp module and/or Process Interaction module
-
Log in to the INUBIT Workbench as
root. -
Open the Repository tab.
-
Open the Global > System directory.
-
When having adjusted files in the Widgets directory manually, backup the current files, for example, to the file system.
-
Right-click the Widgets directory and select the Update Directory menu item.
→ The files in the Widgets directory are updated to the new version.
-
When having backed up files in step 4, adjust the updated files as the files you have backed up before.
For a Liferay portal when using a webapp and/or a tasklist if any corresponding diagram was edited
|
For diagrams being not edited, the following steps are not necessary. |
-
Log in to the INUBIT Workbench as
root. -
Open the Repository tab.
-
Open the Global > System directory.
-
When having adjusted files in the Widgets directory manually, backup the current files, for example, to the file system.
-
Right-click the Widgets directory and select the Update Directory menu item.
→ The files in the Widgets directory are updated to the new version.
-
When having backed up files in step 4, adjust the updated files as the files you have backed up before.
-
Redeploy the portlets.
7.4.0.65
BPC Portal - Updating BPC Modules to Version 3.5.1
Prerequisites
-
You have installed BPC or Liferay as portal for INUBIT.
-
You have configured BPC or Liferay as portal server for INUBIT.
-
You have successfully executed the 7.4.0.65 patch installer for INUBIT or BPC.
Proceed as follows
INUBIT patch installation
-
Navigate to the
<inubit-installdir>/portal/bpc_modulesdirectory. -
Copy the updated modules (frontend and backend) to the
<bpc-installdir>/bpc/<Karaf-dir>/deploydirectory.
BPC patch installation
-
Navigate to the
<bpc-installdir>/bpc_modulesdirectory. -
Copy the updated modules (frontend and backend) to the
<bpc-installdir>/bpc/<Karaf-dir>/deploydirectory.
7.4.0.67
BPC Portal - Updating BPC Modules to Version 3.5.3
Prerequisites
-
You have installed BPC or Liferay as portal for INUBIT.
-
You have configured BPC or Liferay as portal server for INUBIT.
-
You have successfully executed the 7.4.0.67 patch installer for INUBIT or BPC.
Proceed as follows
INUBIT patch installation
-
Navigate to the
<inubit-installdir>/portal/bpc_modulesdirectory. -
Copy the updated modules (frontend and backend) to the
<bpc-installdir>/bpc/<Karaf-dir>/deploydirectory.
BPC patch installation
-
Navigate to the
<bpc-installdir>/bpc_modulesdirectory. -
Copy the updated modules (frontend and backend) to the
<bpc-installdir>/bpc/<Karaf-dir>/deploydirectory.
7.4.0.68
BPC Portal - Updating BPC Modules to Version 3.5.3
Prerequisites
-
You have installed BPC or Liferay as portal for INUBIT.
-
You have configured BPC or Liferay as portal server for INUBIT.
-
You have successfully executed the 7.4.0.68 patch installer for INUBIT or BPC.
Proceed as follows
INUBIT patch installation
-
Navigate to the
<inubit-installdir>/portal/bpc_modulesdirectory. -
Copy the updated modules (frontend and backend) to the
<bpc-installdir>/bpc/<Karaf-dir>/deploydirectory.
BPC patch installation
-
Navigate to the
<bpc-installdir>/bpc_modulesdirectory. -
Copy the updated modules (frontend and backend) to the
<bpc-installdir>/bpc/<Karaf-dir>/deploydirectory.
INUBIT Repository - Updating the Widgets Directory
Proceed as follows
For a BPC portal using BPC INUBIT webapp module and/or Process Interaction module
-
Log in to the INUBIT Workbench as
root. -
Open the Repository tab.
-
Open the Global > System directory.
-
When having adjusted files in the Widgets directory manually, backup the current files, for example, to the file system.
-
Right-click the Widgets directory and select the Update Directory menu item.
→ The files in the Widgets directory are updated to the new version.
-
When having backed up files in step 4, adjust the updated files as the files you have backed up before.
7.4.0.70
Reinstalling the Remote Connector
INUBIT 7.4.0.70 comes with a new Remote Connector. To connect INUBIT with new Remote Connector, Remote Connector version must be 7.4.0.70 or higher.
Annotation
-
Watch Dog support is discontinued from INUBIT 7.4.0.70 onwards.
-
New Remote Connector URL:
https://myRemoteSystem:8585/rc -
System Connectors having old Remote Connector URL will be automatically redirected to new Remote Connector URL during execution.
-
You can update Remote Connector URL with
https://myRemoteSystem:8585/rcin System Connectors (optional). -
For new Remote Connector setup, refer to the INUBIT Administration Guide.
BPC Portal - Updating BPC Modules to Version 3.5.5
Prerequisites
-
You have installed BPC or Liferay as portal for INUBIT.
-
You have configured BPC or Liferay as portal server for INUBIT.
-
You have successfully executed the 7.4.0.70 patch installer for INUBIT or BPC.
Proceed as follows
INUBIT patch installation
-
Navigate to the
<inubit-installdir>/portal/bpc_modulesdirectory. -
Copy the updated modules (frontend and backend) to the
<bpc-installdir>/bpc/<Karaf-dir>/deploydirectory.
BPC patch installation
-
Navigate to the
<bpc-installdir>/bpc_modulesdirectory. -
Copy the updated modules (frontend and backend) to the
<bpc-installdir>/bpc/<Karaf-dir>/deploydirectory.
7.4.0.71
BPC Portal - Updating BPC Modules to Version 3.5.6
Prerequisites
-
You have installed BPC or Liferay as portal for INUBIT.
-
You have configured BPC or Liferay as portal server for INUBIT.
-
You have successfully executed the 7.4.0.71 patch installer for INUBIT or BPC.
Proceed as follows
INUBIT patch installation
-
Navigate to the
<inubit-installdir>/portal/bpc_modulesdirectory. -
Copy the updated modules (frontend and backend) to the
<bpc-installdir>/bpc/<Karaf-dir>/deploydirectory.
BPC patch installation
-
Navigate to the
<bpc-installdir>/bpc_modulesdirectory. -
Copy the updated modules (frontend and backend) to the
<bpc-installdir>/bpc/<Karaf-dir>/deploydirectory.
7.4.0.72
BPC Portal - Updating BPC Modules to Version 3.5.7
Prerequisites
-
You have installed BPC or Liferay as portal for INUBIT.
-
You have configured BPC or Liferay as portal server for INUBIT.
-
You have successfully executed the 7.4.0.72 patch installer for INUBIT or BPC.
Proceed as follows
INUBIT patch installation
-
Navigate to the
<inubit-installdir>/portal/bpc_modulesdirectory. -
Copy the updated modules (frontend and backend) to the
<bpc-installdir>/bpc/<Karaf-dir>/deploydirectory.
BPC patch installation
-
Navigate to the
<bpc-installdir>/bpc_modulesdirectory. -
Copy the updated modules (frontend and backend) to the
<bpc-installdir>/bpc/<Karaf-dir>/deploydirectory.
Adapting OAuth2-related Properties During Deployment
Proceed as follows
-
Log in to the INUBIT Workbench as
root. -
Open Configuration > Deployment.
-
Open the
ibis_deploy.xmlfile. -
Copy the desired OAuth2 properties depending on the modules or system connectors which were added or updated in the
ibis_deploy_template.xmlfile. -
Click the OK button.
-
Restart the INUBIT Process Engine.
If there is no manual configuration necessary, proceed as follows:
-
Copy
<inubit-installdir>/server/ibis_root/conf/ibis_deploy_template.xmlfile. -
Rename the file to
ibis_deploy.xml. -
Remove the
ibis_deploy.xml.bakfile. -
Restart the INUBIT Process Engine.
7.4.0.74
BPC Portal - Updating BPC Modules to Version 3.5.9
Prerequisites
-
You have installed BPC or Liferay as portal for INUBIT.
-
You have configured BPC or Liferay as portal server for INUBIT.
-
You have successfully executed the 7.4.0.74 patch installer for INUBIT or BPC.
Proceed as follows
INUBIT patch installation
-
Navigate to the
<inubit-installdir>/portal/bpc_modulesdirectory. -
Copy the updated modules (frontend and backend) to the
<bpc-installdir>/bpc/<Karaf-dir>/deploydirectory.
BPC patch installation
-
Navigate to the
<bpc-installdir>/bpc_modulesdirectory. -
Copy the updated modules (frontend and backend) to the
<bpc-installdir>/bpc/<Karaf-dir>/deploydirectory.
Remote Connector - Merging Files
Action
Compare and merge the generated files with the suffix _`patch.[bat|cmd|sh] and _backup.[bat|cmd|sh] `after patch installation with original configuration:
-
Windows:
-
<INUBIT‑installdir>/INUBIT/remoteConnector/bin/rc_nt_service_nssm_install_patch.cmd -
<INUBIT‑installdir>/INUBIT/remoteConnector/bin/rc_nt_service_nssm_uninstall_patch.cmd -
<INUBIT‑installdir>/INUBIT/remoteConnector/bin/start_rc_patch.bat -
<INUBIT‑installdir>/INUBIT/remoteConnector/bin/rc_nt_service_install_patch.cmd -
<INUBIT‑installdir>/INUBIT/remoteConnector/bin/rc_nt_service_uninstall_patch.cmd
-
-
Linux:
-
<INUBIT‑installdir>/INUBIT/remoteConnector/bin/INUBITrc_patch -
<INUBIT‑installdir>/INUBIT/remoteConnector/bin/INUBITrcSystemd_patch -
<INUBIT‑installdir>/INUBIT/remoteConnector/bin/start_rc_patch.sh -
<INUBIT‑installdir>/INUBIT/remoteConnector/bin/remote_conf_backup.xml
-
Proceed as follows
-
If Remote Connector is running as a service and the patch is applied for the same, stop Remote Connector Service.
-
Go to folder
<INUBIT-installdir>/INUBIT/remoteConnector/bin. -
If custom configurations exists, rename your existing files
*.[bat|cmd|sh]to*_original.[bat|cmd|sh]to keep a backup of your configuration. -
Rename files
_patch.[bat|cmd|sh]to.[bat|cmd|sh]. -
If custom configurations exists, compare and merge files
_original.[bat|cmd|sh]and.[bat|cmd|sh]. -
If any backup files
_backup.[bat|cmd|sh]has been created after patch installation compare and merge files*_backup.[bat|cmd|sh]and.[bat|cmd|sh]. -
If Remote Connector is running as a service and the patch is applied for the same:
-
Uninstall Remote Connector Service:
<INUBIT‑installdir>/INUBIT/remoteConnector/bin/rc_nt_service_uninstall.cmd -
Install Remote Connector Service:
<INUBIT‑installdir>/INUBIT/remoteConnector/bin/rc_nt_service_install.cmd -
Start Remote Connector Service.
-
7.4.0.77
BPC Portal - Updating BPC Modules to Version 3.5.10
Prerequisites
-
You have installed BPC or Liferay as portal for INUBIT.
-
You have configured BPC or Liferay as portal server for INUBIT.
-
You have successfully executed the 7.4.0.77 patch installer for INUBIT or BPC.
Proceed as follows
INUBIT patch installation
-
Navigate to the
<inubit-installdir>/portal/bpc_modulesdirectory. -
Copy the updated modules (frontend and backend) to the
<bpc-installdir>/bpc/<Karaf-dir>/deploydirectory.
BPC patch installation
-
Navigate to the
<bpc-installdir>/bpc_modulesdirectory. -
Copy the updated modules (frontend and backend) to the
<bpc-installdir>/bpc/<Karaf-dir>/deploydirectory.
Process Engine - Updating Tomcat to 9.0.68
Action
As Tomcat has been updated automatically to version 9.0.68 during patch installation, check whether manual steps are necessary.
Proceed as follows
Refer to Updating Tomcat
7.4.0.78
BPC - Updating Widgets Directory in the Global Repository
|
For BPC INUBIT webapp module and Process Interaction module users only. |
Action
Synchronize files in the Widgets directories in the local Global Repository Hierarchy with the files stored in the corresponding directories on the Process Engine.
When updating the Widgets directory, files in the Global directory and its sub-directories are updated as new version, added, or deleted according to the content of the directories on the Process Engine.
Patching Liferay Portal 7.x/DXP
Proceed as follows
Refer to Patching Liferay 7.x/DXP
BPC Portal - Updating BPC Modules to Version 3.5.11
Prerequisites
-
You have installed BPC or Liferay as portal for INUBIT.
-
You have configured BPC or Liferay as portal server for INUBIT.
-
You have successfully executed the 7.4.0.78 patch installer for INUBIT or BPC.
Proceed as follows
INUBIT patch installation
-
Navigate to the
<inubit-installdir>/portal/bpc_modulesdirectory. -
Copy the updated modules (frontend and backend) to the
<bpc-installdir>/bpc/<Karaf-dir>/deploydirectory.
BPC patch installation
-
Navigate to the
<bpc-installdir>/bpc_modulesdirectory. -
Copy the updated modules (frontend and backend) to the
<bpc-installdir>/bpc/<Karaf-dir>/deploydirectory.
Updating SFTP Cipher algorithms
|
If you are facing SFTP connection issues after patching INUBIT 7.4.0.78, you have to configure the SFTP Cipher algorithms within the Workbench Server Configuration. Refer to Administration Guide. |
|
If already |
Proceed as follows
|
Removing the existing |
-
Go to
<inubit-installdir>/server/Tomcat/bindirectory. -
Open
setenv.[bat|sh]file for editing. -
Remove
-DJVM parameter set forJSch.Example:
set JVM_PARAMS=%JVM_PARAMS% -DJSch.kex=diffie-group14-sha1 -
Save
setenv.[bat|sh]file.
7.4.0.79
Updating scripts
Proceed as follows
Process Engine
-
Create the back-up of
setenv.[sh/bat]from<install-dir>/INUBIT/server/Tomcat/bin. -
Rename
setenv.[sh/bat]tosetenv_backup.[sh/bat]. -
Rename
setenv_patch.[sh, bat]tosetenv.[sh/bat]. -
If you made any changes to the existing
setenv_backup.[sh/bat], adjustsetenv.[sh/bat]accordingly.
INUBIT Workbench
-
Create the back-up of
start_local.[sh/bat]from<install-dir>/INUBIT/client/bin. -
Rename
start_local.[sh/bat]tostart_local_backup.[sh/bat]. -
Rename
start_local_patch.[sh/bat]tostart_local.[sh/bat]. -
If you made any changes to the existing
start_local_backup.[sh/bat], adjuststart_local.[sh/bat]accordingly.
Remote Connector
-
Create the back-up of
start_rc.[sh/bat]from<install-dir>/INUBIT/remoteConnector/bin. -
Rename
start_rc.[sh/bat]tostart_rc_backup.[sh/bat]. -
Rename
start_rc_patch.[sh/bat]tostart_rc.[sh/bat]. -
If you made any changes to the existing
start_rc_backup.[sh/bat], adjuststart_rc.[sh/bat]accordingly.
Changing Repository Workspace Path
|
This is an optional patch step. |
Proceed as follows
-
Open
<inubit-installdir>/server/ibis_root/conf/repository.xmlfile for editing. -
Go to entry:
<Workspace name="${wsp.name}"> <FileSystem class="org.apache.jackrabbit.core.fs.local.LocalFileSystem"> <param name="path" value="${wsp.name}"/> </FileSystem> -
Change
param valueto<param name="path" value="${rep.home}/workspaces/${wsp.name}"/> -
Open
workspace.xmlfiles for editing located in the directories:-
<inubit-installdir>/server/ibis_root/ibis_data/repository/workspaces/ibis -
<inubit-installdir>/server/ibis_root/ibis_data/repository/workspaces/security
-
-
Go to entry:
<FileSystem class="org.apache.jackrabbit.core.fs.local.LocalFileSystem"> <param name="path" value="${wsp.name}"/> </FileSystem> -
Change
param valueto<param name="path" value="${rep.home}/workspaces/${wsp.name}"/> -
Delete previously created empty folders, which will not be used anymore with above changes.
-
<inubit-installdir>/server/Tomcat/bin/ibis -
<inubit-installdir>/server/Tomcat/bin/security
-
7.4.0.80
Update BPC modules to version 3.5.12
Prerequisites
-
You have installed BPC or Liferay as portal for INUBIT.
-
You have configured BPC or Liferay as portal server for INUBIT.
-
You have successfully executed the latest patch installer for INUBIT or BPC.
Proceed as follows
INUBIT patch installation
-
Navigate to the
<inubit-installdir>/portal/bpc_modulesdirectory. -
Copy the updated modules (frontend and backend) to the
<bpc-installdir>/bpc/<Karaf-dir>/deploydirectory.
BPC patch installation
-
Navigate to the
<bpc-installdir>/bpc_modulesdirectory. -
Copy the updated modules (frontend and backend) to the
<bpc-installdir>/bpc/<Karaf-dir>/deploydirectory.
7.4.0.81
Only default patch steps are required.
7.4.0.82
Update EDIGAS files in repository
|
This step is optional and only necessary if you use EDI in connection with EDIGAS messages using auto-detection. |
Requirement
-
The INUBIT Process Engine has started
-
You are connected to the process engine with a workbench
-
You have access to the repository
How to proceed
-
Update the EDIGAS-MESSAGES.xml file in the repository
-
Switch to the Repository tab
-
Select the following path in the navigation tree: Global > System > EDI Specification > Rule Metadata
-
Switch to the file table
-
Right-click to open the context menu and select the following entry: "Import"
-
Use the file EDIGAS-MESSAGES.xml
-
Alternatively, you can also import this zip file directly under Global.
-
-
Remove the EDIGAS-SUBSETS.xml file from the repository
-
Switch to the Repository tab
-
Select the following path in the navigation tree: Global > System > EDI Specification > Rule Metadata
-
Right-click on the "EDIGAS-SUBSETS.xml" file in the table on the right
-
Execute the following entry from the context menu: "Delete…"
-
-
Remove the EDIGAS-SUBSETS.xml file from the server file system
In addition to deleting from the repository, the file (if any) must also be removed from the INUBIT server file system at <inubit-installdir>/inubit/server/ibis_root/ibis_data/repository/deploy/Global/System/EDI Specification/Rule Metadata to prevent deployment to the repository the next time the Process Engine is started.
Update BPC modules to version 3.5.13
Refer to Patching INUBIT BPC modules
Process Engine - Updating JDK to 11.0.18
Action
As the java distribution has been updated automatically to version 11.0.18 during patch installation, check whether manual steps are necessary.
Proceed as follows
Refer to Updating JDK
7.4.0.83
Update BPC modules to version 3.5.15
Refer to Patching INUBIT BPC modules
Process Engine - Updating Tomcat to 9.0.73
Action
As Tomcat has been updated automatically to version 9.0.73 during patch installation, check whether manual steps are necessary.
Proceed as follows
Refer to Updating Tomcat
7.4.0.84
Only default patch steps are required.
7.4.0.85
Only default patch steps are required.
7.4.0.86
BPC - Temporary activation to load inline JavaScript in a browser
|
This step is required if you are using INUBIT WebApp or INUBIT Process Interaction module in BPC and encounter problems related to JavaScript code execution. |
By default, the Karaf applies CSP restrictions informing browsers to prevent inline JavaScript code execution. In order for the affected modules to work, any JavaScript must be loaded via referencing the resource properly.
As a temporary workaround the inline JavaScript execution can be re-enabled by setting a specific module property.
|
Enabling inline JavaScript execution is potentially a security risk. Virtimo recommends strongly to rework all JavaScript usage towards using JS files referenced from within the HTML. |
7.4.0.87
Only default patch steps are required.
7.4.0.88
Only default patch steps are required.
7.4.0.89
Only default patch steps are required.
7.4.0.90
Update BPC modules to version 3.5.19
Refer to Update of the INUBIT BPC modules.
7.4.0.91
Update BPC modules to version 3.5.20
Refer to Update of the INUBIT BPC modules.
7.4.0.92
Only default patch steps are required.